Operating Instructions OLED TV English Model No. TX-55HZ980B TX-65HZ980B (image: TX-65HZ980B) For more detailed instructions, please refer to [eHELP] (Built-in Operating Instructions). How to use [eHELP] (p. 22) Thank you for purchasing this Panasonic product. Please read these instructions carefully before operating this product and retain them for future reference. Please carefully read the “Safety Precautions” of this manual before use.
Contents Be Sure to Read Important Notice··················································· 3 Safety Precautions ··············································· 5 Accessories ························································ 9 Installing the TV ··················································· 9 Installing the wall-hanging bracket ··························11 Connections ·······················································12 Cable arrangement ··············································17 Ide
The terms HDMI and HDMI High-Definition Multimedia Interface, and the HDMI Logo are trademarks or registered trademarks of HDMI Licensing Administrator, Inc. in the United States and other countries. Important Notice Dolby, Dolby Vision, Dolby Atmos, Dolby Audio, and the double-D symbol are trademarks of Dolby Laboratories. Do not display any still part of the image for a long period Manufactured under license from Dolby Laboratories.
Notice for DVB / Data broadcasting / IPTV functions This TV is designed to meet the standards (as of August, 2019) of digital services. Not all the features are available depending on the country, area, broadcaster, service provider and network environment. Compatibility with future services is not guaranteed. Internet apps are provided by their respective service providers, and may be changed, interrupted, or discontinued at any time.
The recording and playback of content on this or any other device may require permission from the owner of the copyright or other such rights in that content. Panasonic has no authority to and does not grant you that permission and explicitly disclaims any right, ability or intention to obtain such permission on your behalf. It is your responsibility to ensure that your use of this or any other device complies with applicable copyright legislation in your country.
This TV is designed to operate on AC 220-240 V, 50 / 60 Hz. Insert the mains plug fully into the mains socket. To turn Off the apparatus completely, you must pull the mains plug out of the mains socket. Consequently, the mains plug should be easily accessible at all times. Disconnect the mains plug when cleaning the TV. Do not touch the mains plug with wet hands. Do not damage the mains lead. • Do not place a heavy object on the lead.
To prevent the spread of fire, keep candles or other open flames away from this product at all times Suffocation / Choking Hazard Warning The packaging of this product may cause suffocation, and some of the parts are small and may present a choking hazard to young children. Keep these parts out of reach of young children. Pedestal Warning Do not disassemble or modify the pedestal. Caution Do not use any pedestal other than the one provided with this TV.
Moving the TV Battery for the Remote Control Caution Caution Before moving the TV, disconnect all cables. At least two people are required to move the TV to prevent injury that may be caused by the tipping or falling of TV. Do not hold the screen part as shown below when moving the TV. This may cause malfunction or damage. How to carry the TV. (p. 10) Incorrect installation may cause battery leakage, corrosion and explosion. Replace only with the same or equivalent type.
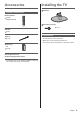
Accessories Installing the TV Pedestal Standard accessories Remote Control (p. 18) N2QAYB001254 Assembly screw (4) M4 × 15 Pedestal (p. 9) Cable tie (p. 17) Preparations Do not hold the screen panel part. Make sure not to scratch or break the TV. Do not place the TV temporarily on the floor or desk. Batteries (2) R6 (p. 19) Operating Instructions Production Registration Leaflet Accessories may not be placed all together. Take care not to throw them away unintentionally.
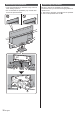
Assembling the pedestal Removing the pedestal Insert the pedestal firmly, otherwise it may come off when setting up the TV. Do not assemble the pedestal by any method other than those specified below. A B 10 English Be sure to remove the pedestal in the following procedures when you use the wall-hanging bracket or repack the TV. 1 Remove the assembly screws from the pedestal. 2 Pull out the pedestal from the TV.
Installing the wallhanging bracket Holes for wall-hanging bracket installation Rear of the TV 55-inch model a: 400 mm a Please contact your local Panasonic dealer to purchase the recommended wall-hanging bracket.
Connections Basic connections Mains lead External equipment and cables shown are not supplied with this TV. Please ensure that the unit is disconnected from the mains socket before attaching or disconnecting any cables. Check the terminal type and cable plugs are correct for connection. Use a fully wired HDMI compliant cable. Keep the TV away from electronic equipment (video equipment, etc.
AV devices Network DVD Recorder / Blu-ray Recorder, etc. TV A broadband network environment is required to be able to use internet services. If you do not have any broadband network services, please consult your retailer for assistance. Prepare the internet environment for wired connection or wireless connection. Setup of the network connection will start when first (p. 21) using the TV.
Connections for 4K / HDR compatible equipment TV Other connections DVD Player / Camcorder / Game equipment (VIDEO equipment) TV (Viewing) (Listening) HDMI cable 4K / HDR compatible equipment Reproduces the image more precisely with the expanded colour gamut when connecting the 4K-compatible equipment. Mode2 is a mode that supports higher definition signals than Mode1. Set to Mode1 when the image or sound in HDMI input is not played properly.
Amplifier (listening with external speakers) Headphones To enjoy multi-channel sound from external equipment (e.g. Dolby Digital 5.1ch), connect the equipment to the amplifier. For information about the connections, read the manuals of the equipment and amplifier. To use headphones, set [Headphone Terminal Output] to [Headphone]. For information about the headphone terminal output settings, refer to [eHELP] (Search by Purpose > Settings > Sound). TV TV (3.
Common Interface Turn the TV off with Mains Power On / Off switch whenever inserting or removing the CI module. If a smart card and a CI module come as a set, first insert the CI module, then insert the smart card into the CI module. Insert or remove the CI module completely in the correct direction as shown. Normally encrypted channels will appear. (Viewable channels and their features depend on the CI module.
Cable arrangement Fixing the cables using the cable clamp Fix the cables using the cable tie, cable clamp, etc. Fixing the Mains lead and the cables Keep pushing the tab Tab Attach the cable tie Insert the cable ties of mains lead and standard accessories Bundle the cable Set Hole Bundle the cables Set the tip in the hooks Hooks To loosen: Keep pushing the knob Knob To remove from the TV: Snaps Fix cables as necessary.
Identifying Controls 7 OK Confirms selections and choices. Press after selecting channel positions to quickly change channel. Remote Control 8 [Option Menu] Easy optional setting for viewing, sound, etc. 9 Coloured buttons (red-green-yellow-blue) Used for the selection, navigation and operation of various functions. 10 Volume Up / Down 11 Numeric buttons Changes channel and teletext pages. Sets characters. When in Standby mode, switches TV on.
Installing / Removing batteries Remote Control Mode Error When the TV receives a signal with a different remote control mode to the mode that is set on the TV five times, Remote Control Mode Error is displayed. Follow the on-screen instructions. Pull open Hook When all settings are initialised by performing Shipping Condition, the TV’s remote control mode is reset to mode 1.
3 Power LED Red: Standby Green: On • Depending on the ambient brightness, adjusts the brightness of LED to easy-to-view levels automatically. Orange: Standby with some functions (recording, etc.) active or panel maintenance in progress The LED blinks when the TV receives a command from the remote control. 4 Input mode selection Press repeatedly until you reach the desired mode.
Set up the network connection Tick the TV signal mode to tune, and then select [Start Auto Setup] [Satellite Antenna Setup] Ensure the satellite connections are completed (p. 12) and select the tuner mode ([Dual Tuner] / [Single Tuner]). Select your region Watching TV 1 (TV) or Auto Setup is now complete and the TV is ready for viewing. If tuning has failed check the Satellite cable, RF cable, and the network connection, and then follow the onscreen instructions.
How to Use eHELP [eHELP] is the detailed operating instructions built into the TV, and gives a more detailed explanation for a better understanding of the operation of each feature.
FAQs Before requesting service or assistance, please follow these simple guides to solve the problem. For details, refer to [eHELP] (Support > FAQs). It takes several seconds to display the image after turning the TV on When turning the TV on, the panel adjustment is performed. It is not a malfunction. The TV does not switch on Check the mains lead is plugged into the TV and the mains socket. The fuse in the mains plug may have blown. Replace it with one of an identical rating. (p.
The panel maintenance notification is displayed when turning the TV off with Standby On / Off switch of the TV’s remote control. Perform the panel maintenance. Select [Turn the TV off now] and press OK button to start the panel maintenance. The panel maintenance is interrupted when selecting [Don’t start panel maintenance this time] or turning the TV off while the notification is displayed.
Specifications Card slot TV ETHERNET Common Interface slot (complies with CI Plus) × 1 RJ45, IEEE802.3 10BASE-T / 100BASE-TX Model No. 55-inch model : TX-55HZ980B 65-inch model : TX-65HZ980B Dimensions (W × H × D) 55-inch model USB 1 / 2 / 3 5 V, Max. 900 mA [SuperSpeed USB 1: DC USB (USB 3.0)] USB 2 / 3: DC 5 V, Max. 500 mA [Hi-Speed USB (USB 2.
Built-in wireless LAN Standard compliance and Frequency range*1 IEEE802.11a/n/ac 5.180 GHz - 5.320 GHz, 5.500 GHz - 5.700 GHz IEEE802.11b/g/n 2.412 GHz - 2.472 GHz Security WPA2-PSK (TKIP/AES) WPA-PSK (TKIP/AES) WEP (64 bit/128 bit) Bluetooth® wireless technology*2 Standard Compliance Bluetooth 4.2 Frequency Range 2.402 GHz - 2.480 GHz 1: The frequency and channel differ depending on the country. 2: Not all the Bluetooth compatible devices are available with this TV.
Disposal of Old Equipment and Batteries Only for European Union and countries with recycling systems These symbols on the products, packaging, and/or accompanying documents mean that used electrical and electronic products and batteries must not be mixed with general household waste. For proper treatment, recovery and recycling of old products and used batteries, please take them to applicable collection points in accordance with your national legislation.