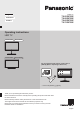
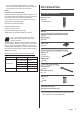
Model No. English TX-50EX780E TX-58EX780E TX-65EX780E TX-75EX780E Nederlands Română Operating Instructions LED TV 50-inch model 58-inch model 65-inch model 75-inch model For more detailed instructions, please refer to [eHELP] (Built-in Operating Instructions). ● How to use [eHELP] (p. 27) Thank you for purchasing this Panasonic product. Please read these instructions carefully before operating this product and retain them for future reference.
● For information about the trademarks, refer to [eHELP] (Search by Purpose > Read first > Before use > Licence). The illustration for TX-58EX780E is used in this manual unless otherwise mentioned. Illustrations shown may be different depending on the model.
Important Notice Notice for DVB / Data broadcasting / IPTV functions ● This TV is designed to meet the standards (as of August, 2016) of DVB-T / T2 (MPEG2, MPEG4AVC(H.264) and MPEG HEVC(H.265)) digital terrestrial services, DVB-C (MPEG2, MPEG4AVC(H.264) and MPEG HEVC(H.265)) digital cable services and DVB-S (MPEG2, MPEG4-AVC(H.264) and MPEG HEVC(H.265)) digital satellite services. Consult your local dealer for availability of DVB-T / T2 or DVB-S services in your area.
Safety Precautions To help avoid risk of electrical shock, fire, damage or injury, please follow the warnings and cautions below: ■■Mains plug and lead Warning If you detect anything unusual, immediately remove the mains plug. ● This TV is designed to operate on AC 220-240 V, 50 / 60 Hz. ● Insert the mains plug fully into the mains socket. ● To turn Off the apparatus completely, you must pull the mains plug out of the mains socket. Consequently, the mains plug should be easily accessible at all times.
Warning Never place a TV in an unstable location. A TV may fall, causing serious personal injury or death. Many injuries, particularly to children, can be avoided by taking simple precautions such as: •• Using cabinets or stands recommended by the manufacturer of the TV. •• Only using furniture that can safely support the TV. •• Ensuring the TV is not overhanging the edge of the supporting furniture.
● When problems occur due to static electricity, etc., the TV might stop operating to protect itself. In this case, turn the TV off at the Mains power On / Off switch, then turn it back on. ■■Bluetooth® wireless technology Caution ● The TV uses the 2.4 GHz radio frequency ISM band (Bluetooth®).
● The recommended viewing distance is at least 3 times of the image height. Do not view 3D images from a distance shorter than recommended. Accessories LED TV Declaration of Conformity (DoC) “Hereby, Panasonic Corporation declares that this TV is in compliance with the essential requirements and other relevant provisions of the Directive 2014/53/EU.” If you want to get a copy of the original DoC of this TV, please visit the following website: Standard accessories Remote Control (p.
Optional accessories Cover 3D Eyewear ● If you need 3D Eyewear, please purchase Panasonic optional accessories. ● Use Panasonic 3D Eyewear supporting Bluetooth wireless technology for active shutter 3D. ● For information about 3D Eyewear (English only): 50-inch model http://panasonic.
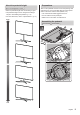
About the pedestal height 50-inch model 58-inch model ● Select a pedestal height from the following 4 types. ● The pedestal height can be changed according to step 2 in “Assembling the pedestal”. (p. 10) ● For each dimension, refer to “Specifications”. (p. 31) High Preparations Take out the pedestal and the TV from the packing case and put the TV onto a work table with the screen panel down on the clean and soft cloth (blanket, etc.) ● Use a flat and firm table bigger than the TV.
2 3 D A E A E D High 4 Low 10 English A
5 7 G F 6 ■■To change the height Be sure to perform the following procedures when you change the height after assembling the pedestal. 1 2 3 4 Remove the cover . Remove the assembly screws from the base. Lift the TV and pull out the pole from the base. Put the TV onto a work table with the screen panel down on the clean and soft cloth. 5 Remove the assembly screws from the support bracket. 6 Pull out the pole from the main bracket. 7 Remove the support bracket. 8 Change the height. (p.
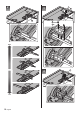
Assembling the pedestal 2 65-inch model 1 A C D 3 A A E 12 English E
4 A 6 B 5 F English 13
Removing the pedestal 7 Be sure to remove the pedestal in the following procedures when you repack the TV. 1 2 3 4 5 6 7 8 Remove the cover . Remove the assembly screws from the base. Lift the TV and pull out the pole from the base. Put the TV onto a work table with the screen panel down on the clean and soft cloth. Remove the assembly screws from the support bracket. Pull out the pole from the main bracket. Remove the assembly screws from the main bracket. Remove the main bracket.
Assembling / Removing the pedestal 75-inch model 2 Assembly screw (4) M4 × 14 Pedestal Cover A Assembling the pedestal 1 B English 15
Connections 3 ● External equipment and cables shown are not supplied with this TV. ● Please ensure that the unit is disconnected from the mains socket before attaching or disconnecting any cables. ● Check the terminal type and cable plugs are correct for connection. ● Use a fully wired HDMI compliant cable. C ● Keep the TV away from electronic equipment (video equipment, etc.
Terminals Basic connections ■■Mains lead 1 2 AC 220-240 V 3 50 / 60 Hz Mains lead 4 ■■Aerial 5 TV Cable 6 7 8 9 10 11 12 1 Model name plate 2 CI slot 1 - 2 (p. 20) 3 Headphone jack 4 HDMI1 - 3 ● For DVB-S 5 USB 1 port 6 Terrestrial / cable terminal (p. 17) (p. 17) 8 AV (COMPONENT / VIDEO) 9 ETHERNET terminal Terrestrial aerial ● For DVB-C, DVB-T, Analogue Satellite connection (p. 20) (p. 19, 20) 7 Satellite terminal RF cable ■■Dual Tuner (DiSEqC) TV (p. 20) (p.
■■Single Tuner TV DVB-via-IP client connection This TV has DVB-via-IP client function and can connect to DVB-via-IP server or SAT>IP compatible servers to receive broadcast streaming. ● It is recommended to connect to DVB-via-IP server with a LAN cable. ■■Wired connection TV Satellite cable Cable Satellite dish ● To ensure your satellite dish is correctly installed, please consult your local dealer. Also consult the received satellite broadcasting companies for details.
■■Wireless connection AV devices ■■DVD Recorder / Blu-ray Recorder, etc. Internet environment TV Built-in wireless LAN Access point Connections for 4K compatible equipment Cable TV HDMI cable RF cable DVD Recorder / Blu-ray Recorder, etc. HDMI cable Terrestrial aerial 4K compatible equipment ● To watch high-definition 4K more accurately or HDR content, connect the 4K compatible equipment to HDMI1 or 2 terminal.
■■Amplifier (listening with external speakers) Other connections ● Use HDMI2 to connect the TV to an amplifier which has ARC (Audio Return Channel) function. ■■DVD Player (COMPONENT equipment) If connecting to an amplifier without ARC function, use DIGITAL AUDIO. TV (Viewing) (Listening) ● To enjoy multi-channel sound from external equipment (e.g. Dolby Digital 5.1ch), connect the equipment to the amplifier. For information about the connections, read the manuals of the equipment and amplifier.
TV 75-inch model CI module ■■USB HDD (for recording) ● Use USB 1 port for connecting the USB HDD. ● For details, refer to [eHELP] (Search by Purpose > Recording). Attach the cable clamp Insert the cable clamp in a hole ■■VIERA Link Hole ● Use HDMI1 - 4 for VIERA Link connection. ● For details, refer to [eHELP] (Search by Purpose > Functions > VIERA Link “HDAVI Control™”). Bundle the cable Cable arrangement Fix the cables using the cable clamp, cable tie, etc.
■■Fixing the cables using the cable tie 50-inch model Bundle the cables 58-inch model Set the tip in the hooks Hooks To loosen: Knob Keep pushing the knob To remove from the TV: Snaps 65-inch model Keep pushing both side snaps 50-inch model 58-inch model ■■Fixing the cables using the cable band 75-inch model Attach the cable band Attach the cable tie Insert the cable tie in a hole Bundle the cables Hole ● Fix cables as necessary.
■■Attaching the cable cover / terminal cover ● Do not apply load to the cable cover / terminal cover. ● Be careful not to nip the cables between the TV and the cable cover / terminal cover. ● When using USB 2 port, USB 3 port or HDMI4 terminal, you cannot attach the cable cover. Keep the removed cable cover for future use. ● When using AV terminal, ETHERNET terminal or DIGITAL AUDIO, you cannot attach the terminal cover. Keep the removed terminal cover for future use.
Identifying Controls Remote Control 7 OK ● Confirms selections and choices. ● Press after selecting channel positions to quickly change channel. ● Displays channel list. 8 [Option Menu] ● Easy optional setting for viewing, sound, etc. 9 Coloured buttons (red-green-yellow-blue) ● Used for the selection, navigation and operation of various functions. 10 Volume Up / Down 11 Numeric buttons ● Changes channel and teletext pages. ● Sets characters. ● When in Standby mode, switches TV on.
■■Installing / Removing batteries Pull open Hook Indicator / Control panel ● When pressing 4, 5, 6 buttons, the control panel guide appears on the right side of the screen for 3 seconds to highlight which button has been pressed. 4 5 Close 6 Note the correct polarity (+ or -) 1 7 2 3 Rear side of the TV 1 Remote control signal receiver ● Do not place any objects between the TV remote control signal receiver and remote control.
First time Auto Setup Tick the TV signal mode to tune, and then select [Start Auto Setup] When the TV is turned on for the first time, it will automatically search for available TV channels and give options to set up the TV. ● These steps are not necessary if the setup has been completed by your local dealer. ● Please complete connections (p. 16 - 23) and settings (if necessary) of the connected equipment before starting Auto Setup.
Watching TV How to Use eHELP 1 [eHELP] is the detailed operating instructions built into the TV, and gives a more detailed explanation for a better understanding of the operation of each feature. Turn power on (TV) 1 or (Remote Control) ● Mains power On / Off switch should be on. (p. 25) Displays information bar on the edge of screen for several seconds. ● For information about the operation and settings, refer to [eHELP].
● To scroll the description (if more than 1 page) While the description is highlighted ● To open the reference screen ( ) ● To display the menu related to the description (only for some descriptions) (red) ● To check the features of this TV Search by Purpose > Read first > Features Viewing 3D images You can enjoy viewing 3D images of content or programmes supporting 3D effects by wearing the 3D Eyewear (optional). ● The 3D Eyewear must be worn to view 3D images.
Note ● Turn off the 3D Eyewear after using it. ● Use the 3D Eyewear within approximately 3.2 m from the TV. You cannot view the 3D images with the 3D Eyewear too far from the TV, because of the difficulty of receiving radio waves from the TV. ● The range may be shortened depending on the obstacles between the TV and the 3D Eyewear, or the surrounding environment. ● When viewing 3D images, make sure your eyes are in a horizontal position where double vision does not occur.
FAQs Before requesting service or assistance, please follow these simple guides to solve the problem. ● For details, refer to [eHELP] (Support > FAQs). The TV does not switch on ● Check the mains lead is plugged into the TV and the mains socket. The TV goes into Standby mode ● Auto power standby function is activated. The remote control does not work or is intermittent ● Are the batteries installed correctly? (p. 25) ● Has the TV been switched on? ● The batteries may be running low.
Maintenance Specifications First, remove the mains plug from the mains socket. ■■TV Display panel, Cabinet, Pedestal Regular care: Gently wipe the surface of the display panel, cabinet, or pedestal by using a soft cloth to remove dirt or fingerprints. For stubborn dirt: (1) First clean the dust from the surface. (2) Dampen a soft cloth with clean water or diluted neutral detergent (1 part detergent to 100 parts water). (3) Wring out the cloth firmly.
75-inch model 62.5 kg Net (With Pedestal) 54.0 kg Net (TV only) Power source AC 220-240 V, 50 / 60 Hz Panel DIGITAL AUDIO output PCM / Dolby Digital, Fibre optic Receiving systems / Band name DVB-S / S2 Digital satellite services (MPEG2, MPEG4AVC(H.264) and MPEG HEVC(H.265)) Receiver frequency range - 950 MHz to 2 150 MHz LED LCD panel Sound Speaker output 20 W (10 W + 10 W) DiSEqC - Version 1.0 DVB-C Digital cable services (MPEG2, MPEG4AVC(H.264) and MPEG HEVC(H.265)) Headphones M3 (3.
Operating conditions Temperature 0 °C - 35 °C Humidity 20 % - 80 % RH (non-condensing) Built-in wireless LAN Standard compliance and Frequency range*1 IEEE802.11a/n 5.180 GHz - 5.320 GHz, 5.500 GHz - 5.580 GHz, 5.660 GHz - 5.700 GHz ■■When using the wall-hanging bracket Please contact your local Panasonic dealer to purchase the recommended wall-hanging bracket. 50-inch model 58-inch model 1 Remove the assembly screws bracket . 2 Remove the back bracket .
● Holes for wall-hanging bracket installation Rear of the TV 50-inch model 58-inch model 65-inch model a b a: 400 mm b: 200 mm 75-inch model a: 600 mm b: 300 mm (View from the side) Depth of screw 50-inch model minimum: 10 mm maximum: 15 mm Diameter: M6 58-inch model minimum: 10 mm maximum: 17 mm Diameter: M6 65-inch model minimum: 9 mm maximum: 30 mm Diameter: M6 75-inch model minimum: 11 mm maximum: 30 mm Diameter: M8 Screw for fixing the TV onto the wall-hanging bracket (not supplied with the TV)
Disposal of Old Equipment and Batteries Only for European Union and countries with recycling systems These symbols on the products, packaging, and/or accompanying documents mean that used electrical and electronic products and batteries must not be mixed with general household waste. For proper treatment, recovery and recycling of old products and used batteries, please take them to applicable collection points in accordance with your national legislation.
Modelnr. Nederlands TX-50EX780E TX-58EX780E TX-65EX780E TX-75EX780E Gebruiksaanwijzing Led-tv 50 inch-model 58 inch-model 65 inch-model 75 inch-model Raadpleeg de [eHELP] (ingebouwde bedieningsinstructies) voor gedetailleerde instructies. ● Gebruik van de [eHELP] (p. 27) Hartelijk dank voor de aankoop van dit Panasonic-product. Lees deze instructies aandachtig voordat u het product gebruikt en bewaar ze zodat u ze later opnieuw kunt raadplegen.
● Raadpleeg de [eHELP] (Zoeken op doel > Lees dit eerst > Voordat u het product gebruikt > Licentie) voor informatie over de handelsmerken. De afbeelding voor TX-58EX780E wordt, tenzij anders gemeld, in deze handleiding gebruikt. Afhankelijk van het model, kunnen de getoonde illustraties iets verschillen.
Belangrijke kennisgeving Kennisgeving over DVB/datatransmissie/ IPTV-functies ● Deze tv is ontworpen om te voldoen aan de normen (stand augustus 2016) van DVB-T/T2 (MPEG2, MPEG4-AVC(H.264) en MPEG HEVC(H.265)) digitale aardse services, DVB-C (MPEG2, MPEG4AVC(H.264) en MPEG HEVC(H.265)) digitale kabelservices en DVB-S (MPEG2, MPEG4AVC(H.264) en MPEG HEVC(H.265)) digitale satellietservices. Raadpleeg uw lokale dealer voor de beschikbaarheid van DVB-T-/T2- of DVB-S-services in uw gebied.
Veiligheidsmaatregelen Volg onderstaande waarschuwingen en voorzorgsmaatregelen om het risico op een elektrische schok, brand, schade of letsel te helpen vermijden. ■■Stekker en netsnoer Waarschuwing Verwijder de stekker onmiddellijk uit het stopcontact als u iets opvalt dat niet normaal is. ● Deze tv is ontworpen om te werken op 220-240 V wisselstroom 50/60 Hz. ● Steek de stekker van het netsnoer volledig in het stopcontact.
Waarschuwing Plaats een tv nooit op een onstabiele plaats. Een tv kan vallen, wat tot ernstige lichamelijke letsels of de dood kan leiden. Veel letsels, vooral bij kinderen, kunnen worden voorkomen door een eenvoudige voorzorgen te nemen, zoals: •• Gebruik van tv-meubel of -standaard die door de fabrikant van de tv wordt aanbevolen. •• Enkel gebruik van meubelen waarop de tv op een veilige manier kan staan. •• Ervoor zorgen dat de tv niet over de rand gaat van het meubelstuk waarop die staat.
● Het ingebouwde draadloze LAN gebruikt de frequentiebanden 2,4 GHz en 5 GHz. Houd de tv uit de buurt van andere apparaten die 2,4 GHz en 5 GHz-signalen gebruiken zoals andere draadloze LAN-apparaten, magnetrons en mobiele telefoons om storing of vertraging door interferentie te vermijden wanneer de ingebouwde draadloze LAN-adapter wordt gebruikt. ● Wanneer een probleem optreedt door statische elektriciteit e.d. kan de tv automatisch stoppen door de zelfbeveiligingsfunctie.
■■3D-beeld weergeven Let op ● Let bijzonder op wanneer kinderen naar 3D-beeld kijken. Kinderen jonger dan ongeveer 6 jaar mogen niet naar 3D-beeld kijken. Wanneer kinderen naar 3D-beeld kijken, moeten ze voortdurend onder toezicht blijven van een ouder of voogd die moet letten op hun veiligheid en gezondheid. ● Stop onmiddellijk met kijken naar 3D-beeld als u moe wordt, als u zich onwel voelt, als u een ander onaangenaam gevoel ervaart of duidelijk dubbel beeld ziet.
Accessoires Standaardaccessoires Afstandsbediening (p. 24) ● N2QAYB001115 Optionele accessoires 3D-bril ● Als u een 3D-bril nodig hebt, kunt u die afzonderlijk aanschaffen als optionele accessoire van Panasonic. ● Gebruik een 3D-bril van Panasonic die Bluetooth ondersteunt voor actieve sluiter-3D. ● Voor informatie over de 3D-bril (alleen in het Engels): http://panasonic.
De hoogte van de standaard Deksel 50 inch-model 65 inch-model 58 inch-model 50 inch-model 58 inch-model ● Kies de hoogte van de standaard uit drie mogelijkheden. ● De hoogte van de standaard kan worden aangepast zoals uitgelegd in stap 2 in “De standaard monteren”. (p. 10) ● Raadpleeg “Specificaties” voor de verschillende afmetingen. (p.
Voorbereidingen Haal het voetstuk en de tv uit de verpakkingsdoos en leg de tv op een werktafel met het scherm naar beneden op de schone en zachte doek (deken, enz.). ● Gebruik een vlakke en stevige tafel die groter is dan de tv. ● Houd het schermonderdeel niet vast. 2 ● Zorg dat u de tv niet bekrast of breekt.
3 A E 5 A E D F 6 4 A B Nederlands 11
De standaard monteren 7 65 inch-model 1 G ■■De hoogte wijzigen Voer de volgende procedures uit wanneer u de hoogte wijzigt na het monteren van de standaard. 1 2 3 4 Verwijder het deksel . Verwijder de montageschroeven van de basis. Til de tv op en trek de stang uit de basis. Leg de tv met het scherm naar beneden op een werktafel op de schone en zachte doek. 5 Verwijder de montageschroeven van de steunbeugel. 6 Trek de stang uit van de hoofdbeugel. 7 Verwijder de steunbeugel. 8 Wijzig de hoogte. (p.
4 2 A D 3 A 5 E A E F Nederlands 13
7 6 G B De stand van het paneel aanpassen 50 inch-model 58 inch-model 65 inch-model ● Plaats geen voorwerpen binnen de draaicirkel van de tv.
De standaard verwijderen De standaard monteren/verwijderen Verwijder de standaard aan de hand van de volgende procedures wanneer u de tv opnieuw inpakt. 1 2 3 4 5 6 7 8 Verwijder het deksel . Verwijder de montageschroeven van de basis. Til de tv op en trek de stang uit de basis. Leg de tv met het scherm naar beneden op een werktafel op de schone en zachte doek. Verwijder de montageschroeven van de steunbeugel. Trek de stang uit van de hoofdbeugel. Verwijder de montageschroeven van de hoofdbeugel.
De standaard monteren 3 1 C B 2 A De standaard verwijderen Verwijder de standaard aan de hand van de volgende procedures wanneer u de muurbevestigingssteun gebruikt of de tv opnieuw inpakt. 1 Verwijder het deksel . 2 Verwijder de montageschroeven van de standaard. 3 Trek de standaard weg van onder de tv.
Verbindingen Aansluitingen 1 ● De afgebeelde externe apparatuur en kabels worden niet bij de tv meegeleverd. ● Zorg ervoor dat de stekker van de tv niet in het stopcontact zit als u kabels aansluit of loskoppelt. ● Controleer of u de juiste aansluitingen en connectoren gebruikt voor de verbinding. ● Gebruik een HDMI-kabel met volledige bedrading. 2 3 ● Houd de tv uit de buurt van elektronische apparaten (videoapparatuur enz.
■■Enkele tuner Basisaansluitingen TV ■■Netsnoer 220-240 V wisselstroom 50/60 Hz Satellietkabel Satellietschotel ● Neem contact op met uw lokale leverancier om te controleren of uw satellietschotel correct is geïnstalleerd. Raadpleeg ook de maatschappijen van de satellietzenders die u ontvangt voor details.
DVB-via-IP-clientverbinding Deze tv is voorzien van een DVB-via-IP-clientfunctie en kan verbonden worden met een DVB-via-IP-server of SAT>IP-compatibele servers om gestreamde inhoud te ontvangen. ● Het wordt aanbevolen om een LAN-kabel te gebruiken voor verbinding met een DVB-via-IPserver. AV-apparaten ■■dvd-recorder / Blu-ray-recorder, enz TV ■■Bekabelde verbinding TV Kabel LAN-kabel (afgeschermd) ● Gebruik een afgeschermde dubbeldraadse (getwist paar, STP) LAN-kabel.
Netwerk Voor gebruik van internetdiensten is een breedbandnetwerk vereist. ● Raadpleeg uw leverancier voor hulp als u geen breedbandnetwerkservices hebt. ● Zorg dat de internetomgeving gereed is voor het aansluiten van een bekabelde of draadloze verbinding. ● Het instellen van de netwerkverbinding start bij het eerste gebruik van de tv. (p. 26) ■■Bekabelde verbinding [Modus 1]: Voor een betere compatibiliteit. Stel in op [Modus 1] als beeld of geluid op de HDMI-ingang niet goed wordt afgespeeld.
■■Camcorder / Spelsysteem hebt, plaatst u eerst de CI-module en vervolgens steekt u de smartcard in de CI-module. (VIDEO-apparatuur) TV (Kijken) (Luisteren) Camcorder / Spelsysteem ■■Versterker (luisteren met externe luidsprekers) ● Plaats of verwijder de CI-module altijd volledig en in de aangegeven richting. ● Gewoonlijk worden gecodeerde kanalen weergegeven. (Beschikbare kanalen en functies zijn afhankelijk van de CI-module.) Als de gecodeerde kanalen niet [Gemeensch.
■■Het netsnoer vastmaken met de kabelklem 50 inch-model Voor het losmaken: 58 inch-model Houd het lipje ingedrukt Lipje Van de tv verwijderen: Ontgrendelknoppen Houd beide ontgrendelknoppen ingedrukt ■■Zet de kabels met de kabelbinder vast 50 inch-model 65 inch-model 65 inch-model 75 inch-model 75 inch-model Bevestig de kabelklem Steek de kabelklem in een opening Gat Bundel de kabel Instellen 22 Nederlands 58 inch-model
Bevestig de kabelbinder Bundel de kabels Steek de kabelbinder in een opening Gat Bundel de kabels Schuif de punt onder de geleiders Haken Losmaken: Knop Houd de knop ingedrukt Van de tv verwijderen: ● Bevestig de kabels als nodig. ● Volg bij gebruik van optionele accessoires de handleiding bij de accessoire voor informatie over het bevestigen van kabels. ■■Het kabelpaneel/aansluitpaneel bevestigen ● Leg niets op het kabelpaneel/aansluitpaneel.
Bedieningsonderdelen Afstandsbediening 7 OK ● Bevestigt selecties en keuzes. ● Schakelt over naar de geselecteerde kanaalpositie. ● Geeft de kanalenlijst weer. 8 [Menu Opties] ● Eenvoudige optionele instellingen voor weergave, geluid enz. 9 Gekleurde toetsen (rood, groen, geel, blauw) ● Voor selectie, navigatie en de bediening van verschillende functies. 10 Volume omhoog/omlaag 11 Cijfertoetsen ● Overschakelen naar een ander kanaal of een andere teletekstpagina. ● Tekst invoeren.
25 Handelingen voor inhoud, aangesloten apparatuur, enz. ■■De batterijen plaatsen/verwijderen Opentrekken Indicator/Bedieningspaneel ● Als u op een van de toetsen 4, 5 of 6 drukt, wordt gedurende 3 seconden rechts op het scherm een hulpaanduiding weergegeven die aangeeft welke toets werd ingedrukt.
Automatisch instellen bij het eerste gebruik Wanneer de tv voor het eerst wordt aangezet, zoekt hij automatisch naar beschikbare tv-kanalen en verschijnen opties om de tv in te stellen. ● U mag deze stappen overslaan als uw dealer de tv al heeft ingesteld. ● Voltooi alle verbindingen (p. 17 - 23) en instellingen (indien nodig) van de externe apparatuur voordat u de automatische instelling uitvoert. Raadpleeg de handleiding van het aangesloten apparaat voor informatie over de instellingen ervan.
Tv kijken 1 Schakel de tv in (TV) of (Afstandsbediening) ● De hoofdschakelaar moet aan staan. (p. 25) Geeft de informatiebalk enkele seconden weer aan de rand van het scherm. ● Voor meer informatie over de bediening en instellingen raadpleegt u [eHELP]. (Zoeken op doel > Lees dit eerst > Functies) 2 Selecteer de stand TV keuze DVB-S DVB-C DVB-T DVB-via-IP Analoog Gebruik eHELP [eHELP] is de naam van de gedetailleerde, ingebouwde bedieningsinstructies van de tv.
● Terug naar het vorige scherm / niveau ● De beschrijving scrollen (indien langer dan één pagina) Wanneer de beschrijving wordt gemarkeerd ● Het scherm openen waarnaar wordt verwezen ( ) ● Het menu bij de beschrijving weergeven (alleen bij bepaalde beschrijvingen) (Rood) ● De functies van deze tv bekijken Zoeken op doel > Lees dit eerst > Functies 3D-beeld weergeven U kunt genieten van het 3D-beeld van inhoud en programma’s die 3D ondersteunen door een 3D-bril te dragen (optioneel).
1 Zet de 3D-bril aan en zet hem op De verbindingsstatus en de batterijstatus worden rechtsonder in het scherm aangegeven. 2 Kijk naar het 3D-beeld Wanneer u voor het eerst naar 3D-beeld kijkt, worden de veiligheidsmaatregelen weergegeven. Selecteer [Ja] of [Nee] om verder te gaan met het bekijken van 3D-beeld. Opmerking ● Schakel de 3D-bril na gebruik uit. ● Gebruik de 3D-bril binnen een afstand van ongeveer 3,2 m van de tv.
Veelgestelde vragen Probeer eerst het probleem op te lossen aan de hand van de volgende eenvoudige richtlijnen voordat u hulp inroept. ● Raadpleeg de [eHELP] (Ondersteuning > Veelgestelde vragen) voor details. De tv gaat niet aan ● Controleer of de stekker van het netsnoer in de tv en in het stopcontact zit. De tv schakelt over naar de stand-bystand ● De automatische stand-byfunctie is geactiveerd. De afstandsbediening werkt niet of slechts af en toe ● Zijn de batterijen op de juiste manier geplaatst? (p.
Onderhoud Specificaties Verwijder eerst de stekker van het netsnoer uit het stopcontact. ■■TV Modelnr. Beeldscherm, Behuizing, Standaard 50 inch-model : TX-50EX780E Regelmatig onderhoud: Veeg de buitenkant van het beeldscherm, de behuizing of de standaard voorzichtig af met een zachte doek om vuil of vingerafdrukken te verwijderen. 65 inch-model : TX-65EX780E Voor hardnekkig vuil: (1) Verwijder eerst het stof van de buitenkant.
75 inch-model 62,5 kg netto (met standaard) 54,0 kg netto (alleen tv) Stroomvoorziening 220-240 V wisselstroom, 50/60 Hz Paneel Led-lcd-paneel Geluid Uitgang luidspreker 20 W (10 W + 10 W) Hoofdtelefoon 3,5-mm M3-stereoministekker × 1 Aansluitingen AV-ingang (COMPONENT / VIDEO) DIGITAL AUDIO-uitgang PCM / Dolby Digital, optische vezel Ontvangstsystemen / Bandnaam DVB-S / S2 Digitale satellietservices (MPEG2, MPEG4AVC(H.264) en MPEG HEVC(H.
Bedrijfscondities Temperatuur 0 °C - 35 °C Vochtigheid 20 % - 80 % RV (niet-condenserend) Ingebouwd draadloos LAN Standaardcompliantie en frequentiebereik*1 IEEE802.11a/n 5,180 GHz - 5,320 GHz, 5,500 GHz - 5,580 GHz, 5,660 GHz - 5,700 GHz ■■Bij gebruik van de muurbevestigingssteun Neemt contact op met uw plaatselijke Panasonicdealer als u de aanbevolen muurbevestigingssteun wilt aanschaffen. 50 inch-model 58 inch-model 1 Verwijder de montageschroeven achterste steun . 2 Verwijder de achterste steun .
● Gaten voor installatie met de muurbevestigingssteun Achterzijde van de tv 50 inch-model 58 inch-model 65 inch-model a b a: 400 mm b: 200 mm 75 inch-model a: 600 mm b: 300 mm (zijaanzicht) Diepte schroef 50 inch-model minimaal: 10 mm maximaal: 15 mm Diameter: M6 58 inch-model minimaal: 10 mm maximaal: 17 mm Diameter: M6 65 inch-model minimaal: 9 mm maximaal: 30 mm Diameter: M6 75 inch-model minimaal: 11 mm maximaal: 30 mm Diameter: M8 Schroef voor het bevestigen van de tv op de muurbevestigingssteun
Het ontdoen van oude apparatuur en batterijen. Enkel voor de Europese Unie en landen met recycle systemen. Deze symbolen op de producten, verpakkingen en/of begeleidende documenten betekenen dat gebruikte elektrische en elektronische producten en batterijen niet samen mogen worden weggegooid met de rest van het huishoudelijk afval.
Model nr. Română TX-50EX780E TX-58EX780E TX-65EX780E TX-75EX780E Manual de utilizare LED TV Model de 50 inci Model de 58 inci Model de 65 inci Model de 75 inci Pentru instrucţiuni mai detaliate, vă rugăm să consultaţi [eAJUTOR] (Instrucţiunile de utilizare integrate). ● Mod de utilizare a sistemului [eAJUTOR] (p. 27) Vă mulţumim că aţi cumpărat acest produs Panasonic. Vă rugăm să citiţi aceste instrucţiuni cu atenţie înainte de a folosi aparatul şi să le păstraţi pentru consultări ulterioare.
● Pentru informaţii privind mărcile comerciale, consultaţi [eAJUTOR] (Căutare după Scop > A se citi înainte > Înainte de utilizare > Licenţă). În acest manual se va utiliza ilustraţia pentru TX-58EX780E, dacă nu există specificaţii contrare. Este posibil ca, în funcţie de model, ilustraţiile prezentate să fie diferite.
Notă importantă Referitor la funcţiile DVB/transmisie de date/IPTV ● Acest televizor este conceput pentru a corespunde standardelor (începând cu august 2016) pentru servicii digitale terestre DVB-T / T2 (MPEG2, MPEG4-AVC(H.264) și MPEG HEVC(H.265)), pentru servicii digitale prin cablu DVB-C (MPEG2, MPEG4-AVC(H.264) și MPEG HEVC(H.265)) și servicii digitale prin satelit DVB-S (MPEG2, MPEG4-AVC(H.264) și MPEG HEVC(H.265)).
Măsuri de siguranţă Pentru a contribui la evitarea pericolelor de electrocutare, incendii, deteriorări sau vătămări corporale, vă rugăm să urmaţi avertismentele şi atenţionările de mai jos: ■■Ştecărul şi cablul de alimentare Avertisment În cazul în care constataţi orice aspect neobişnuit, scoateţi imediat ştecărul din priză. ● Acest TV este proiectat pentru a opera cu o tensiune 220-240 V, 50 / 60 Hz. de ● Introduceţi ştecărul complet în priză.
Avertisment Nu amplasați niciodată televizorul pe o suprafață instabilă. Televizorul poate cădea, cauzând vătămări corporale sau deces. Pot fi evitate multe răniri, în special la copii, luând măsuri de precauție simple, cum ar fi: •• Utilizarea carcaselor sau a suporturilor recomandate de producătorul televizorului. •• Utilizarea exclusivă a pieselor de mobilier care pot sprijini în siguranță televizorul. •• Să vă asigurați că televizorul nu atârnă peste marginea mobilierului de suport.
■■Tehnologie fără fir Bluetooth® Atenţie ● Televizorul utilizează banda de frecvenţe radio ISM 2,4 GHz (Bluetooth®). Pentru a evita defecţiunile sau reducerea vitezei de răspuns cauzate de interferenţele cu unde radio, păstraţi televizorul la distanţă de dispozitive precum alte dispozitive LAN wireless, alte dispozitive Bluetooth, cuptoare cu microunde, telefoane mobile şi dispozitive care utilizează semnale la 2,4 GHz.
● Când vizionaţi imagini 3D, simţul distanţei poate fi indus în eroare sau poate crea impresii eronate. Acordaţi atenţie, pentru a nu lovi accidental ecranul TV sau alte persoane. Asiguraţi-vă că nu există obiecte casabile în jurul utilizatorului, pentru a evita rănirea sau daunele accidentale. ● Distanţa recomandată de vizionare este de cel puţin 3 ori înălţimea imaginii. Nu vizionaţi imagini 3D de la o distanţă mai redusă decât cea recomandată.
Accesorii opționale Ochelari 3D ● Dacă aveţi nevoie de ochelari 3D, vă rugăm să-i achiziţionaţi ca accesorii opţionale Panasonic. ● Utilizaţi ochelari 3D Panasonic compatibili cu tehnologia wireless Bluetooth pentru ochelarii 3D cu obturator activ. ● Pentru informaţii despre ochelarii 3D (doar în limba engleză): http://panasonic.
Despre înălțimea piedestalului Model de 50 inci Model de 58 inci ● Selectați o înălțime a piedestalului din următoarele 4 tipuri. ● Înălțimea piedestalului poate fi modificată în conformitate cu pasul 2 din „Asamblarea piedestalului”. (p. 10) ● Pentru fiecare dimensiune, consultați „Date tehnice”. (p. 31) Ridicat Pregătiri Scoateți piedestalul și televizorul din cutie și puneți televizorul pe o masă de lucru, cu panoul ecranului îndreptat în jos pe un material curat și moale (pătură etc.
2 3 D A E A E D Ridicat 4 Scăzut 10 Română A
5 7 G F 6 ■■Pentru a modifica înălțimea Trebuie să efectuați următoarele proceduri atunci când modificați înălțimea după asamblarea piedestalului. 1 2 3 4 B Demontați capacul . Demontaţi şuruburile de asamblare de pe bază. Ridicați televizorul și demontați stâlpul din bază. Puneți televizorul pe o masă de lucru cu panoul ecranului îndreptat în jos pe un material curat și moale. 5 Demontaţi şuruburile de asamblare de pe suportul de susținere. 6 Extrageți stâlpul din suportul principal.
Asamblarea piedestalului 2 Model de 65 inci 1 A C D 3 A A E 12 Română E
4 A 6 B 5 F Română 13
Demontarea piedestalului 7 Asiguraţi-vă că demontaţi piedestalul respectând următoarele proceduri atunci când reambalaţi televizorul. 1 2 3 4 5 6 7 8 G Demontați capacul . Demontaţi şuruburile de asamblare de pe bază. Ridicați televizorul și demontați stâlpul din bază. Puneți televizorul pe o masă de lucru cu panoul ecranului îndreptat în jos pe un material curat și moale. Demontaţi şuruburile de asamblare de pe suportul de susținere. Extrageți stâlpul din suportul principal.
Asamblarea/demontarea piedestalului Model de 75 inci 2 Şurub de asamblare (4) M4 × 14 Piedestal Capac A Asamblarea piedestalului 1 B Română 15
Conexiuni 3 ● Echipamentele externe şi cablurile ilustrate în imagini nu se livrează împreună cu televizorul. ● Asiguraţi-vă că aparatul este deconectat de la priză înainte de a lega sau deconecta orice fel de cabluri. ● Pentru conectare, verificaţi dacă tipul de terminale şi ştecăre este corect. ● Folosiţi un fir complet cablat compatibil HDMI. C ● Ţineţi televizorul la distanţă de echipamentele electronice (echipamente video etc.
Terminale Conexiuni de bază ■■Cablu de alimentare 1 2 CA 220-240 V 3 4 50 / 60 Hz Cablu de alimentare ■■Antenă 5 Televizor Cablu 6 7 8 9 10 11 12 1 Plăcuță cu numele modelului 2 Slot CI 1 - 2 3 Mufă cască 4 HDMI1 - 3 (p. 20) ● Pentru DVB-S 5 Port USB 1 6 Terminal terestru/de cablu (p. 17) (p. 17) 8 AV (COMPONENT / VIDEO) 9 Terminal ETHERNET Antenă terestră ● Pentru DVB-C, DVB-T, Analogic Conexiune prin satelit (p. 20) (p.
■■Tuner singular Televizor ■■Conexiune prin cablu Televizor Cablu Cablu satelit Antenă parabolică ● Pentru a vă asigura că antena parabolică este corect montată, vă rugăm să consultaţi furnizorul local. Consultaţi, de asemenea, operatorii de transmisie prin satelit, pentru mai multe detalii. Conexiune server DVB via IP Cablu LAN (Ecranat) ● Folosiţi cablul LAN torsadat în pereche, ecranat (STP).
■■Conexiune prin cablu Dispozitive AV ■■Recorder DVD / echipament de înregistrare Televizor Blu-ray etc. Televizor Mediu Internet Cablu LAN (Ecranat) ● Folosiţi cablul LAN torsadat în pereche, ecranat (STP). ■■Conexiune wireless Cablu Mediu Internet LAN wireless integrat Cablu HDMI Punct de acces Cablu RF Recorder DVD / echipament de înregistrare Blu-ray etc.
Cablu HDMI Alte conexiuni Amplificator cu sistem de difuzoare ■■Player DVD (echipament COMPONENT) Televizor (Vizionare) Echipament extern (DVD player etc.) ■■Căşti ● Pentru informaţii privind setările de volum, consultați [eAJUTOR] (Căutare după Scop > Setări > Sunet).
■■VIERA Link ● Utilizaţi HDMI1 - 4 pentru conexiunea VIERA Link. ● Pentru detalii, consultați [eAJUTOR] (Căutare după Scop > Funcţii > VIERA Link „HDAVI Control™”). Model de 75 inci Aranjarea cablurilor Fixați cablurile utilizând colierul de cablu, apoi atașați capacul pentru cablu/capacul pentru terminal la televizor.
■■Fixați cablurile utilizând legătura de cablu Legaţi cablurile Model de 50 inci Model de 58 inci Plasaţi vârful în cârlige Cârlige Pentru a desface: Țineți apăsată clapeta Clapetă Pentru deconectare de la televizor: Agrafe Model de 65 inci Apăsaţi ambele agrafe laterale Model de 50 inci Model de 58 inci ■■Fixați cablurile utilizând banda pentru cablu Model de 75 inci Ataşați banda pentru cablu Ataşarea legăturii de cablu Inseraţi legătura de cablu într-un orificiu Legaţi cablurile Orificiu
■■Atașarea capacului pentru cablu/capacului pentru terminal ● Nu aplicați greutăți pe capacul pentru cablu/capacul pentru terminal. ● Aveți grijă să nu blocați cablurile între televizor și capacul pentru cablu/capacul pentru terminal. ● Atunci când utilizați port USB 2, port USB 3 sau terminal HDMI4, nu puteți atașa capacul pentru cablu. Păstrați capacul pentru cablu scos pentru utilizare ulterioară.
Identificarea elementelor de comandă Telecomandă 6 Netflix ● Accesează direct serviciul NETFLIX. ● Pentru utilizarea la maximum a acestei funcţii este necesar un mediu de reţea de bandă largă. ● Acest serviciu poate fi oprit sau modificat fără notificare prealabilă. 7 OK ● Confirmă selectările şi opţiunile. ● Pentru o modificare rapidă a canalului, apăsaţi după selectarea poziţiilor canalelor. ● Afişează lista de canale. 8 [Meniu opţiuni] ● Setare opţională simplă pentru vizionare, sunet etc.
21 Revenire ● Revenire la meniul/pagina precedentă. 22 Canalul următor/anterior 23 Activare/dezactivare sunet 24 Ultima vizualizare ● Trece la canalul vizionat anterior sau la modul de introducere date. 25 Operaţii pentru conţinut, echipamente conectate etc. ■■Instalarea/demontarea bateriilor Trageţi pentru a deschide Cârlig 3 LED de alimentare Roşu: Mod de aşteptare Verde: Activat Portocaliu: Mod de aşteptare cu anumite funcţii (înregistrare etc.
Setare automată iniţială La pornirea pentru prima dată a televizorului, acesta va căuta automat canalele TV disponibile şi va furniza opţiuni de configurare a televizorului. ● Aceşti paşi nu trebuie parcurşi în cazul în care configurarea a fost făcută de reprezentantul local al firmei Panasonic. ● Vă rugăm să finalizaţi conexiunile (p. 16 - 23) şi setările echipamentului conectat (dacă este necesar) înainte de a începe Setarea automată.
Vizionarea programelor TV 1 Porniți televizorul (TV) sau (Telecomandă) ● Butonul de pornire/oprire a alimentării trebuie să fie în poziţia de pornire. (p. 25) Afișează bara de informații pe marginea ecranului pentru câteva secunde. ● Pentru informații privind utilizarea și setările, consultați [eAJUTOR].
Vizionarea imaginilor 3D ● Pentru a reveni la ecranul/câmpul anterior ● Pentru a derula descrierea (dacă are mai mult de 1 pagină) În timp ce descrierea este evidenţiată ● Pentru a deschide ecranul de referință ( ) ● Pentru a afişa meniul aferent descrierii (numai pentru unele descrieri) (Roşu) ● Pentru verificarea funcţiilor acestui televizor Căutare după Scop > A se citi înainte > Funcţii Vă puteţi bucura de vizionarea imaginilor 3D de conţinut sau programe compatibile cu efecte 3D prin purtarea och
2 Vizualizaţi imaginile 3D La prima vizionare a imaginii 3D, vor fi afişate măsurile de precauţie. Selectaţi [Da] sau [Nu] pentru a continua vizionarea imaginilor 3D. Observaţie ● Opriţi ochelarii 3D după utilizare. ● Utilizaţi ochelarii 3D la o distanţă de aproximativ 3,2 m de televizor. Nu puteţi viziona imaginile 3D cu ochelarii 3D la o distanţă prea mare de televizor, din cauza dificultăţii de recepţionare a undelor radio de la televizor.
Întrebări frecvente Înainte de a solicita service sau asistenţă, urmaţi aceste indicaţii simple pentru a rezolva problema. ● Pentru detalii, consultați [eAJUTOR] (Asistenţă > Întrebări frecvente). Televizorul nu porneşte ● Verificaţi dacă aţi conectat cablul de alimentare la televizor şi la priză. Televizorul trece în modul aşteptare ● Funcţia automată de aşteptare este activată. Telecomanda nu funcţionează sau funcţionează intermitent ● Bateriile sunt introduse corect? (p.
Întreţinere Date tehnice Mai întâi, scoateţi ştecărul din priză. ■■Televizor Ecranul de afişare, carcasa, piedestalul Îngrijirea periodică: Ştergeţi cu atenţie suprafaţa ecranului de afişare, carcasa sau piedestalul prin utilizarea unei cârpe moi pentru a curăţa urmele de murdărie sau amprentele. Pentru urme persistente de murdărie: (1) Mai întâi, ştergeţi praful de pe suprafaţă.
Masa ETHERNET Model de 50 inci 22,5 kg net (Cu piedestal) 16,0 kg net (Numai televizorul) Model de 58 inci 30,5 kg net (Cu piedestal) 24,0 kg net (Numai televizorul) Model de 65 inci 43,5 kg net (Cu piedestal) 39,0 kg net (Numai televizorul) Model de 75 inci 62,5 kg net (Cu piedestal) 54,0 kg net (Numai televizorul) Sursa de alimentare CA 220-240 V, 50 / 60 Hz Panou Panou LCD cu leduri USB 1/2/3 5 V, Max. 900 mA [SuperSpeed USB1: c.c. USB (USB 3.0)] 5 V, Max. 500 mA [Hi-Speed USB2 / 3: c.c.
M.NTSC Redare de pe videocasetofoane M.NTSC (videorecorder) NTSC (numai intrare AV) Redare de pe videocasetofoane NTSC (videorecorder) Intrare antenă parabolică Tip mamă 75 Ω × 2 Intrare antenă VHF/UHF ■■Când utilizaţi suportul pentru suspendare pe perete Vă rugăm să vă contactaţi distribuitorul local Panasonic pentru a achiziţiona suportul pentru suspendare pe perete. Model de 50 inci Model de 58 inci 1 Demontați șuruburile de asamblare din spate . 2 Demontați suportul din spate .
● Găuri pentru montarea suportului pentru suspendare de perete Partea din spate a televizorului Model de 50 inci Model de 58 inci Model de 65 inci a b a: 400 mm b: 200 mm Model de 75 inci a: 600 mm b: 300 mm (Vedere din lateral) Adâncime şurub Model de 50 inci minimum: 10 mm maximum: 15 mm Diametru: M6 Model de 58 inci minimum: 10 mm maximum: 17 mm Diametru: M6 Model de 65 inci minimum: 9 mm maximum: 30 mm Diametru: M6 Model de 75 inci minimum: 11 mm maximum: 30 mm Diametru: M8 Şurub pentru fixarea t
Depunerea la deşeuri a echipamentelor şi a bateriilor vechi Doar pentru Uniunea Europeană şi pentru ţările cu sisteme de reciclare Aceste simboluri de pe produse, ambalaje şi/sau documentele însoţitoare indică faptul că produsele electrice şi electronice, precum şi bateriile uzate nu trebuie să fie amestecate cu deşeurile menajere obişnuite.