Model No. TX-L32D28BP (Purple model) TX-L32D28BS (Silver model) TX-L32D28BW (White model) TX-L37D28BS (Silver model) Operating Instructions LCD Television Thank you for purchasing this Panasonic product. Please read these instructions carefully before operating this product and retain them for future reference. The images shown in this manual are for illustrative purposes only. “B” model no. suffix denotes UK model. English U.K.
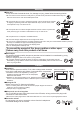
Features ■ freesat HD tuner built-in Receives freesat - free digital satellite broadcasts in the UK This TV has a built-in freesat HD tuner. freesat is a free digital TV service which broadcasts via satellite so you can receive TV, radio, interactive TV, and HD TV with crystal clear reception. You can enjoy sharp pictures, vivid colours, multi-channel sound, and various services with the interactive content.
Contents ■ FULL HD Be Sure to Read ■ HD TV 1080p This TV supports high definition TV signals. ■ Dolby Digital Plus decoder Quick Start Guide This TV uses a high definition panel to produce high definition pictures close to their original resolution. IPS LED LCD TV This TV uses IPS (In Plane Switching) panel with LED backlight.
Safety Precautions Warning ■Mains plug and lead To help avoid risk of electrical shock, fire, damage or injury, please follow the warnings below: ●This TV is designed to operate on AC 220-240 V, 50 / 60 Hz. ●Insert the mains plug fully into the socket outlet. ●Ensure that the mains plug is easily accessible. ●Remove the mains plug when cleaning the TV. ●Do not touch the mains plug with a wet hand. If you detect anything unusual, immediately switch off the mains supply switch and remove the mains plug.
Warning ■Take care To help avoid risk of electrical shock, fire, damage or injury, please follow the warnings below: ●Do not remove covers and never modify the TV yourself as live parts are accessible when they are removed. There are no user serviceable parts inside. ●Do not expose the TV to rain or excessive moisture. This TV must not be exposed to dripping or splashing water and objects filled with liquid, such as vases, must not be placed on top of or above the TV.
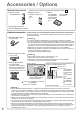
Accessories / Options Standard accessories □ Remote Control ●N2QAYB000504 Check that you have the accessories and items shown □ Batteries for the Remote Control (2) ●R6 p. 8 □ Stand TX-L32D28BP: TX-L32D28BS: TX-L32D28BW: ●TBLX0186 p. 7 TX-L37D28BS: ●TBLX0187 □ Operating Instructions □ Product Registration Leaflet Optional accessories □ Wireless LAN Adaptor ●DY-WL10E-K Caution ●To use the Wireless LAN Adaptor, an access point needs to be obtained.
Attaching the stand To help avoid risk of damage or injury by the TV tipping or falling, please follow the warnings and cautions below: Warning ●Do not disassemble or modify the stand. Caution dealer immediately. ●During setup, make sure that all screws are securely tightened. ●Ensure that the TV does not suffer any impact during installation of the stand. ●Ensure that children do not climb onto the stand. ●Install or remove the TV from the stand with at least two people.
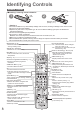
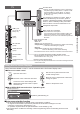
Identifying Controls Remote Control ■Installing / removing remote’s batteries 1 2 Pull open Close Note the correct polarity (+ or -) Hook Caution ●Incorrect installation may cause battery leakage and corrosion, resulting in damage to the remote control. ●Do not mix old and new batteries. ●Replace only with same or equivalent type. Do not mix different battery types (such as alkaline and manganese batteries). ●Do not use rechargeable (Ni-Cd) batteries. ●Do not burn or break up batteries.
TV Function select ●Volume / Contrast / Brightness / Colour / Sharpness / Tint (NTSC signal) / Bass (“Music” or “Speech” mode in the Sound Menu) / Treble (“Music” or “Speech” mode in the Sound Menu) / Balance / Auto Setup (p. 40 and p. 41) F TV AV Changes the input mode USB 2 port (p. 13, 62, 66 and p. 75) Mains power On / Off switch ●Use to switch the mains power. CI slot (p.
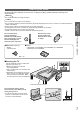
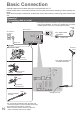
Basic Connection External equipment and cables shown are not supplied with this TV. Please ensure that the unit is disconnected from the mains socket before attaching or disconnecting any leads. When disconnecting the mains lead, be absolutely sure to disconnect the mains plug at the socket outlet first. Example 1 Connecting dish or aerial ●The freesat channel uses Astra 2 at 28.2° East, and Eurobird 1 TV only at 28.5° East satellites.
Example 2 Connecting DVD Recorder / VCR TV, DVD Recorder or VCR Example 3 Connecting DVD Recorder / VCR and Cable TV box TV, DVD Recorder / VCR and Cable Rear of the TV Terrestrial aerial Terrestrial aerial Quick Start Guide AC 220-240 V 50 / 60 Hz Rear of the TV AC 220-240 V 50 / 60 Hz Mains lead Aerial input terminal Mains lead Aerial input terminal ●Basic Connection Fully wired HDMI compliant cable RF cable Fully wired SCART cable Fully wired HDMI compliant cable AV 2 Fully wired SCART c
Auto Setup Search and store TV channels automatically. ●These steps are not necessary if the setup has been completed by your local dealer. ●Please complete connections (p. 10 and p. 11) and settings (if necessary) of the connected equipment before starting Auto Setup. For details of settings for the connected equipment, read the appropriate manual.
3 Setup the wireless LAN connection Setup the wireless LAN connection to enable the network service functions (p. 74). (If you do not wish to use wireless LAN connection or the network service functions, skip this step.) ●To setup the wireless LAN connection, the Wireless LAN Adaptor (optional accessory) is required. For the information about the Wireless LAN Adaptor “Optional accessories” (p. 6) ●Confirm the encryption key, settings and positions of your access point before starting setup.
Auto Setup 4 Input Owner ID Owner ID Please enter new PIN PIN Please enter your own choice of PIN number, name, etc. to help the police to crack crime. ●Make a note of the PIN number in case you forget it. The PIN number cannot be reset. ●You can input or change the Owner ID later. “Owner ID” (p. 56) * * * * EXIT ●To skip this step ●This step will be skipped in the Auto Setup after “Shipping Condition” (p. 51) is performed.
Select “Home” 5 Select “Home” viewing environment (highlight “Home” in yellow) to use in your home environment. Please select your viewing environment. Home Shop select set (for shop display only) “Shop” viewing environment is the demonstration mode to explain main features of this TV. Select “Home” viewing environment to use in your home environment. ●You can return to viewing environment selection screen at the stage of Shop confirmation screen and Automatic Demo Off / On selection screen.
Watching TV 1 Turn power on 2 Select the mode (freesat, DVB, Analogue or Other Sat.) (Press for about 1 second) ●Mains power On / Off switch should be On. (p. 9) INPUT TV MENU ASPECT EXIT watch IDE GU TV Selection freesat TV DVB select Analogue Displayed if Other Satellite channels are tuned (p. 49) ●Also possible by pressing the TV button repeatedly on the remote control or side panel of the TV. (p. 9) Other Sat.
■Other useful functions Hold HOLD Freeze / unfreeze picture Display Information banner Display Information banner ●Also appears when changing a channel Same programme available as HD broadcast ●For details, display the extra information Channel type if it is HDTV, Radio or Data channel Current time Channel position and name TV mode ( Example (freesat): 103 ITV Wales Programme Radio Coronation Street 19:30 - 20:00 Mute Encrypted STTL All DVB Channels Select favourites For info press TEXT Multi
Watching TV ■Other useful functions Display subtitles ■freesat, DVB or Other Sat. mode Display / hide subtitles (if available) STTL ●To change the language for DVB (if available) “Preferred Subtitles” (p. 35) ■Analogue mode Display subtitles ●To hide subtitles STTL EXIT Note ●This is the same as switching to Analogue teletext service and selecting “P888” (subtitle service). (p. 27) ●You cannot change the channel when this function is active.
■Other useful functions Display the selectable settings for the current status Check or change the current status instantly OPTION ●To change change select Multi Audio / AD (freesat mode) Allows you to select between alternative language or Audio Description for sound tracks (if available) ●Set Audio Description “Auto” in the Sound Menu (p. 33) to select the audio description sound track. In freesat mode, Audio Description cannot be controlled separately from the audio description sound track.
Using TV Guide TV Guide―Electronic Programme Guide (EPG) provides an on screen listing of the programmes currently broadcast and the forthcoming broadcasts over the next seven days (depending on the broadcasters). ●When this TV is turned on for the first time, or the TV is switched off for more than a week, it may take some time before the TV Guide is completely shown.
DVB or Analogue mode ●This TV supports the GUIDE Plus+ system. ●The Gemstar branding partner will supply the rating informations in the programme information and the recommended group in the Search list. ●DVB and Analogue channels are displayed on the same TV Guide screen. “D” means DVB channel and “A” means Analogue channel. There will be no programme listings for Analogue channels. INPUT TV 1 Select DVB or Analogue 2 View TV Guide p.
Using TV Guide ■Other useful functions Timer Programming (freesat or DVB mode) Timer Programming can remind you to watch a programme or record one on an external recorder or a USB HDD. Select the forthcoming programme Select the function (Ext Rec., USB HDD Rec. or Reminder) Function select Ext Rec. No. D store Wed 28 Oct 2009 10:46 Timer Programming Date Channel Name 1 BBC ONE DIY SOS Guide Guide Wed 28 Oct Start End 20:00 20:30 (30 mi n. ) --- --- --/-- --:---:-(--- min.
Guide link programming (Timer Programming from the TV Guide signal) Guide link programming is Timer Programming which is controlled by information from the TV Guide; if programme start and end times are changed by the broadcaster, the timer programming event will follow the change. A Split Programme programming is a Guide link programming which is interrupted by one or more other programmes.
Using TV Guide Other Sat. mode In Other Sat. mode, TV Guide is not available. In stead, Channel List will appear. ●To tune in Other Sat. Channels p. 49 1 Select Other Sat. 2 Display the Channel List p. 16 TV INPUT TV EXIT IDE GU IDE GU BACK/ RETURN All Other Sat.
Viewing Teletext You can enjoy news, weather forecasts and subtitles, etc. (depending on the broadcaster) ●The availability of teletext services for a programme is indicated by “TEXT” in the information banner. Information banner (p.
Viewing Teletext Analogue teletext Analogue teletext services Analogue teletext services are the text information provided by the broadcasters. The features may vary depending on the broadcasters. What is FASTEXT mode? In FASTEXT mode, four differently coloured subjects are situated at the bottom of the screen. To access more information about one of these subjects, press the appropriately coloured button. This facility enables fast access to information on the subjects shown.
INDEX Return to the main index page INDEX Subtitles View a favourite page stored ●Factory setting is “P888” (subtitle service) on the blue button (List mode). STTL View in multi window Watch TV and Teletext in two windows at once ●Operations can be made only in Teletext screen. ●Each time pressed: Teletext TV and Teletext TEXT TV Store frequently viewed pages (List mode only) ●If you wish to use Subtitles, As page is displayed do not change number on blue button.
Watching External inputs Connect the external equipment (VCRs, DVD equipment, etc.) and you can watch through the AV input. ●To connect the equipment p. 11 and p. 92 The Remote Control is capable of operating some functions of selected external equipment. 1 Turn the TV on ■When connecting with SCART as example 2 or 3 (p. 11) Receives input signals automatically when playback starts ●Input signals are automatically identified by the SCART (pin 8) terminal.
Screen display Terminal Manual input ( default setting in “Input Labels” Auto input mode or (EC VIERA Link ) ) AV1 AV2 AV3 COMPONENT PC HDMI1 HDMI2 HDMI3 HDMI4 AV1 AV1-RGB AV2 AV2-S-Video AV2-RGB AV3 COMPONENT PC HDMI1 HDMI2 HDMI3 HDMI4 EC/HDMI1 EC/HDMI2 EC/HDMI3 EC/HDMI4 EC/AV2 EC/AV1 EC/AV2-S-Video EC/AV1-RGB EC/AV2-RGB ― ― ― ●Applicable for ●Applicable ●Applicable ●Applicable EC mode and for for for VIERA Link VIERA Link VIERA Link VIERA Link ●If the above information is
How to Use VIERA TOOLS You can access some special features easily by using the VIERA TOOLS function. ●For “VIERA Link Control” and “Pause Live TV” functions to operate correctly, ensure the connections and settings are completed. “Summary of Q-Link and VIERA Link features” (p. 84 and p. 85), “Preparations” (p. 87) After connection, turn the equipment on and then switch the TV on.
How to Use Menu Functions Various menus allow you to make settings for the picture, sound, and other functions. MENU EXIT 1 Display the menu ●Displays the functions that can be set MENU 2 Select the menu (varies according to the input signal) access Main Menu Picture Sound Setup BACK/ RETURN select Select the item 3 Example (Picture Menu): 1/2 Dynamic select Warm Off Off Basic Picture Menu Viewing Mode Contrast Brightness Colour Sharpness Tint Colour Balance Vivid Colour C.A.T.S.
How to Use Menu Functions ■Menu list Menu Picture 32 Item Adjustments / Configurations (alternatives) Viewing Mode Basic picture mode (Dynamic / Normal / Cinema / True Cinema / Game / Photo / Professional1 / Professional2) In each Viewing Mode, Contrast, Brightness, Colour, Sharpness, Tint, Colour Balance, Vivid Colour, C.A.T.S., P-NR and 3D-COMB can be adjusted and stored to suit your particular viewing requirement. ●Set for each input signal.
Menu Item Mode Bass Treble Equalizer Balance Headphone Volume Adjustments / Configurations (alternatives) Selects the basic sound mode (Music / Speech / User) ●The selected mode affects all input signals. Music: Improves sound quality for watching music videos, etc. Speech: Improves sound quality for watching news, drama, etc. ●In Music and Speech modes, you can adjust “Bass” and “Treble” settings, and those settings will be stored for each mode.
How to Use Menu Functions Menu Item Timer Programming Sets a timer to remind watching or record forthcoming programmes (p. 52) Off Timer Sets the time until the TV automatically goes to Standby mode (Off / 15 / 30 / 45 / 60 / 75 / 90 minutes) (p. 19) USB HDD Setup Register the connected USB HDD and makes the settings for the recording (p. 62) Link Settings Setup VIERA Link Sets to use VIERA Link functions (Off / On) (p.
Menu Item Adjustments / Configurations (alternatives) Analogue Tuning Menu Auto Setup Automatically sets the Analogue channels received in the area (p. 41) Manual Tuning Sets the Analogue channels manually (p. 47) Favourites Edit Creates a list of favourite Other Satellite channels (p. 50) Channel List Skips the unwanted Other Satellite channels or edits Other Satellite channels (p. 50) Auto Setup Automatically sets the Other Satellite channels received in the area (p.
How to Use Menu Functions Menu Item System Menu USB Keyboard Layout Shipping Condition Owner ID Common Interface System Update Software Licence System Information Adjustments / Configurations (alternatives) Selects the language that your USB Keyboard supports ●Use a USB Keyboard to enter characters in VIERA CAST (p. 83). ●Characters may not be displayed correctly on the TV screen depending on the connected keyboard or the keyboard layout setting. Resets all settings, for example, when moving house (p.
■Overview (Picture, Sound) ●How to operate p. 31 Main Menu Picture Sound Setup Picture Menu Viewing Mode Contrast Brightness Colour Sharpness Tint Colour Balance Vivid Colour Reversal Film Effect Picture Menu C.A.T.S. P-NR 3D-COMB Picture Display Reset to Defaults 1/2 Dynamic Available in NTSC Warm Off Off 2/2 Off Off Off On Reset (p.
How to Use Menu Functions ■Overview (Setup) ●How to operate Timer Programming F u n ct io n p. 31 Main Menu No . 72 BBC 2W < T I ME R > Reminder 14 E4 The Bill Ext Rec. 1 BBC ONE DIY SOS Ext Rec. 1 BBC ONE < T I ME R > Wed 28.10.2009 10:46 Date Ch an n e l N a m e Ext Rec. --- Picture USB HDD Remaining Capacity 500GB (50%) Start Wed 28 Oct Guide S/P STTL End 20:00 21:30 ( 90 m i n. ) Wed 28 Oct 21: 00 22: 00 ( 60 m i n. ) Wed 28 Oct 22: 45 23: 00 ( 15 m i n.
Link Settings VIERA Link HDMI Content Detection Q-Link AV2 out Standby Power Save Intelligent Auto Standby Q-Link Download 1/2 On Off AV2 TV On On (No reminder) Access Sending Preset Data Please wait! 0% 100% Remote control unavailable (p. 34) (p. 34) Child Lock List - TV and AV Child Lock Change PIN Child Lock List Access Access (p.
Retuning from Setup Menu Auto Setup retunes all channels automatically. freesat channels Automatically retune all the freesat channels received in the area. ●Only freesat channels are retuned. ●All the previous tuning settings (Favourites Edit and Channel List, etc.) are erased. ●If a Child Lock PIN number (p. 54) has been set, it must be entered. INPUT TV MENU EXIT 1 Select freesat 2 Display the menu 3 Select “Setup” p.
DVB or Analogue channels Automatically retune all DVB or Analogue channels received in the area. ●Only DVB channels are retuned in DVB mode. ●Only Analogue channels are retuned in Analogue mode. ●All the previous tuning settings (Channel List, etc.) are erased. ●If a Child Lock PIN number (p. 54) has been set, it must be entered.
Tuning and Editing Channels (freesat) You can retune channels or make your favourite channel list, skip unwanted channels, etc. INPUT TV MENU EXIT BACK/ RETURN 1 Select freesat 2 Display the menu 3 Select “Setup” p. 16 TV MENU access Main Menu Picture Sound Setup 4 5 select Select “freesat Tuning Menu” Setup Menu Timer Programming Off Timer USB HDD Setup Link Settings Child Lock freesat Tuning Menu Other Sat.
List favourite freesat channels Favourites Edit Create your favourite channel list from various broadcasters. The freesat Favourites list is available from “Channel Genre” in the TV Guide (p. 20).
Tuning and Editing Channels (DVB) You can retune channels or make your favourite channel lists, skip unwanted channels, etc. INPUT TV MENU EXIT 1 Select DVB 2 Display the menu 3 Select “Setup” BACK/ RETURN def ghi jkl mno pqrs tuv wxyz EXIT MENU access Main Menu Picture Setup 5 ■To return to TV TV Sound 4 abc p.
List favourite DVB channels Favourites Edit Create your favourite channel lists from various broadcasters (up to 4: Favourites1 to 4). The DVB Favourites lists are available for switching in the Information banner (p. 17) and from “Category” in the TV Guide (p. 21).
Tuning and Editing Channels Update DVB channel automatically Update Channel List You can add new channels, delete removed channels, update channel name and position automatically to Channel List. ●Channel List is updated while keeping your settings in Favourites Edit, DVB Update Channel List Progress Analogue Scan CH 21 This will take about 3 minutes. CH Free TV: 0 68 Channel Name Pay TV: 0 Type Radio: 0 Channel List, Child Lock, Timer Programming, etc.
Skip unwanted Analogue channels, Edit Analogue channels Channel List You can hide unwanted Analogue channels. The hidden channels cannot be displayed except in this function. Use this function to skip unwanted channels. Select a channel and reveal / hide reveal / hide Analogue Channel List 1 BBC1 2 ***** 3 ***** 4 5 6 7 ●To reveal all channels : reveal : hide (skip) select yellow You can also edit each channel in Channel List.
Tuning and Editing Channels (Other Sat.) You can tune all receivable digital satellite channels or skip unwanted channels, etc. ●Some of Other Sat. functions may work to differing specifications (depending on the broadcasters). Select freesat or Other Sat. 1 INPUT TV MENU EXIT BACK/ RETURN p. 16 TV 2 Display the menu 3 Select “Setup” MENU access Main Menu Picture Sound Setup abc def ghi jkl mno pqrs tuv wxyz 4 5 ■To return to TV EXIT 6 select Select “Other Sat.
Set all receivable digital satellite channels Auto Setup Any receivable digital compliant satellite channels can be tuned. ●Only Other Sat. channels are retuned. ●All the previous tuning settings are erased. ●If a Child Lock PIN number (p. 54) has been set, it must be entered. Select the satellite ●Selectable satellites are Astra2/Eurobird, Astra1 and Other Satellite Auto Setup - Satellite Selection Satellite Selection Astra2/Eurobird freesat and other channels Hotbird.
Tuning and Editing Channels List favourite Other Sat. channels Favourites Edit Create your favourite channel lists from various broadcasters (up to 4: Favourites1 to 4). The Other Sat. Favourites lists are available for switching in the Information banner (p. 17). Select a channel to list Other Sat. Favourites Editor Favourites1 All Other Sat.
Shipping Condition Resets the TV to its original condition with no channels tuned in. All settings other than “Owner ID” and “USB HDD registration” are reset (channels, picture, sound settings, etc.).
Timer Programming Timer Programming from Menu The Timer Programming menu allows you to choose programmes that you wish to remind watching or record to the external recorder or the USB HDD. At the correct time, the TV will tune to the correct channel automatically to record even if the TV is in Standby mode. TV Guide may also be used to set timer programming event (p. 22). ●Timer Programming can store up to 15 events. ●For recording using Timer Programming, the TV must be either On or in standby.
Set timer programming event details Timer Programming Start making the settings Select the function (Ext Rec., USB HDD Rec. or Reminder) select : to record the programme to the external recorder (Ext Rec.) or the Ext Rec. / USB HDD Rec. USB HDD (USB HDD Rec.) When the start time comes, the channel will be switched automatically and the video and audio signals will be output. 2 mins. before the starting time, a reminder message appears if you are watching TV.
Child Lock You can lock specific channels / AV input terminals and control who watches them. When the locked channel / input is selected, a message appears; by entering the PIN number, you can watch it. MENU EXIT 1 Display the menu 2 Select “Setup” MENU access Main Menu Picture Sound Setup abc def ghi jkl mno pqrs tuv wxyz Select “Child Lock” 3 ■To return to TV Setup Menu Timer Programming Off Timer USB HDD Setup Link Settings Child Lock freesat Tuning Menu Other Sat.
Input Labels For easier identification and selection of the input mode, you can label each input mode or skip terminals that are not connected to any equipment. ●To select the input mode MENU EXIT p.
Owner ID Entry of the PIN number and personal information (your name, address and postcode). In the unfortunate event of theft, the Owner ID will help the Police to determine the owner.
Using Common Interface The Common Interface Module menu provides access to software contained on Common Interface (CI) Modules. This TV works only Pay TV modules complying with CI standard. ●This function is not available for BSkyB’s Sky channels. Caution CI slot ●Remove the cover before using CI slot. ●Turn Off Mains power On / Off switch whenever inserting or removing the CI module.
Updating the TV Software From time to time, a new version of software may become available for download to enhance the performance or operations of the TV. In DVB mode, a notification banner will appear when one of the BBC channels is turned to if a new available software is found. ●To download ●If you choose not to download EXIT You can update any new software automatically, or manually.
Displaying PC Screen on TV The screen of the PC connected to the TV can be displayed on the TV. You can also listen to PC sound with the audio cable connected. ●To connect PC p. 92 INPUT TV AV 1 Select the external input 2 Select “PC” TV ■PC menu setting ●To make settings Menu access Input Selection AV1 AV2/S AV3 COMPONENT PC HDMI1 HDMI2 HDMI3 HDMI4 TV Media Server select ●Corresponding signals p. 98 ●If “H-freq.” or “V-freq.” is shown in red, the signals may not be supported.
Advanced Picture Settings You can adjust and setup the detailed picture settings for each Viewing Mode. ●To use this function completely, set “Advance(isfccc)” to “On” in the Setup Menu. p. 35 ●For PC input mode, some functions are available without setting “Advance(isfccc)”. Select the input mode to adjust and setup 1 INPUT TV AV MENU EXIT p. 16 and p.
Adjust the detailed picture settings Advanced Settings ●To make settings Advanced Settings R-Gain G-Gain B-Gain R-Cutoff G-Cutoff B-Cutoff Gamma Reset to Defaults Menu “How to Use Menu Functions” to (p. 31) 2.
USB HDD Recording You can record the digital TV programmes to the connected USB HDD and enjoy playing back in various ways. ●Analogue TV programme cannot be recorded to the USB HDD. ●The data broadcasting (MHEG, etc.), radio broadcasting and the periods without any signal will not be recorded. ●Not all the programmes can be recorded depending on the broadcaster and service provider. ●This TV supports USB HDD with capacity from 160 GB up to 2 TB.
Register and setup the USB HDD Device Setup All the USB devices recognized as a mass storage device will be listed. You can only register USB HDDs. ●Up to 8 USB HDDs can be registered with this TV. However you can only choose one USB HDD for recording at a time. ●Some USB HDD may not be registered.
USB HDD Recording Recording the TV programme to USB HDD You can record the current programme immediately by using “One Touch Recording”. You can also record the current programme constantly for the selected period by using “Rewind LIVE TV” so that you can go back or pause the current programme. ●Ensure the connection, registration and setup are completed before start recording p. 62 and p. 63 ●Ensure not to connect or disconnect any USB devices during USB HDD recording.
One touch direct TV recording - What you see is What you record One Touch Recording Recording the current programme in the USB HDD immediately. Select the maximum recording time (30 / 60 / 90 / 120 / 180 minutes) USB HDD Setup Device Setup One Touch Recording Rewind LIVE TV select 180 minutes Off ■To start One Touch Recording Set the position to “TV” DVD/VCR LED LED will turn to orange (flash) while One Touch Recording is in progress.
Using Media Player Media Player allows you to enjoy photo, video or music recorded on an SD Card and a USB Flash Memory, and recorded contents on the registered USB HDD. VIERA IMAGE VIEWER is the function of the easy viewing for photos or videos recorded on an SD Card on the TV screen by simply inserting into the SD Card slot. Photo mode : Still pictures recorded by digital cameras will be displayed.
Starting Media Player 1 Insert the SD Card or USB Flash Memory ●For registered USB HDD, ensure the connection status is “Yes”. 2 Switch to Media Player ●When SD Card is inserted, switching will be done automatically. SD CARD 3 Start Media Player p. 63 SD CARD MENU EXIT Media Player Signal output from all AV terminals will be disabled during Media Player view. Press OK to proceed. Press EXIT to return to TV viewing.
Using Media Player Photo mode Photo mode will read all “.jpg” extension files in the SD Card or USB Flash Memory. Error display (images that could not be loaded, etc.) SD CARD Media Player Photo The thumbnail of all the photos on the SD Card or USB Flash Memory will be displayed. ●You can also access Photo mode directly by using VIERA TOOLS. “How to Use VIERA TOOLS” (p. 30) ●To change the background music “Photo Setup” (p.
Photo Setup Choose the settings for Photo mode.
Using Media Player Video mode For SD Card or USB Flash Memory Video mode supports AVCHD, MPEG2 and DivX® file formats. Film icon will be displayed if the file does not support thumbnail view. SD CARD Media Player Error display (images that could not be loaded, etc.
For registered USB HDD Remaining capacity of the HDD ●This value may not be accurate depending on the condition. Media Player USB HDD recordings Date Time Title BBC 1 Wed 28/10 12:00 Eastender ITV Sun 10/01 13:30 News Fri 15/01 13:50 Cinema Channel BBC 2 Contents list of the registered USB HDD will be displayed. ●You can also access the contents list directly by using VIERA TOOLS. “How to use VIERA TOOLS” (p.
Using Media Player Sound Settings You can enjoy the multi-channel sound via an amplifier connected to DIGITAL AUDIO OUT terminal. ■To confirm or change the current sound status (during playback) Display the Option menu OPTION Change the sound (if the video has multiple audio signals) Example: Option Menu Multi Audio ●It may take several seconds to change the sound.
Music mode Music mode supports MP3 and AAC file format. Media Player SD CARD My Music_1 Music My Music_2 The thumbnail of music folders in the SD Card or USB Flash Memory will be displayed. ●You can also access Music mode directly by using VIERA TOOLS “How to use “VIERA TOOLS” (p.
Using Network Services (DLNA / VIERA CAST / freesat) DLNA® This TV is a DLNA Certified™ product. DLNA (Digital Living Network Alliance) is a standard that makes DLNA Certified digital electronics easier and more convenient to use on a home network. To learn more, visit www.dlna.org. It allows you to share photos and videos stored in the DLNA Certified media server (for example, PC with windows 7 installed, DIGA Recorder etc.) connected to your home network, and enjoy watching them on the TV screen.
Network connections To use only DLNA features, you can operate the features without Broadband network environment. To use VIERA CAST features or freesat interactive services, you need a Broadband network environment. ●If you do not have a Broadband network services, please consult your retailer for assistance. ●Confirm the terms and conditions of the contracts with your Internet Service Provider (ISP) or telecommunications company. ●Set up and connect any equipment required for the network environment.
Using Network Services (DLNA / VIERA CAST / freesat) Network Setup ●Ensure the connections are completed before starting Network Setup. “Network connections” (p. 75) MENU 1 Display the menu 2 Select “Setup” MENU EXIT access Main Menu Picture Sound Setup BACK/ RETURN Select “Network Setup” 3 abc def ghi jkl mno pqrs tuv wxyz ■To return to TV EXIT select Setup Menu Timer Programming Off Timer USB HDD Setup Link Settings Child Lock freesat Tuning Menu Other Sat.
Network settings for the LAN Cable connection This setting is for the network connection by using the LAN cable. Select “Network Type” and set to “Wired” Network Setup Network Type Access Point Settings IP/DNS Settings Proxy Settings Connection Test VIERA Name Software Update MAC Address Wired --- If you make the network connection like “Example2” (p. 63), you do not have to set “Acquire DNS Address”, “Proxy” and “Proxy Port”.
Using Network Services (DLNA / VIERA CAST / freesat) Network settings for the Wireless LAN connection This setting is for the network connection by using Wireless LAN Adaptor.
■WPS(Push button) Press the WPS button on the access point until the light flashes. And then, press the OK button to connect the Wireless LAN Adaptor and the access point. WPS(Push button) 1) Please press the ‘WPS’ buttton on the access point until its light flashes. 2) When light is flashing select ‘Connect’ on TV. If you are unsure, please check the instruction manual of the access point. Connect ●Ensure that your access point supports WPS for this setup.
Using Network Services (DLNA / VIERA CAST / freesat) Using DLNA® features ●Ensure the preparation of media server, network connections and network settings are completed. “Media server” (p. 74), “Network connections” (p. 75), “Network Setup” (p.
For photo file ■Single view - Photos are displayed one at a time. ●To display / hide the operation guide ●To operate Single view To the previous photo Rotate 90˚ (anti-clockwise) To the next photo Slideshow Rotate 90˚ (clockwise) Single view Rotate EXIT Select RETURN Slideshow Single view Operation guide BACK/ RETURN ●To return to list ■Slideshow - Slideshow will be started from the selected photo file and completed within the list.
Using Network Services (DLNA / VIERA CAST / freesat) Photo Setup (for photo contents) and Video Setup (for video contents) Choose the settings for Photo and Video file operations.
VIERA CAST™ You can access a selection of internet services from VIERA CAST home screen. For example, YouTube, Picasa Web Albums (current as of March, 2010). ●VIERA CAST requires a broadband internet connection. Dial-up internet connections cannot be used. ●Ensure the network connections and network settings are completed. “Network connections” (p. 75), “Network Setup” (p. 76 - 79) EXIT Access VIERA CAST ●Depending on the usage conditions, Example: it may take a while to read all the data.
Link Functions (Q-Link VIERA Link) Q-Link connects the TV and DVD Recorder / VCR, and enables easy recording, playback, etc. (p. 86) VIERA Link (HDAVI Control™) connects the TV and the equipment with VIERA Link function, and enables easy control, convenient recording, playback, energy saving, creation of a home theatre, etc., without complicated setting. (p. 87 - 91) You can use Q-Link and VIERA Link functions together. ●This TV supports “HDAVI Control 5” function.
■VIERA Link (HDMI and Audio out connections) Connected equipment Features Analogue channel download Easy playback Power on link Power off link Reduce unnecessary power consumption in standby Auto standby for unnecessary equipment Pause Live TV programme Direct TV Recording Control the menu of the connected equipment by VIERA remote control Speaker control Player theatre with VIERA Link function Blu-ray Disc theatre with VIERA Link function Amplifier with VIERA Link function – – ∗5 – – – ∗3 – – – –
Link Functions (Q-Link VIERA Link) Q-Link ■Preparations ●Connect the DVD Recorder / VCR with the following logos: “Q-Link”, “NEXTVIEWLINK”, “DATA LOGIC”, “Easy Link”, “Megalogic” or “SMARTLINK” ●Q-Link connection p. 84 ●Use fully wired SCART cable. ●Set up the DVD Recorder / VCR. Read the manual of the recorder. ●Q-Link terminal setup in the Setup Menu “Q-Link” (p. 34), “AV1 / AV2 out” (p.
VIERA Link “ Control™”∗ ∗Enjoy additional HDMI Inter-Operability with Panasonic products which have “HDAVI Control” function. This TV supports “HDAVI Control 5” function. Connections to the equipment (DIGA Recorder, HD Video Camera, Player theatre, Amplifier, etc.) with HDMI and SCART cables allow you to interface them automatically (p. 84 and p. 85). These features are limited to models incorporating “HDAVI Control” and “VIERA Link”.
Link Functions (Q-Link VIERA Link) ■Features available Reduce unnecessary power consumption in standby Standby Power Save Set Standby Power Save “On” in the Setup Menu to use this function “Standby Power Save” (p. 34) The power consumption in Standby mode of the connected equipment is controlled in synchronization with the TV On / Off state.
■Features available (Using VIERA Link Menu) Pause Live TV programme Pause Live TV You can pause the live TV programme and resume the programme later. The live TV programme will be recorded on HDD of the connected DIGA Recorder. ●This function is available with a DIGA Recorder which has HDD. ●If you connect a variety of recorders including other manufacturers’ recorders at the same time, please connect the DIGA Recorder which has HDD to the TV’s lower HDMI terminal number.
Link Functions (Q-Link VIERA Link) ■Features available (Using VIERA Link Menu) Control the menu of the connected equipment by VIERA remote control VIERA Link Control You can control some functions of the connected equipment with this TV remote control (point the remote control at the TV’s signal receiver). ●If you cannot operate the menu of the connected equipment, check the settings and the equipment “Summary of Q-Link and VIERA Link features” (p. 84 and p. 85), “Preparations” (p.
■Features available (Using VIERA Link Menu) Speaker control Speaker Selection You can control the home theatre speakers with this TV remote control (point the remote control at the TV’s signal receiver). ●If you cannot control the home theatre speakers with this remote control, check the settings and the equipment “Summary of Q-Link and VIERA Link features” (p. 84 and p. 85), “Preparations” (p.
External Equipment These diagrams show our recommendations for connection of your TV to various pieces of equipment. For other connections, consult the instructions for each piece of equipment, the table below, and the specifications (p. 107). Satellite dish To enjoy the sound from the external equipment in multi-channel sound (e.g. Dolby Digital 5.1ch), connect the equipment to the amplifier. For the connections, read the manuals of the equipment and amplifier.
USB devices Rear of the TV USB cable Network Internet LAN cable (Shielded) Hub or Router To watch cable broadcasts Cable Cable TV box Camcorder / HDMI equipment Fully wired SCART cable Camcorder / Game equipment (Viewing) HDMI 4 Fully wired HDMI compliant cable ●External Equipment Fully wired HDMI compliant cable Modem AV 3 V (Listening) Headphones L R (M3 stereo mini plug) “Headphone Volume” in the Sound Menu (p.
Technical Information Auto Aspect The optimum size and aspect can be chosen automatically, and you can enjoy finer images. (p. 18) ■Aspect Control Signal “WIDE” will appear in the top left of the screen if a Widescreen signal (WSS) or a Control signal through SCART / HDMI terminal is found. The aspect will switch to the appropriate 16:9 or 14:9 widescreen ratio. This function will work in any aspect mode.
DivX ABOUT DIVX VIDEO: DivX® is a digital video format created by DivX, Inc. This is an official DivX Certified device that plays DivX video. Visit www.divx.com for more information and software tools to convert your files into DivX video. ■DivX video file DivX Certified to play DivX video up to HD 1080p, including premium content. Extension - “.divx” or “.
Technical Information Characters table for numeric buttons You can enter characters by using numeric buttons for free input items. Press the numeric button repeatedly until you reach the desired character. abc def ●The character is set automatically if you do not press the button for one second. ghi jkl mno ● You can also set the character by pressing the OK button or pqrs tuv wxyz other numeric buttons within one second.
HDMI connection HDMI (high-definition multimedia interface) is the world’s first complete digital consumer AV interface complying with a non-compression standard. HDMI allows you to enjoy high-definition digital images and high-quality sound by connecting the TV and the equipment. HDMI-compatible equipment(∗1) with an HDMI or DVI output terminal, such as a DVD player, a set top box or a game equipment, can be connected to the HDMI terminal using an HDMI compliant (fully wired) cable.
Technical Information USB connection ●It is recommended to connect the USB HDD or USB Flash Memory directly to the TV’s USB ports. ●Some USB devices or USB HUB may not be used with this TV. ●You cannot connect any devices by using USB card reader. ■The combination of USB devices that have been tested for each TV’s USB port.
FAQs Before requesting service or assistance, please follow these simple guides to resolve the problem. If the problem still persists, please contact your local Panasonic dealer or Panasonic Customer Care Centre for assistance. For details p. 108 Block noise, frozen or disappearing image occurs in digital mode / White spots or shadow image (ghosting) occurs in analogue mode / Some channels cannot be tuned freesat Auto Setup cannot be done completely ●Check connections and dish alignment.
FAQs Problem Chaotic image, noisy No image can be displayed Actions ●Set “P-NR” in the Picture Menu (to remove noise). (p. 32) ●Check nearby electrical products (fluorescent lamp, DECT phones, mobile phones, microwave, etc.). ●Is “Contrast”, “Brightness” or “Colour” in the Picture Menu set to the minimum? (p. 32) ●Please also refer to “Neither image nor sound is produced” (p. 99).
Problem Actions ●Set the sound setting of the connected equipment to Sound is unusual “2ch L.PCM”. HDMI ●Check the “HDMI1 / 2 / 3 / 4 Input” setting in the Sound Menu. (p. 33) ●If digital sound connection has a problem, select analogue sound connection. (p. 97) Pictures from external equipment are unusual when the equipment is connected via HDMI ●Check the HDMI cable is connected properly. (p. 92) ●Turn the TV and equipment Off, then turn them On again. ●Check an input signal from the equipment. (p.
On screen messages Message Meaning / Action All contents will be lost. Are you sure to delete this device? ●Once you unregister the USB HDD, all the recorded programme will be All tuning data will be erased ●“Shipping Condition” will erase all tuning data (p. 51). ●Confirm correct operation. Are you sure ? Are you sure you want to delete this timer ? Press OK to delete timer. Press RETURN to return. erased. ●Confirm correct operation. ●The signal is weak. Check the aerial is plugged in properly.
Message Meaning / Action PIN incorrect! ●The PIN number you entered is wrong. Please check settings and connections on HDMI devices. ●Communication error in VIERA Link function (p. 87). Please enter a frequency between 10700 and 12750 MHz. ●The frequency you entered is out of range. Consult the received satelite Please wait. ●A function is in progress. ●The recorder is recording the programme from its own tuner. You can turn Recording this channel now broadcasting company. (p. 48).
Maintenance First, remove the mains plug from the socket outlet. Display panel, Cabinet, Stand Regular care: Gently wipe the surface of the display panel, cabinet, or stand by using a soft cloth to clean the dirt or fingerprints. For stubborn dirt: Dampen a soft cloth with clean water or diluted neutral detergent (1 part detergent to 100 parts water). Then wring the cloth and wipe the surface. Finally, wipe away all the moisture. Caution ●Do not use a hard cloth or rub the surface too hard.
Licence Even if no special notation has been made of company or product trademarks, these trademarks have been fully respected. ●“freesat” is a registered trademark and the “freesat” logo is a trademark of Freesat (UK) Ltd. ●DVB and the DVB logos are trademarks of the DVB Project. ●VGA is a trademark of International Business Machines Corporation. ●Macintosh is a registered trademark of Apple Inc., USA. ●S-VGA is a registered trademark of the Video Electronics Standard Association.
Index A Accessories ······································································· 6 B C D E F G H I L M 106 Advanced Picture Settings ·············································· 60 Analogue Tuning Menu ············································· 41, 46 Aspect ······································································· 18, 94 Astra 1 ············································································· 49 Astra 2 ····················································
Specifications Power Source Rated Power Consumption Standby Power Consumption Display panel Aspect Ratio Visible screen size Sound Number of pixels Speaker Audio Output Headphones PC signals TX-L32D28BP TX-L32D28BS TX-L37D28BS TX-L32D28BW AC 220-240 V, 50 / 60 Hz 136 W 147 W 0.30 W 36.00 W (With monitor out recording) 16:9 80 cm (diagonal) 94 cm (diagonal) 698 mm (W) × 392 mm (H) 819 mm (W) × 460 mm (H) 2,073,600 (1,920 (W) × 1,080 (H)) 140 mm × 35 mm × 2 pcs, 8 Ω 20 W (10 W + 10 W), 10% THD M3 (3.
Information for Users on Collection and Disposal of Old Equipment and used Batteries These symbols on the products, packaging, and/or accompanying documents mean that used electrical and electronic products and batteries should not be mixed with general household waste. For proper treatment, recovery and recycling of old products and used batteries, please take them to applicable collection points, in accordance with your national legislation and the Directives 2002/96/EC and 2006/66/EC.