Model No. TX-L32U3B TX-L37U3B TX-L42U3B Operating Instructions LCD Television Thank you for purchasing this Panasonic product. Please read these instructions carefully before operating this product and retain them for future reference. The images shown in this manual are for illustrative purposes only.
Features DVB-T tuner built-in Receives DVB (Digital Video Broadcasting) digital terrestrial broadcasts. DVB-T2 tuner built-in DVB-T2 is an advanced digital terrestrial system for more efficient transmission. Available DVB-T2 broadcasts will be tuned automatically when you perform DVB Auto Setup. GUIDE Plus+ (p. 18) This TV supports the TV Guide services sent from the GUIDE Plus+ system. Sharp pictures and clear sound with HDMI connection (p.
This product is licensed under the AVC patent portfolio license for the personal and non-commercial use of a consumer to (i) encode video in compliance with the AVC Standard (“AVC Video”) and/or (ii) decode AVC Video that was encoded by a consumer engaged in a personal and non-commercial activity and/or was obtained from a video provider licensed to provide AVC Video. No license is granted or shall be implied for any other use. Additional information may be obtained from MPEG LA, LLC. See http://www.mpegla.
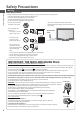
Safety Precautions Warning Safety Precautions Mains plug and lead To help avoid risk of electrical shock, fire, damage or injury, please follow the warnings below: This TV is designed to operate on AC 220-240 V, 50 Hz. Insert the mains plug fully into the socket outlet. Ensure that the mains plug is easily accessible. Remove the mains plug when cleaning the TV. Do not touch the mains If you detect anything unusual, immediately plug with a wet hand.
Warning Take care To help avoid risk of electrical shock, fire, damage or injury, please follow the warnings below: Do not remove covers and never modify the TV yourself as live parts are accessible when they are removed. There are no user serviceable parts inside. Safety Precautions t o not expose the TV to rain or excessive moisture. This TV must not be t Dexposed to dripping or splashing water and objects filled with liquid, such as vases, must not be placed on top of or above the TV.
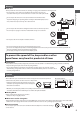
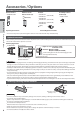
Accessories / Options Standard accessories Remote Control N2QAYB000487 Batteries for the Remote Control (2) R6 (see below) t TV abc Pedestal TBL5ZA0050 (TX-L32U3B) TBL5ZA0051 Quick Start Guide t t t TTBL5ZA0048 t BL5ZA0049 (TX-L37U3B) t TTBL5ZA0045 t BL5ZA0046 (TX-L42U3B) t AV def ghi jkl mno pqrs tuv wxyz TV Assembly screw for Pedestal (4) XYN4+F12FJK t M4 × 12 (p.
Attaching the pedestal To help avoid risk of damage or injury by the TV tipping or falling, please follow the warnings and cautions below: Warning t Do not disassemble or modify the pedestal. Caution Assembling the pedestal Use the assembly screws A to fasten the bracket C to the base D securely. Make sure that the screws are securely tightened. Forcing the assembly screws the wrong way will strip the threads.
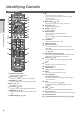
Identifying Controls Remote Control 8 OK Quick Start Guide 1 2 3 4 5 6 7 15 16 17 18 19 8 20 21 9 Identifying Controls 22 10 11 23 24 onfirms selections and choices t CPress selecting channel positions to quickly t changeafterchannel t Displays the Channel List 9 [Option Menu] (p. 16) t Easy optional setting for viewing, sound, etc. 10 Teletext (p. 21) t Switches to teletext mode 11 Subtitles (p.
TV 4 5 1 6 5 Channel Up / Down, Value change (when using the F button), Switching the TV On (press either button for about 1 second when in Standby mode) 6 Changes the input mode 7 Mains power On / Off switch switch the mains power. t UIf seyoutoturned the TV Off during Standby mode by the 2 8 Remote control signal receiver 8 9 9 C.A.T.S. (Contrast Automatic Tracking System) sensor Senses brightness to adjust picture quality when [Eco Mode] in the Picture Menu is set to [On] (p.
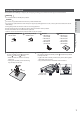
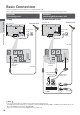
Basic Connection External equipment and cables shown are not supplied with this TV. Please ensure that the unit is disconnected from the mains socket before attaching or disconnecting any leads.
Example 3 Connecting DVD Recorder / VCR and Satellite Receiver TV, DVD Recorder / VCR and Satellite Terrestrial aerial Rear of the TV Quick Start Guide AC 220-240 V 50 Hz Mains lead Basic Connection V Y L PB R PR AV2 DIGITAL AUDIO OUT AV1 Fully wired HDMI compliant cable AUDIO COMPONENT IN Aerial input terminal Fully wired SCART cable Fully wired HDMI compliant cable RF cable Fully wired SCART cable HDMI Recorder/AV AV 2 AV 1 HDMI RF OUT DVD Recorder or VCR Satellite Receiver RF OU
Auto Setup Search and store TV channels automatically. These steps are not necessary if the setup has been completed by your local dealer. Please complete connections (p. 10, 11) and settings (if necessary) of the connected equipment before starting Auto Setup. For details of settings for the connected equipment, read the appropriate manual. t t Quick Start Guide 1 Plug the TV into mains socket and switch On 2 Select your country a few seconds to be displayed.
3 How to input Owner ID 1 Enter the PIN number (4 digits) Owner ID abc Please enter new PIN PIN * * * * def ghi jkl mno pqrs tuv wxyz t Enter the PIN number twice at first setting.
Watching TV SD CARD INPUT TV AV MENU ASPECT 1 Turn power on 2 Select DVB or Analogue t 1.SFTT GPS BCPVU TFDPOE t BJOT QPXFS 0O 0GG TXJUDI TIPVME CF 0O Q N DIRECT TV REC EXIT MTP QPTTJCMF UP TFMFDU UIF NPEF QSFTTJOH UIF 57 t "CVUUPO PO UIF TJEF QBOFM PG UIF 57 Q ̓ TV OPTION RETURN *OGPSNBUJPO CBOOFS (p.
Other useful functions Display Information banner Display Information banner "MTP BQQFBST XIFO DIBOHJOH B DIBOOFM t 1 7 1 BBC ONE WALES 5 6 1 2 3 4 2 8 3 4 &YBNQMF %7# Radio Coronation Street 19:30 - 20:00 Mute Encrypted Now AD $IBOOFM QPTJUJPO BOE OBNF All DVB Channels Select favourites For info press TEXT Multi Audio 45 19:50 Also in STTL 5 1SPHSBNNF 6 1SPHSBNNF 4UBSU̓ ̓'JOJTI UJNF %7# $IBOOFM UZQF <3BEJP> <%BUB> <)%57> FUD $IBOOFM OVNCFS FUD "OBMPHVF $VSSFOU UJNF <"MM %7# $I
Hold Freeze / unfreeze picture HOLD Display the selectable settings for the current status Check or change the current status instantly 5P DIBOHF OPTION t TFMFDU DIBOHF [Subtitle Language] [Audio Description] %7# NPEF %7# NPEF "MMPXT ZPV UP TFMFDU UIF MBOHVBHF JO XIJDI TVCUJUMFT TIPVME 4FU UP <"VUP> JG UIF QSPHSBNNF IBT "VEJP %FTDSJQUJPO TFSWJDF BQQFBS JG BWBJMBCMF UIFO ZPV XJMM IFBS BO BEEJUJPOBM BVEJP USBDL UP EFTDSJCF 5IJT TFUUJOH JT OPU NFNPSJ[FE BOE JU XJMM SFUVSO UP UIF FWFOUT PO TDSFFO
Aspect Change the aspect ratio (image size) &OKPZ WJFXJOH UIF JNBHF BU JUT PQUJNVN TJ[F BOE BTQFDU ASPECT 1SPHSBNNFT VTVBMMZ DPOUBJO BO i"TQFDU $POUSPM 4JHOBMw 8JEFTDSFFO TJHOBM FUD BOE UIF 57 XJMM DIPPTF UIF BTQFDU SBUJP BVUPNBUJDBMMZ BDDPSEJOH UP UIF i"TQFDU $POUSPM 4JHOBMw Q ̓ If you would like to change the aspect ratio manually 1 Display Aspect Selection list 2 While the list is displayed, select the mode ASPECT Aspect Selection "VUP ;PPN ;PPN ;PPN 4FMFDU &9*5 $IBOHF P
Using TV Guide 57 (VJEF¦&MFDUSPOJD 1SPHSBNNF (VJEF &1( QSPWJEFT BO PO TDSFFO MJTUJOH PG UIF QSPHSBNNFT DVSSFOUMZ CSPBEDBTU BOE UIF GPSUIDPNJOH CSPBEDBTUT PWFS UIF OFYU TFWFO EBZT EFQFOEJOH PO UIF CSPBEDBTUFST 5IJT 57 TVQQPSUT UIF (6*%& 1MVT TZTUFN 5IF 3PWJ CSBOEJOH QBSUOFS XJMM TVQQMZ UIF SBUJOH JOGPSNBUJPO JO UIF QSPHSBNNF JOGPSNBUJPO BOE UIF SFDPNNFOEFE HSPVQ JO UIF 4FBSDI MJTU %7# BOE "OBMPHVF DIBOOFMT BSF EJTQMBZFE PO UIF TBNF 57 (VJEF TDSFFO <%> NFBOT %7# DIBOOFM BOE <"> NFBOT "OBMPHVF
To search programme types and view a channel list of the searched programmes %7# NPEF ZFMMPX 4FBSDI MJTU 5ZQF MJTU TFMFDU UZQF Prog.Type All Types Search Search Titles... All Types Movie News and Fac tual Movie News . . . WJFX . . . To search programme titles and view a list of the searched programmes %7# NPEF ZFMMPX 4FBSDI MJTU Search 1 Select 2 Set characters [Search Titles...
Note IJT GVODUJPO JT OPU BWBJMBCMF JO "OBMPHVF NPEF t 55JNFS 1SPHSBNNJOH SFNJOEFS NFTTBHFT XJMM SFNBJO EJTQMBZFE VOUJM POF PG UIF GPMMPXJOH PDDVST t t :PV QSFTT UIF 0, CVUUPO UP WJFX UIF QSPHSBNNF PS UIF &9*5 CVUUPO UP DBODFM UIF SFNJOEFS t 5IF UJNFS QSPHSBNNJOH FWFOU UIBU UIF SFNJOEFS JT TFU GPS FOET t /8P PUIFS DIBOOFM DBO CF TFMFDUFE XIJMF UIF SFDPSEJOH PG 5JNFS 1SPHSBNNJOH JT JO QSPHSFTT t IFO SFDPSEJOH QSPHSBNNFT CF TVSF UP NBLF UIF QSPQFS TFUUJOHT PO UIF SFDPSEFS DPOOFDUFE UP UIF 57 (p.
Viewing Teletext :PV DBO FOKPZ OFXT XFBUIFS GPSFDBTUT BOE TVCUJUMFT FUD EFQFOEJOH PO UIF CSPBEDBTUFS 5IF BWBJMBCJMJUZ PG UFMFUFYU TFSWJDFT GPS B QSPHSBNNF JT JOEJDBUFE CZ <5&95> JO UIF JOGPSNBUJPO CBOOFS t *OGPSNBUJPO CBOOFS (p. 15) 1 BBC ONE Wales 19:50 Coronation Street 19:30 - 20:00 Now All DVB Channels Select favourites For info press %JTQMBZFE JG QSPHSBNNF IBT UFMFUFYU TFSWJDF TEXT %FQFOEJOH PO UIF CSPBEDBTUFS UIF EJHJUBM UFMFUFYU .
Analogue teletext "OBMPHVF UFMFUFYU TFSWJDFT BSF UIF UFYU JOGPSNBUJPO QSPWJEFE CZ UIF CSPBEDBTUFST 5IF GFBUVSFT NBZ WBSZ EFQFOEJOH PO UIF CSPBEDBTUFST What is FASTEXT (FLOF) mode? *O '"45&95 NPEF GPVS EJGGFSFOUMZ DPMPVSFE TVCKFDUT BSF TJUVBUFE BU UIF CPUUPN PG UIF TDSFFO 5P BDDFTT NPSF JOGPSNBUJPO BCPVU POF PG UIFTF TVCKFDUT QSFTT UIF BQQSPQSJBUFMZ DPMPVSFE CVUUPO 5IJT GBDJMJUZ FOBCMFT GBTU BDDFTT UP JOGPSNBUJPO PO UIF TVCKFDUT TIPXO What is List mode? *O -JTU NPEF GPVS EJGGFSFOUMZ DPMPVSFE QBHF O
INDEX Subtitles Return to the main index page View a favourite page stored INDEX STTL BDUPSZ TFUUJOH JT i1 w t 'TVCUJUMF TFSWJDF PO UIF CMVF CVUUPO -JTU NPEF View in multi window Watch TV and Teletext in two windows at once TEXT QFSBUJPOT DBO CF NBEF POMZ JO 5FMFUFYU TDSFFO t 0&BDI UJNF QSFTTFE 5FMFUFYU 57 BOE 5FMFUFYU t 57 Store frequently viewed pages Store frequently viewed pages in the colour bar -JTU NPEF POMZ "T QBHF JT EJTQMBZFE G ZPV
Watching External Inputs Connect the external equipment (VCRs, DVD equipment, etc.) and you can watch through the AV input. To connect the equipment (p. 10, 11, 66, 67) The Remote Control is capable of operating some functions of selected external equipment. “Operating the equipment with the TV remote control” (p. 25) t SD CARD INPUT TV AV MENU ASPECT 1 Turn the TV on N DIRECT TV REC When connecting with SCART as example 2 or 3 (p.
Operating the equipment with the TV remote control The Panasonic equipment connected to the TV can be directly operated with the below buttons of this TV remote control.
How to Use VIERA TOOLS You can access some special features easily by using the VIERA TOOLS function. or [VIERA Link Control] and [Pause Live TV] functions to operate correctly, ensure the connections and settings are t Fcompleted. “Summary of Q-Link and VIERA Link features” (p. 58, 59), “Preparations” (p. 61) After connection, turn the equipment on and then switch the TV on.
How to Use Menu Functions Various menus allow you to make settings for the picture, sound, and other functions.
Menu list Menu Item Adjustments / Configurations (alternatives) Basic picture mode [Dynamic] / [Normal] / [Cinema] / [True Cinema] / [Game] In each Viewing Mode, [Contrast], [Brightness], [Colour], [Sharpness], [Tint], [Colour Balance], [Vivid Colour], [C.A.T.S.], [P-NR] and [3D-COMB] can be adjusted and stored to suit your particular viewing requirement. Set for each input signal. [Dynamic] : Provides enhanced picture contrast and sharpness when viewing in a bright room.
Menu Adjustments / Configurations (alternatives) Item Selects the basic sound mode [Music] / [Speech] / [User] The selected mode affects all input signals. [Music] : Improves sound quality for watching music videos, etc. [Speech] : Improves sound quality for watching news, drama, etc. In Music and Speech modes, you can adjust [Bass] and [Treble] settings, and those settings will be stored for each mode. [User] : Adjusts the sounds manually by using the equaliser to suit your favourite sound quality.
Menu Item Audio Description Audio Description Menu Sound t t Volume Adjusts the volume for Audio Description DVB mode only Speakers Set to [On] to activate the description sound track from TV speakers [Off] / [On] DVB mode only Headphones Set to [On] to activate the description sound track from headphones [Off] / [On] DVB mode only t t t Reset to Defaults Press the OK button to reset the present Sound Mode, [Balance], [Headphone Volume] and [Surround] to the default settings Timer Program
Menu Item Child Lock Adjustments / Configurations (alternatives) Locks a channel / AV input to prevent access to it (p. 43) DVB Tuning Menu Creates a list of favourite DVB channels (p. 38) Channel List Skips the unwanted DVB channels or edits DVB channels (p. 39) Auto Setup Automatically sets the DVB channels received in the area (p. 36) Channel Sorting by Region Automatically sorts tuned channels according to the available region (p. 37) Manual Tuning Sets the DVB channels manually (p.
Menu Item Network Setup Adjustments / Configurations (alternatives) Sets the network setting to use in your network environment (p. 45) System Menu Setup Shipping Condition Resets all settings, for example, when moving house (p. 47) Owner ID Inputs the owner ID (p. 48) Common Interface Uses include to watch encrypted channels (p. 49) System Update Downloads new software to this TV (p.
Overview (Picture, Sound) How to operate (p. 27) Main Menu Picture Sound Setup Picture Menu Viewing Mode Contrast Brightness Colour Sharpness Tint Colour Balance Vivid Colour C.A.T.S. 1/2 Dynamic Available in NTSC Warm Off Off Picture Menu P-NR 3D-COMB Screen Display Advanced Settings Reset to Defaults Not available when [Viewing Mode] is set to [True Cinema] 2/2 Off Off On Access Reset Not available in PC Available in NTSC / PAL Advanced Settings (p.
Overview (Setup) How to operate (p. 27) Main Menu Picture Sound Timer Programming Ext Rec. D 72 BBC 2W Reminder D 14 E4 The Bill Ext Rec. Ext Rec. --- Setup Menu Wed 27.10.2010 10:46 No. Channel Nam e Func tion Setup D D Date Star t End Wed 27 Oct 20:00 21:30 (90 min.) Wed 27 Oct 21:00 22:00 (60 m in.) Wed 27 Oct 22:45 23:00 (15 m in.) Thu 28 Oct 10:30 11:30 (60 min.) --/-- --:---:-(--- min.
TV Guide Settings Menu TV Guide View GUIDE Plus+ Postcode GUIDE Plus+ Information Normal Access Access Link Settings (p. 30) Enter Postcode Postcode A B C D E U V W X Y F G H Z 0 I 1 J 2 K 3 L M N O P Q R 4 5 6 7 8 9 1 .!:# 4 S 2 abc 5 T (p. 30) 3 6 jkl mno 7 8 9 tuv On TV On On (No reminder) Access def ghi pqrs 1/2 VIERA Link AV1 out Standby Power Save Intelligent Auto Standby Q-Link Download Sending Preset Data Please wait! 0% wxyz 0 (p.
Retuning from Setup Menu Automatically retune the channels received in the area. This function is available if channel tuning is already performed. Only the selected mode is retuned. All the previous tuning settings are erased. If Child Lock PIN number (p. 43) has been set, the PIN number is required. If tuning has not been done completely [Manual Tuning] (p.
Tuning and Editing Channels (DVB) You can retune channels or make your favourite channel lists, skip unwanted channels, etc.
List favourite DVB channels [Favourites Edit] Create your favourite channel lists from various broadcasters (up to 4: [Favourites]1 to 4). The DVB Favourites lists are available for switching in the Information banner (p. 15) and from [Category] in the TV Guide screen (p. 18).
Skip unwanted DVB channels, Edit DVB Channels [Channel List] You can hide unwanted DVB channels. The hidden channels cannot be displayed except in this function. Use this function to skip unwanted channels.
Skip unwanted Analogue channels, Edit Analogue channels [Channel List] You can hide unwanted Analogue channels. The hidden channels cannot be displayed except in this function. Use this function to skip unwanted channels. Select a channel and [reveal] / [hide] Analogue Channel List 1 2 3 4 5 6 7 t To reveal all channels select BBC1 ***** ***** ***** ***** ***** ***** (yellow) [reveal] / [hide] : [reveal] : [hide] (skip) To edit channels You can also edit each channel in Channel List.
Timer Programming Timer Programming from Menu The Timer Programming menu allows you to choose programmes that you wish to remind watching or record to the external recorder. At the correct time, the TV will tune to the correct channel automatically to record even if the TV is in Standby mode. TV Guide may also be used to set timer programming event (p. 19). Timer Programming can store up to 15 events. For recording using Timer Programming, the TV must be either On or in standby.
Set timer programming event details [Timer Programming] 1 Start making the settings 2 Select the function ([Ext Rec.] or [Reminder]) select [Ext Rec.] : to record the programme to the external recorder When the start time comes, the channel will be switched automatically and the video and audio signals will be output. 2 minutes before the starting time, a reminder message appears if you are watching TV.
Child Lock You can lock specific channels / AV input terminals and control who watches them. When the locked channel / input is selected, a message appears; by entering the PIN number, you can watch it.
Input Labels For easier identification and selection of the input mode, you can label each input mode or skip terminals that are not connected to any equipment. To select the input mode (p.
Setup for Internet Connection The ETHERNET terminal is for TV’s software update. You can download a newer version of software through the internet, if it is available. (p. 46) To update the TV’s software without internet connection “Updating the TV Software” (p. 50) t Network connections Connect the TV and the Broadband network equipment (modem, hub or router) by using a LAN cable. If you do not have a Broadband network services, please consult your retailer for assistance.
Connect to the network [Network Setup] 1 Select [IP/DNS Settings] and set the items select Network Setup Connection Test IP/DNS Settings Software Update MAC Address Access access ab-cd-ef-gh-ij-kl To set [Acquire IP Address] / [Acquire DNS Address] Select [Acquire IP Address] / [Acquire DNS Address] and set to [Auto] select IP/DNS Settings Acquire IP Address IP Address Subnet Mask Gateway Acquire DNS Address DNS Address Proxy Settings Auto . . . Auto . . . . . . . . .
Shipping Condition Resets the TV to its original condition with no channels tuned in. All settings other than [Owner ID] are reset (channels, picture, sound settings, etc.). To retune TV channels only, e.g. after moving house “Retuning from Setup Menu” (p.
Owner ID Entry of the PIN number and personal information (your name, address and postcode). In the unfortunate event of theft, the Owner ID will help the Police to determine the owner.
Using Common Interface The Common Interface Module menu provides access to software contained on Common Interface (CI) Modules. This TV works only for Pay TV modules complying with CI standard. This function is not available for BskyB’s Sky channels. Video and audio signals may not be output depending on broadcasts or services.
Updating the TV Software From time to time, a new version of software may become available for download to enhance the performance or operations of the TV. In DVB mode, a notification banner will appear when one of the BBC channels is turned to if a new available software is found. t To download f you choose not to download t IEXIT You can update any new software automatically or manually.
Using Media Player Media Player allows you to enjoy photo, video or music recorded on an SD Card. VIERA IMAGE VIEWER is the function of the easy viewing for photos or videos recorded on an SD Card on the TV screen by simply inserting into the SD Card slot. Photo mode : Still pictures recorded by digital cameras will be displayed. Video mode : Moving pictures recorded by digital video cameras will be played back. Music mode : Digital music data will be played back.
Photo mode Photo mode will read all “.jpg” extension files in the SD Card. The thumbnail of all the photos in the SD Card will be displayed. Example : Thumbnail - [All photos] INPUT TV AV SD CARD MENU ASPECT N DIRECT TV REC All photos Media Player Photo View Select Slideshow EXIT RETURN View Select EXIT OPTION RETURN TEXT STTL INDEX HOLD or SD Card Info Option Menu Contents Select : Error display the back ground music “Photo Settings” (p.
[Single view] - Photos are displayed one at a time.
Menu Item Transition Effect Adjustments / Configurations (alternatives) Selects the transition effect for switching the photo during the slideshow [Off] / [Fade] / [Slide] / [Dissolve] / [Motion] / [Random] [Fade] : The next photo fades in gradually. [Slide] : The next photo slides and appears from the left side. [Dissolve] : Each photo is dissolved when switching to the next photo. [Motion] : Each photo is displayed with an effect of enlarging, reducing, moving up or moving down.
Video mode Supported file formats SD CARD (p. 69) The thumbnail of video titles in the SD Card will be displayed. Example : Thumbnail - [Title view] Title view The preview will start when the title is Media Player Video highlighted if it supports a preview. To turn off the preview Trip1 Trip2 Trip3 Trip4 Trip5 Room Nature1 “Video Setup” (p.
Video Setup Setup the settings for Video mode. 1 Display the option menu 2 Select [Video Setup] 3 Select the items and set in the thumbnail view OPTION Video Setup Menu Option Menu Video Preview Repeat Video Setup On Off select set access Menu Item Adjustments / Configurations (alternatives) Video Setup Video Preview Sets to start the preview of the title or scene in the thumbnail view [Off] / [On] Image may not be displayed for an instant in the thumbnail view.
Music mode Supported file formats SD CARD MENU ASPECT (p. 69) The thumbnail of music folders in the SD Card will be displayed.
Link Functions (Q-Link / VIERA Link) Q-Link connects the TV and DVD Recorder / VCR, and enables easy recording, playback, etc. (p. 60) VIERA Link (HDAVI Control™) connects the TV and the equipment with VIERA Link function, and enables easy control, convenient recording, playback, energy saving, creation of a home theatre, etc., without complicated setting. (p. 61 - 65) You can use Q-Link and VIERA Link functions together. This TV supports “HDAVI Control 5” function.
VIERA Link (HDMI and Audio out connections) Connected equipment Features Analogue channel download Easy playback Power on link Power off link Reduce unnecessary power consumption in standby Auto standby for unnecessary equipment Pause Live TV programme Direct TV Recording Control the menu of the connected equipment by VIERA remote control Speaker control Player theatre with VIERA Link function Blu-ray Disc theatre with VIERA Link function Amplifier with VIERA Link function – – – – – 5 5 – – 3 3
Q-Link Preparations onnect the DVD Recorder / VCR with the following logos: t C“Q-Link”, “NEXTVIEWLINK”, “DATA LOGIC (a trademark of Metz Corporation)”, “Easy Link (a trademark of Philips Corporation)”, “Megalogic (a trademark of Grundig Corporation)” or “SMARTLINK (a trademark of Sony Corporation)” (p. 58) t QUse-Linkfullyconnection SCART cable. t Set up thewired DVD Recorder / VCR. Read the manual of the recorder. t Q-Link terminal setup in the Setup Menu [AV1 out] (p.
VIERA Link “ Control™” Enjoy additional HDMI Inter-Operability with Panasonic products which have “HDAVI Control” function. This TV supports “HDAVI Control 5” function. Connections to the equipment (DIGA Recorder, HD Video Camera, Player theatre, Amplifier, etc.) with HDMI and SCART cables allow you to interface them automatically (p. 58, 59). These features are limited to models incorporating “HDAVI Control” and “VIERA Link”.
Reduce unnecessary power consumption in standby [Standby Power Save] Set Standby Power Save [On] in the Setup Menu to use this function [Standby Power Save] (p. 30) The power consumption in Standby mode of the connected equipment is controlled in synchronization with the TV On / Off state. When the TV is set to Standby mode, the connected equipment is automatically set to Standby and the power consumption in Standby mode of the connected equipment is automatically minimised.
Pause Live TV programme [Pause Live TV] You can pause the live TV programme and resume the programme later. The live TV programme will be recorded on HDD of the connected DIGA Recorder. This function is available with a DIGA Recorder which has HDD. If you connect a variety of recorders including other manufacturers’ recorders at the same time, please connect the DIGA Recorder which has HDD to the TV’s lower HDMI terminal number.
3 Select the equipment you want to access The type of the connected equipment is displayed. Select the type of the equipment and access. VIERA Link Menu Pause Live TV Direct TV Rec VIERA Link Control Speaker Selection select access Start Start Recorder Home Cinema [Recorder] / [Player] / [Home Cinema] / [Video Camera] / [LUMIX] / [Digital Camera] / [Other] can also access directly by using VIERA TOOLS “How to Use VIERA TOOLS” (p. 26) t You he displayed item may vary depending on the connected equipment.
Speaker control [Speaker Selection] You can control the home theatre speakers with this TV remote control (point the remote control at the TV’s signal receiver). If you cannot operate, check the settings and the equipment “Summary of Q-Link and VIERA Link features” (p. 58, 59), “Preparations” (p.
External Equipment These diagrams show our recommendations for connection of your TV to various pieces of equipment. For other connections, consult the instructions for each piece of equipment, the table below, and the specifications (p. 79).
To watch DVDs (Listening) V DVD Player Y (Viewing) AV2 L PB R PR AV1 HDMI equipment DIGITAL AUDIO OUT AUDIO COMPONENT IN t HDMI connection (p.
Technical Information Auto Aspect The optimum size and aspect can be chosen automatically, and you can enjoy finer images. (p. 17) Aspect Control Signal [WIDE] will appear in the top left of the screen if a Widescreen signal (WSS) or a Control signal through SCART / HDMI terminal is found. The aspect will switch to the appropriate 16:9 or 14:9 widescreen ratio. This function will work in any aspect mode.
Media Player SD Card Card format : SDXC Card - exFAT SDHC Card / SD Card - FAT16 or FAT32 Compliant card type (maximum capacity) : SDXC Card (64 GB), SDHC Card (32 GB), SD Card (2 GB), miniSD Card (2 GB) (requiring miniSD adaptor) If miniSD Card is used, insert / remove it together with the adaptor. 2.1 mm Check the latest information on the card type at the following website. http://panasonic.jp/support/global/cs/tv/ If the SD Card does not meet SD standards, it may cause the TV to malfunction.
Characters table for numeric buttons You can enter characters by using numeric buttons for free input items. Press the numeric button repeatedly until you reach the desired User input Name character. abc A U a u B V b v C W c w D X d x E Y e y F G H I Z 0 1 f g h i z ( ) + J K L M N O P Q R S T 2 3 4 5 6 7 8 9 ! : # j k l m n o p q r s t - . * _ 1 2 .
Input signal that can be displayed COMPONENT (Y, PB, PR), HDMI Signal name 525 (480) / 60i, 60p 625 (576) / 50i, 50p 750 (720) / 60p, 50p 1,125 (1,080) / 60i, 50i 1,125 (1,080) / 60p, 50p, 24p COMPONENT HDMI Mark : Applicable input signal PC (from HDMI terminal) Signal name 640 × 480 @60 Hz 750 (720) / 60p 1,125 (1,080) / 60p Horizontal frequency (kHz) 31.47 45.00 67.50 Vertical frequency (Hz) 60.00 60.00 60.00 Applicable input signal for PC is basically compatible to HDMI standard timing.
FAQs Before requesting service or assistance, please follow these simple guides to resolve the problem. If the problem still persists, please contact your local Panasonic dealer or Panasonic Customer Care Centre for assistance. For details (p. 80) Block noise, frozen or disappearing image occurs in digital mode / White spots or shadow image (ghosting) occurs in Analogue mode / Some channels cannot be tuned Check the position, direction and connection of the aerial. Check [Signal Condition] (p. 38).
Problem Chaotic image, noisy Screen No image can be displayed Blurry or distorted image (no sound or low volume) Unusual image is displayed No sound is produced Sound Sound level is low or sound is distorted Unusual sound from the TV Digital Channel No programmes shown on TV Guide Cannot find a channel you have previously watched Sound is unusual HDMI Pictures from external equipment are unusual when the equipment is connected via HDMI Network Cannot connect to the network Other The TV goes into
Problem Actions Other Parts of the TV become hot emperature rises of parts of the front, top and rear panels will not pose any problems in t Tterms of performance or quality of the TV. The LCD panel moves slightly when it is pushed with a finger Clattered sound might be heard is some flexibility around the panel to prevent damage to the panel. t TThere he panel might move slightly when it is pushed with a finger, and clattered sound t might be heard. This is not a malfunction.
Message New channels found! Press OK to update channel list. Press EXIT to ignore. No channel found. Please check aerial or local signal availability. Press OK to start Auto Setup. No module inserted No recording Already recording No recording Check media No recording - Playing No recording - Unknown reason No service No signal PIN incorrect! Please check settings and connections on HDMI devices. Please wait. Recording this channel now Reset to Factory Shipping Condition Completed. Please switch off TV.
Media Player Message Cannot read file No SD card inserted No valid file to play This operation is not possible Meaning / Action is damaged or unreadable. t TThehe TVfiledoes not support the format. t (For the applicable formats and data p. 69) t Confirm the SD Card is inserted correctly. t The card has no data. t The selected operation is not available. Network Message Ethernet cable not connected Meaning / Action t t Check the connection of the LAN cable.
Maintenance First, remove the mains plug from the socket outlet. Display panel, Cabinet, Pedestal Regular care: Gently wipe the surface of the display panel, cabinet, or pedestal by using a soft cloth to clean the dirt or fingerprints. For stubborn dirt: Dampen a soft cloth with clean water or diluted neutral detergent (1 part detergent to 100 parts water). Then wring the cloth and wipe the surface. Finally, wipe away all the moisture. Caution o not use a hard cloth or rub the surface too hard.
Index Index 78 A Accessories························································································· 6 Advanced Settings ········································································28 Analogue Tuning Menu·················································36, 39, 40 Aspect ································································································17 Audio Description ··································································15, 30 Auto Gain Control··
Specifications TX-L32U3B TX-L37U3B TX-L42U3B Power Source AC 220-240 V, 50 Hz Rated Power Consumption 94 W 137 W 188 W 0.3 W 11.5 W (With monitor out recording) 779 mm × 531 mm × 207 mm (With Pedestal) 779 mm × 497 mm × 84 mm (TV only) 9.5 kg Net (With Pedestal) 8.5 kg Net (TV only) 0.3 W 11.5 W (With monitor out recording) 896 mm × 598 mm × 266 mm (With Pedestal) 896 mm × 564 mm × 88 mm (TV only) 13.5 kg Net (With Pedestal) 12.0 kg Net (TV only) 0.
Information for Users on Collection and Disposal of Old Equipment and used Batteries These symbols on the products, packaging, and/or accompanying documents mean that used electrical and electronic products and batteries should not be mixed with general household waste. For proper treatment, recovery and recycling of old products and used batteries, please take them to applicable collection points, in accordance with your national legislation and the Directives 2002/96/EC and 2006/66/EC.