Operating Instructions LCD Television Model No.
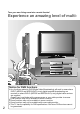
Turn your own living room into a movie theatre! Experience an amazing level of multi- Notice for DVB functions Any functions related to DVB (Digital Video Broadcasting) will work in areas where 2 DVB-T (MPEG2 and MPEG4-AVC(H.264)) digital terrestrial broadcasting are received or where DVB-C (MPEG2 and MPEG4-AVC(H.264)) digital cable services are supplied. Consult your local dealer with coverage areas or your cable provider to access. DVB functions may not be available in some countries.
media excitement Enjoy rich multi-media SD Card Camcorder Personal computer DVD Recorder Amplifier with Speaker system VCR Set top box DVD player Up to 60,000 hours LCD Panel Lifetime The LCD display panel used in the 2009 VIERA TV range is rated for up to 60,000 hours. This measurement is based on the time taken for the brightness of the panel to reduce to half of it’s maximum level.
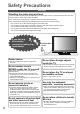
Safety Precautions Warning Handling the mains plug and lead Insert the mains plug fully into the socket outlet. (If the mains plug is loose, it could generate heat and cause fire.) Ensure that the mains plug is easily accessible. Do not touch the mains plug with a wet hand. (This may cause electrical shock.) Do not damage the mains lead. (A damaged lead may cause fire or electrical shock.) Do not move the TV with the lead plugged in the socket outlet.
Notes Do not block the rear air vents Caution When cleaning the TV, remove the mains plug Blocked ventilation by newspapers, table cloths, curtains, etc. may cause overheating, fire or electrical shock. Cleaning an energized TV may cause electrical shock.
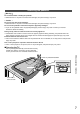
Accessories / Options Standard accessories Remote Control INPUT TV AV ASPECT MENU N2QAYB000328 N DIRECT TV REC A TOOLS VIER IDE GU VIERA Lin EXIT k OPTION RETURN TEXT STTL INDEX HOLD Check that you have the accessories and items shown Batteries for the Clamper Cleaning cloth Remote Control (2) (TX-L32X15E) R6 (UM3) PROGRAMME REC TV Operating Instructions Pan European Guarantee Card Pedestal Assembly screw for Pedestal (4) M4 × 10 This product contains possibly
Attaching the pedestal Warning Do not disassemble or modify the pedestal. Otherwise the TV may fall over and become damaged, and personal injury may result. Caution Do not use any other TV and displays. Otherwise the TV may fall over and become damaged, and personal injury may result. Do not use the pedestal if it becomes warped or physically damaged. If you use the pedestal while it is physically damaged, personal injury may result. Contact your nearest Panasonic dealer immediately.
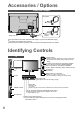
Accessories / Options Using the clamper To tighten: To loosen: Keep the knob pressed Rear of the TV •• • Do not bundle the RF cable and mains lead together (could cause distorted image). Fix cables with clampers as necessary. When using the optional accessory, follow the option’s assembly manual to x cables.
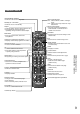
Remote Control VIERA IMAGE VIEWER Input mode selection Switches to SD Card viewing mode TV - switches DVB-C / DVB-T / Analogue mode Standby On / Off switch Switches TV On or Off standby AV - switches to AV input mode from Input Aspect Direct TV Recording Selection list Records programme immediately in Changes aspect ratio from Aspect Selection list Also possible by pressing this button DVD Recorder / VCR with Q-Link or VIERA Link connection repeatedly until you reach the desired
Basic Connection External equipment and cables shown are not supplied with this TV. Please ensure that the unit is disconnected from the mains socket before attaching or disconnecting any leads.
Example 3 Connecting DVD Recorder / VCR and Satellite receiver TV, DVD Recorder / VCR and Satellite receiver Rear of the TV AC 220-240 V 50 Hz Aerial Mains lead Cable DIGITAL AUDIO OUT L PB R PR Basic Connection L R • AUDIO AUDIO Y OUT IN PC COMPONENT 1 2 RF cable SCART cable (fully wired) RF OUT DVD Recorder or VCR RF IN Fully wired HDMI compliant cable RF cable SCART cable (fully wired) RF OUT RF IN Satellite receiver RF IN RF cable RF cable 11
Auto Setup Search and store TV channels automatically. These steps are not necessary if the setup has been completed by your local dealer. Please complete connections (p. 10 and p. 11) and settings (if necessary) of the connected equipment before starting Auto Setup. For details of settings for the connected equipment, read the manual of the equipment.
Using the On Screen Displays Many features available on this TV can be accessed via the On Screen Display menu.
How to Use Menu Functions Various menus allow you to make settings for the picture, sound, and other functions.
Overview How to operate p. 14 Main Menu Picture Sound Setup Picture Menu 1/2 Viewing Mode Contrast Brightness Colour Sharpness Tint Colour Balance Colour Management Eco Mode Dynamic 60 0 30 5 0 Normal On Off Picture Menu 2/2 P-NR 3D-COMB 3D-COMB Reset to Defaults Off Off Reset (p.
How to Use Menu Functions Menu list Menu Item Adjustments / Configurations (alternatives) Basic picture mode (Dynamic / Normal / Cinema / Game) Set for each input signal Viewing Mode Picture 16 Dynamic : Provides enhanced picture contrast and sharpness when viewing in a bright room Normal : Recommended for viewing under normal ambient room lighting conditions Cinema : For watching movies in a darkened room producing a cinema-like picture Game : Fast response signal specifically to provide suitable
Menu Item Adjustments / Configurations (alternatives) Increases or decreases level to enhance or minimise lower, deeper sound output Treble Increases or decreases level to enhance or minimise sharper, higher sound output Balance Adjusts volume level of right and left speakers Headphone Volume Adjusts the volume of the headphones Surround Surround sound settings (Off / V-Audio / V-Audio Surround) V-Audio: Provides a dynamic enhancer of width to simulate improved spatial effects V-Audio Surround: P
How to Use Menu Functions Menu list Menu Item Off Timer Adjustments / Configurations (alternatives) Sets the time the TV automatically turns Off (Off / 15 / 30 / 45 / 60 / 75 / 90 minutes) Link Settings VIERA Link Sets to use VIERA Link functions (Off / On) Q-Link Selects which AV terminal is to be used for data communication between this TV and a compatible recorder (AV1 / AV2) Select the connected terminal to the recorder even it is not compatible with Q-Link.
Menu Item Adjustments / Configurations (alternatives) Analogue Tuning Menu Channel List Skips the unwanted Analogue channels or edits Analogue channels Auto Setup Automatically sets the Analogue channels received in the area Manual Tuning Sets the Analogue channels manually Retunes all TV channels to add DVB-T channels Add DVB-T Channels All the previous tuning settings are erased. Use this function if DVB-T services start in your area.
Information for Users on Collection and Disposal of Old Equipment and used Batteries These symbols on the products, packaging, and/or accompanying documents mean that used electrical and electronic products and batteries should not be mixed with general household waste. For proper treatment, recovery and recycling of old products and used batteries, please take them to applicable collection points, in accordance with your national legislation and the Directives 2002/96/EC and 2006/66/EC.