Model No. TX-L32ET5B TX-L37ET5B TX-L42ET5B TX-L47ET5B TX-L55ET5B Operating Instructions LCD Television Thank you for purchasing this Panasonic product. Please read these instructions carefully before operating this product and retain them for future reference. The images shown in this manual are for illustrative purposes only.
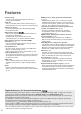
Features 3D technology You can enjoy viewing 3D images on this TV by wearing the 3D Eyewear. RealD 3D This TV and 3D Eyewear use the 3D technology of RealD. RealD is one of the inventors in 3D technology. DVB-T tuner built-in Receives DVB (Digital Video Broadcasting) digital terrestrial broadcasts. DVB-T2 tuner built-in DVB-T2 is an advanced digital terrestrial system for more efficient transmission. Available DVB-T2 broadcasts will be tuned automatically when you perform DVB Auto Setup.
Transport only in upright position Panasonic does not guarantee operation and performance of peripheral devices made by other manufacturers; and we disclaim any liability or damage arising from operation and/ or performance from usage of such other maker’s peripheral devices.
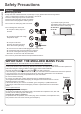
Safety Precautions Warning Safety Precautions ■ Mains plug and lead To help avoid risk of electrical shock, fire, damage or injury, please follow the warnings below: ● This TV is designed to operate on AC 220-240 V, 50 / 60 Hz. ● Insert the mains plug fully into the socket outlet. ● Ensure that the mains plug is easily accessible. ● Remove the mains plug when cleaning the TV. If you detect anything unusual, ● Do not touch the mains plug with a wet hand.
Warning ■ Take care Safety Precautions To help avoid risk of electrical shock, fire, damage or injury, please follow the warnings below: ● Do not remove covers and never modify the TV yourself as live parts are accessible when they are removed. There are no user serviceable parts inside. ● Do not expose the TV to rain or excessive moisture. This TV must not be exposed to dripping or splashing water and objects filled with liquid, such as vases, must not be placed on top of or above the TV.
■ When not in use for a long time This TV will still consume some power even in the Off mode, as long as the mains plug is still connected to a live socket outlet. ● Remove the mains plug from the wall socket when the TV is not in use for a prolonged period of time. Safety Precautions 6 ■ Excessive volume Do not expose your ears to excessive volume from the headphones. Irreversible damage can be caused. ■ Built-in wireless LAN ● To use the built-in wireless LAN, an access point needs to be obtained.
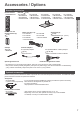
Accessories / Options Standard accessories Remote Control ● N2QAYB000752 Pedestal (p. 8) TX-L32ET5B ● TBL5ZX03471 ● TBL5ZX03551 ● TXFPE01TQUE TX-L47ET5B ● TBL5ZX03501 ● TBL5ZX03511 ● TXFPE01TQUE TX-L55ET5B ● TBL5ZX03501 ● TBL5ZX03851 ● TXFPE01TQUE Mains lead (p. 12) TX-L32ET5B TX-L42ET5B TX-L37ET5B TX-L47ET5B TX-L55ET5B ● K2CT2YY00093 ● K2CT2YY00090 Terminal adaptors AV1 (SCART) adaptor (p. 13) ● K1HY20YY0011 Operating Instructions 3D Eyewear (4) (p.
Wall-hanging bracket Please contact your local Panasonic dealer to purchase the recommended wall-hanging bracket.
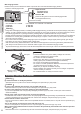
Assembly screw (4) ● XSS5+15FNK M5 × 15 Assembly screw (4) ● XYN4+F25FJK Bracket ● TBL5ZA32911 (TX-L32ET5B) ● TBL5ZA32831 (TX-L37ET5B) ● TBL5ZA32921 TX-L42ET5B TX-L47ET5B TX-L55ET5B ( ) Base ● TBL5ZX03551 (TX-L32ET5B) ● TBL5ZX03541 (TX-L37ET5B) ● TBL5ZX03531 (TX-L42ET5B) ● TBL5ZX03511 (TX-L47ET5B) ● TBL5ZX03851 (TX-L55ET5B) 1 2 Securing the TV Use the assembly screws to fasten securely. ● Tighten the four assembly screws loosely at first, then tighten them firmly to fix securely.
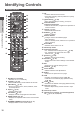
Identifying Controls Remote Control 8 OK Quick Start Guide Identifying Controls 1 2 3 4 5 6 7 16 8 21 9 22 10 11 12 23 24 17 18 19 9 10 20 11 12 13 13 14 14 25 15 26 15 16 17 27 18 19 20 21 22 23 1 Standby On / Off switch 24 3 25 4 5 6 7 10 ● Switches TV on or off standby. (p. 33) ● Switches the viewing mode between 2D and 3D. [Main Menu] (p. 36) ● Press to access Picture, Sound, Network, Timer and Setup Menus. Aspect (p. 23) ● Changes aspect ratio. Information (p.
Indicator / Control panel 5 Remote control signal receiver 1 2 3 6 4 7 Rear side of the TV 1 Function select Identifying Controls ● [Volume] / [Contrast] / [Brightness] / [Colour] / [Sharpness] / [Tint] (NTSC signal) / [Bass]∗ / [Treble]∗ / [Balance] / [Auto Setup] (p.
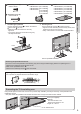
Basic Connection External equipment and cables shown are not supplied with this TV. Please ensure that the unit is disconnected from the mains socket before attaching or disconnecting any leads. Terminals 2 Quick Start Guide 1 3 Basic Connection 4 6 1 2 3 4 5 6 7 8 9 10 5 11 7 8 9 10 11 CI slot (p. 57) SD Card slot (p. 61) USB 1 - 3 port (p. 61, 86) HDMI1 - 4 (p. 13, 86) Headphone jack (p. 87) ETHERNET (p. 14) Terrestrial terminal (see below) DIGITAL AUDIO OUT (p. 87) PC terminal (p.
AV devices ■ Player / 3D compatible player TV Player / 3D-compatible player HDMI cable Terrestrial aerial DVD Recorder / VCR Basic Connection AV1 (SCART) adaptor∗ Aerial input terminal SCART cable RF cable Quick Start Guide ■ DVD Recorder / VCR TV RF cable ■ DVD Recorder / VCR and Satellite receiver TV Satellite receiver TV HDMI cable Terrestrial aerial SCART cable AV1 (SCART) adaptor∗ RF Cable Aerial input terminal SCART cable RF Cable RF cable DVD Recorder / VCR ∗Supplied with this TV Note
Network To enable the network service functions (VIERA Connect, etc.), you need to connect the TV to a broadband network environment. ● If you do not have any broadband network services, please consult your retailer for assistance. ● Prepare the internet environment for wired connection or wireless connection. ● Setup of the network connection will start after the tuning (when first using the TV). (p.
Auto Setup Search and store TV channels automatically. ● These steps are not necessary if the setup has been completed by your local dealer. ● Please complete connections (p. 12 - 14) and settings (if necessary) of the connected equipment before starting Auto Setup. For details of settings for the connected equipment, read the manual of the equipment. Plug the TV into mains socket and switch on 2 Select your country ● Takes a few seconds to be displayed.
3 Setup the network connection Setup the network connection to enable the network service functions such as VIERA Connect, etc. (p. 19, 69). ● Please note that this TV does not support wireless public access points. ● Ensure the network connections (p. 14) and network environment are completed before starting setup. Select the network type [Wired] “Wired connection” (p. 14) Network Setup [Wireless] “Wireless connection” (p.
3 4. After the access point setting is finished, perform the connection test Connection Test Check wireless network connection. Check acquired IP address. Check for devices using same IP address. Check gateway connection. Check server connection for VIERA Connect. : succeeded The test is successful and the TV is connected to the network. : failed Check the settings and connections. And then select [Retry]. ● To set manually, select [Manual] and set each item. For details (p.
4 ■ How to input Owner ID 1 Enter the PIN number (4 digits) ● Enter the PIN number twice at first setting.
Using “VIERA Connect” VIERA Connect is a gateway to the internet services unique to Panasonic. VIERA Connect allows you to access some specific websites supported by Panasonic, and enjoy internet contents such as videos, games, EPG, communication tools, etc. from VIERA Connect home screen. ● This TV does not support full web browser function and some features of the websites may not be available. 1 Turn power on ● Press for about 1 second. ● Mains power On / Off switch should be on. (p.
Watching TV 1 Turn power on ● Press for about 1 second. ● Mains power On / Off switch should be on. (p. 11) ■ VIERA Connect introduction banner appears Every time you turn on the TV, this banner appears at the bottom of the screen. You can access to VIERA Connect easily and enjoy the various contents. (p. 19) ● To remove this banner, leave for about 5 seconds or press any buttons (except the buttons to access VIERA Connect). ● To set this banner display off [VIERA Connect Banner] (p.
Other useful functions Display Information banner Display Information banner ● Also appears when changing a channel. 1 2 3 5 6 7 4 Example: DVB 1 HDTV ZDF Mute Bad signal AD 1 Channel position and name 2 Channel type ([Radio], [Data], [HDTV], etc.) / Encrypted channel ( 3 Programme 4 Current time 20:35 All DVB Channels Select favourites C Coronation Street 20:00 - 20:55 2 Now Info ) / TV mode ( , ) STTL TEXT Multi Audio 45 5 Programme Start / Finish time (DVB) Channel number, etc.
Hold Freeze / unfreeze picture Display the selectable settings for the current status Confirm or change the current status instantly ● To change select select / change access store [Voice Guidance Settings] Guidance settings for visually (p.
Aspect Change the aspect ratio (image size) Enjoy viewing the image at its optimum size and aspect. Programmes usually contain an “Aspect Control Signal” (Widescreen signal, etc.), and the TV will choose the aspect ratio automatically according to the “Aspect Control Signal” (p. 89).
Using TV Guide TV Guide - Electronic Programme Guide (EPG) provides an on-screen listing of the programmes currently broadcast and the forthcoming broadcasts over the next seven days (depending on the broadcasters). ● DVB and Analogue channels are displayed on the same TV Guide screen. [D] means DVB channel and [A] means Analogue channel. There will be no programme listings for Analogue channels.
■ To view a channel list of the selected category (blue) (Category list) select category Category All Channels All Channels All HD Channels All DVB Channels All Analogue Channels Free DVB Channels TV/Data DVB Channels Favourites1 Favourites2 Favourites3 Favourites4 view Only Analogue channels are listed ● To list favourite channels (p. 49) ■ To search programme types and view a channel list of the searched programmes (DVB) (yellow) (Type list) (Search list) select type Prog.
■ To check / change / cancel a timer ■ To return to TV Guide programming event “Timer Programming” (p. 52 - 53) ■ If you select the current programme ■ If a programme exists in both HD and SD broadcasts A confirmation screen asking whether you want to watch or record the programme appears. The [Timer Options] screen will be displayed to select HD or Select [Timer Programming] and set [Ext Rec.] to record SD broadcast.
Viewing Teletext You can enjoy news, weather forecasts and subtitles, etc. (depending on the broadcaster) ● The availability of teletext services for a programme is indicated by [TEXT] in the information banner. Information banner 1 BBC ONE WALES 20:35 All DVB Channels Select favourites Coronation Street 20:00 - 20:55 Now (p. 21) Displayed if programme has teletext service TEXT Depending on the broadcaster, the digital teletext (MHEG) services may not be available.
Analogue teletext Teletext services are the text information provided by the broadcasters. The features may vary depending on the broadcasters. What is FASTEXT mode? In FASTEXT mode, four differently coloured subjects are situated at the bottom of the screen. To access more information about one of these subjects, press the appropriate coloured button. This facility enables fast access to information on the subjects shown.
FULL / TOP / BOTTOM (green) (TOP) (BOTTOM) Normal (FULL) (Expand the TOP half) (Expand the BOTTOM half) View in multi window Watch TV and Teletext in two windows at once ● Operations can be made only in Teletext screen. ● Each time pressed: Teletext TV and Teletext TV ● If you wish to use Subtitles, do not change number on blue button.
Watching External Inputs Connect the external equipment (VCRs, DVD equipment, etc.) and you can watch through the input. ● To connect the equipment (p. 12 - 14, 86 - 88) The remote control is capable of operating the contents or external equipment. 1 Turn the TV on When connecting with SCART (p. 13) Receives input signals automatically when playback starts ● Input signals are automatically identified by the SCART (pin 8) terminal. ● This function is also available for HDMI connections (p. 86).
Operating the contents or equipment with the TV remote control You can operate the contents in Media Player / media servers, recording functions or the connected equipment with the below buttons of this TV remote control.
Viewing 3D images You can enjoy viewing 3D images with contents or programmes corresponding to the 3D effect by wearing the 3D Eyewear. “Standard accessories” (p. 7) This TV supports [Frame Sequential]∗1, [Side by Side]∗2 and [Top and Bottom]∗3 3D formats. ∗1: The 3D format that the images for the left and right eyes are recorded with the high definition quality and alternately played back. ∗2, ∗3: Other available 3D formats ● How to view the 3D images (p.
To view the 3D images You can enjoy the 3D images in a variety of ways. (Frame Sequential, Side by Side and Top and Bottom are the supported 3D format.) ■ Playing back 3D-compatible Blu-ray disc (Frame Sequential format) ● Connect the 3D-compatible player via a fully wired HDMI compliant cable. ● If input mode is not switched automatically, select the input mode connected to the player. (p. 30) ● If you use the non 3D-compatible player, the images will be displayed on 2D mode.
[Frame Sequential - 3D] / [Frame Sequential - 2D] / [Side by Side - 3D] / [Side by Side - 2D] / [Top and Bottom - 3D] / [Top and Bottom - 2D]: Displays the mode you select. Not valid on Analogue and AV mode [2D 3D]: Converts 2D images into 3D. ● Please note the 3D images appear slightly different from the originals. ● Using this function for profit-making purposes, or publically showing images converted from 2D to 3D in places such as shops or hotels etc.
Item 2D Adjustments / Configurations (alternatives) 3D Depth Selects a level of 3D-image depth for viewing converted 2D images [Min] / [Mid] / [Max] Edge Smoother Set to [On] if you feel the contoured parts of an image are not smooth enough (except in [2D 3D] mode) [Off] / [On] 3D Detection Automatically detects the 3D format signals [Off] / [On] / [On (Advance)] [On (Advance)]: Detects all the 3D format signals and displays the 3D image automatically.
How to Use Menu Functions Various menus allow you to make settings for the picture, sound, and other functions. 1 Display the menu 2 Select the menu ● Displays the functions that can be set (varies according to the input signal). select Main Menu access Picture Sound Network Timer How to Use Menu Functions Setup Select the item 3 select 1/2 Viewing Mode Contrast Brightness Colour Sharpness Tint Colour Balance Vivid Colour C.A.T.S.
Menu list Menu Item Viewing Mode Adjustments / Configurations (alternatives) In each Viewing Mode, [Contrast], [Brightness], [Colour], [Sharpness], [Tint], [Colour Balance], [Vivid Colour], [C.A.T.S.], [P-NR] and [3D-COMB] can be adjusted and stored. Additionally, you can adjust the detailed settings when [Advance(Calibration)] in the Setup Menu is set to [On]. (p. 43) ● You can set [Viewing Mode] in 2D and 3D mode for each.
Menu Advanced Settings Picture How to Use Menu Functions Item Adjustments / Configurations (alternatives) Intelligent Frame Creation Automatically compensates the picture frame rate and removes juddering movements to make the images smooth [Off] / [Min] / [Mid] / [Max] ● Depending on the contents, images may be noisy. To prevent the noise, change the setting.
Menu Item Adjustments / Configurations (alternatives) Balance Adjusts volume level of right and left speakers Headphone Volume Adjusts the volume of the headphones Surround Surround sound settings [Off] / [V-Audio] / [V-Audio Surround] [V-Audio]: Provides a dynamic enhancer of width to simulate improved spatial effects. [V-Audio Surround]: Provides a dynamic enhancer of width and depth to simulate improved spatial effects. ● Switching is also possible by the SURROUND button on the remote control (p.
Menu Item Voice Guidance Settings Audio Description Menu Sound How to Use Menu Functions Network Voice Guidance Set to [On] to enable voice guidance of the basic features (EPG, on-screen messages, etc.
Menu Item TV Guide Settings TV Guide View Eco Navigation Adjustments / Configurations (alternatives) Changes the layout of TV Guide [Normal] / [Full] / [Info] [Normal]: Default TV Guide screen [Full]: Displays channels and programmes full-screen without the operation guide [Info]: Displays details of the selected programme at the bottom without the operation guide Automatically sets the TV to the most suitable energy-saving mode ● If you press the OK button, the following items are set as below: [C.A.T.
Menu Item Tuning Menu* Language Update Channel List Updates the channel list while keeping your settings (p. 51) ● For DVB mode New Channel Message Selects whether to give a notification message when a new channel is found [Off] / [On] (p. 51) ● For DVB mode Signal Condition Checks the signal condition (p.
Menu Item Adjustments / Configurations (alternatives) DivX® VOD Displays DivX VOD registration code (p. 92) Advance(Calibration) Enables the advanced picture settings [Off] / [On] ● Set to [On] to display the advanced items in the Picture Menu. (p. 60) Other Settings Selects the language that your USB Keyboard supports ● For the information of using USB Keyboard (p. 94) Shipping Condition Resets all settings to the original condition (p. 55) Owner ID Inputs the owner ID (p.
Overview (Picture, Sound, Network, Timer, Setup) How to operate Main Menu Picture Sound Network (p. 36) 1/2 Viewing Mode Contrast Brightness Colour Sharpness Tint Colour Balance Vivid Colour C.A.T.S.
Main Menu Picture Timer Programming Off Timer Auto Standby Access Off Off Timer Programming Function (p. 40) Sound Network Wed 26 Oct 2011 10:46 No. Channel Name Ext Rec. D 72 BBC 2W Reminder D 14 E4 The Bill Ext Rec. D 1 BBC ONE DIY SOS Ext Rec. D BBC ONE --- Date Start 20:00 21:30 (90 min.) Wed 26 Oct 21:00 22:00 (60 min.) Wed 26 Oct 22:45 23:00 (15 min.) Thu 27 Oct 10:30 11:30 (60 min.) Guide S/P STTL --- End Wed 26 Oct --:-- --:-- Timer --:-- (p.
Overview (Setup) How to operate (p.
DVB Favourites Editor All DVB Channels 70 72 105 719 720 1 7 DVB Manual Tuning [CH21] Frequency Signal Quality Signal Strength No. 474,00 MHz 0 0 Channel Name Type 10 10 New 1 7 14 70 72 105 719 720 CBBC Channel Cartoon Nwk BBCi BBC Radio Wales BBC Radio Cymru BBC ONE Wales BBC THREE All DVB Channels BBC One Wales BBC THREE E4 CBBC Channel Cartoon Nwk BBCi BBC Radio Wales BBC Radio Cymru Favourites1 (p. 49) Pay TV: 0 Radio: 0 Searching DVB Auto Setup Data: 0 (p.
Retuning from Setup Menu Automatically retune the channels received in the area. ● This function is available if channel tuning is already performed. ● Only the selected mode is retuned. All the previous tuning settings are erased. ● If Child Lock PIN number (p. 54) has been set, the PIN number is required. ● If tuning has not been done completely [Manual Tuning] (p. 51) DVB or Analogue channels 1 Select the mode 2 Display the menu and select [Setup] (p.
Auto setup using the buttons on the TV For Auto Setup, using the buttons on the TV (p. 11) 1 Press the F button repeatedly until [Auto Setup] appears 2 Access [Auto Setup] 3 Start [Auto Setup] ● To return to TV ● Control panel OSD appears when pressing the control panel button. Tuning and Editing Channels You can retune channels or make your favourite channel lists, skip unwanted channels, etc. 1 Select the mode 2 Display the menu and select [Setup] (p.
■ To edit Favourites list While the cursor is in the Favourites field to edit ● To move the channel Select the Select the new position turn (green) ● To delete the channel Store (green) or ● To delete all channels (yellow) ● To name the Favourites Set characters (maximum 10 characters) Store select User input (red) Name ● To use numeric buttons 3 Store set (p. 96) Note ● Channel position numbers (known as logical channel numbers) can be swapped in Channel List.
Set DVB channel manually [Manual Tuning] Normally use [Auto Setup] or [Update Channel List] to retune DVB channels. If tuning has not been done completely or for adjusting the direction of the aerial, use this function. DVB Manual Tuning Frequency Signal Quality Signal Strength No.
Timer Programming Timer Programming from Menu The Timer Programming menu allows you to choose programmes that you want to remind watching or record to the external recorder. At the correct time, the TV will tune to the correct channel even if the TV is in Standby mode. TV Guide may also be used to set timer programming event (p. 25). ● Timer Programming can store up to 15 events.
: Overlapped timer programming events Timer programming - Programmes according to the time setting Timer Programming Function D 72 BBC 2W Reminder D 14 E4 The Bill Ext Rec. D 1 BBC ONE DIY SOS Ext Rec. D BBC ONE --- Duration (automatic display) Records with subtitles (if available) ● To indicate this (yellow) (Press again to remove subtitles) Wed 26 Oct 2011 10:46 No. Channel Name Ext Rec. Date End 20:00 21:30 (90 min.) Wed 26 Oct 21:00 22:00 (60 min.
Child Lock You can lock specific channels / AV input terminals and control who watches them. When the locked channel / input is selected, a message appears. Enter the PIN number to watch. 1 Display the menu and select [Setup] select Setup 2 access Select [Child Lock] select Child Lock access Access Control channel audience [Child Lock] 1 Enter the PIN number (4 digits) ● Enter the PIN number twice at first setting. ● Make a note of the PIN number in case you forget it.
Shipping Condition Resets the TV to its original condition, i.e. no channels tuned in. All settings other than [Owner ID] are reset (channels, picture, sound settings, etc.). ● To retune TV channels only, e.g. after moving house “Retuning from Setup Menu” (p.
Owner ID Entry of the PIN number and personal information (your name, address and postcode). In the unfortunate event of theft, the Owner ID will help the Police to determine the owner. 1 Display the menu and select [Setup] select Setup 2 Select [System Menu] select System Menu 3 access Access access Select [Owner ID] select System Menu Owner ID access Access Input owner ID [Owner ID] 1 Enter the PIN number (4 digits) ● Enter the PIN number twice at first setting.
Using Common Interface The Common Interface Module menu provides access to software contained on Common Interface (CI) Modules. This TV works only for Pay TV modules complying with CI standard. ● Video and audio signals may not be output depending on broadcasts or services. CI slot Caution ● Turn off Mains power On / Off switch whenever inserting or removing the CI module. ● If a view card and a card reader come as a set, first insert the card reader, then insert the view card into the card reader.
Updating the TV Software A new version of software may be released for download to enhance the performance or operations of the TV. In DVB mode, a notification banner will appear when one of the BBC channels is turned to if a new available software is found. ● To download (Press the EXIT button not to download) You can update new software automatically or update manually.
Displaying PC Screen on TV The screen of the PC connected to the TV can be displayed on the TV. You can also listen to PC sound with the audio cable connected. ● To connect PC (p. 86) 1 Select the external input 2 Select [PC] select Input Selection AV1 AV2 PC HDMI1 HDMI2 HDMI3 HDMI4 TV SD Card/USB access ● Corresponding signals (p. 95) ● If [H-freq.] or [V-freq.] is shown in red, the signals may not be supported. PC menu setting ● To make settings Menu “How to Use Menu Functions” (p.
Advanced Picture Settings You can adjust and setup the detailed picture settings for each Viewing Mode. ● To use this function completely, set [Advance(Calibration)] to [On] in the Setup Menu. (p. 43) ● For PC input mode, some functions are available without setting [Advance(Calibration)].
Using Media Player Media Player allows you to enjoy photo, video or music recorded on an SD Card and a USB Flash Memory. VIERA IMAGE VIEWER is the function of the easy viewing for photos or videos recorded on an SD Card on the TV screen by simply inserting into the SD Card slot. Photo mode: Still pictures recorded by digital cameras will be displayed. Video mode: Moving pictures recorded by digital video cameras will be played back. Music mode: Digital music data will be played back.
Starting Media Player 1 Insert the SD Card or USB Flash Memory to the TV 2 Confirm the message and start Media Player (p. 61) ● You can also start by pressing following button. “Watching External Inputs” (p. 30) 3 Select the device to access Drive Select EXIT Select RETURN Access SD Card USB USB Drive... HDD1 select access USB Flash... SD Card ● If two or more devices are not connected, this step will be skipped.
Photo mode Photo mode will read all “.jpg” extension files and supports “.mpo” extension files in the SD Card or USB Flash Memory. The thumbnail of all the photos in the SD Card or USB Flash Memory will be displayed.
Multi Shot 3D This TV can create the 3D photo using a pair of photos in the SD Card and save it into the same SD Card. ● This TV can also create the 3D photo from photos in the USB Flash Memory, but cannot save it. ● This function is available with photos recorded by digital cameras. ● Depending on the photos you select, the created 3D photo may not be suitable or the 3D photo creation may not be possible.
Menu Item Adjustments / Configurations (alternatives) Colour Effect Selects the colour effect of photos on Single view and Slideshow [Off] / [Sepia] / [Gray scale] ● This function is not available when [Frame] is set to [Drift], [Gallery] or [Cinema]. Transition Effect Selects the transition effect for switching the photo during the slideshow [Off] / [Fade] / [Slide] / [Dissolve] / [Motion] / [Random] [Fade]: The next photo fades in gradually.
Video mode ● Supported file format (p. 90, 91) The thumbnail of video titles in the SD Card or USB Flash Memory will be displayed. Example: Thumbnail - [Title view] Media Player Video Title view The preview will start when the title / scene is highlighted if it supports a preview. ● To turn off the preview Trip1 Trip2 Trip3 Trip4 Trip5 Room Nature1 “Video Setup” (p. 67) Nature2 Nature3 Nature4 Nature5 Nature6 2011_4 : Error display : The file does not support thumbnail view.
■ Video Setup Setup the settings for Video mode. ● Menu items and selectable options vary depending on the content. 1 Display the option menu 2 Select [Video Setup] 3 Select the items and set select Option Menu Video Setup Menu Item access / store Adjustments / Configurations (alternatives) Video Setup Sets to start the preview of the title or scene in the thumbnail view [Off] / [On] ● Image may not be displayed for an instant in the thumbnail view. Set the preview [Off] to resolve this.
Music mode ● Supported file format (p. 91) The thumbnail of music folders in the SD Card or USB Flash Memory will be displayed. Example: Thumbnail - [Folder view] Media Player Music Folder view ● To play back the selected folder Select the folder Start playback My Music_1 My Music_2 Access Select Play Folder (red) My Music_3 EXIT RETURN Info Option Menu Drive Select SD Card Contents Select ■ Playback from File view Selected file will be played back.
Using Network Services (DLNA / VIERA Connect) DLNA® This TV is a DLNA Certified™ product. DLNA (Digital Living Network Alliance) is a standard that makes DLNA Certified digital electronics easier and more convenient to use on a home network. To learn more, visit www.dlna.org. It allows you to share photos, videos (including 3D images) and music stored in the DLNA Certified media server (for example, PC with Windows 7 installed, DIGA Recorder, etc.
Network connections To use only DLNA features, you can operate the features without broadband network environment. To use VIERA Connect features, you need a broadband network environment. ● If you do not have any broadband network services, please consult your retailer for assistance. ● Set up and connect any equipment required for the network environment. You cannot make settings for the equipment on this TV. Read the manual of the equipment. ● Required speed (effective): at least 1.
Network Setup ● Ensure the connections are completed before starting Network Setup. “Network connections” (p. 70) Display the menu and select [Network] select Network access Network Link settings Sets the link settings to control this TV from the network equipment via the network.
■ [Acquire IP Address] / [Acquire DNS Address] Sets [IP Address], [Subnet Mask], [Default Gateway] and [DNS Address]. Select [Acquire IP Address] / [Acquire DNS Address] and set to [Auto] (recommended). ● The available settings are displayed automatically.
2 Select [Wireless Network Settings] select Connection Test Network Connection Wireless Wireless Network Settings Access IP/DNS Settings Network Link Settings Software Update New Software Message On Network Status access ● When the access point is already set, [Current Settings] screen will be displayed. To change the settings, select [No] on this screen and go to the next step.
■ [Manual] You can setup SSID, security type, encryption type, and encryption key manually. Follow the on-screen instructions and set manually. ● When you use 11n (5 GHz) for the wireless system between the built-in wireless LAN and access point, select [AES] for the encryption type. Security Type Settings Wireless Network Settings Please input the network name(SSID). Connection will be made with the following settings:Network Name(SSID) : XXXXXXX SSID Please select the security type.
For photo file [Single view] - Photos are displayed one at a time. Example: Single view Single view Stop ● To display / hide the operation guide ● To return to list ● To operate Single view To the previous photo ● To rotate 90° Slideshow EXIT Select RETURN Rotate Operation guide (blue) To the next photo Stop (return to list) [Slideshow] - Slideshow completes when all photos are viewed within the list.
For DIGA Recorder Control the DIGA Recorder Example: The screen of the DIGA Recorder will be displayed. You can control the functions of the DIGA Recorder with this TV remote control according to the operation guide. DIRECT NAVIGATOR (Grouped Titles) All Not Viewed Movie Time Remaining 36:17 (DR) Sports 19.08(Wed) Journal Télévisé / Météo AV1 19.08(Wed) Bibel TV Start Time 11:01 Titles 27 WDR Aachen 18.08(Tue) WDR aktuell WDR Wuppertal 18.
Audio output settings (for video contents) You can enjoy the multi-channel sound via an amplifier connected to DIGITAL AUDIO OUT or HDMI2 (ARC function) terminal. ● To confirm or change the current sound status (p.
Link Functions (Q-Link / VIERA Link) Q-Link connects the TV and DVD Recorder / VCR, and enables easy recording, playback, etc. (p. 80) VIERA Link (HDAVI Control™) connects the TV and the equipment with VIERA Link function, and enables easy control, (p. 81 - 85) convenient recording, playback, energy saving, creating home theatre, etc., without complicated setting. You can use Q-Link and VIERA Link functions together. ● This TV supports “HDAVI Control 5” function.
VIERA Link (HDMI and Audio out connections) Connected equipment Player theatre with VIERA Link function Features Analogue channel download Easy playback Power on link Power off link Reduce unnecessary power consumption in Standby Auto standby for unnecessary equipment Pause Live TV programme Direct TV Recording Control the menu of the connected equipment by VIERA remote control Speaker control – ∗5 Blu-ray Disc theatre with VIERA Link function – ∗5 ∗3 – ∗3 ∗6 Amplifier with VIERA Link function – – –
Q-Link Preparations ● Connect the DVD Recorder / VCR with the following logos: “Q-Link”, “NEXTVIEWLINK”, “DATA LOGIC (a trademark of Metz Corporation)”, “Easy Link (a trademark of Philips Corporation)”, “Megalogic (a trademark of Grundig Corporation)”, “SMARTLINK (a trademark of Sony Corporation)” ● Q-Link connection (p. 78) ● Use fully wired SCART cable. ● Set up the DVD Recorder / VCR. Read the manual of the recorder. ● Q-Link terminal setup in the Setup Menu [AV1 out] (p.
VIERA Link “ ”∗ ∗Enjoy additional HDMI Inter-Operability with Panasonic products which have “HDAVI Control” function. This TV supports “HDAVI Control 5” function. Connections to the equipment (DIGA Recorder, HD Video Camera, Player theatre, Amplifier, etc.) with HDMI and SCART cables allow you to interface them automatically (p. 78, 79). These features are limited to models incorporating “HDAVI Control” and “VIERA Link”.
Reduce unnecessary power consumption in Standby [Standby Power Save] Set Standby Power Save [On] in the Setup Menu to use this function [Standby Power Save] (p. 41) The power consumption in Standby mode of the connected equipment is controlled higher or lower in synchronisation with the TV on / off state to reduce the consumption. When the TV is set to Standby mode, the connected equipment is automatically set to Standby and the power consumption of the connected equipment is automatically minimised.
Pause Live TV programme [Pause Live TV] You can pause the current TV programme and resume later. The current TV programme will be recorded on HDD of the connected DIGA Recorder. ● This function is available with a DIGA Recorder which has HDD. ● If you connect a variety of recorders including other manufacturers’ recorders at the same time, connect the DIGA Recorder which has HDD to the TV’s lower HDMI terminal number.
2 Select [VIERA Link Control] Pause Live TV Direct TV Rec VIERA Link Control Speaker Selection 3 select VIERA Link Menu Start Start Recorder Home Cinema access Select the equipment to access Select the type of the connected equipment and access.
Speaker control [Speaker Selection] You can control the theatre speaker with this TV remote control pointing at the TV’s signal receiver. ● If you cannot operate, check the settings and the equipment. “Summary of Q-Link and VIERA Link features” (p. 78, 79), “Preparations” (p.
External Equipment These diagrams show our recommendations for connection of your TV to various pieces of equipment. For other connections, consult the instructions for each piece of equipment, the basic connection (p. 12 - 14), the table (p. 88), and the specifications (p. 106, 107). Check the type of terminals and cable plugs are correct when connecting.
To listen with speakers Optical digital audio cable Amplifier with speaker system To enjoy the sound from the external equipment in multi-channel sound (e.g. Dolby Digital 5.1ch), connect the equipment to the amplifier. For the connections, read the manuals of the equipment and amplifier. Rear of the TV Headphones (M3 stereo mini plug) ● To adjust volume [Headphone Volume] (p.
Types of connectable equipment to each terminal Terminal AV2∗1 USB 1 - 3 HDMI 1 - 4 ETHERNET DIGITAL AUDIO OUT VIDEO COMPONENT AV1∗1 Features To record / playback videocassettes / DVDs (VCR / DVD Recorder) To watch 3D contents (Blu-ray Disc Player) ∗2 To watch satellite broadcasts (Set top box) To watch DVDs (DVD Player) To watch camcorder images (Video camera) To play games (Game equipment) ∗3 To use amplifier with speaker system ∗4 To use network services Q-Link VIERA Link (with HDMI) Direc
Technical Information Auto Aspect The optimum size and aspect can be chosen automatically, and you can enjoy finer images. (p. 23) ■ Aspect Control Signal [WIDE] will appear in the top left of the screen if a Widescreen signal (WSS) or a Control signal through SCART / HDMI terminal is found. The aspect will switch to the appropriate 16:9 or 14:9 widescreen ratio. This function will work in any aspect mode.
Supported file format in Media Player and media servers ■ Photo Format File extension .jpg JPEG Image resolution (pixel) .jpeg .mpo 8×8 to 30,719 × 17,279 File extension Video codec Details / Restrictions DCF and EXIF standards Sub-sampling: 4:4:4, 4:2:2, 4:2:0 ● Progressive JPEG is not supported. ■ Video Container Details / Restrictions AVCHD .mts H.264 Dolby Digital AVCHD Standard Ver. 2.
Container File extension Video codec Audio codec Details / Restrictions .asf .wmv DivX3 DivX4 DivX5 DivX6 MPEG4 SP/ASP VC-1 Windows Media Video Ver. 9 AAC Dolby Digital Dolby Digital Plus HE-AAC LPCM MP3 WMA WMA Pro ● Copy-protected files cannot be played back. MP4 .f4v .m4v .mp4 DivX3 DivX4 DivX5 DivX6 H.264 BP/MP/HP MPEG1 MPEG2 MPEG4 SP/ASP AAC Dolby Digital Dolby Digital Plus HE-AAC MPEG Audio MP3 ● This TV supports this container recorded by Panasonic products.
DivX DivX Certified® to play DivX® and DivX Plus® HD (H.264/MKV) video up to 1080p HD including premium content. ABOUT DIVX VIDEO: DivX® is a digital video format created by DivX, LLC, a subsidiary of Rovi Corporation. This is an official DivX Certified® device that plays DivX video. Visit divx.com for more information and software tools to convert your files into DivX videos.
Devices for recording or playing back ■ SD Card Card format: SDXC Card - exFAT SDHC Card / SD Card - FAT16 or FAT32 Compliant card type (maximum capacity): SDXC Card (64 GB), SDHC Card (32 GB), SD Card (2 GB), miniSD Card (2 GB) (requiring miniSD adaptor) ● If miniSD Card is used, insert / remove it together with the adaptor. ● Check the latest information on the card type at the following website. http://panasonic.jp/support/global/cs/tv/ ● Use an SD Card which meets SD standards.
HDMI connection HDMI (high-definition multimedia interface) is the world’s first complete digital consumer AV interface complying with a non-compression standard. HDMI allows you to enjoy high-definition digital images and high-quality sound by connecting the TV and the equipment. HDMI-compatible equipment∗1 with an HDMI or DVI output terminal, such as a DVD player, a set top box or game equipment, can be connected to the HDMI terminal using an HDMI compliant (fully wired) cable.
■ Gamepad ● Check the gamepads that have been tested for the performance with this TV at the following website. http://panasonic.jp/support/global/cs/tv/ ● Some of the keys of gamepads correspond to the operation of the remote control.
Characters table for numeric buttons You can enter characters by using numeric buttons for free input items. Press the numeric button repeatedly until you reach the User input desired character. Name A B C D E F G H I J K L M N O P Q R S T U V W X Y Z 0 1 2 3 4 5 6 7 8 9 ! : # a b c d e f g h i j k l m n o p q r s t u v w x y z ( ) + - . * _ 1 .!:# 2 7 pqrs 3 abc 4 5 ghi jkl 8 tuv ● The character is set automatically if you leave for 1 second.
How to use Windows 7 as a media server Follow the examples below to set up Windows 7 for use as a media server. Confirm the MAC Address of VIERA in [Network Setup] (p. 40). The following procedure and screens are examples. For more information, refer to the help functions of Windows 7. 1 Open the Windows start menu and select [Control Panel]. Select [HomeGroup] in Control Panel window.
FAQs Before requesting service or assistance, please follow these simple guides to resolve the problem. If the problem still persists, please contact your local Panasonic dealer for assistance. Block noise, frozen or disappearing image occurs in DVB mode / White spots or shadow image (ghosting) occurs in Analogue mode / Some channels cannot be tuned ● Check the position, direction and connection of the aerial. ● Check [Signal Condition] (p. 51).
Problem Causes / Actions Screen Sound ● Set [P-NR] in the Picture Menu to remove noise. (p. 37) ● Check nearby electrical products (car, motorcycle, fluorescent lamp). No image can be displayed ● Is [Contrast], [Brightness] or [Colour] in the Picture Menu set to the minimum? (p. 37) ● Check the setting of [AV2] ([COMPONENT] / [VIDEO]) in [Input Selection] to match the output of the external equipment. (p. 30) Blurry or distorted image (no sound or low volume) ● Reset channels.
Problem Causes / Actions Other The TV does not switch on ● Check the mains lead is plugged into the TV and the socket outlet. The TV goes into Standby mode ● Auto power standby function is activated. (p. 11) ● The TV enters Standby mode about 30 minutes after analogue broadcasting ends. The remote control does not work or is intermittent ● Are the batteries installed correctly? (p. 8) ● Has the TV been switched on? ● The batteries may be running low. Replace them.
Message Meaning / Action Invalid operation - Please check settings and connections. ● Check the Q-Link or VIERA Link connection and setting. (p. 78 - 81) Invalid system time. Please exit ! ● Cannot get the time information and cannot edit Timer Programming screen. Check the connection of the RF cable. Invalid system time, Timer Programming will not work. Please press TV button on remote control and check time display on Banner ● Cannot get the time information.
Message Timer already expired ! Timer incorrect ! Meaning / Action ● The starting time in Timer Programming has already passed. Set the timer correctly (p. 52). ● Set the start and end times in Timer Programming correctly (p. 52). Timer overlap. Press OK to keep, RETURN to edit. ● Timer programming events are overlapped. Press the OK button to keep the overlapped setting. [Ext Rec.] is given priority over [Reminder]. When two or more [Ext Rec.
Glossary DLNA Digital Living Network Alliance DVI Digital Visual Interface - A high quality video interface standard to connect to the display ETHERNET One of the popular standards of LAN EPG Electronic Programme Guide - A digital guide showing scheduled programmes Frame Sequential The 3D format that the separated images for the left and right eyes are recorded with the high definition quality and alternately played back at the high speed HDMI High-Definition Multimedia Interface - A digital audio and video
This product incorporates the following software or technology: (1) the software developed independently by or for Panasonic Corporation, (2) the software owned by third party and licensed to Panasonic Corporation, (3) the software based in part on the work of the Independent JPEG Group, (4) the software developed by the FreeType Project, (5) the software licensed under the GNU LESSER GENERAL PUBLIC LICENSE (LGPL) and/or, (6) open sourced software other than the software licensed under the LGPL.
Index A Accessories ·······························7 Advanced Settings·············38, 60 Analogue Tuning Menu······48, 49 Aspect································23, 89 Audio Description ··············22, 40 Auto Gain Control ····················39 Auto Setup ·························15, 48 Auto Standby ···························40 AV1 out ······························41, 79 B Banner Display Timeout ··········42 Built-in wireless LAN················14 C Category list·····························25 C.A.T.S.
Specifications ■ TV Model No. TX-L32ET5B Dimensions (W × H × D) Mass 11.5 Net (With Pedestal) 14.0 9.5 Net (TV only) 11.5 Model No. TX-L42ET5B 874 mm × 580 mm × 238 mm (With Pedestal) 874 mm × 534 mm × 52 mm (TV only) 997 mm × 650 mm × 247 mm (With Pedestal) 997 mm × 604 mm × 52 mm (TV only) Net (With Pedestal) 17.5 14.
Connection terminals Built-in wireless LAN PC HIGH-DENSITY D-SUB 15PIN R,G,B: 0.7 V[p-p] (75 Ω) HD, VD: TTL Level 2.0 – 5.0 V[p-p] (high impedance) ● Applicable input signals: VGA, SVGA, WVGA, XGA SXGA, WXGA ······ (compressed) Horizontal scanning frequency 31 - 69 kHz Vertical scanning frequency 59 - 86 Hz Card slot SD Card slot × 1 Common Interface slot (complies with CI Plus) × 1 ETHERNET RJ45, IEEE802.3 10BASE-T / 100BASE-TX USB 1 / 2 / 3 USB2.0 DC 5 V, Max.
Information for Users on Collection and Disposal of Old Equipment and used Batteries These symbols on the products, packaging, and/or accompanying documents mean that used electrical and electronic products and batteries should not be mixed with general household waste. For proper treatment, recovery and recycling of old products and used batteries, please take them to applicable collection points, in accordance with your national legislation and the Directives 2002/96/EC and 2006/66/EC.