Operating Instructions Plasma Television Model No. TX-P37C10B TX-P42C10B TX-P50C10B Please read these instructions before operating your set and retain them for future reference. The images shown in this manual are for illustrative purposes only. U.K.
Features ■Receives DVB digital terrestrial broadcasts Select the programme or set Timer Programming easily by using TV Guide. (p. 18 - 20) Register and instantly call up favourite channels with Favourites Edit. (p. 37) ●DVB - Digital Video Broadcasting ■VIERA TOOLS-Display special feature icons for easy accessibility (p. 14) VIERA TOOLS is the easy way to access the special features with the VIERA TOOLS button. ■HD ready High Definition signals are supported by HDMI and Component Video inputs.
VIERA TOUGH PANEL A front panel increases the durability of the plasma display. This protects against accidental impacts to the screen surface, and also makes cleaning easier. 100Hz Double Scan 100Hz Double Scan is a function of this TV that reduces large area flicker.
Safety Precautions Warning & Caution Handling the mains plug and lead ●Ensure that the mains plug is easily accessible at all times. The On / Off switch on this model does not fully disconnect the TV from the mains supply. Remove the mains plug from the wall socket when the TV is not used for a prolonged period of time. ●Ensure the earth pin on the mains plug is securely connected to prevent electrical shock.
Notes Do not display a still picture for a long time Do not expose to rain or excessive moisture ●To prevent damage which might result in electric shock or fire, do not expose this TV to rain or excessive moisture. This TV must not be exposed to dripping or splashing water and objects filled with liquid, such as vases, must not be placed on top of or above the TV. This causes the image to remain on the plasma screen (“image retention”).
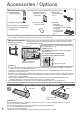
Accessories / Options Standard accessories □ Remote Control INPUT TV AV ●N2QAYB000328 ASPECT MENU N DIRECT TV REC EXIT OPTION RETURN Check that you have the accessories and items shown □ Batteries for the □ Mains Lead ●K2CT3YY00016 Remote Control (2) ●R6 (UM3) TEXT STTL INDEX HOLD p.
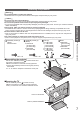
Attaching the pedestal Warning Do not disassemble or modify the pedestal. ●Otherwise the TV may fall over and become damaged, and personal injury may result.
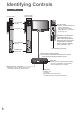
Identifying Controls TV (TX-P37C10B) SD CARD Common Interface SD Card slot (p. 48) V TX-P42C10B TX-P50C10B ) Function select SD CARD ●Volume / Contrast / Brightness / Common Interface Colour / Sharpness / Tint (NTSC mode) / Bass / Treble / Balance / Auto Setup (p. 34 and p. 35) CI slot (p. 45) Increases or decreases the channel position by one. When a function is already displayed, press to increase or decrease the selected function. When in Standby mode, switches TV On.
Remote Control VIERA IMAGE VIEWER (p. 48) ●Switches to SD Card viewing mode Input mode selection Standby On / Off switch ●TV - switches DVB / Analogue mode (p. 15) ●AV - switches to AV input mode from Input Aspect (p. 17) Direct TV Recording (p. 52 and p. 54) Selection list (p. 24) ●Switches TV On or Off standby DVD Recorder / VCR with Q-Link or VIERA Link connection repeatedly until you reach the desired aspect Main Menu (p.
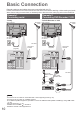
Basic Connection External equipment and cables shown are not supplied with this TV. Please ensure that the unit is disconnected from the mains socket before attaching or disconnecting any leads. When disconnecting the mains lead, be absolutely sure to disconnect the mains plug at the socket outlet first.
Example 3 Connecting DVD Recorder / VCR and Satellite receiver TV, DVD Recorder / VCR and Satellite Rear of the TV Push until both side tabs click AC 220-240 V 50 / 60 Hz Make sure that the mains lead is securely fixed.
Auto Setup Search and store TV channels automatically. ●These steps are not necessary if the setup has been completed by your local dealer. ●Please complete connections (p. 10 and p. 11) and settings (if necessary) of the connected equipment before starting Auto Setup. For details of settings for the connected equipment, read the appropriate manual.
Using the On Screen Displays Many features available on this TV can be accessed via the On Screen Display menu.
How to Use VIERA TOOLS You can access some special features easily by using the VIERA TOOLS function. ●For “VIERA Link Control” and “Pause Live TV” functions to operate correctly, ensure the connections and settings are completed. “Summary of Q-Link and VIERA Link features” (p. 50 and p. 51), “Preparations” (p. 53) After connection, turn the equipment on and then switch the TV on.
Watching TV INPUT TV AV ASPECT MENU N DIRECT TV REC EXIT OPTION 1 Turn power on 2 Select DVB or Analogue ●Also possible by pressing the TV button on the side panel of the TV RETURN (Press for about 1 second) ●Mains power On / Off switch should be On. (p. 8) TV. (p. 8) 1 BBC ONE Wales 19:35 Coronation Street 19 : 30 - 20 : 00 Now All DVB Channels For info press Information banner appears whenever you select a channel ●For details p.
Watching TV ■Other useful functions Display subtitles ■DVB mode Display / hide subtitles (if available) ●To change the language for DVB (if available) STTL “Preferred Subtitles” (p. 33) ■Analogue mode Display subtitles ●To hide subtitles STTL EXIT Note ●This is the same as switching to Analogue teletext service and selecting “P888” (subtitle service). (p. 23) ●You cannot change the channel when this function is active.
■Other useful functions Aspect ASPECT Change the aspect ratio (image size) Enjoy viewing the image at its optimum size and aspect. Normally programmes have the Aspect Control Signal (Widescreen signal, etc.), and the TV will choose the aspect ratio automatically according to the Aspect Control Signal (p. 60).
Using TV Guide TV Guide―Electronic Programme Guide (EPG) provides an on-screen listing of the programmes currently broadcast and the forthcoming broadcasts over the next seven days (depending on the broadcasters). ●This TV supports the GUIDE Plus+ system. ●The Gemstar branding partner will supply the rating informations in the programme information and the recommended group in the Prog.Type list. ●Analogue channels will be listed after DVB channels but there will be no programme listings.
■Other useful functions (Operate whilst viewing TV Guide) View advertisement Enter your postcode when using this function for the first time “Postcode” in “GUIDE Plus+ Settings” (p. 33) If you have already entered your postcode in “Auto Setup” - when first using the TV (p. 12), you do not have to enter again. If you enter an incorrect postcode for your area, or no postcodes are entered, advertisement may not be displayed correctly.
Using TV Guide ■Other useful functions (Operate whilst viewing TV Guide) Guide link recording (Timer Programming from the TV Guide signal) Guide link recording is a timer programme controlled by information from the TV Guide. Programme start and end times may be changed by broadcasters and sent to the TV for timer programme to follow the change. Split Programme is a programme which is interrupted by one or more other programmes. Both of the above are subject to signals being sent by broadcasters.
Viewing Teletext You can enjoy news, weather forecasts and subtitles, etc. (depending on the broadcaster) ●The availability of teletext services for a programme is indicated by “TXT” in the information banner. Information banner (p. 16) 1 BBC ONE Wales 19:35 Coronation Street 19 : 30 - 20 : 00 Now All DVB Channels Select favourites For info press TXT Displayed if programme has teletext service DVB teletext (MHEG) DVB teletext services DVB teletext services differ greatly from analogue teletext.
Viewing Teletext Analogue teletext Analogue teletext services Analogue teletext services are the text information provided by the broadcasters. The features may vary depending on the broadcasters. What is FASTEXT mode? In FASTEXT mode, four differently coloured subjects are situated at the bottom of the screen. To access more information about one of these subjects, press the appropriately coloured button. This facility enables fast access to information on the subjects shown.
INDEX Subtitle Return to the main index page View a favourite page stored STTL INDEX ●Factory setting is “P888” (subtitle service) on the blue button (List mode). View in multi window Watch TV and Teletext in two windows at once ●Operations can be made only in Teletext screen.
Watching External inputs Connect the external equipment (VCRs, DVD equipment, etc.) and you can watch through the input. ●To connect the equipment p. 10, 11 and p. 58 The Remote Control is capable of operating some functions of selected external equipment. 1 Turn the TV on ■When connecting with SCART as example 2 or 3 (p. 10 and p. 11) Receives input signals automatically when playback starts ●Input signals are automatically identified by the SCART (pin 8) terminal.
Screen display Terminal Manual input ( default setting in “Input Labels” Auto input ( EC mode or VIERA Link ) ) AV1 AV2 AV3 COMPONENT HDMI1 HDMI2 AV1 AV1-RGB AV2 AV2-S-Video AV2-RGB AV3 AV3-S-Video COMPONENT HDMI1 HDMI2 EC/AV1 EC/AV1-RGB EC/AV2 EC/AV2-S-Video EC/AV2-RGB ― ― ●Applicable for EC/HDMI1 EC mode and VIERA Link ●If the above information is permanently displayed on the top left of the screen, press the Operating the equipment with the TV remote control EC/HDMI2 ●Applica
How to Use Menu Functions Various menus allow you to make settings for the picture, sound, and other functions.
■Overview (Picture, Sound) ●How to operate p. 26 Main Menu Picture Sound Setup Picture Menu Viewing Mode Contrast Brightness Colour Sharpness Tint Colour Balance Colour Management P-NR 1/2 Dynamic Picture Menu 3D-COMB Reset to Defaults Available in NTSC Warm Off Off 2/2 Available in NTSC / PAL Off Reset (p. 30) 1/2 Music Off Available in DVB 2/2 Available in Analogue Off Digital Access Reset Available in HDMI (p.
How to Use Menu Functions ■Overview (Setup) ●How to operate Timer Programming Wed 15/10/08 18:50 N o. C ha nne l N a m e p. 26 Date St a r t En d D 1 BBC1 17/10 FR 18: 00 20: 00 120 Off D 1 BBC1 Holiday News 18/10 SA 21:30 22:30 60 Off 18/10 --/-- SA 22:30 --:-- 23:30 --:-- 60 --- Off --- --- --/-- --:-- --:-- --- --- --- --/-- --:-- --:-- --- --- Guide D --3 ITV1 Freshl y S queez ed E xt ra Main Menu S/P mi n . ST T L (p.
Sending Preset Data Please wait! 0% 100% Remote control unavailable (p. 32) Child Lock Change PIN Child Lock List Access Access Child Lock List - TV and AV (p. 40) Name 4 BBC ONE Wales 7 BBC THREE 14 E4 VCR 1 BBC1 2 ***** AV1 AV2/S Input DVB DVB DVB Analogue Analogue Analogue External External Type Free TV Free TV Free TV Analogue Analogue Analogue AV AV Lock Lock Lock Lock Lock Lock Lock Lock (p.
How to Use Menu Functions ■Menu list Menu Picture 30 Item Adjustments / Configurations (alternatives) Viewing Mode Selects four different screen settings (Dynamic / Normal / Cinema / Game) In each Viewing Mode setting, Contrast, Brightness, Colour, Sharpness, Tint, Colour Balance, Colour Management, Eco Mode and 3D-COMB can be adjusted and stored to suit your particular viewing requirement (e.g., you may require different settings for viewing sports, films, news etc.
■Menu list Menu Item Adjustments / Configurations (alternatives) Increases or decreases level to enhance or minimise lower, deeper sound output Treble Increases or decreases level to enhance or minimise sharper, higher sound output Balance Adjusts volume level of right and left speakers Headphone Volume Adjusts the volume of the headphones Surround Surround sound settings (Off / V-Audio) Provides a dynamic enhancer of width to simulate improved spatial effects ●Switching is also possible by the S
How to Use Menu Functions ■Menu list Menu Item Timer Programming Records forthcoming channels (p. 47) Off Timer Sets the time the TV automatically turns Off (Off / 15 / 30 / 45 / 60 / 75 / 90 minutes) Link Settings Setup VIERA Link Sets to use VIERA Link functions (Off / On) (p. 53) Q-Link Selects which AV terminal is to be used for data communication between this TV and a compatible recorder (AV1 / AV2) (p. 52) ●Select the connected terminal to the recorder even it is not compatible with Q-Link.
■Menu list Menu Item Adjustments / Configurations (alternatives) Display Settings Analogue teletext display mode (FASTEXT / List) (p. 22) Preferred Subtitles Selects the preferred language for digital channel subtitles (depending on the broadcaster) ●To display subtitles p. 16 Side Panel Increases the brightness of the side panel (Off / Low / Mid / High) ●The recommended setting is “High” to prevent panel “image retention”. Input Labels Labels or skips each input terminal (p.
Retuning from Setup Menu Auto Setup retunes all channels automatically. DVB channels Automatically retune all DVB channels received in the area. ● Only DVB channels are retuned in DVB mode. ● All the previous tuning settings are erased. ● If a Child Lock PIN number (p. 40) has been set, it must be entered.
Analogue channels Automatically retune all Analogue channels received in the area. ● Only Analogue channels are retuned in Analogue mode. ● All the previous tuning settings are erased. ● If a Child Lock PIN number (p. 40) has been set, it must be entered.
Tuning and Editing Channels (DVB) You can retune channels or make your favourite channel lists, skip unwanted channels, etc.
List favourite DVB channels Favourites Edit Create your favourite channel lists from various broadcasters (up to 4: Favourites1 to 4). The DVB Favourites lists are available for switching in the Information banner (p. 16) and from “Category” in the TV Guide (p. 18).
Tuning and Editing Channels (Analogue) You can retune channels or skip unwanted channels, edit channels etc.
Skip unwanted Analogue channels, Edit Analogue channels Channel List You can hide unwanted Analogue channels. The hidden channels cannot be displayed except in this function. Use this function to skip unwanted channels. Select a channel and reveal / hide reveal / hide Analogue Channel List 1 BBC1 2 ***** 3 ***** 4 5 6 7 select ■ To edit channels yellow Channel position Channel name You can also edit each channel in Channel List.
Child Lock You can lock specific channels / AV input terminals and control who watches them. When the locked channel / input is selected, a message appears; by entering the PIN number, you can watch it.
Shipping Condition Resets the TV to its original condition, i.e. no channels tuned in. All settings other than “Owner ID” are reset (channels, picture, sound settings, etc.).
Owner ID Entry of the PIN number and personal information (your name, address and postcode). In the unfortunate event of theft it will help the Police to determine the owner.
Input Labels For easier identification and selection of the input mode, you can label each input mode or skip terminal that is not connected to any equipment. ● To select the input mode INPUT TV AV ASPECT MENU p.
Advanced Settings (DVB) Advanced Settings provide various DVB features.
Pay-TV Common Interface The Common Interface Module menu provides access to software contained on Common Interface (CI) Modules. This TV receiver works only Pay TV modules complying with CI standard. ● This function is not available for BSkyB’s Sky channels. Caution CI slot ● Remove the cover before using CI slot. Insert or remove straightly and completely ● Turn Off Mains power On / Off switch whenever inserting or removing the CI module.
Recording Controls Timer Programming from Menu The Timer programming menu allows you to choose programmes that you wish to record. At the correct time, the TV will switch on and tune to the correct channel (even if the TV is in Standby mode). TV Guide may also be used to set timer programming. (p. 19) ● If the recorder is compatible with Q-Link or similar technologies (p. 52), and setup / connection are done completely (p. 50 and p.
Set timer programming details Timer Programming Start making the settings Repeat the operations as below, and set items in the order of ● set , and to can also be entered with numeric buttons. select the item D: DVB A: Analogue (you cannot change TV mode within the menu) Timer recording Records according to the time setting Guide: Guide link recording Records according to the TV Guide signal (p. 20) S/P: Split Programme (p. 20) Timer Programming Wed 15/10/08 18:50 No .
Viewing from SD Card (VIERA IMAGE VIEWER) Still images recorded by digital cameras will be displayed. ● During the operation, sound signal is output from AV1, AV2 and AUDIO OUT terminals. But no video signals are output. ● “Date” shows the date on which the recording was made by the digital camera or digital video camera. The file without record of the date is shown “**/**/****”. p.
Slideshow ■ Start Slideshow (operate in step ) Select the photo for the first view Start Slideshow ●To pause red ●To return to single view green Note ●Slideshow is done within the thumbnail. ●You can also start slideshow directly by using VIERA TOOLS “How to Use VIERA TOOLS” (p.
Link Functions (Q-Link VIERA Link) Q-Link connects the TV and DVD Recorder / VCR, and enables easy recording, playback, etc. (p. 52) VIERA Link (HDAVI Control™) connects the TV and the equipment with VIERA Link function, and enables easy control, convenient recording, playback, energy saving, creating home theatre, etc., without complicated setting. (p. 53 - 59) You can use Q-Link and VIERA Link functions together. ● This TV supports “HDAVI Control 4” function.
■ VIERA Link (HDMI and Audio out connections) Connected equipment Features Analogue channel download Easy playback Power on link Power off link Reduce unnecessary power consumption in standby Auto standby for unnecessary equipment Pause Live TV programme Direct TV Recording Control the menu of the connected equipment by VIERA remote control Speaker control Player theatre with VIERA Link function Blu-ray Disc theatre with VIERA Link function Amplifier with VIERA Link function – – ∗5 – – – ∗3 – – –
Link Functions (Q-Link VIERA Link) Q-Link ■ Preparations ●Connect the DVD Recorder / VCR with the following logos: “Q-Link”, “NEXTVIEWLINK”, “DATA LOGIC”, “Easy Link”, “Megalogic” or “SMARTLINK” ●Q-Link connection p. 50 ●Use fully wired SCART cable. ●Set up the DVD Recorder / VCR. Read the manual of the recorder. ●Q-Link terminal setup in the Setup Menu “Q-Link” (p. 32), “AV1 / AV2 out” (p.
VIERA Link “ Control™”∗ ∗Enjoy additional HDMI Inter-Operability with Panasonic products which have “HDAVI Control” function. This TV supports “HDAVI Control 4” function. Connections to the equipment (DIGA Recorder, HD Video Camera, Player theatre, Amplifier, etc.) with HDMI and SCART cables allow you to interface them automatically (p. 50 and p. 51). These features are limited to models incorporating “HDAVI Control” and “VIERA Link”.
Link Functions (Q-Link VIERA Link) ■Features available Reduce unnecessary power consumption in standby Standby Power Save Set Standby Power Save “On” in the Setup Menu to use this function “Standby Power Save” (p. 32) The power consumption in Standby mode of the connected equipment is controlled higher or lower in synchronization with the TV On / Off state to reduce the consumption.
■Features available (Using VIERA Link Menu) Pause Live TV programme Pause Live TV You can pause the live TV programme and resume later. Live TV programme will be recorded on HDD of the connected DIGA Recorder. ●This function is available with DIGA Recorder which has HDD. ●If you connect a variety of recorders including other manufacturers’ recorders at the same time, please connect DIGA Recorder which has HDD to the TV’s lower HDMI terminal number.
Link Functions (Q-Link VIERA Link) ■Features available (Using VIERA Link Menu) Control the menu of the connected equipment by VIERA remote control VIERA Link Control You can control some functions of the connected equipment with this TV remote control (point the remote control at the TV’s signal receiver). ●If you cannot operate, check the settings and the equipment “Summary of Q-Link and VIERA Link features” (p. 50 and p. 51), “Preparations” (p.
■Features available (Using VIERA Link Menu) Speaker control Speaker Selection You can control the theatre speaker with this TV remote control (point the remote control at the TV’s signal receiver). ●If you cannot operate, check the settings and the equipment “Summary of Q-Link and VIERA Link features” (p. 50 and p. 51), “Preparations” (p.
External Equipment These diagrams show our recommendations for connection of your TV to various pieces of equipment. For other connections, consult the instructions for each piece of equipment, the table below, and the specifications (p. 71). To watch satellite broadcasts HDMI equipment “HDMI connection” (p. 61) HD Satellite receiver Fully wired SCART cable Fully wired HDMI compliant cable Fully wired HDMI compliant cable To enjoy the sound from the external equipment in multi-channel sound (e.g.
Rear of the TV AV3 (S-VIDEO) or (VIDEO) Terrestrial aerial S-V V L R (AUDIO) RF cable (M3 stereo mini plug) Camcorder / Game equipment Headphones To record / playback DVD Recorder / VCR COMPONENT Y L PB R PR Advanced To adjust volume “Headphone Volume” in the Sound Menu (p.
Technical Information Auto Aspect The optimum size and aspect can be chosen automatically, and you can enjoy finer images. (p. 17) ■Aspect Control Signal “WIDE” will appear in the top left of the screen if a Widescreen signal (WSS) or a Control signal through SCART / HDMI terminal is found. The aspect will switch to the appropriate 16:9 or 14:9 widescreen ratio. This function will work in any aspect mode.
HDMI connection HDMI (high-definition multimedia interface) is the world’s first complete digital consumer AV interface complying with a non-compression standard. HDMI allows you to enjoy high-definition digital images and high-quality sound by connecting the TV and the equipment. HDMI-compatible equipment (∗1) with an HDMI or DVI output terminal, such as a set top box or a DVD player, can be connected to the HDMI terminal using an HDMI compliant (fully wired) cable.
Technical Information Input signal that can be displayed COMPONENT (Y, PB, PR), HDMI ∗ Mark: Applicable input signal Signal name 525 (480) / 60i 525 (480) / 60p 625 (576) / 50i 625 (576) / 50p 750 (720) / 60p 750 (720) / 50p 1,125 (1,080) / 60i 1,125 (1,080) / 50i 1,125 (1,080) / 60p 1,125 (1,080) / 50p 1,125 (1,080) / 24p PC (from HDMI terminal) COMPONENT ∗ ∗ ∗ ∗ ∗ ∗ ∗ ∗ Applicable input signal for PC is basically compatible to HDMI standard timing.
Characters table for numeric buttons You can enter characters by using numeric buttons for free input items. Press the numeric button repeatedly until you reach the desired character. ●The character is set automatically if you leave for one second. ●You can also set the character by pressing the OK button or other numeric buttons within one second.
FAQs Before requesting service or assistance, please follow these simple guides to resolve the problem. If the problem still persists, please contact your local Panasonic dealer or Panasonic Customer Care Centre for assistance. For details p. 72 White spots or shadow images (noise) ●Check the position, direction, and connection of the aerial. Neither image nor sound is produced ●Is the TV in AV mode? ●Check the correct AV input mode is selected. ●Check the mains lead is plugged into the socket outlet.
Problem Chaotic image, noisy Screen No image can be displayed Blurry or distorted image (no sound or low volume) Unusual image is displayed Sound No sound is produced Sound level is low or sound is distorted Actions ●Set “P-NR” in the Picture Menu (to remove noise). (p. 30) ●Check nearby electrical products (fluorescent lamp, DECT phones, mobile phones, microwave, etc.). ●Is “Colour” or “Contrast” in the Picture Menu set to the minimum? (p.
On screen messages Message Meaning / Action All tuning data will be erased ●“Shipping Condition” will erase all tuning data (p. 41). Are you sure ? ●Confirm correct operation. Are you sure you want to delete this timer ? Press OK to delete timer Press RETURN to return ●Confirm correct operation. ●The signal is weak. Check the aerial is plugged in properly. It may be necessary to have an aerial installer check the signal and aerial alignment. ●Reset channels. (p. 34 and p.
Message Meaning / Action No module inserted ●Check the CI module inserted completely (p. 45). No recording - Check media ●The tape or disc may be “write protected”, missing or damaged. No recording - Already recording ●The equipment may already be recording. No recording - Unknown reason ●The recording may not be performed. Check the equipment. ●Disc or tape may be full. No service ●The broadcaster has stopped the service. Check the channel in TV No signal ●The TV cannot detect the signal.
On screen messages Message Meaning / Action This timer will not follow the TV Guide information Press OK to continue, RETURN to restore original timer ●If you edit the start time or end time of Guide link recording more than Timer already expired ! ●Starting time in Timer Programming is already past. Set correctly (p. 47).
Glossary ■DVB Digital Video Broadcasting ■DVD Digital Versatile Disc ■DVI Digital Visual Interface ■EPG Electronic Programme Guide ■HDMI High-Definition Multimedia Interface ■NTSC ■SCART ■RF ■Shop viewing environment National Television System Committee One of the television signals used in USA, etc.
Licence Even if no special notation has been made of company or product trademarks, these trademarks have been fully respected. ●DVB is a trademark of the DVB Digital Video Broadcasting Project (1991 to 1996). ●SDHC Logo is a trademark. ●HDMI, the HDMI Logo and High-Definition Multimedia Interface are trademarks or registered trademarks of HDMI Licensing LLC. ●HDAVI Control™ is a trademark of Panasonic Corporation. ●x.v.Colour™ is a trademark.
Specifications TX-P37C10B TX-P42C10B TX-P50C10B Power Source AC 220-240 V, 50 / 60 Hz Power Consumption 230 W Power Consumption in Standby mode 0.
Information for Users on Collection and Disposal of Old Equipment and used Batteries These symbols on the products, packaging, and/or accompanying documents mean that used electrical and electronic products and batteries should not be mixed with general household waste. For proper treatment, recovery and recycling of old products and used batteries, please take them to applicable collection points, in accordance with your national legislation and the Directives 2002/96/EC and 2006/66/EC.