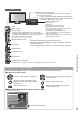
Model No. TX-P42G20E TX-P46G20E TX-P50G20E TX-P42G20ES TX-P46G20ES TX-P50G20ES Operating Instructions Plasma Television Contents Be Sure to Read For more detailed instructions, refer to the Operating Instructions on the CD-ROM. To view the Operating Instructions on the CD-ROM, you need a computer equipped with a CD-ROM drive, and Adobe® Reader® (Version 7.0 or later is recommended) installed on your computer.
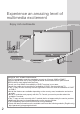
Experience an amazing level of multimedia excitement Enjoy rich multimedia VCR Amplifier with Speaker system DVD Recorder DVD Player Notice for DVB functions USB HDD This TV is designed to meet the standards (current as of August, 2009) of DVB-T (MPEG2 and MPEG4-AVC(H.264)) digital terrestrial services and DVB-C (MPEG2 and MPEG4-AVC(H.264)) digital cable services. Consult your local dealer for availability of DVB-T services in your area.
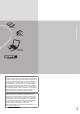
Camcorder Basic Personal computer Quick Start Guide SD Card Set top box Advanced A The recording and playback of content on this or any other device may require permission from the owner of the copyright or other such rights in that content. Panasonic has no authority to and does not grant you that permission and explicitly disclaims any right, ability or intention to obtain such permission on your behalf.
Safety Precautions Warning Handling the mains plug and lead ●Insert the mains plug fully into the socket outlet. (If the mains plug is loose, it could generate heat and cause fire.) ●Ensure that the mains plug is easily accessible. ●Ensure the earth pin on the mains plug is securely connected to prevent electrical shock. • An apparatus with CLASS I construction shall be connected to a mains socket outlet with a protective earthing connection. ●Do not touch the mains plug with a wet hand.
■When cleaning the TV, remove the Caution mains plug ■Do not block the rear air vents ●Blocked ventilation by newspapers, table ●Cleaning an energized TV may cause electrical shock. cloths, curtains, etc. may cause overheating, fire or electrical shock.
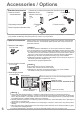
Accessories / Options Standard accessories □ Remote Control ●N2QAYB000490 Check that you have the accessories and items shown □ Batteries for the Remote Control (2) ●R6 □ Clamper p. 10 □ Mains Lead p. 10 p. 8 □ Operating Instructions □ Pan European Guarantee Card □ Pedestal p. 7 □ Ferrite core (2) ●This product contains possibly dangerous parts (such as plastic bags), that can be breathed in or swallowed by young children accidentally. Keep these parts out of reach of young children.
Attaching the pedestal Warning Do not disassemble or modify the pedestal. ●Otherwise the TV may fall over and become damaged, and personal injury may result. Caution Do not use any other TV and displays. ●Otherwise the TV may fall over and become damaged, and personal injury may result. Do not use the pedestal if it becomes warped or physically damaged. ●If you use the pedestal while it is physically damaged, personal injury may result. Contact your nearest Panasonic dealer immediately.
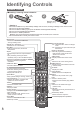
Identifying Controls Remote Control ■Installing / removing remote’s batteries 1 2 Pull open Close Note the correct polarity (+ or -) Hook Caution ●Incorrect installation may cause battery leakage and corrosion, resulting in damage to the remote control. ●Do not mix old and new batteries. ●Do not mix different battery types (such as alkaline and manganese batteries). ●Do not use rechargeable (Ni-Cd) batteries. ●Do not burn or breakup batteries.
TV Remote control signal receiver ●Do not place any objects between the TV remote control signal receiver and remote control. C.A.T.S. (Contrast Automatic Tracking System) sensor ●Senses brightness to adjust picture quality when “Eco Mode” in the Picture Menu is set to “On” (p.
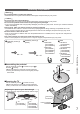
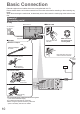
Basic Connection External equipment and cables shown are not supplied with this TV. Please ensure that the unit is disconnected from the mains socket before attaching or disconnecting any leads. When disconnecting the mains lead, be absolutely sure to disconnect the mains plug at the socket outlet first. Example 1 Connecting aerial TV only ■Mains Lead Rear of the TV AC 220-240 V 50 / 60 Hz Mains lead (supplied) ■Clamper Make sure that the mains lead is securely fixed.
Example 2 Connecting DVD Recorder / VCR TV, DVD Recorder or VCR Example 3 Connecting DVD Recorder / VCR and Set top box TV, DVD Recorder / VCR and Set top box Rear of the TV Terrestrial aerial Rear of the TV Terrestrial aerial Cable AC 220-240 V 50 / 60 Hz Cable AC 220-240 V 50 / 60 Hz RF cable Mains lead (supplied) Mains lead (supplied) HDMI 1 COMPONENT AUDIO AUDIO OUT IN DIGITAL AUDIO OUT PC R PC PB PR RGB VIDEO AV1 RGB VIDEO S VIDEO AV2 L PB R R PR RGB VIDEO AV1 RGB VIDEO S
Auto Setup Search and store TV channels automatically. ●These steps are not necessary if the setup has been completed by your local dealer. ●Please complete connections (p. 10 and p. 11) and settings (if necessary) of the connected equipment before starting Auto Setup. For details of settings for the connected equipment, read the manual of the equipment.
5 Select “Start Auto Setup” access TV Signal Selection DVB-C D DVB-T DHD DVB-T support for HD services A Analogue select Start Auto Setup Auto Setup starts Auto Setup will start to search for TV channels and store them. The stored channels and sorted channel order vary depending on the country, area, broadcasting system and conditions of signal reception. Auto Setup varies depending on the country you select.
Auto Setup 6 Setup the wireless LAN connection Setup the wireless LAN connection to enable the network service functions. (If you do not wish to use wireless LAN connection or the network service functions, skip this step.) ●To setup the wireless LAN connection, the Wireless LAN Adaptor (optional accessory) is required. For the information about the Wireless LAN Adaptor “Optional accessories” (p. 6) ●Confirm the encryption key, settings and positions of your access point before starting setup.
Select “Home” 7 Select “Home” viewing environment to use in your home environment. Please select your viewing environment. Home Shop select set Auto Setup is now complete and your TV is ready for viewing. ■“Shop” viewing environment (for shop display only) “Shop” viewing environment is the demonstration mode to explain main features of this TV. Select “Home” viewing environment to use in your home environment.
How to Use VIERA TOOLS You can access some special features easily by using the VIERA TOOLS function. EXIT TO VIERA OLS 1 Display icons of the feature 2 Select a feature TO VIERA OLS select access VIERA Link Control 3 Follow the operations of each feature ●VIERA Link Control When two or more compatible equipment are connected, a selection screen will be displayed. Please select the correct description and access.
How to Use Menu Functions Various menus allow you to make settings for the picture, sound, and other functions.
How to Use Menu Functions ■Menu list Menu Item Picture Viewing Mode Basic picture mode (Dynamic / Normal / Cinema / THX (True Cinema) / Game / Photo / Professional1 / Professional2) In each Viewing Mode and input, Contrast, Brightness, Colour, Sharpness, Tint, Colour Balance, Vivid Colour, Eco Mode, P-NR and 3D-COMB can be adjusted and stored to suit your particular viewing requirement. ●Set for each input signal. Dynamic : Provides enhanced picture contrast and sharpness when viewing in a bright room.
Menu Item Adjustments / Configurations (alternatives) Bass Increases or decreases level to enhance or minimise lower, deeper sound output Treble Increases or decreases level to enhance or minimise sharper, higher sound output Equalizer Adjusts the frequency level to suit your favourite sound quality ●This function is available when “Mode” is set to “User”. ●Select the frequency and change the frequency level by using the cursor button.
How to Use Menu Functions Menu Item Sound SPDIF Selection SPDIF : A standard audio transfer file format Selects the initial setting for digital audio output signal from DIGITAL AUDIO OUT terminal (Auto / PCM) Auto : Dolby Digital Plus and Dolby Digital are output as Dolby Digital Bitstream. HE-AAC (48 kHz) 5.1ch is output as DTS. MPEG is output as PCM. PCM : Digital output signal is fixed to PCM.
Menu Item Adjustments / Configurations (alternatives) DVB-C Tuning Menu DVB-T Tuning Menu Analogue Tuning Menu Creates list of favourite DVB-C channels Channel List Skips the unwanted DVB-C channels or edits DVB-C channels Auto Setup Automatically sets the DVB-C channels supplied Manual Tuning Sets the DVB-C channels manually Update Channel List Updates DVB-C Channel List while keeping your settings Favourite Network Selects your favourite network for each broadcasters (only available in some
How to Use Menu Functions Menu Item OSD Language Adjustments / Configurations (alternatives) Changes language for on screen displays Language Selects the first and second preferred language for DVB multi audio (depending on Preferred Audio 1 / 2 the broadcaster) Display Settings Setup Preferred Subtitles 1/2 Selects the first and second preferred language for DVB subtitles (depending on the broadcaster) Preferred Teletext Selects the preferred language for DVB teletext service (depending on the b
Menu Item Adjustments / Configurations (alternatives) Selects the language that your USB Keyboard supports ●Use a USB Keyboard to enter characters in VIERA CAST. ●Characters may not be displayed correctly on the TV screen depending on the connected keyboard or the keyboard layout setting.
Information for Users on Collection and Disposal of Old Equipment and used Batteries These symbols on the products, packaging, and/or accompanying documents mean that used electrical and electronic products and batteries should not be mixed with general household waste. For proper treatment, recovery and recycling of old products and used batteries, please take them to applicable collection points, in accordance with your national legislation and the Directives 2002/96/EC and 2006/66/EC.