Model No.
Important Notice Do not display any still part of the image for a long period In such cases the still part of the image remains dimly on the plasma screen (“image retention”). This is not considered a malfunction and is not covered by the warranty.
Rovi Corporation and/or its subsidiaries and related affiliates are not in any way liable for the accuracy or availability of the program schedule information or other data in the Rovi Guide system and cannot guarantee service availability in your area. In no event shall Rovi Corporation and/or its related affiliates be liable for any damages in connection with the accuracy or availability of the program schedule information or other data in the Rovi Guide system.
To prevent the spread of fire, keep candles or other open flames away from this product at all times ■ Dangerous part / Small object Warning ● This product contains possibly dangerous parts such as plastic bags, that can be breathed in or swallowed by young children accidentally. Keep these parts out of reach of young children. ● Do not allow children to handle any small objects such as SD Card. The small object could be swallowed by young children.
■ Moving the TV Caution Before moving the TV, disconnect all cables. ● The TV is heavy. Move the TV with at least two people. Support as shown to avoid injury by the TV tipping or falling. ● Transport only in upright position. Transporting the TV with its display panel facing upwards or downwards may cause damage to the internal circuitry.
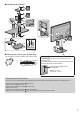
Accessories Remote Control (p. 13) ● N2QAYB000863 Batteries (2) ● R6 (p. 13) Pedestal (see below) 3D Eyewear (2) (p. 19) Electronic Touch Pen (with R03 battery) (p. 14) Cable tie (p. 12) Ferrite core for LAN cable (2) (Large size) (p. 10) Ferrite core for headphones (Small size) (p. 11) Operating Instructions Mains lead (p. 8) AV1 (SCART) adaptor (p. 9) Production Registration Leaflet Use the Ferrite cores to comply with the EMC standard. ● Accessories may not be placed all together.
■ Assembling the pedestal B F A 4 3 C D 1 E 2 A 6 5 B ■ Adjusting the panel to your desired angle ● Do not place any objects within the full rotation range. 15° 15° (View from the top) 42-inch model Secure the base as shown below to prevent the TV from falling over. ● The place where the base is secured should be thick enough and made of hard material.
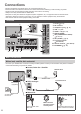
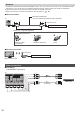
Connections ● External equipment and cables shown are not supplied with this TV. ● Ensure that the unit is disconnected from the mains socket before attaching or disconnecting any leads. ● Check the type of terminals and cable plugs are correct when connecting. ● Always use a fully wired SCART or HDMI cable. ● Keep the TV away from electronic equipment (video equipment, etc.) or equipment with an infrared sensor.
AV devices ■ DVD Recorder / VCR TV Terrestrial aerial SCART cable DVD Recorder / VCR AV1 (SCART) adaptor (supplied) RF cable RF cable ■ DVD Recorder / VCR and Cable TV Cable Cable TV box HDMI cable Terrestrial aerial SCART cable SCART cable RF cable AV1 (SCART) adaptor (supplied) RF Cable RF cable DVD Recorder / VCR 9
Network ● To enable the network service functions (VIERA Connect, etc.), you need to connect the TV to a broadband network environment. If you do not have any broadband network services, please consult your retailer for assistance. ● Prepare the internet environment for wired connection or wireless connection. ● Setup of the network connection will start when first using the TV. (p. 16) ■ Wired connection LAN cable (Unshielded) ● Use the Unshielded Twist Pair (UTP) LAN cable.
■ Camcorder / Game equipment (VIDEO equipment) TV (Viewing) Camcorder (Listening) Game equipment ■ Amplifier (to listen with speakers) TV HDMI cable Amplifier with speaker system External equipment (DVD Player, etc.) ● Use HDMI2 for connecting an amplifier. This connection is applicable when using an amplifier that has ARC (Audio Return Channel) function. As for an amplifier without ARC function, use DIGITAL AUDIO. ● To enjoy the sound from the external equipment in multi-channel sound (e.g.
Types of connectable equipment to each terminal Terminal VIDEO USB 1 - 3 COMPONENT HDMI 1 - 3 AV1*1 DIGITAL AUDIO Features ETHERNET AV2 To record / play back videocassettes / DVDs (VCR / DVD Recorder) To watch 3D contents (Blu-ray Disc Player) To watch satellite broadcasts (Set top box) To watch DVDs (DVD Player) To watch camcorder images (Video camera) To play games (Game equipment) To use amplifier with speaker system *2 To use network services *3 USB HDD Recording *4 VIERA Link : Recommen
Identifying Controls Remote Control 6 OK 1 2 3 14 15 4 5 16 17 18 6 19 7 20 8 9 10 21 22 11 23 7 8 9 10 11 12 13 14 15 12 13 24 16 17 25 18 19 20 21 1 Standby On / Off switch 2 3D button 22 ● Switches the view between 2D and 3D. 3 [Main Menu] ● Press to access Picture, Sound, Network, Timer, Setup and Help Menus. 4 Information ● Displays channel and programme information. 5 APPS ● Displays [APPS List] (applications list). 23 24 25 ● Confirms selections and choices.
Electronic Touch Pen You can paint or play games on the TV screen with the Electronic Touch Pen. ● The Electronic Touch Pen can be used by pairing to the TV in [Auto Setup] (p. 16) or [Touch Pen Setup]. For more information, refer to [eHELP] (Functions > Electronic Touch Pen > Touch Pen Setup). 2 1 3 4 1 Power button To turn on: Press once To turn off: Press and hold 2 seconds or longer ● Automatically turned off if unused for 5 minutes. 2 Indicator lamp ● Lights for approx.
Indicator / Control panel ● When pressing 1, 2, 3 buttons, the control panel guide appears on the right side of the screen for 3 seconds to highlight the pressed button. 2 Channel Up / Down 1 Cursor Up / Down (when in the menu system) 3 Volume Up / Down Cursor Left / Right (when in the menu system) 2 4 Mains power On / Off switch ● Use to switch the mains power. 3 5 Remote control signal receiver 4 5 6 ● Do not place any objects between the TV remote control signal receiver and remote control.
First time Auto Setup Automatically sets up the TV and searches for available TV channels when the TV is turned on for the first time. ● These steps are not necessary if the setup has been completed by your local dealer. ● Please complete connections (p. 8 - 12) and settings (if necessary) of the connected equipment before starting Auto Setup. For details of settings for the connected equipment, read the manual of the equipment.
Operations Turn power on ● Mains power On / Off switch should be on. (p. 15) (Remote Control) or (TV) The last viewed [Home Screen] is displayed. Example: [TV Home Screen] Example: Selected content screen ● To return to [Home Screen] at any time ● You can set up or make [Home Screen] to display desired information, to access specific features easily, to select the default [Home Screen], etc. For details, follow the on-screen instructions or refer to [eHELP] (Watching > my Home Screen).
How to Use eHELP [eHELP] is the detailed operating instructions built into the TV, and helps you to get more understanding of the operations for each feature. 1 Display [eHELP] or [Help] [eHELP] ● [Read first] will be displayed on the top page. Please read these instructions fully to get more understanding of the operation in [eHELP]. ● If this is not the first time to view [eHELP] from when the TV is turned on, the confirmation screen is displayed to select whether [First Page] or [Last Page].
Viewing 3D images You can enjoy viewing 3D images with contents or programmes corresponding to the 3D effect by wearing the 3D Eyewear. “Accessories” (p. 6) ● The 3D Eyewear must be worn to view 3D images. ● This TV supports [Frame Sequential]*, [Side by Side] and [Top and Bottom] 3D formats. *: The 3D format that the images for the left and right eyes are recorded with the high definition quality and alternately played back.
1 Turn the 3D Eyewear on and put it on 2 View the 3D images Connection status and battery status are displayed on the bottom right of the screen. Safety precautions will be displayed when you first watch the 3D image. Select [Yes] or [No] to continue to view 3D images. Note ● Turn off the 3D Eyewear after using it. ● Use the 3D Eyewear within approximately 3.2 m from the TV.
Unusual sound from the TV ● When the power is on, drive noise may be heard from inside the TV (not a sign of faulty operation). Parts of the TV become hot ● Even if the temperature of parts of the front, top and rear panels has risen, these temperature rises do not cause any problems in terms of performance or quality. Check you can get Freeview HD in your area. Text your postcode, followed by your house number or name to 80560*. Or visit freeview.co.uk *e.g. NW96NY1 (Costs no more than a normal text.
Panel Plasma panel AV1 input / output Connection terminals AV2 input (COMPONENT / VIDEO) SCART (Audio/Video in, Audio/Video out, RGB in) VIDEO RCA PIN Type × 1 1.0 V[p-p] (75 Ω) AUDIO L - R RCA PIN Type × 2 0.5 V[rms] Y PB, PR 1.0 V[p-p] (including synchronisation) ±0.35 V[p-p] HDMI 1 / 2 / 3 input TYPE A Connectors HDMI1 / 3: 3D, Content Type, Deep Colour, x.v.Colour™ HDMI2: 3D, Content Type, Audio Return Channel, Deep Colour, x.v.Colour™ ● This TV supports “HDAVI Control 5” function.
■ 3D Eyewear Dimensions (W × H × D) 164.7 mm × 41.0 mm × 170.7 mm Mass Approx. 34 Lens type Liquid Crystal Shutter Usage temperature range 0 °C - 40 °C Battery Coin-shaped lithium battery CR2025 Operation time: Approx. 75 hours in continuous use of the battery made by Panasonic Materials Main body: Resin Lens section: Liquid crystal glass ■ Electronic Touch Pen Length: 186.7 mm Diameter: 18.2 mm Dimensions Mass Approx.
Information for Users on Collection and Disposal of Old Equipment and used Batteries These symbols on the products, packaging, and/or accompanying documents mean that used electrical and electronic products and batteries should not be mixed with general household waste. For proper treatment, recovery and recycling of old products and used batteries, please take them to applicable collection points, in accordance with your national legislation and the Directives 2002/96/EC and 2006/66/EC.