Model No.
Important Notice Do not display any still part of the image for a long period In such cases the still part of the image remains dimly on the plasma screen (“image retention”). This is not considered a malfunction and is not covered by the warranty.
● Ensure that the mains plug is easily accessible. ● Disconnect the mains plug when cleaning the TV. ● Do not touch the mains plug with wet hands. ● Do not damage the mains lead. • Do not place a heavy object on the lead. • Do not place the lead near a high temperature object. • Do not pull on the lead. Hold onto the mains plug body when disconnecting the plug. • Do not move the TV with the lead plugged into a socket outlet. • Do not twist the lead, bend it excessively or stretch it.
■ Ventilation ■ When not in use for a long time Caution Allow sufficient space around the TV in order to help prevent excessive heat, which could lead to early failure of some electronic components. Minimum distance: Caution This TV will still consume some power even in the Off mode, as long as the mains plug is still connected to a live socket outlet. ● Remove the mains plug from the wall socket when the TV is not in use for a prolonged period of time.
Assembling / Removing the pedestal Assembly screw (4) (silver) Assembly screw (4) (black) Pole (2) L R M5 × 18 Base M5 × 30 ■ Assembling the pedestal A A C- R C- L 1 B 2 D 3 Removing the pedestal from the TV Be sure to remove the pedestal in the following way when using the wall-hanging bracket or repacking the TV. 1 Remove the assembly screws from the TV. 2 Pull out the pedestal from the TV. 3 Remove the assembly screws from the poles.
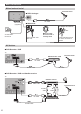
Basic connections Mains lead and aerial Terrestrial aerial ■ DVB, Analogue RF cable Mains lead (supplied) ■ Mains lead To remove from the TV: tabs AC 220-240 V 50 / 60 Hz Push until both side tabs click Make sure that the mains lead is securely fixed.
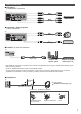
Other connections ■ DVD player (COMPONENT equipment) TV (Listening) DVD Player (Viewing) ■ Camcorder / Game equipment (VIDEO equipment) TV (Listening) Camcorder (Viewing) Game equipment ■ Amplifier (to listen with speakers) TV HDMI cable Amplifier with speaker system External equipment (DVD Player, etc.) ● Use HDMI2 for connecting an amplifier. This connection is applicable when using an amplifier that has ARC (Audio Return Channel) function.
■ Common Interface ● If a smart card and a CI module come as a set, first insert the CI module, then insert the smart card into the CI module. ● Insert the module in the correct direction. ● Normally encrypted channels will appear. (The viewable channels and its features depend on the CI module.) If encrypted channel does not appear [Common Interface] (p. 18) ● There might be some CI modules in the market with older firmware versions that do not work fully interoperable with this new CI+ v1.3 TV.
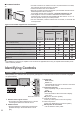
Remote Control 6 OK 1 2 3 4 5 12 6 16 7 17 13 14 15 8 18 7 8 9 10 19 9 20 11 12 10 21 11 13 14 15 16 1 Standby On / Off switch 2 VIERA TOOLS Displays some special feature icons and accesses easily. PHOTO VIDEO MUSIC 17 18 ECO NAVIGATION VIERA Link ● [VIERA Link] (p. 25) ● [Photo] in Media Player (p. 21) ● [Video] in Media Player (p. 21) ● [Music] in Media Player (p. 21) ● [Eco Navigation] (p. 17) 3 [Main Menu] (p.
Using the On Screen Displays - Operation guide Many features available on this TV can be accessed via the On Screen Display menu. ■ Operation guide ■ How to use remote control Operation guide will help your operation by using the remote control.
Watching TV 1 Turn power on (TV) Information banner Display Information banner ● Also appears when changing a channel. Example: DVB 1 or ● Mains power On / Off switch should be on. (p. 8) (Remote Control) 2 Select the mode down 1 ZDF Mute 2 3 5 C Coronation Street 20:00 - 20:55 2 Now Bad signal g Dolbyy D+ 6 7 4 20:35 Info AD STTL All DVB Channels Select favourites 45 TEXT Multi Audio * 1 Channel position and name 2 Channel type ([Radio], [Data], [HDTV], etc.
■ Information on the next programme (DVB) Viewing Text Service ■ To hide Text services are the text information provided by the broadcasters. The features may vary depending on the broadcasters. ● The availability of text services for a programme is indicated by [TEXT] in the information banner. ■ Extra information (DVB) (Press again to hide the banner) ■ To set display timeout Depending on the broadcaster, the digital text (MHEG) services may not be available.
Analogue teletext FULL / TOP / BOTTOM What is FASTEXT mode? In FASTEXT mode, four differently coloured subjects are situated at the bottom of the screen. To access more information about one of these subjects, press the appropriate coloured button. This facility enables fast access to information on the subjects shown. What is List mode? In List mode, four differently coloured page numbers are situated at the bottom of the screen. Each of these numbers can be altered and stored in the TV’s memory.
Using TV Guide TV Guide - Electronic Programme Guide (EPG) provides an on-screen listing of the programmes currently broadcast and the forthcoming broadcasts over the next seven days (depending on the broadcasters). ● This function varies depending on the country you select. ● When this TV is turned on for the first time, or the TV is switched off for more than a week, it may take some time before TV Guide is completely shown.
Picture Viewing Mode Selects your favourite picture mode for each input. [Dynamic]: Improves contrast and sharpness for viewing in a bright room. [Normal]: Normal use for viewing in a normal lighting condition. [Cinema]: Improves the performance of contrast, black and colour reproduction for watching movies in a darkened room. [True Cinema]: Reproduces the original image quality precisely without any revision. [Custom]: Adjusts each menu item manually to suit your favourite picture quality.
■ H-Size Switches the horizontal display range to reduce noise on the side edge of the image. ● For TV mode, AV and HDMI input ■ Zoom Adjustments Adjusts the vertical position and size when aspect is set to [Just], [Sidecut Just], [Zoom] or [Sidecut Zoom]. ■ Screen Display Turns the screen off when you select [Off]. This function is effective in reducing power consumption when listening to the sound without watching the TV screen. ● Press any buttons (except Standby) to turn the screen on.
SPDIF Selection SPDIF: A standard audio transfer file format Selects the initial setting for digital audio output signal from DIGITAL AUDIO and HDMI2 (ARC function) terminals. [Auto]: Dolby Digital Plus, Dolby Digital and HE-AAC multi-channel are output as Dolby Digital Bitstream. MPEG is output as PCM. DTS is output as DTS for video contents of Media Player. [PCM]: Digital output signal is fixed to PCM.
Tuning Menu* ■ Favourites Edit Creates a list of favourite channels. (p. 19) ● Not valid on Analogue mode ■ Channel List Skips unwanted channels or edits channels. (p. 19) ■ Auto Setup Automatically searches for receivable channels. (p. 19) ■ Channel Sorting by Region Automatically sorts tuned channels according to the available region. (p. 19) ● For DVB mode ■ Manual Tuning Searches for channels manually. (p. 19) ■ Update Channel List Updates the channel list while keeping your settings. (p.
Channel List Help TV Self Test Makes a diagnosis of picture or sound problems. Follow the on-screen instructions. System Information Displays the system information of this TV. Note *The menu name varies depending on the TV mode. ● A different menu will be displayed in the mode of Media Player. (p. 21) ● Only available items can be selected. Tuning and Editing Channels You can retune channels or make your favourite channel lists, skip unwanted channels, etc.
● Set where the level of [Signal Quality] becomes the maximum. 2 Search ■ To change the PIN number Select [Change PIN] and enter a new PIN number twice ■ Freeview Players Applies access control for some MHEG services. ■ To set Parental Rating Analogue: ■ Fine Tuning Use to make small adjustments to the tuning of an individual programme (affected by weather conditions, etc.). 1 Select the channel position ● If a VCR is connected only with the RF cable, select channel position [0].
Using Media Player Update from Internet The ETHERNET terminal is for TV’s software update. You can download a newer version of software through the internet, if it is available. Network connections Connect the TV and the broadband network equipment (modem, hub or router) by using a LAN cable. Internet environment LAN cable (Unshielded) ● Use the Unshielded Twist Pair (UTP) LAN cable.
Photo mode Example: Thumbnail - [All photos] Media Player View Select Slideshow Photo Info Option Menu RETURN View Select Drive Select All photos USB Flash Contents Select : Error display ● To change the size of photos on a thumbnail screen [Change Size] [Single view] - Photos are displayed one at a time. Select the file from the thumbnail of photos to be viewed [Slideshow] - Slideshow completes when all photos are viewed within the current thumbnail.
Music mode Video mode Example: Thumbnail - [Folder view] Example: Thumbnail - [Title view] Media Player Video Title view Trip1 Trip2 Trip3 Trip4 Trip5 Room Nature1 Nature2 Nature3 Nature4 Nature5 Nature6 2011_4 2011_7 Media Player Music My Music_1 My Music_3 My Music_2 Folder view 2011_9 Access Select Play RETURN Info Option Menu Drive Select USB Flash Contents Select : Error display : The file does not support thumbnail view.
● Please refer to individual manuals for other manufacturers’ equipment supporting VIERA Link function. ● About applicable Panasonic equipment, consult your local Panasonic dealer. ● To confirm this TV’s version of HDAVI Control [System Information] (p.
Operations Preparations ● VIERA Link connection (p. 24) ● Set up the connected equipment. Read the manual of the equipment. ● Set [VIERA Link] to [On] in the Setup Menu. (p. 18) ● Set up the TV. After connection, turn the equipment on and then switch the TV on. Select the input mode from HDMI1 or HDMI2 (p. 12), and make sure that an image is displayed correctly.
■ If multiple recorders or players are connected The number is given from the TV’s lower number of HDMI terminal connected to the same type equipment. For example, two recorders to HDMI1 and HDMI2, the recorder connected to HDMI1 is displayed as [Recorder1], and the recorder connected to HDMI2 is displayed as [Recorder2].
● Equipment having no digital output terminal may be connected to the input terminal of component or video to receive analogue signals. *1: The HDMI logo is displayed on HDMI-compliant equipment. *2: Audio Return Channel (ARC) is a function to send digital sound signals via an HDMI cable.
USB devices ● It is recommended to connect the USB device to the TV’s USB port directly. ● Some USB devices or USB HUB may not be used with this TV. ● You cannot connect any devices by using USB card reader. ● You cannot use two or more same kind of USB devices simultaneously except USB Flash Memory. ● Additional information for the devices may be on the following website. http://panasonic.
FAQs Before requesting service or assistance, please follow these simple guides to solve the problem. When an error message appears, follow the message’s instructions. If the problem still persists, contact your local Panasonic dealer or the authorised service centre. Block noise, frozen or disappearing image occurs in DVB mode / White spots or shadow image (ghosting) occurs in Analogue mode / Some channels cannot be tuned ● Check the position, direction and connection of the aerial.
Check you can get Freeview HD in your area. Text your postcode, followed by your house number or name to 80560*. Or visit freeview.co.uk *e.g. NW96NY1 (Costs no more than a normal text.) To get the most up to date service from Freeview it is important for Freeview customers to retune from time to time. How do I re-tune my Freeview TV ? This is a quick reference. If you have any problems, check the Operating Instructions or ask a friend or family member to show you how.
Power source AC 220-240 V, 50 / 60 Hz Panel Plasma panel Sound Speaker (160 mm × 40 mm) × 2, 8 Ω Audio output 20 W (10 W + 10 W) Headphones M3 (3.5 mm) stereo mini Jack × 1 Operating conditions AV1 input / output Connection terminals AV2 input (COMPONENT / VIDEO) Temperature: 0 °C - 35 °C Humidity: 20 % - 80 % RH (non-condensing) SCART (Audio/Video in, Audio/Video out, RGB in) VIDEO RCA PIN Type × 1 1.0 V[p-p] (75 Ω) AUDIO L - R RCA PIN Type × 2 0.5 V[rms] Y PB, PR 1.
Information for Users on Collection and Disposal of Old Equipment and used Batteries These symbols on the products, packaging, and/or accompanying documents mean that used electrical and electronic products and batteries should not be mixed with general household waste. For proper treatment, recovery and recycling of old products and used batteries, please take them to applicable collection points, in accordance with your national legislation and the Directives 2002/96/EC and 2006/66/EC.