Model No. TX-P42GT30E TX-P46GT30E TX-P50GT30E Operating Instructions Plasma Television Contents Be Sure to Read Safety Precautions······················································4 Maintenance ································································5 For more detailed instructions, refer to the Operating Instructions on the CD-ROM. To view the Operating Instructions on the CD-ROM, you need a computer equipped with a CD-ROM drive, and Adobe® Reader® (Version 8.
Experience an amazing level of multimedia excitement Enjoy rich multimedia USB device Camcorder SD Card Network Set top box Amplifier with Speaker system DVD Recorder VCR USB HDD DVD Player Blu-ray Disc Player 2
Do not display a still picture for a long time This causes the image to remain on the plasma screen (“image retention”). This is not considered a malfunction and is not covered by the warranty. Typical still images number and other logos • Channel • Image displayed in 4:3 mode game • Video image •ToComputer prevent image retention, contrast is lowered automatically after a few minutes if no signals are sent or no operations are performed.
Safety Precautions Warning Handling the mains plug and lead the mains plug fully into the socket outlet. (If the mains plug is loose, it could generate heat and cause fire.) • Insert that the mains plug is easily accessible. • Ensure the earth pin on the mains plug is securely connected to prevent electrical shock. • Ensure • An apparatus with CLASS I construction shall be connected to a mains socket outlet with a protective earthing connection. not touch the mains plug with a wet hand.
Caution When cleaning the TV, remove the mains plug Do not block the rear air vents When the TV is not going to be used for a long period of time, remove the mains plug Do not expose your ears to excessive volume from the headphones ventilation by newspapers, table cloths, curtains, • Blocked etc. may cause overheating, fire or electrical shock. • Cleaning an energized TV may cause electrical shock. TV will still consume some power even in the Off mode, • Irreversible damage can be caused.
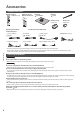
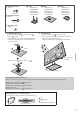
Accessories Standard accessories Remote Control N2QAYB000572 • Batteries for the Remote Control (2) R6 (p. 8) • Pedestal (see below) Clamper (p. 10) Ferrite core (2) (Large size) Operating Instructions Ferrite core (Small size) Pan European Guarantee Card Terminal adaptors Satellite adaptor (p. 10) • • RF(p.adaptor 10, 11) adaptor • SCART (p. 10, 11) • Composite adaptor • Audio adaptor • Optical digital audio adaptor • COMPONENT adaptor may not be placed all together.
A Assembly screw (4) (silver) E D Pole TBL5ZA3055 (TX-P42GT30E) TBL5ZA3065 TX-P46GT30E TX-P50GT30E • • M5 × 20 B Assembly screw (4) (black) ( ) F Base TBL5ZX0063 (TX-P42GT30E) TBL5ZX0067 TX-P46GT30E TX-P50GT30E • • ( ) Cover TXFBL5Z0017 (TX-P42GT30E) TXFBL5Z0019 TX-P46GT30E TX-P50GT30E • • ( ) M5 × 25 C Assembly screw (black) M4 × 8 1 Assembling the pedestal Use the assembly screws A to fasten the pole D to the base E securely. Make sure that the screws are securely tightened.
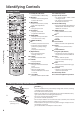
Identifying Controls Remote Control 1 Standby On / Off switch MENU ASPECT DIRECT TV REC EXIT VIERA Lin k TO VIERA OLS IDE GU 1 2 3 4 5 6 7 INPUT TV AV 8 BACK/ RETURN OPTION • Switches TV On or Off standby 2 3D button to the viewing mode • Switches between 2D and 3D 15 16 17 18 to access Picture, Sound, • Press Timer and Setup Menus 19 10 11 12 abc def ghi jkl mno pqrs tuv wxyz • Changes aspect ratio channel and • Displays programme information 20 23 24 6 VIERA TOOLS 18 Exit 7 [VIE
TV 7 Changes the input mode 8 Mains power On / Off switch 5 1 to switch the mains power. • Use If you turned the TV Off during Standby mode by the 6 remote control last time, the TV will be in Standby mode when you turn the TV On with Mains power On / Off switch. 7 2 12 3 9 Remote control signal receiver not place any objects between the TV remote • Do control signal receiver and remote control. 10 C.A.T.S.
Basic Connection External equipment and cables shown are not supplied with this TV. Please ensure that the unit is disconnected from the mains socket before attaching or disconnecting any leads. There are some restrictions on placement for viewing 3D images. For details (p. 17, 19) Example 1 Connecting dish or aerial TV only To ensure your satellite dish is correctly installed, please consult your local dealer. Also please consult the received satellite broadcasting companies for details.
Example 3 Connecting DVD Recorder / VCR and Set top box TV, DVD Recorder / VCR and Set top box Rear of the TV Cable Fully wired HDMI compliant cable Set top box SCART adaptor (supplied) Terrestrial aerial AC 220-240 V 50 / 60 Hz RF cable Mains lead Fully wired SCART cable Fully wired SCART cable RF adaptor (supplied) RF cable RF OUT RF IN DVD Recorder or VCR ■ Connecting to the network environment (Network connections) • • • Internet environment Basic Connection To enable the network serv
Auto Setup Search and store TV channels automatically. These steps are not necessary if the setup has been completed by your local dealer. Please complete connections (p. 10, 11) and settings (if necessary) of the connected equipment before starting Auto Setup. For details of settings for the connected equipment, read the manual of the equipment.
5 3 [DVB-S Auto Setup] 4 [DVB-C Network Settings] DVB-S Auto Setup Satellite Astra 19.2° E 0% Progress This will take about 30 minutes. No. Channel Name Type CBBC Channel 1 Free TV BBC Radio Wales 2 Free TV E4 3 Free TV Free TV: 3 Pay TV: 0 100% Quality 100 100 100 on the country you select, select your cable provider • Depending beforehand by following the on screen instructions.
6 ■ [Wireless] Select the connection type select Connection Type Please select network connection type. access Search for access point WPS(Push button) [Search for access point] Access points found automatically are listed. 1. Select your desired access point select Available Access Points No. 1 2 3 Wireless type 11n(2.
[WPS(Push button)] 1. Press the WPS button on the access point until the light flashes 2. Connect the Wireless LAN Adaptor and the access point 6 WPS(Push button) 1) Please press the ‘WPS’ button on the access point until its light flashes. 2) When the light is flashing select ‘Connect’ on TV. If you are unsure, please check the instruction manual of the access point. Connect that your access point supports WPS for this setup.
Using “VIERA Connect” VIERA Connect is a gateway to the internet services unique to Panasonic and has expanded VIERA CAST features greatly. VIERA Connect allows you to access some specific websites supported by Panasonic, and enjoy internet contents such as photos, videos, games, etc. from VIERA Connect home screen. This TV has no full browser function and all features of websites may not be available. • 1 Turn power on for about 1 second • Press • Mains power On / Off switch should be On. (p.
Viewing 3D images You can enjoy viewing 3D images with contents or programmes corresponding to the 3D effect by wearing the 3D Eyewear. This TV supports [Frame Sequential]∗1, [Side by Side]∗2 and [Top and Bottom]∗3 3D formats. ∗1 : The 3D format that the images for the left and right eyes are recorded with the high definition quality and alternately played back ∗2, ∗3 : Other available 3D formats How to view the 3D images (p.
To view the 3D images You can enjoy the 3D images in a variety of ways. (Frame Sequential, Side by Side and Top and Bottom are the supported 3D format.) ■ Playing back 3D-compatible Blu-ray disc (Frame Sequential format) the 3D-compatible player via a fully wired HDMI compliant cable. • Connect mode is not switched automatically, select the input mode connected to the player. • IfIf input • you use the non 3D-compatible player, the images will be displayed on 2D mode.
Table of images that can be seen for each [3D Mode Selection (Manual)] and the source image format If the picture appears to be abnormal, refer to the table below to choose the correct 3D mode.
How to Use Menu Functions Various menus allow you to make settings for the picture, sound, and other functions.
Menu list Menu Item Adjustments / Configurations (alternatives) Contrast, Brightness, Colour, Sharpness Increases or decreases the levels of these options according to your personal preference Tint With an NTSC signal source connected to the TV, the picture hue can be adjusted to suit your taste Colour Balance Allows you to set the overall colour tone of the picture [Cool] / [Normal] / [Warm] Vivid Colour Automatically adjusts colours to vivid ones [Off] / [On] Colour Remaster Displays the vivid
Menu Item 2D 3D Depth Selects a level of 3D-image depth for viewing converted 2D images [Min] / [Mid] / [Max] 3D Settings 3D Adjustment Adjustment of the 3D effect (except in [2D 3D] mode) [Off] / [On] [Effect] : Adjust the 3D depth according to the contents or to your preference. Picture Sequence Select [Reverse] if you feel that the sense of depth is unusual. (except in [2D mode) [Normal] / [Reverse] Edge Smoother Select [On] if you feel the contoured parts of an image are not smooth enough.
Menu Item Adjustments / Configurations (alternatives) Bass Increases or decreases level to enhance or minimise lower, deeper sound output Treble Increases or decreases level to enhance or minimise sharper, higher sound output Equaliser Adjusts the frequency level to suit your favourite sound quality Balance Adjusts volume level of right and left speakers Headphone Volume Adjusts the volume of the headphones Surround Surround sound settings [Off] / [V-Audio] / [V-Audio Surround] [V-Audio] : Pro
Menu Item Timer Timer Programming Sets a timer to remind watching or record forthcoming programmes Off Timer Sets the time until the TV automatically goes to Standby mode [Off] / [15] / [30] / [45] / [60] / [75] / [90] (minutes) Auto Standby Sets the time the TV automatically goes to Standby mode when no operation is performed for the selected times [Off] / [2] / [4] (hours) Eco Navigation Automatically sets the TV to the most suitable energy-saving mode Recording Setup Formats the connected USB
Menu Item Adjustments / Configurations (alternatives) DVB-C Tuning Menu DVB-T Tuning Menu Analogue Tuning Menu Creates list of favourite DVB-C channels Channel List Skips the unwanted DVB-C channels or edits DVB-C channels Auto Setup Automatically sets the DVB-C channels supplied Manual Tuning Sets the DVB-C channels manually Update Channel List Updates DVB-C Channel List while keeping your settings Favourite Network Selects your favourite network for each broadcasters (only available in some
Menu Item Language Display Settings Setup How to Use Menu Functions OSD Language Changes language for on screen displays Preferred Audio 1 / 2 Selects the first and second preferred language for DVB multi audio (depending on the broadcaster) Preferred Subtitles 1/2 Selects the first and second preferred language for DVB subtitles (depending on the broadcaster) Preferred Teletext Selects the preferred language for DVB teletext service (depending on the broadcaster) Preferred Subtitle Type Selec
Menu Item Adjustments / Configurations (alternatives) GUIDE Plus+ Settings Update Performs the update of the GUIDE Plus+ schedule and advertising information for the GUIDE Plus+ system Postcode Sets your postcode to display advertisements in the GUIDE Plus+ system System Information Displays the system information of the GUIDE Plus+ system Other Settings Setup Automatically selects the input when the TV is turned on [TV] / [AV] Set to [TV] to view picture from TV tuner.
Information for Users on Collection and Disposal of Old Equipment and used Batteries These symbols on the products, packaging, and/or accompanying documents mean that used electrical and electronic products and batteries should not be mixed with general household waste. For proper treatment, recovery and recycling of old products and used batteries, please take them to applicable collection points, in accordance with your national legislation and the Directives 2002/96/EC and 2006/66/EC.