
Operating Instructions


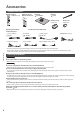


Identifying Controls
EXIT
OPTION
TEXT
REC
PROGRAMME
STTL
INDEX HOLD
BACK/
RETURN
ASPECT
INPUT
LAST VIEW
TV
G
U
I
D
E
V
I
E
R
A
T
O
O
L
S
V
I
E
R
A
L
i
n
k
DVD/VCR
TV
AVTV
abc def
jkl
ghi
mno
tuvpqrs
wxyz
DIRECT TV REC
MENU
1
15
16
18
19
20
21
22
23
25
26
27
17
24
2
4
6
11
3
5
7
8
9
10
12
13
14
8
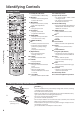
Identifying Controls
Remote Control
1
Standby On / Off switch
•
Switches TV On or Off standby
2
3D button
•
Switches to the viewing mode
between 2D and 3D
3
[Main Menu]
•
Press to access Picture, Sound,
Timer and Setup Menus
4
Aspect
•
C hanges aspect ratio
5
Information
•
D isplays channel and
programme information
6
VIERATOOLS
•
D isplays some special feature
icons and accesses easily
7
[VIERA Link Menu]
8
OK
•
C onfirms selections and choices
•
Press after selecting channel
positions to quickly change
channel
•
D isplays the Channel List
9
[Option Menu]
•
E asy optional setting for
viewing, sound, etc.
10
Teletext
•
Switches to teletext mode
11
Subtitles
•
D isplays subtitles
12
Numeric buttons
•
C hanges channel and teletext
pages
•
Sets characters
•
When in Standby mode,
switches TV On (Press for about
1 second)
13
Sound Mute
•
Switches sound mute On or Off
14
Volume Up / Down
15
Input mode selection
•
TV - switches DVB-S / DVB-C / DVB-T
/ Analogue mode
•
AV - switches to AV input mode
from Input Selection list
16
Direct TV Recording
•
R ecords programme immediately in
DVD Recorder / VCR with Q-Link or
VIERA Link connection
17
[VIERA Connect]
•
D isplays VIERAConnect home
screen
18
Exit
•
R eturns to the normal viewing
screen
19
TV Guide
20
Cursor buttons
•
M akes selections and adjustments
21
Return
•
R eturns to the previous menu /
page
22
Coloured buttons
(red-green-yellow-blue)
•
U sed for the selection, navigation
and operation of various functions
23
Hold
•
Freeze / unfreeze picture
•
H olds the current teletext page
(teletext mode)
24
Index
•
R eturns to the teletext index page
(teletext mode)
25
Last view
•
Switches to previously viewed
channel or input mode
26
Channel Up / Down
27
Connected equipment operations
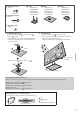
Installing / removing remote’s batteries
1
Pull open
H ook
Caution
•
I ncorrect installation may cause battery leakage and corrosion, resulting
in damage to the remote control.
•
D o not mix old and new batteries.
•
R eplace only with same or equivalent type. Do not mix different battery
types (such as alkaline and manganese batteries).
•
D o not use rechargeable (Ni-Cd) batteries.
•
D o not burn or break up batteries.
•
D o not expose batteries to excessive heat such as sunshine, fire or the like.
•
M ake sure you dispose of batteries correctly.
•
E nsure batteries are replaced correctly, there is danger of explosion and
fire if battery is reversed.
•
D o not disassemble or modify the remote control.
2
N ote the correct
polarity (+ or -)
Close