Model No. English TX-P42GT50E TX-P50GT50E Nederlands Operating Instructions Plasma Television Contents Be Sure to Read Safety Precautions ······································ 2 Quick Start Guide For more detailed instructions, refer to the Operating Instructions on the CD-ROM. To view the Operating Instructions on the CD-ROM, you need a computer equipped with a CD-ROM drive, and Adobe® Reader® (Version 8.0 or later is recommended) installed on your computer.
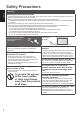
Safety Precautions Warning English Handling the mains plug and lead ● Insert the mains plug fully into the socket outlet. (If the mains plug is loose, it could generate heat and cause fire.) ● Ensure that the mains plug is easily accessible. ● Ensure the earth pin on the mains plug is securely connected to prevent electrical shock. • An apparatus with CLASS I construction shall be connected to a mains socket outlet with a protective earthing connection. ● Do not touch the mains plug with a wet hand.
Radio waves English ● Do not use the TV in any medical institutions or locations with medical equipment. Radio waves from the TV may interfere with the medical equipment and cause accidents due to the malfunction. ● Do not use the TV near any automatic control equipment such as automatic doors or fire alarms. Radio waves from the TV may interfere with the automatic control equipment and cause accidents due to the malfunction.
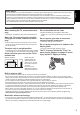
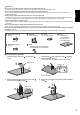
Accessories Standard accessories English Remote Control ● N2QAYB000715 Batteries for the Remote Control (2) ● R6 (see below) Pedestal (see below) Clamper (p. 11) Mains lead (p. 9) Ferrite core (2) (Large size) (p. 11) Ferrite core (Small size) Operating Instructions Pan European Guarantee Card Use the Ferrite cores to comply with the EMC standard. Terminal adaptors ● AV1 (SCART) adaptor (p. 10) ● AV2 (COMPONENT / VIDEO) adaptor ● Accessories may not be placed all together.
Caution Assembly screw (5) (black) Bracket ● TBL5ZA3254 Cover ● TXFBL5Z0092 M4 × 10 Assembly screw (7) (silver) English Do not use any pedestal other than the one provided with this TV. ● Otherwise the TV may fall over and become damaged, and personal injury may result. Do not use the pedestal if it becomes warped or physically damaged. ● If you use the pedestal while it is physically damaged, personal injury may result. Contact your local Panasonic dealer immediately.
■ Securing the TV English Use the assembly screws to fasten securely. ● Tighten the four assembly screws loosely at first, then tighten them firmly to fix securely. ● Carry out the work on a horizontal and level surface. Arrow mark A Hole for pedestal installation Removing the pedestal from the TV Be sure to remove the pedestal in the following way when using the wall-hanging bracket or repacking the TV. 1 Remove the assembly screws from the TV. 2 Pull out the pedestal from the TV.
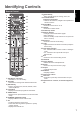
Identifying Controls Remote Control 15 16 4 5 6 17 7 19 8 20 ● Easy optional setting for viewing, sound, etc. 9 Coloured buttons 10 18 11 12 13 9 10 11 21 22 12 23 14 15 16 13 17 24 14 25 18 19 20 21 22 23 24 1 Standby On / Off switch ● Switches TV on or off standby. 2 3D button 3 4 5 6 7 ● Switches the viewing mode between 2D and 3D. [Main Menu] ● Press to access Picture, Sound, Network, Timer and Setup Menus. Information ● Displays channel and programme information.
Indicator / Control panel 1 Function select English ● [Volume] / [Contrast] / [Brightness] / [Colour] / [Sharpness] / [Tint] (NTSC signal) / [Bass]∗ / [Treble]∗ / [Balance] / [Auto Setup] ∗[Music] or [Speech] mode in the Sound Menu 2 Channel Up / Down, Value change (when using the F button), Switching the TV on (press either button for about 1 second when in Standby mode) 3 Changes the input mode 4 Mains power On / Off switch ● Use to switch the mains power.
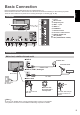
Basic Connection Terminals 1 2 3 4 5 6 7 8 9 10 11 2 1 3 4 5 6 7 8 9 10 English External equipment and cables shown are not supplied with this TV. Please ensure that the unit is disconnected from the mains socket before attaching or disconnecting any leads. There are some restrictions on placement for viewing 3D images. For details (p.
AV devices ■ Player / 3D compatible player TV English Player / 3D-compatible player HDMI cable ■ DVD Recorder / VCR TV Terrestrial aerial DVD Recorder / VCR AV1 (SCART) adaptor∗ Cable SCART cable RF cable RF cable ■ DVD Recorder / VCR and Set top box TV Set top box Cable HDMI cable TV SCART cable AV1 (SCART) adaptor∗ RF Cable SCART cable RF cable Terrestrial aerial DVD Recorder / VCR ∗Supplied with this TV Note 10 ● Connect to the TV’s AV1 for a DVD Recorder / VCR supporting Q-Link.
Network ■ Wired connection English To enable the network service functions (VIERA Connect, etc.), you need to connect the TV to a broadband network environment. ● If you do not have any broadband network services, please consult your retailer for assistance. ● Prepare the internet environment for wired connection or wireless connection. ● Setup of the network connection will start after the tuning (when first using the TV). (p.
Auto Setup English Search and store TV channels automatically. ● These steps are not necessary if the setup has been completed by your local dealer. ● Please complete connections (p. 9 - 11) and settings (if necessary) of the connected equipment before starting Auto Setup. For details of settings for the connected equipment, read the manual of the equipment. 1 Plug the TV into mains socket and switch on 2 Select the language 3 ● Takes a few seconds to be displayed.
5 1 DVB-S Search Mode 2 DVB-S Satellite Search DVB-S Auto Setup Search Mode Free Channels All Channels Satellite Progress This will take up to 40 minutes. 100% set English Satellite Astra 19.2°E Hot Bird 13°E select Press EXIT to skip Satellite installation Searching Satellite 3 [DVB-S Auto Setup] 4 [DVB-C Network Settings] DVB-S Auto Setup Satellite Astra 19.2° E 0% Progress This will take about 30 minutes. No.
6 ■ [Wired] 1. Select [Auto] Connection Test Acquire IP Address Auto English Check network cable connection. Check acquired IP address. Check for devices using same IP address. Check gateway connection. Check server connection. Manual select access Automatically setup is done and the test of the network connection starts. ● To set manually, select [Manual] and set each item. 2. Go to the next step : succeeded The test is successful and the TV is connected to the network.
6 [WPS(Push button)] 1. Press the WPS button on the access point until the light flashes 2. Connect the TV with the access point WPS(Push button) 2) When the light is flashing select ‘Connect’ on TV. If you are unsure, please check the instruction manual of the wireless access point. Connect ● Ensure that your access point supports WPS for this setup. ● WPS: Wi-Fi Protected Setup™ ● If the connection has failed, check the settings and positions of your access point.
Using “VIERA Connect” English VIERA Connect is a gateway to the internet services unique to Panasonic. VIERA Connect allows you to access some specific websites supported by Panasonic, and enjoy internet contents such as videos, games, communication tools, etc. from VIERA Connect home screen. ● This TV does not support full web browser function and some features of the websites may not be available. 1 Turn power on ● Press for about 1 second. ● Mains power On / Off switch should be on. (p.
Viewing 3D images English You can enjoy viewing 3D images with contents or programmes corresponding to the 3D effect by wearing the 3D Eyewear. This TV supports [Frame Sequential]∗1, [Side by Side]∗2 and [Top and Bottom]∗3 3D formats. ∗1: The 3D format that the images for the left and right eyes are recorded with the high definition quality and alternately played back. ∗2, ∗3: Other available 3D formats ● How to view the 3D images (p.
3D Eyewear (optional) ● Use the Panasonic 3D Eyewear that has this logo and supports Bluetooth® wireless technology. English “Full HD 3D Glasses™” logo indicates products that are compatible with the active shutter 3D glasses technology standards licensed by the Full HD 3D Glasses Initiative. The RF mark on the logo means the wireless system (Bluetooth® wireless technology), and you can use the 3D Eyewear and the TV that have the same mark together. Note ● Use the 3D Eyewear within approximately 3.
Changing 2D - 3D mode 2D [3D] / [2D] / [2D 3D]: Displays the appropriate image that you desire without selecting 3D format. ● This mode may not work properly depending on the source image format. In this case, select the appropriate 3D format manually. English You can easily change the viewing mode between 2D and 3D using the 3D button. Select the mode ● Items of [3D Mode Selection] vary 3D Mode Selection select depending on the condition.
How to Use VIERA TOOLS You can access some special features easily by using the VIERA TOOLS function.
How to Use Menu Functions Various menus allow you to make settings for the picture, sound, and other functions. Display the menu 2 Select the menu ● Displays the functions that can be set (varies according to the input signal).
Maintenance First, remove the mains plug from the socket outlet. English Display panel, Cabinet, Pedestal Regular care: Gently wipe the surface of the display panel, cabinet, or pedestal by using a soft cloth to clean the dirt or fingerprints. For stubborn dirt: First clean the dust on the surface. Dampen a soft cloth with clean water or diluted neutral detergent (1 part detergent to 100 parts water). Wring the cloth and wipe the surface. Finally, wipe away all the moisture.
■ Product fiche Manufacturer Panasonic Corporation Model No. TX-P42GT50E TX-P50GT50E C C Visible screen size (diagonal) 107 cm / 42 inches 127 cm / 50 inches On mode average power consumption 137 W 185 W Annual energy consumption∗1 200 kWh 270 kWh 400 W Rated power consumption 325 W Standby power consumption∗2 0.30 W Off mode power consumption 0.
Information for Users on Collection and Disposal of Old Equipment and used Batteries English These symbols on the products, packaging, and/or accompanying documents mean that used electrical and electronic products and batteries should not be mixed with general household waste. For proper treatment, recovery and recycling of old products and used batteries, please take them to applicable collection points, in accordance with your national legislation and the Directives 2002/96/EC and 2006/66/EC.
Modelnr. Nederlands TX-P42GT50E TX-P50GT50E Gebruiksaanwijzing Plasmatelevisie Inhoudsopgave Belangrijke informatie Veiligheidsmaatregelen ······························· 2 Quick Start-handleiding Raadpleeg de bedieningsinstructies op de cd-rom voor gedetaileerdere instructies. Als u de bedieningsinstructies op de cd-rom wilt bekijken, hebt u een computer nodig met cdromdrive plus Adobe® Reader® (bij voorkeur versie 8.0 of hoger).
Veiligheidsmaatregelen Waarschuwing De stekker en het netsnoer Nederlands ● Steek de stekker van het netsnoer volledig in het stopcontact. (Als de stekker niet goed vast zit, kan dit warmte opwekken, waardoor brand kan ontstaan.) ● Zorg voor een makkelijke toegang naar de stekker van de voedingskabel. ● Steek de geaarde stekker altijd in een goed werkend geaard stopcontact, om elektrische schokken te voorkomen.
Radiogolven ● Gebruik de tv niet in een medische inrichting of een andere plaats met medische apparatuur. De radiogolven van de tv kunnen interfereren met de medische apparatuur en storing en ongevallen veroorzaken. ● Gebruik de tv niet nabij automatische controleapparatuur zoals een automatische deur of brandalarm. De radiogolven van de tv kunnen interfereren met de controleapparatuur en storing en ongevallen veroorzaken.
Accessoires Standaardaccessoires Nederlands Afstandsbediening ● N2QAYB000715 Batterijen voor de afstandsbediening (2) ● R6 (zie hierna) Standaard (zie hierna) Kabelklem (p. 11) Netsnoer (p. 9) Ferrietkern (2) (Groot) (p. 11) Ferrietkern (Klein) Gebruiksaanwijzing Europese Garantie Gebruik de ferrietkernen om te voldoen aan de EMCnorm. Adapteraansluitingen ● AV1 (SCART) adapter (p. 10) ● AV2 (COMPONENT/VIDEO) adapter ● De accessoires mogen niet allemaal samen worden geplaatst.
Let op Montageschroef (5) (zwart) Steun ● TBL5ZA3254 Deksel ● TXFBL5Z0092 Steunplaat ● TBL5ZX0312 (TX-P42GT50E) ● TBL5ZX0243 (TX-P50GT50E) M4 × 10 Montageschroef (7) (zilver) Nederlands Gebruik alleen de standaard die u bij deze tv hebt ontvangen. ● Anders bestaat de kans dat de tv omver valt en beschadigd wordt, hetgeen tot verwondingen kan leiden. De vloerstandaard niet gebruiken als deze verbogen, gebarsten of anderszins beschadigd is.
■ De tv bevestigen Zet de tv goed vast met de montageschroeven . ● Draai de vier montageschroeven eerst losjes vast en draai ze daarna stevig aan. ● Voer de werkzaamheden uit op een horizontale, vlakke ondergrond. Pijl Nederlands A Opening voor montage van standaard De standaard van de tv verwijderen Verwijder de standaard op de volgende manier wanneer u de muurbevestigingssteun gebruikt of de tv opnieuw inpakt. 1 Verwijder de montageschroeven uit de tv. 2 Trek de standaard van de tv.
Bedieningsonderdelen Afstandsbediening 8 [Menu Opties] 1 2 3 15 16 9 17 18 10 7 19 11 8 20 12 13 9 10 11 21 22 12 23 14 15 16 13 24 14 25 17 18 19 20 21 22 1 Stand-bytoets 2 3 4 5 6 7 ● Zet de tv in stand-by of haalt de tv uit stand-by. 3D-toets ● Schakelt over tussen de 2D- en 3D-stand. [Hoofdmenu] ● Geeft toegang tot de menu’s Beeld, Geluid, Netwerk, Timer en Instellingen. Informatie ● Geeft kanaal- en programma-informatie weer.
Indicator/Bedieningspaneel 1 Functie selecteren Nederlands ● [Volume] / [Kontrast] / [Helderheid] / [Kleur] / [Scherpte] / [Tint] (NTSC-signaal) / [Laag]∗ / [Hoog]∗ / [Balans] / [Auto set-up] ∗[Muziek] of [Spraak]-stand in het menu Geluid 2 Kanaal omhoog/omlaag, waarde wijzigen (bij gebruik van de F-knop), de tv inschakelen (druk in de stand-bystand ongeveer 1 seconde op een van beide knoppen) 3 Wijzigt de ingangsmodus 4 Hoofdschakelaar ● Hiermee zet u de tv aan of uit.
Basisaansluitingen De afgebeelde externe apparatuur en kabels worden niet bij de tv meegeleverd. Zorg ervoor dat de stekker van de tv niet in het stopcontact zit als u kabels aansluit of loskoppelt. Er zijn enkele beperkingen op de plaatsing voor het weergeven van 3D-beelden. Voor meer informatie (p.
AV-apparaten ■ Speler/3D-compatibele speler TV Speler/3D-compatibele speler HDMI-kabel Nederlands ■ DVD-/videorecorder TV Aardse antenne DVD-/videorecorder AV1-adapter (SCART)∗ Kabel SCART-kabel RF-kabel RF-kabel ■ DVD-/videorecorder en set-top box TV Set-top box Kabel HDMI-kabel TV SCART-kabel AV1-adapter (SCART)∗ RF-kabel SCART-kabel RF-kabel Aardse antenne DVD-/videorecorder ∗Meegeleverd bij de tv Opmerking 10 ● Sluit een DVD-recorder/videorecorder met Q-Link-ondersteuning aan op AV
Netwerk Als u de netwerkservicefuncties (VIERA Connect enz.) wilt gebruiken, moet u de tv op een breedbandnetwerk aansluiten. ● Raadpleeg uw leverancier voor hulp als u geen breedbandnetwerkservices hebt. ● Zorg dat de internetomgeving gereed is voor het aansluiten van een bekabelde of draadloze verbinding. ● Het instellen van de netwerkverbinding start na het afstemmen (bij het eerste gebruik van de tv). (p.
Automatisch instellen U kunt tv-kanalen automatisch opzoeken en opslaan. ● U mag deze stappen overslaan als uw dealer de tv al heeft ingesteld. ● Voltooi alle verbindingen (p. 9 - 11) en instellingen (indien nodig) van de externe apparatuur voordat u de automatische instelling uitvoert. Raadpleeg de handleiding bij het aangesloten apparaat voor informatie over de instellingen ervan. 1 Steek de stekker van de tv in het stopcontact en schakel de tv in Nederlands ● Het beeld verschijnt na enkele seconden.
5 1 DVB-S zoekmodus 2 DVB-S satelliet zoeken DVB-S auto set-up Zoekmode Vrije kanalen Alle kanalen Satelliet LNB2 controleren 0% Voortgang Dit zal ongeveer 40 minuten duren. selecteren instellen Druk op EXIT om satelliet installatie over te slaan Satelliet zoeken 3 [DVB-S auto set-up] 4 [DVB-C Netwerkinstellingen] DVB-S auto set-up Gratis tv: 3 Astra 19.2° E 0% 100% Type Gratis tv Gratis tv Gratis tv Betaal tv: 0 Kwal.
6 ■ [Bedraad] 1. Selecteer [Auto] Verbindingstest IP-adres ophalen Auto Controleer de aansluiting van de netwerkkabel. Verkregen IP-adres controleren. Controleer op apparaten met hetzelfde IP-adres. Verbinding met gateway controleren. Communicatie met server controleren. Handmatig selecteren openen De instelling wordt automatisch uitgevoerd en de netwerkverbinding wordt getest. ● Voor handmatige instelling selecteert u [Handmatig] en u stelt elk onderdeel in. Nederlands 2.
6 [WPS (Push-knop)] 1. Houd de WPS-knop op het toegangspunt ingedrukt tot het lampje knippert 2. Verbind de tv met het toegangspunt WPS (Push-knop) 1) Druk op de 'WPS'-knop op het draadloze toegangspunt tot het lampje knippert. 2) Kies 'Verbinden' als het toegangspunt gereed is. Raadpleeg voor meer informatie de handleiding van het draadloze toegangspunt. Verbinden 3. Nadat het toegangspunt is ingesteld, moet u de verbinding testen Verbindingstest Draadloze netwerkverbinding controleren.
VIERA Connect VIERA Connect is een gateway voor unieke internetdiensten van Panasonic. Met VIERA Connect hebt u toegang tot geselecteerde websites die door Panasonic worden ondersteund en kunt u video’s, games, communicatieprogramma’s enz. op internet gebruiken via het beginscherm van VIERA Connect. ● De tv ondersteunt niet alle webbrowserfuncties en sommige functies van websites kunnen mogelijk niet gebruikt worden. 1 Schakel de tv in ● Houd de knop ongeveer 1 seconde ingedrukt.
3D-beeld weergeven U kunt genieten van het bijzondere effect van 3D-beeld en -programma’s door een 3D-bril te dragen. Deze tv ondersteunt de 3D-formaten [Frame Sequential]∗1, [Zij aan Zij]∗2 en [Boven en Onder]∗3. ∗1: 3D-formaat waarbij de beelden voor het linker- en rechteroog zijn opgenomen in HD-kwaliteit (High Definition) en afwisselend weergegeven worden. ∗2, ∗3: Andere ondersteunde 3D-formaten ● Naar 3D-beeld kijken (p.
3D-bril (optioneel) ● Gebruik een 3D-bril van Panasonic die dit logo draagt en geschikt is voor Bluetooth® draadloze technologie. Het logo “Full HD 3D Glasses™” geeft aan dat een product compatibel is met de normen voor 3D-brillen met actievesluitertechnologie onder licentie van Full HD 3D Glasses Initiative. De RFmarkering op het logo staat voor het draadloze systeem (Bluetooth® draadloze technologie) en geeft aan dat u de 3D-bril kunt gebruiken met een tv die dezelfde markering draagt.
Overschakelen tussen 2D en 3D Met de 3D-toets kunt u eenvoudig overschakelen tussen 2D en 3D. Selecteer de stand 3D-modusselectie selecteren 2D 3D 2D instellen 3D ● De onderdelen in [3D-modusselectie] kunnen verschillen naargelang de situatie. [3D] / [2D] / [2D 3D]: Het 3D-formaat wordt automatisch geselecteerd. ● Deze functie werkt niet voor alle beeldformaten. Selecteer indien nodig zelf het geschikte 3D-formaat.
VIERA TOOLS Met de functie VIERA TOOLS hebt u eenvoudig toegang tot een aantal speciale functies.
Werken met de menufuncties U kunt via verschillende menu’s instellingen voor beeld, geluid en andere functies aanpassen. 1 Geef het menu weer 2 Selecteer het menu ● De instelbare functies worden weergegeven (afhankelijk van het ingangssignaal). selecteren Hoofdmenu Nederlands openen Beeld Geluid Netwerk Timer Instellingen Selecteer het onderdeel 3 ■ Terug naar de tv (op elk gewenst moment) Beeld Instelling Kontrast Helderheid Kleur Scherpte Tint Kleurtemp.
Onderhoud Verwijder eerst de stekker van het netsnoer uit het stopcontact. Beeldscherm, Behuizing, Standaard Nederlands Regelmatig onderhoud: Veeg de buitenkant van het beeldscherm, de behuizing of de standaard voorzichtig af met een zachte doek om vuil of vingerafdrukken te verwijderen. Voor hardnekkig vuil: Verwijder eerst het stof aan de buitenkant. Bevochtig een zachte doek met schoon water of een opgelost neutraal schoonmaakproduct (1 deel schoonmaakproduct op 100 delen water).
■ Productkaart Producent Panasonic Corporation Modelnr. TX-P42GT50E TX-P50GT50E Energie-efficiëntieklasse C C Zichtbare schermdiagonaal 107 cm / 42 inch 127 cm / 50 inch 137 W 185 W Elektriciteitsverbruik in de gebruiksstand Jaarlijks energieverbruik∗1 270 kWh Nominaal energieverbruik 325 W 400 W Elektriciteitsverbruik in de slaapstand∗2 0,30 W Elektriciteitsverbruik in de uitstand 0,25 W Schermresolutie 1.920 (B) × 1.
Informatie voor gebruikers betreffende het verzamelen en verwijderen van oude uitrustingen en lege batterijen Nederlands Deze symbolen op de producten, verpakkingen, en/of begeleidende documenten betekenen dat gebruikte elektrische en elektronische producten en batterijen niet met het algemene huishoudelijke afval gemengd mogen worden.