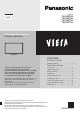
Model No. English TX-P42ST50Y TX-P50ST50Y TX-P55ST50Y TX-P65ST50Y Dansk Operating Instructions Plasma Television Contents Be Sure to Read Safety Precautions ······································ 2 Quick Start Guide For more detailed instructions, refer to the Operating Instructions on the CD-ROM. To view the Operating Instructions on the CD-ROM, you need a computer equipped with a CD-ROM drive, and Adobe® Reader® (Version 8.0 or later is recommended) installed on your computer.
Safety Precautions Warning English Handling the mains plug and lead ● Insert the mains plug fully into the socket outlet. (If the mains plug is loose, it could generate heat and cause fire.) ● Ensure that the mains plug is easily accessible. ● Ensure the earth pin on the mains plug is securely connected to prevent electrical shock. • An apparatus with CLASS I construction shall be connected to a mains socket outlet with a protective earthing connection. ● Do not touch the mains plug with a wet hand.
Radio waves English ● Do not use the TV in any medical institutions or locations with medical equipment. Radio waves from the TV may interfere with the medical equipment and cause accidents due to the malfunction. ● Do not use the TV near any automatic control equipment such as automatic doors or fire alarms. Radio waves from the TV may interfere with the automatic control equipment and cause accidents due to the malfunction.
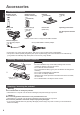
Accessories Standard accessories English Remote Control ● N2QAYB000715 Batteries for the Remote Control (2) ● R6 (see below) Pedestal (see below) Clamper (p. 11) Mains lead (p. 9) Ferrite core (2) (Large size) (p. 11) Ferrite core (Small size) Operating Instructions Pan European Guarantee Card Use the Ferrite cores to comply with the EMC standard. Terminal adaptors ● AV1 (SCART) adaptor (p. 10) ● AV2 (COMPONENT / VIDEO) adaptor ● Accessories may not be placed all together.
Assembly screw (black) (5) (TX-P42ST50Y, TX-P50ST50Y) (1) (TX-P55ST50Y, TX-P65ST50Y) English During set-up, make sure that all screws are securely tightened. ● If insufficient care is taken to ensure screws are properly tightened during assembly, the pedestal will not be strong enough to support the TV, and it might fall over and become damaged, and personal injury may result. Ensure that the TV does not fall over.
3 Attach the bracket to the tabs of the neck and fix with assembly screws 4 Attach the cover screw and fix securely with assembly A B E Tabs (top) English C D ■ Securing the TV Use the assembly screws (TX-P42ST50Y, TX-P50ST50Y) or (TX-P55ST50Y, TX-P65ST50Y) to fasten securely. ● Tighten the four assembly screws loosely at first, then tighten them firmly to fix securely. ● Carry out the work on a horizontal and level surface.
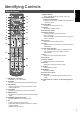
Identifying Controls Remote Control 15 16 4 5 6 17 7 19 8 20 ● Easy optional setting for viewing, sound, etc. 9 Coloured buttons 10 18 11 12 13 9 10 11 21 22 12 23 14 15 16 13 17 24 14 18 19 20 25 21 22 23 24 1 Standby On / Off switch ● Switches TV on or off standby. 2 3D button 25 English 8 [Option Menu] 1 2 3 (red-green-yellow-blue) ● Used for the selection, navigation and operation of various functions. Sound Mute ● Switches sound mute on or off.
Indicator / Control panel 1 Function select English ● [Volume] / [Contrast] / [Brightness] / [Colour] / [Sharpness] / [Tint] (NTSC signal) / [Bass]∗ / [Treble]∗ / [Balance] / [Auto Setup] ∗[Music] or [Speech] mode in the Sound Menu 2 Channel Up / Down, Value change (when using the F button), Switching the TV on (press either button for about 1 second when in Standby mode) 3 Changes the input mode 4 Mains power On / Off switch ● Use to switch the mains power.
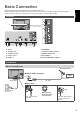
Basic Connection Terminals English External equipment and cables shown are not supplied with this TV. Please ensure that the unit is disconnected from the mains socket before attaching or disconnecting any leads. There are some restrictions on placement for viewing 3D images. For details (p.
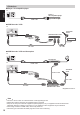
AV devices ■ Player / 3D compatible player TV English Player / 3D-compatible player HDMI cable ■ DVD Recorder / VCR TV Terrestrial aerial DVD Recorder / VCR AV1 (SCART) adaptor∗ Cable SCART cable RF cable RF cable ■ DVD Recorder / VCR and Set top box TV Set top box TV HDMI cable SCART cable AV1 (SCART) adaptor∗ RF Cable SCART cable RF cable Terrestrial aerial DVD Recorder / VCR ∗Supplied with this TV Note 10 ● Connect to the TV’s AV1 for a DVD Recorder / VCR supporting Q-Link.
Network ■ Wired connection English To enable the network service functions (VIERA Connect, etc.), you need to connect the TV to a broadband network environment. ● If you do not have any broadband network services, please consult your retailer for assistance. ● Prepare the internet environment for wired connection or wireless connection. ● Setup of the network connection will start after the tuning (when first using the TV). (p.
Auto Setup English Search and store TV channels automatically. ● These steps are not necessary if the setup has been completed by your local dealer. ● Please complete connections (p. 9 - 11) and settings (if necessary) of the connected equipment before starting Auto Setup. For details of settings for the connected equipment, read the manual of the equipment. 1 Plug the TV into mains socket and switch on 2 Select the language 3 ● Takes a few seconds to be displayed.
5 1 [DVB-C Network Settings] ● Depending on the country you select, select your cable provider beforehand by following the on-screen instructions. select [Start Auto Setup] DVB-C Network Settings Auto Auto Start Auto Setup access Normally set [Frequency] and [Network ID] to [Auto]. If [Auto] is not displayed or if necessary, enter [Frequency] and [Network ID] specified by your cable provider with numeric buttons.
6 ■ [Wireless] Access points found automatically are listed. 1. Select your desired access point select Available Wireless Networks English No. 1 2 3 Network Name(SSID) Access Point A Access Point B Access Point C Wireless type 11n(2.4GHz) 11n(5GHz) 11n(5GHz) Status access ● For [WPS(Push button)] (p. 15) (red) : Encrypted access point ● To search access points again ● For the information of the highlighted ● To set manually access point (yellow) (blue) 2.
6 [WPS(Push button)] 1. Press the WPS button on the access point until the light flashes 2. Connect the TV with the access point WPS(Push button) 2) When the light is flashing select ‘Connect’ on TV. If you are unsure, please check the instruction manual of the wireless access point. Connect ● Ensure that your access point supports WPS for this setup. ● WPS: Wi-Fi Protected Setup™ ● If the connection has failed, check the settings and positions of your access point.
Using “VIERA Connect” English VIERA Connect is a gateway to the internet services unique to Panasonic. VIERA Connect allows you to access some specific websites supported by Panasonic, and enjoy internet contents such as videos, games, communication tools, etc. from VIERA Connect home screen. ● This TV does not support full web browser function and some features of the websites may not be available. 1 Turn power on ● Press for about 1 second. ● Mains power On / Off switch should be on. (p.
Viewing 3D images English You can enjoy viewing 3D images with contents or programmes corresponding to the 3D effect by wearing the 3D Eyewear. This TV supports [Frame Sequential]∗1, [Side by Side]∗2 and [Top and Bottom]∗3 3D formats. ∗1: The 3D format that the images for the left and right eyes are recorded with the high definition quality and alternately played back. ∗2, ∗3: Other available 3D formats ● How to view the 3D images (p.
3D Eyewear (optional) ● Use the Panasonic 3D Eyewear that has this logo and supports Bluetooth® wireless technology. English “Full HD 3D Glasses™” logo indicates products that are compatible with the active shutter 3D glasses technology standards licensed by the Full HD 3D Glasses Initiative. The RF mark on the logo means the wireless system (Bluetooth® wireless technology), and you can use the 3D Eyewear and the TV that have the same mark together. Note ● Use the 3D Eyewear within approximately 3.
Changing 2D - 3D mode 2D [3D] / [2D] / [2D 3D]: Displays the appropriate image that you desire without selecting 3D format. ● This mode may not work properly depending on the source image format. In this case, select the appropriate 3D format manually. English You can easily change the viewing mode between 2D and 3D using the 3D button. Select the mode ● Items of [3D Mode Selection] vary 3D Mode Selection select depending on the condition.
How to Use VIERA TOOLS You can access some special features easily by using the VIERA TOOLS function.
How to Use Menu Functions Various menus allow you to make settings for the picture, sound, and other functions. Display the menu 2 Select the menu ● Displays the functions that can be set (varies according to the input signal).
Maintenance First, remove the mains plug from the socket outlet. English Display panel, Cabinet, Pedestal Regular care: Gently wipe the surface of the display panel, cabinet, or pedestal by using a soft cloth to clean the dirt or fingerprints. For stubborn dirt: First clean the dust on the surface. Dampen a soft cloth with clean water or diluted neutral detergent (1 part detergent to 100 parts water). Wring the cloth and wipe the surface. Finally, wipe away all the moisture.
■ Product fiche Manufacturer Panasonic Corporation Model No. TX-P42ST50Y TX-P50ST50Y TX-P55ST50Y TX-P65ST50Y C C C C Visible screen size (diagonal) 107 cm / 42 inches 127 cm / 50 inches 140 cm / 55 inches 165 cm / 65 inches On mode average power consumption 133 W 180 W 205 W 255 W Annual energy consumption∗1 194 kWh 263 kWh 299 kWh 372 kWh Rated power consumption 295 W 355 W 400 W 450 W Standby power consumption∗2 0.30 W Off mode power consumption 0.
Information for Users on Collection and Disposal of Old Equipment and used Batteries English These symbols on the products, packaging, and/or accompanying documents mean that used electrical and electronic products and batteries should not be mixed with general household waste. For proper treatment, recovery and recycling of old products and used batteries, please take them to applicable collection points, in accordance with your national legislation and the Directives 2002/96/EC and 2006/66/EC.
Modelnr. Dansk TX-P42ST50Y TX-P50ST50Y TX-P55ST50Y TX-P65ST50Y Brugervejledning Plasmafjernsyn Indhold Husk at læse Sikkerhedsforanstaltninger ·························· 2 Kvik-start vejledning Se brugsanvisningen på CD-ROM`en for mere udførlige oplysninger. For at se brugsanvisningen på CD-ROM`en, skal du anvende en computer, som er udstyret med et CD-ROM-drev og Adobe® Reader® (version 8.0 eller nyere anbefales) installeret på din computer.
Sikkerhedsforanstaltninger Advarsel Håndtering af stikket og ledningen Dansk ● Sæt stikket helt ind i stikkontakten. (Hvis stikket er løst, kan det frembringe varme og være årsag til brand.) ● Sørg for en nem adgang til stikket. ● Sørg for, at jordstiften på netstikket er korrekt tilsluttet, for at undgå elektrisk stød. • Et apparat med KLASSE I-konstruktion skal sluttes til en stikkontakt i væggen med en beskyttende jordtilslutning. ● Rør ikke ved stikket med våde hænder.
Radiobølger ● Undlad at bruge fjernsynet på medicinske institutioner eller steder med medicinsk udstyr. Radiobølger fra fjernsynet kan eventuelt forstyrre det medicinske udstyr og forårsage uheld pga. teknisk fejl. ● Brug ikke fjernsynet i nærheden af automatisk kontroludstyr, såsom automatiske døre eller brandalarmer. Radiobølger fra fjernsynet kan eventuelt forstyrre det automatiske udstyr og forårsage uheld pga. teknisk fejl.
Tilbehør Standardtilbehør Dansk Fjernbetjening ● N2QAYB000715 Batterier til fjernbetjeningen (2) ● R6 (se herunder) Sokkel (se herunder) Klemme (s. 11) Netledning (s. 9) Ferritkerne (2) (Stor størrelse) (s. 11) Ferritkerne (Lille størrelse) Brugervejledning Pan europæisk garanti Brug ferritkernerne til at overholde EMC-standarden. Terminaladaptere ● AV1 (SCART) adapter (s. 10) ● AV2 (COMPONENT / VIDEO) adapter ● Alt tilbehør er muligvis ikke placeret sammen.
Sørg under ophængningen for, at alle skruer er forsvarligt strammet. ● Hvis du ikke sikrer dig, at skruerne strammes forsvarligt under samlingen, vil soklen ikke være stærk nok til at understøtte fjernsynet, og det kan vælte og lide skade, og tilskadekomst kan blive resultatet. Sørg for, at fjernsynet ikke vælter. ● I tilfælde af rystelser eller hvis børn kravler op på soklen, mens fjernsynet er monteret, kan fjernsynet vælte, hvilket kan medføre personskader.
3 Fastgør beslaget til halsens tapper fiksér med monteringsskruer , og 4 Fastgør dækslet , og fiksér sikkert med monteringsskruen A B E Tapper (top) C D Dansk ■ Fastgøring af fjernsynet Anvend monteringsskruerne (TX-P42ST50Y, TX-P50ST50Y) eller (TX-P55ST50Y, TX-P65ST50Y) til at fastgøre skærmen ordentligt. ● Stram først de fire monteringsskruer løst, og stram dem derefter godt for at fastholde korrekt. ● Udfør arbejdet på en vandret og plan overflade.
Kontakternes betegnelse Fjernbetjening 8 [Alternativmenu] 1 2 3 15 16 17 7 19 8 20 10 18 11 12 13 9 10 11 21 22 12 23 14 15 16 13 17 24 14 18 19 20 25 21 22 23 24 1 Standby til / fra knap ● Skifter fjernsynet mellem til (On) og fra (standby). 25 (rød-grøn-gul-blå) ● Anvendes til valg, navigation og anvendelse af forskellige funktioner. Lyd mute ● Slår lyden til eller fra. Tekst-TV ● Skifter til tekst-tv tilstand. Lydstyrke op / ned Taltaster ● Skifter kanal og tekst-tv sider.
Indikator / Kontrolpanel 1 Funktionsvalg Dansk ● [Lydstyrke] / [Kontrast] / [Lys] / [Farve] / [Skarphed] / [Nuance] (NTSC-signal) / [Bas]∗ / [Diskant]∗ / [Balance] / [Autosøgning] ∗indstillingerne [Musik] eller [Tale] i lydmenuen 2 Kanal op/ned, Værdiændring (ved anvendelse af F-knappen), tænd for fjernsynet (tryk på en af knapperne i cirka 1 sekund i Standby-tilstand) 3 Ændrer indgangstilstand 4 Tænd / sluk-knap (hovedafbryder) ● Bruges til at tænde og slukke for udstyret.
Grundlæggende tilslutning Det viste eksterne udstyr og kabler følger ikke med dette fjernsyn. Bekræft venligst, at enheden er taget ud af forbindelse med lysnettet, inden du tilslutter nogen ledninger eller tager dem ud af forbindelse. Der er visse begrænsninger ved placering til visning af 3D-billeder. For detaljer (s.
AV-enheder ■ Afspiller / 3D-kompatibel afspiller Fjernsyn Afspiller / 3D-kompatibel afspiller HDMI-kabel ■ DVD-optager / videobåndoptager Dansk Fjernsyn Jordbaseret antenne DVD-optager / videobåndoptager AV1 (SCART) adapter∗ Kabel SCART-kabel RF-kabel RF-kabel ■ DVD-optager / videobåndoptager og Sæt-topboks Fjernsyn Sæt-topboks Fjernsyn HDMI-kabel SCART-kabel AV1 (SCART) adapter∗ RF-kabel SCART-kabel RF-kabel Jordbaseret antenne DVD-optager / videobåndoptager ∗Leveret med dette fjernsyn B
Netværk For at aktivere netværkstjenestens funktioner (VIERA Connect osv.) skal du tilslutte fjernsynet til et netværksmiljø med bredbånd. ● Hvis du ikke har bredbåndsnetværkstjenester, skal du henvende dig til din forhandler for at få hjælp. ● Forbered internetmiljøet til kabelforbindelser eller trådløse forbindelser. ● Opsætning af netværksforbindelsen starter efter indstillingen (ved anvendelse af fjernsynet for første gang). (s.
Automatisk opsætning Søger efter og gemmer automatisk fjernsynskanaler. ● Disse trin er ikke nødvendige, hvis klargøringen er blevet udført af din lokale forhandler. ● Fuldfør tilslutningerne (s. 9 - 11) og indstillingerne (om nødvendigt) af det tilsluttede udstyr, før du starter Autosøgning. For detaljer om det tilsluttede udstyr, henvises der til brugsvejledningen for udstyret.
5 1 [DVB-C netværksindstillinger] ● Afhængigt af det land, du vælger, bør du først vælge din kabeludbyder ved at følge vejledningen på skærmen. vælg [Start Autosøgning] DVB-C netværksindstillinger Frekvens Netværk ID Automatisk Automatisk Start Autosøgning adgang Indstil normalt [Frekvens] og [Netværk ID] til [Automatisk]. Hvis [Automatisk] ikke vises, eller hvis det er nødvendigt, skal du indtaste [Frekvens] og [Netværk ID] specificeret af din kabeludbyder med taltaster.
6 ■ [Trådløs] De access points, der blev fundet automatisk, er listet. 1. Vælg dit ønskede access point vælg Tilgængelige trådløse netværk Nr. 1 2 3 Netværksnavn (SSID) Access Point A Access Point B Access Point C Trådløs type 11n(2.4GHz) 11n(5GHz) 11n(5GHz) Status adgang ● For [WPS (Trykknap)] (s. 15) (Rød) : Krypteret access point ● For at søge access points igen ● For informationen om det markerede ● For manuel indstilling access point (Gul) (Blå) Dansk 2.
6 [WPS (Trykknap)] 1. Tryk på WPS-knappen på det trådløse access point, indtil lampen lyser 2. Tilslut fjernsynet til adgangspunktet WPS (Trykknap) 1) Tryk på knappen 'WPS' på det trådløse adgangspunkt, indtil lampen blinker. 2) Vælg “Tilslut”, når adgangspunktet er klart. Er du i tvivl, så se brugsanvisningen til det trådløse adgangspunkt. Tilslut ● Bekræft, at dit access point understøtter WPS til denne indstilling.
Brug af “VIERA Connect” VIERA Connect er porten til Panasonics unikke internettjenester. VIERA Connect giver dig adgang til visse specifikke websteder, der understøttes af Panasonic, og giver mulighed for at nyde internetindhold, som f.eks. videoer, spil, kommunikationsværktøjer osv. fra VIERA Connects startskærm. ● Dette fjernsyn har ikke fuld browser-funktion, og visse af hjemmesidernes funktioner kan være utilgængelige. 1 Tænd ● Tryk i omkring 1 sekund. ● Tænd / sluk-knap skal være tændt. (s.
Visning af 3D-billeder Du kan få vist 3D-billeder med indhold eller programmer, der svarer til 3D-effekten, hvis du tager 3D-brillerne på. Dette fjernsyn understøtter 3D-formaterne [Frame Sequential]∗1, [Side om side]∗2 og [Top og bund]∗3. ∗1: Et 3D-format, hvor billederne for venstre og højre øje er indspillet i HD-kvalitet og afspilles skiftevis. ∗2, ∗3: Andre tilgængelige 3D-formater ● Sådan kan man se 3D-billeder (s.
3D-briller (valgfri) ● Brug Panasonic 3D-briller, som bærer dette logo og understøtter Bluetooth® trådløs teknologi. Logoet “Full HD 3D Glasses™” betegner produkter, som er kompatible med 3D-brilleteknologistandarder med aktiv lukker licenseret af Full HD 3D Glasses Initiative. RF-mærket på logoet betyder det trådløse system (Bluetooth® trådløs teknologi), og man kan bruge 3D-brillerne sammen med et fjernsyn med samme mærke. Bemærk Dansk ● Benyt 3D-brillerne på en afstand af ca. 3,2 m fra fjernsynet.
Skift mellem 2D- og 3D-tilstand Det er let at ændre visningstilstand mellem 2D og 3D vha. 3D-knappen. Vælg tilstanden Valg af 3D-tilstand vælg 2D 3D 2D indstil 3D ● Mulighederne for [Valg af 3D-tilstand] varierer afhængigt af forholdene. [3D] / [2D] / [2D 3D]: Viser det ønskede billede uden at vælge 3D-format. ● Denne tilstand fungerer muligvis ikke korrekt afhængigt af kildebilledformatet. Vælg i så fald det relevante 3D-format manuelt. Hvis billedet ikke ændres korrekt vha.
Sådan anvendes VIERA TOOLS Du kan nemt få adgang til nogle specielle egenskaber ved at anvende funktionen VIERA TOOLS.
Sådan anvendes menu-funktionerne Forskellige menuer gør det muligt at udføre indstillinger af billede, lyd og andre funktioner. 1 Vis menuen 2 Vælg menuen ● Viser de funktioner, som kan indstilles (varierer alt efter indgangssignalet). vælg Hovedmenu adgang Dansk Billede Lyd Netværk Timer Indstilling Vælg posten 3 ■ For til enhver tid at gå tilbage til fjernsynet Billedindstilling Kontrast Lys Farve Skarphed Nuance Farvetemp.
Vedligeholdelse Tag først stikket ud af stikkontakten. Displaypanel, Kabinet, Hylde Almindelig pleje: Tør forsigtigt overfladen af billedskærmen, kabinettet eller hylden med en blød klud for at rengøre snavs eller fingeraftryk. Til genstridigt snavs: Tør først overfladen af for støv. Fugt en blød klud med rent vand eller fortyndet neutralt rengøringsmiddel (1 del rengøringsmiddel til 100 dele vand). Vrid derefter kluden og tør overfladen af. Tør til sidst al fugten af.
■ Datablad Producent Panasonic Corporation Modelnr. TX-P42ST50Y TX-P50ST50Y TX-P55ST50Y TX-P65ST50Y Energieffektivitetsklasse C C C C Synlig skærmdiagonal 107 cm / 42 tommer 127 cm / 50 tommer 140 cm / 55 tommer 165 cm / 65 tommer Effektforbruget i tændt tilstand 133 W 180 W 205 W 255 W 194 kWh 263 kWh 299 kWh 372 kWh Bedømt effektforbrug 295 W 355 W 400 W 450 W Effektforbruget i standbytilstand∗2 0,30 W Effektforbruget i slukket tilstand 0,25 W Skærmopløsning 1.
Brugerinformation om indsamling og bortskaffelse af elektronikskrot og brugte batterier Disse symboler på produkter, emballage og/eller ledsagedokumenter betyder, at brugte elektriske og elektroniske produkter og batterier ikke må smides ud som almindeligt husholdningsaffald. Sådanne gamle produkter og batterier skal indleveres til behandling, genvinding resp. recycling i henhold til gældende nationale bestemmelser samt direktiverne 2002/96/EF og 2006/66/EF.