
Operating Instructions


English
6
3
Attach the bracket to the tabs of the neck
and fix with assembly screws
B
C
D
Tabs (top)
4
Attach the cover and fix securely with assembly
screw
E
A
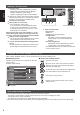
■ Securing the TV
Use the assembly screws
(TX-P42ST50Y, TX-P50ST50Y) or
(TX-P55ST50Y, TX-P65ST50Y) to fasten
securely.
●
Tighten the four assembly screws loosely
at first, then tighten them firmly to fix
securely.
●
Carry out the work on a horizontal and level
surface.
Hole for pedestal installation
Arrow mark
(TX-P42ST50Y, TX-P50ST50Y) /
(TX-P55ST50Y, TX-P65ST50Y)
Removing the pedestal from the TV
Be sure to remove the pedestal in the following way
when using the wall-hanging bracket or repacking the
TV.
1 Remove the assembly screws
(TX-P42ST50Y,
TX-P50ST50Y) or (TX-P55ST50Y, TX-P65ST50Y)
from the TV.
2 Pull out the pedestal from the TV.
3 Remove the assembly screw from the cover.
4 Remove the assembly screws from the bracket.
5 Remove the assembly screws from the back of
the base and pull out the neck.
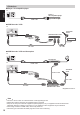
Adjusting the panel to your desired angle
(TX-P42ST50Y, TX-P50ST50Y)
●
Do not place any objects within the full rotation range.
(View from the top)
TX-P42ST50Y: 15°
TX-P50ST50Y: 10°
Preventing the TV from falling over (TX-P42ST50Y, TX-P50ST50Y)
Using the fall-prevent screw hole and a screw (commercially available), securely fix the body of the pedestal to the
installation surface.
●
The place where the pedestal is to be fixed should be thick enough and made of hard material.
Screw (not supplied)
Diametre: 3 mm
Length: 25 - 30 mm
Screw hole