Model No. TX-P50VT50Y TX-P55VT50Y TX-P65VT50Y Operating Instructions Plasma Television Thank you for purchasing this Panasonic product. Please read these instructions carefully before operating this product and retain them for future reference. The images shown in this manual are for illustrative purposes only. Please refer to Pan European Guarantee Card if you need to contact your local Panasonic dealer for assistance.
Do not display any still part of the image for a long period In such cases the still part of the image remains dimly on the plasma screen (“image retention”). This is not considered a malfunction and is not covered by the warranty.
Panasonic does not guarantee operation and performance of peripheral devices made by other manufacturers; and we disclaim any liability or damage arising from operation and/ or performance from usage of such other maker’s peripheral devices. The recording and playback of content on this or any other device may require permission from the owner of the copyright or other such rights in that content.
Safety Precautions Warning Safety Precautions Handling the mains plug and lead ● Insert the mains plug fully into the socket outlet. (If the mains plug is loose, it could generate heat and cause fire.) ● Ensure that the mains plug is easily accessible. ● Ensure the earth pin on the mains plug is securely connected to prevent electrical shock. • An apparatus with CLASS I construction shall be connected to a mains socket outlet with a protective earthing connection.
Radio waves Safety Precautions ● Do not use the TV, 3D Eyewear and VIERA Touch Pad Controller in any medical institutions or locations with medical equipment. Radio waves from the TV, 3D Eyewear and VIERA Touch Pad Controller may interfere with the medical equipment and cause accidents due to the malfunction. ● Do not use the TV, 3D Eyewear and VIERA Touch Pad Controller near any automatic control equipment such as automatic doors or fire alarms.
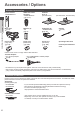
Accessories / Options Standard accessories Remote Control ● N2QAYB000715 Quick Start Guide Accessories / Options VIERA Touch Pad Controller ● N2QBYB000015 (p. 7, 11) Pedestal (p. 8) (TX-P50VT50Y) Mains lead (p. 13) Batteries (4) ● R6 (p. 7) 3D Eyewear (2) ● N5ZZ00000257 (p. 33) Clamper (p. 15) Ferrite core (2) (Large size) (p. 15) Ferrite core (Middle size) (p. 104) Ferrite core (Small size) (p.
Wall-hanging bracket ● TY-WK4P1RW (TX-P50VT50Y) ● TY-WK5P1RW (TX-P55VT50Y) a: 400 mm b: 300 mm a: 500 mm b: 300 mm ● Tilting angle for this TV: 0 (vertical) to 10 degrees ● Tilting angle for this TV: 0 (vertical) to 20 degrees a Depth of screw: ● TX-P50VT50Y, TX-P55VT50Y minimum 10 mm, maximum 16 mm Diametre: M8 b ● Tilting angle for this TV: 0 (vertical) to 10 degrees ● TX-P65VT50Y minimum 17 mm, maximum 23 mm Screw for fixing the TV onto the wall-hanging bracket (not supplied with the TV) (View
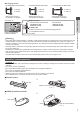
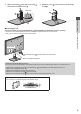
Attaching / removing the pedestal Warning Do not disassemble or modify the pedestal. ● Otherwise the TV may fall over and become damaged, and personal injury may result. Caution Quick Start Guide Accessories / Options Do not use any pedestal other than the one provided with this TV. ● Otherwise the TV may fall over and become damaged, and personal injury may result. Do not use the pedestal if it becomes warped or physically damaged.
3 Attach the bracket to the tabs of the neck and fix with assembly screws 4 Attach the cover screw B and fix securely with assembly A Tabs (top) E C ■ Securing the TV Arrow mark (TX-P50VT50Y) / Accessories / Options Use the assembly screws (TX-P50VT50Y) / (TX-P55VT50Y, TX-P65VT50Y) to fasten securely. ● Tighten the four assembly screws loosely at first, then tighten them firmly to fix securely. ● Carry out the work on a horizontal and level surface.
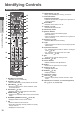
Identifying Controls Remote Control 8 [Option Menu] 1 2 3 15 16 Quick Start Guide 4 5 6 17 7 19 8 20 9 10 18 11 12 13 Identifying Controls 9 10 11 21 22 12 23 14 15 16 13 17 24 14 25 18 19 20 21 22 23 24 1 Standby On / Off switch ● Switches TV on or off standby. (p. 36) ● Switches the viewing mode between 2D and 3D. [Main Menu] (p. 40) ● Press to access Picture, Sound, Network, Timer and Setup Menus. Information (p. 22) ● Displays channel and programme information. VIERA TOOLS (p.
VIERA Touch Pad Controller 1 2∗ 1 Standby On / Off switch 7∗ 8 9 10 ● VIERA TOOLS: Same function of the remote control button 5 (p. 10). ● On-screen remote control: Press and hold to display the remote control GUI (Graphical User Interface). Press again to move the position of GUI. (To change the page of GUI, slide your finger to the left / right on the touch pad.) 6 Volume Up / Down ● Same function of the remote control button 12 (p. 10).
Indicator / Control panel 1 Function select Quick Start Guide Identifying Controls ● [Volume] / [Contrast] / [Brightness] / [Colour] / [Sharpness] / [Tint] (NTSC signal) / [Bass]∗ / [Treble]∗ / [Balance] / [Auto Setup] (p. 51 - 54) ∗[Music] or [Speech] mode in the Sound Menu 2 Channel Up / Down, Value change (when using the F button), Switching the TV on (press either button for about 1 second when in Standby mode) 3 Changes the input mode 4 Mains power On / Off switch ● Use to switch the mains power.
Basic Connection External equipment and cables shown are not supplied with this TV. Please ensure that the unit is disconnected from the mains socket before attaching or disconnecting any leads. There are some restrictions on placement for viewing 3D images. For details (p. 32, 33) Terminals 1 3 4 5 6 7 8 9 10 11 12 12 Basic Connection 9 10 11 CI slot (p. 64) SD Card slot (p. 70, 74) Headphone jack (p. 105) USB 1 - 3 port (p. 70, 74, 104) HDMI1 - 4 (p. 14, 104) ETHERNET (p.
AV devices ■ Player / 3D compatible player TV Player / 3D-compatible player HDMI cable Quick Start Guide ■ DVD Recorder / VCR TV Terrestrial aerial Basic Connection DVD Recorder / VCR AV1 (SCART) adaptor∗ Cable SCART cable RF cable RF cable ■ DVD Recorder / VCR and Set top box TV Set top box Cable HDMI cable TV SCART cable AV1 (SCART) adaptor∗ RF Cable SCART cable RF cable Terrestrial aerial DVD Recorder / VCR ∗Supplied with this TV Note 14 ● Connect to the TV’s AV1 for a DVD Recorder
Network To enable the network service functions (VIERA Connect, etc.), you need to connect the TV to a broadband network environment. ● If you do not have any broadband network services, please consult your retailer for assistance. ● Prepare the internet environment for wired connection or wireless connection. ● Setup of the network connection will start after the tuning (when first using the TV). (p.
Auto Setup Search and store TV channels automatically. ● These steps are not necessary if the setup has been completed by your local dealer. ● Please complete connections (p. 13 - 15) and settings (if necessary) of the connected equipment before starting Auto Setup. For details of settings for the connected equipment, read the manual of the equipment. Quick Start Guide 1 Plug the TV into mains socket and switch on 2 Select the language Auto Setup 3 ● Takes a few seconds to be displayed.
5 1 DVB-S Search Mode 2 DVB-S Satellite Search DVB-S Auto Setup Search Mode Free Channels All Channels Satellite Progress This will take up to 40 minutes. 100% Satellite Astra 19.2°E Hot Bird 13°E select set Press EXIT to skip Satellite installation Searching Satellite 3 [DVB-S Auto Setup] 4 [DVB-C Network Settings] Satellite Astra 19.2° E 0% Progress This will take about 30 minutes. No.
6 ■ [Wired] 1. Select [Auto] Connection Test Acquire IP Address Auto Check network cable connection. Check acquired IP address. Check for devices using same IP address. Check gateway connection. Check server connection. Manual select access Quick Start Guide Automatically setup is done and the test of the network connection starts. ● To set manually, select [Manual] and set each item. For details (p. 89) 2.
6 [WPS(Push button)] 1. Press the WPS button on the access point until the light flashes 2. Connect the TV with the access point WPS(Push button) 1) Please press the ‘WPS’ button on the wireless access point until its light flashes. 2) When the light is flashing select ‘Connect’ on TV. ● Ensure that your access point supports WPS for this setup. ● WPS: Wi-Fi Protected Setup™ ● If the connection has failed, check the settings and positions of your access point. And then, follow the on-screen instructions.
Using “VIERA Connect” VIERA Connect is a gateway to the internet services unique to Panasonic. VIERA Connect allows you to access some specific websites supported by Panasonic, and enjoy internet contents such as videos, games, communication tools, etc. from VIERA Connect home screen. ● This TV does not support full web browser function and some features of the websites may not be available. 1 Turn power on ● Press for about 1 second. ● Mains power On / Off switch should be on. (p.
Watching TV 1 Turn power on ● Press for about 1 second. ● Mains power On / Off switch should be on. (p. 12) ■ VIERA Connect introduction banner appears Every time you turn on the TV, this banner appears at the bottom of the screen. You can access to VIERA Connect easily and enjoy the various (p. 20) contents. ● To remove this banner, leave for about 5 seconds or press any buttons (except the buttons to access VIERA Connect). ● To set this banner display off [VIERA Connect Banner] (p.
Other useful functions Display Information banner Display Information banner ● Also appears when changing a channel. 1 2 3 5 6 7 4 Example: DVB HDTV 1 ZDF Bad signal 45 Dolby D+ 1 Channel position and name 2 Channel type ([Radio], [Data], [HDTV], etc.) / Encrypted channel ( TV mode ( , , , 3 Programme 4 Current time 20:35 All DVB-T Channels Change category C Coronation Street 20:00 - 20:55 2 Now Info )/ ) 5 Programme Start / Finish time (DVB) Channel number, etc.
Display the selectable settings for the current status Confirm or change the current status instantly ● To change select select / change access store [Multi Video] (DVB) Selects from a group of multiple videos (if available) ● This setting is not memorised and it will return to the default setting once you exit the current programme.
Aspect Change the aspect ratio (image size) Enjoy viewing the image at its optimum size and aspect. Programmes usually contain an “Aspect Control Signal” (Widescreen signal, etc.), and the TV will choose the aspect ratio automatically according to the “Aspect Control Signal” (p. 107).
Using TV Guide TV Guide - Electronic Programme Guide (EPG) provides an on-screen listing of the programmes currently broadcast and the forthcoming broadcasts over the next seven days (depending on the broadcasters). ● This function varies depending on the country you select (p. 16). ● The postcode entry or update may be required to use the GUIDE Plus+ system depending on the country you select. “View advertisement” (p. 26) ● DVB-T and Analogue channels are displayed on the same TV Guide screen.
■ To the previous day (DVB) ■ To the next day (DVB) (red) (green) ■ To view a channel list of the selected type (DVB) ■ To view a channel list of the selected category (blue) (yellow) (Type list) Prog.
Timer Programming (DVB) The Timer Programming menu allows you to choose programmes that you want to remind watching or record to the external recorder, the USB HDD or the SD Card. At the correct time, the TV will tune to the correct channel even if the TV is in Standby mode. 1 Select the forthcoming programme select 2 Select the function ([Ext Rec.], [USB HDD Rec.], [SD Card Rec.] or [Reminder]) (Timer Programming screen) set Timer Programming ● LED will turn to orange if Timer Programming is set.
Viewing Teletext Teletext services are the text information provided by the broadcasters. The features may vary depending on the broadcasters. What is FLOF (FASTEXT) mode? In FLOF mode, four differently coloured subjects are situated at the bottom of the screen. To access more information about one of these subjects, press the appropriate coloured button. This facility enables fast access to information on the subjects shown.
FULL / TOP / BOTTOM (green) (TOP) (BOTTOM) Normal (FULL) (Expand the TOP half) (Expand the BOTTOM half) View in multi window Watch TV and Teletext in two windows at once Select [Picture and text] On or Off (Press twice) ● Operations can be made only in teletext screen. press and hold Corresponding coloured button The number changes to white.
Watching External Inputs Connect the external equipment (VCRs, DVD equipment, etc.) and you can watch through the input. ● To connect the equipment (p. 13 - 15, 104 - 106) The remote control is capable of operating the contents or external equipment. (p. 31) 1 Turn the TV on When connecting with SCART (p. 14) Receives input signals automatically when playback starts ● Input signals are automatically identified by the SCART (pin 8) terminal. ● This function is also available for HDMI connections (p. 104).
Operating the contents or equipment with the TV remote control You can operate the contents in Media Player / media servers, recording functions or the connected equipment with the below buttons of this TV remote control.
Viewing 3D images You can enjoy viewing 3D images with contents or programmes corresponding to the 3D effect by wearing the 3D Eyewear. “Standard accessories” (p. 6) This TV supports [Frame Sequential]∗1, [Side by Side]∗2 and [Top and Bottom]∗3 3D formats. ∗1: The 3D format that the images for the left and right eyes are recorded with the high definition quality and alternately played back. ∗2, ∗3: Other available 3D formats ● How to view the 3D images (p.
3D Eyewear Use ● Pay special attention when children are using the 3D Eyewear. 3D Eyewear should not be used by children younger than about 5 - 6 years old, as a guideline. All children must be fully supervised by parents or guardians who must ensure their safety and health throughout the using 3D Eyewear. ● Before using the 3D Eyewear, ensure no breakable objects surrounding the user to avoid any accidental damage or injury.
Part names and functions Power switch ON / OFF ● Slide the tab to the “ON” / “OFF” position to switch the power On / Off. MODE ● Slide the tab to the “MODE” position to change the mode between 3D and 2D (view a 3D image in 2D). ● This is also used when registering the 3D Eyewear to the TV. For details “Registration” (see below) Indicator lamp Lights or flashes during use to show the status. Insulating sheet Pull Viewing 3D images Battery cover ● When using for the first time, remove the insulating sheet.
■ Registration again When connection with registered TV fails, or when using with another TV, re-register the 3D Eyewear. 1 Turn the TV on 2 Within 50 cm from the TV, hold the power switch on the “MODE” position for more than 2 seconds ● Release the power switch when registration starts. 3 The green LED lights for 3 seconds when the registration is successfully completed Note ● If the registration failed, the 3D Eyewear will be turned off. In this case, turn off the TV and perform from step 1.
To view the 3D images You can enjoy the 3D images in a variety of ways. (Frame Sequential, Side by Side and Top and Bottom are the supported 3D format.) ■ Playing back 3D-compatible Blu-ray disc (Frame Sequential format) ● Connect the 3D-compatible player via a fully wired HDMI compliant cable. ● If input mode is not switched automatically, select the input mode connected to the player. (p. 30) ● If you use the non 3D-compatible player, the images will be displayed on 2D mode.
■ To change 3D format manually When the image is not changed properly using [3D], [2D] or [2D During the above operation 3D] mode, use this manual setting.
3D Settings If the 3D images are not displayed correctly or seem unusual, adjust and setup the 3D settings.
How to Use VIERA TOOLS You can access some special features easily by using the VIERA TOOLS function. 1 Display icons of the feature 2 Select a feature select access VIERA Link ■ To return to TV ■ Follow the operations of each feature [VIERA Link] (p. 100 - 103) [Music]∗ (p. 84) [Photo]∗ (p. 76) [VIERA Connect] (p. 20, 86) [Video]∗ (p. 80) [Media Server]∗ (p. 92) How to Use VIERA TOOLS or [Recorded TV]∗ (p.
How to Use Menu Functions Various menus allow you to make settings for the picture, sound, and other functions. 1 Display the menu 2 Select the menu ● Displays the functions that can be set (varies according to the input signal).
Menu list Menu Item Selects your favourite picture mode for each input [Dynamic] / [Normal] / [Cinema] / [THX Cinema] / [THX Bright Room] / [Game] / [Professional1] / [Professional2] [Dynamic]: Improves contrast and sharpness for viewing in a bright room. [Normal]: Normal use for viewing in a normal lighting condition. [Cinema]: Improves the performance of contrast, black and colour reproduction for watching movies in a darkened room.
Menu Item Eco Mode Automatic Brightness Control function Adjusts picture settings automatically depending on ambient lighting conditions [Off] / [On] P-NR Picture Noise Reduction Reduces unwanted picture noise and flicker noise in the contoured parts of a picture [Off] / [Min] / [Mid] / [Max] / [Auto] ● Not valid when [Viewing Mode] is set to [Game] or [1080p Pure Direct] is set to [On] 3D-COMB Makes still or slow moving pictures more vivid [Off] / [On] ● Occasionally, while viewing still or slow movi
Menu Item Adjustments / Configurations (alternatives) AV Colour System Selects optional colour system based on video signals in AV mode [Auto] / [PAL] / [SECAM] / [M.NTSC] / [NTSC] DVI Input Setting Changes the black level of the image for HDMI input mode with DVI input signal manually [Normal] / [Full] ● When the DVI input signal from the external equipment (especially from PC) is displayed, the black level may not be suitable. In this case, select [Full].
Menu Sound How to Use Menu Functions 44 Item Adjustments / Configurations (alternatives) Equaliser Adjusts the frequency level to suit your favourite sound quality ● This function is available when [Mode] is set to [User]. ● Select the frequency and change the frequency level by using the cursor button. ● To enhance the bass sound, raise the level of the lower frequency. To enhance the treble sound, raise the level of the higher frequency.
Menu Item Adjustments / Configurations (alternatives) HDMI1 / 2 / 3 / 4 Input Selects to fit the input signal [Digital] / [Analogue] (p.
Menu Item Eco Navigation Automatically sets the TV to the most suitable energy-saving mode ● If you press the OK button, the following items are set as below: [Eco Mode], [VIERA Link], [Power off Link], [Standby Power Save], [Power Save] [On] [Intelligent Auto Standby] [On (No reminder)] [2 hours] [Auto Standby] Recording Setup Settings for the recording feature of the USB HDD / SD Card (p. 71) Bluetooth Setup Settings for the specific devices supporting Bluetooth wireless technology (p.
Menu Item Child Lock Adjustments / Configurations (alternatives) Applies access control for channels or inputs to prevent unwanted access (p. 62) Creates a list of favourite channels (p. 55) ● Not valid on Analogue mode Channel List Skips the unwanted channels or edits channels (p. 56) Auto Setup Automatically searches for the receivable channels (p. 51 - 54) Manual Tuning Searches for the channels manually (p. 57) Update Channel List Updates the channel list while keeping your settings (p.
Menu Item Language Setup How to Use Menu Functions Display Settings 48 Adjustments / Configurations (alternatives) OSD Language Changes language for on-screen displays Preferred Audio 1/2 Selects the first and second preferred language for DVB multi audio (depending on the broadcaster) Preferred Subtitles 1/2 Selects the first and second preferred language for DVB subtitles (depending on the broadcaster) ● To display subtitles (p.
Menu Item Adjustments / Configurations (alternatives) Display Settings Data Service Application Sets to use Hybrid Broadcast Broadband TV application (depending on the selected country and broadcaster) [Off] / [Auto Start Off] / [Auto Start On] (p. 63) ● For DVB mode Radio Mode Sets the timer for turning off the screen automatically when a radio channel is selected [Off] / [5] / [10] / [15] / [20] (seconds) ● The sound is active even if the screen turns off.
Menu Other Settings Setup How to Use Menu Functions 50 Item Adjustments / Configurations (alternatives) Power on Preference Automatically selects the input when the TV is turned on [TV] / [AV] ● Set to [TV] to view picture from TV tuner. Set to [AV] to view input from the external equipment connected to the AV1 or HDMI1 terminal, e.g. set top box. ● The external equipment must be switched on and sending a control signal for automatic switching at power on to occur.
Retuning from Setup Menu Automatically retune the channels received in the area. ● This function is available if channel tuning is already performed. ● Only the selected mode is retuned. All the previous tuning settings are erased. ● If Child Lock PIN number (p. 62) has been set, the PIN number is required. ● If tuning has not been done completely [Manual Tuning] (p. 57) DVB-S channels 1 Select DVB-S 2 Display the menu and select [Setup] (p.
4 [LNB]: ● If you set to [One LNB], [LNB] is not selectable. ● If you set to [MiniDiSEqC] or [Single Cable], select from LNB AA and AB. ● If you set to [DiSEqC 1.0], select from LNB AA, AB, BA and BB. [Satellite]: ● Select [No Satellite] if you do not know the connected satellite (available satellite will be searched in Auto Setup). ● Select [User defined] to set [Test Transponder Frequency] manually. ● If you set to [Single Cable], additional settings are required.
DVB-C, DVB-T, Analogue channels 1 Select DVB-C, DVB-T or Analogue 2 Display the menu and select [Setup] (p.
6 DVB-T: DVB-T Auto Setup DVB-T Auto Setup CH 5 Progress All DVB-T tuning data will be erased This will take about 3 minutes. CH Channel Name CBBC Channel 62 BBC Radio Wales 62 E4 62 62 Cartoon Nwk Free TV: 4 69 Type Free TV Free TV Free TV Free TV Quality 100 100 100 100 Radio: 0 Pay TV: 0 Searching Analogue: Analogue Auto Setup Analogue Auto Setup Scan This will take about 3 minutes.
Tuning and Editing Channels You can retune channels or make your favourite channel lists, skip unwanted channels, etc. 1 Select the mode 2 Display the menu and select [Setup] (p. 21) select Setup 3 access Select [DVB-S Tuning Menu], [DVB-C Tuning Menu], [DVB-T Tuning Menu] or [Analogue Tuning Menu] select DVB-S Tuning Menu DVB-C Tuning Menu DVB-T Tuning Menu Analogue Tuning Menu 4 Access Access Access Access access ● The displayed item depends on the selected mode.
■ To edit Favourites list While the cursor is in the Favourites field to edit ● To move the channel Select the new position (green) ● To delete the channel Store (green) or ● To delete all channels (yellow) ● To name the Favourites Set characters (maximum 10 characters) Store select User input (red) Name set ● To use numeric buttons (p. 114) 3 Store Skip unwanted channels, Edit Channels [Channel List] You can hide (skip) unwanted channels.
Set DVB channel manually [Manual Tuning] Normally use [Auto Setup] or [Update Channel List] to retune DVB channels. If tuning has not been done completely or for adjusting the direction of the aerial or dish, use this function. ● All channels found will be added to the Channel List. DVB-S: 1 Set the satellite select set DVB-S Manual Tuning Signal Quality Signal Strength 100% 100% Satellite Transponder Frequency Symbol Rate Polarisation Modulation Service ID Astra 19.
Update DVB channel automatically [Update Channel List] You can add new channels, delete removed channels, update channel name and position automatically to the channel list. ● The channel list is updated while keeping your settings in [Favourites Edit], DVB-T Update Channel List Progress CH 5 69 [Channel List], [Child Lock], etc. This will take about 3 minutes. ● Depending on the signal condition, the update may not work properly.
Timer Programming Timer Programming from Menu The Timer Programming menu allows you to choose programmes that you want to remind watching or record to the external recorder, the USB HDD or the SD Card. At the correct time, the TV will tune to the correct channel even if the TV is in Standby mode. TV Guide may also be used to set timer programming event (p. 27). ● This function is not available in Analogue mode. ● Timer Programming can store up to 15 events.
Set timer programming event details 1 Start making the settings 2 Select the function ([Ext Rec.], [USB HDD Rec.], [SD Card Rec.] or [Reminder]) [Ext Rec.] / [USB HDD Rec.] / [SD Card Rec.]: Records the programme to the external recorder, the USB HDD or the SD Card. When the start time comes, the channel will be switched automatically and the video and audio signals will be output. 2 minutes before the starting time, a reminder message appears if you are watching TV. For [USB HDD Rec.] and [SD Card Rec.
■ To edit a timer programming event Select the event ● To change a timer programming event Correct as necessary (p. 60) ● To delete a timer programming event ● To record with subtitles (if available) • Each time pressed: (yellow) auto off ● To cancel a timer programming event temporarily • Each time pressed: (blue) cancel stop cancelling (red) ■ To unlock the tuner and stop recording Note Timer Programming ● Check that the LED is orange. If not, timer programming events are not active or not stored.
Child Lock You can lock specific channels / AV input terminals and control who watches them. When the locked channel / input is selected, a message appears. Enter the PIN number to watch. 1 Display the menu and select [Setup] select Setup 2 access Select [Child Lock] select Child Lock access Access Control channel audience [Child Lock] 1 Enter the PIN number (4 digits) ● Enter the PIN number twice at first setting. ● Make a note of the PIN number in case you forget it.
Using Data Service Application You can enjoy Hybrid Broadcast Broadband TV application that is one of the interactive data services for digital broadcasting. ● To use Hybrid Broadcast Broadband TV application fully, you need a broadband network environment. Ensure the network connections and network settings are completed. “Network connections” (p. 87), “Network Setup” (p. 88 - 91) ● Not all the data service are available depending on the country, area and broadcaster.
Using Common Interface The Common Interface Module menu provides access to software contained on Common Interface (CI) Modules. ● This function may not be available in some countries or regions. ● Video and audio signals may not be output depending on broadcasts or services. Although CI module may enable you to view some services, this TV does not guarantee all services (e.g. encrypted pay-TV channels). Please use only the approved CI module by the broadcaster.
Shipping Condition Resets the TV to its original condition, i.e. no channels tuned in. All settings other than [USB HDD Setup] are reset (channels, picture, sound settings, etc.). ● To retune TV channels only, e.g. after moving house “Retuning from Setup Menu” (p.
Updating the TV Software A new version of software may be released for download to enhance the performance or operations of the TV. If there is an update available, a notification message is displayed when the channel has the update information. ● To download (Press the EXIT button not to download) You can update new software automatically or update manually.
Multi Window Enjoy viewing the digital TV programme and external input (AV, Component or HDMI) at once. Display the menu and select [Picture] 1 select Picture access Select [Picture in Picture] 2 select Picture in Picture access Access ● Remote control operations apply to the main screen.
Advanced Picture Settings You can adjust and setup the detailed picture settings for each input and Viewing Mode (except THX modes). ● To use this function completely, set [Advance(isfccc)] to [On] in the Setup Menu. (p. 49) 1 Select the input mode to adjust and setup 2 Display the menu and select [Picture] (p.
Menu Item Adjustments / Configurations (alternatives) Advanced Settings Colour Management Picture Gamma R-Hue, G-Hue, B-Hue Adjusts the picture hue of red / green / blue area R-Saturation, G-Saturation, B-Saturation Adjusts the saturation of red / green / blue area R-Luminance, G-Luminance, B-Luminance Adjusts the luminance of red / green / blue area More Detailed Adjustment Adjusts more detailed Colour Management items [Y-Hue] / [C-Hue] / [M-Hue]: Adjusts the picture hue of yellow / cyan / ma
USB HDD / SD Card Recording You can record the digital TV programmes to the connected USB HDD or inserted SD Card and enjoy playing back in various ways. ● Analogue TV programme cannot be recorded on the USB HDD / SD Card. ● The data broadcasting (MHEG, etc.), radio broadcasting and the periods without any signal will not be recorded. ● Not all the programmes can be recorded depending on the broadcaster and service provider. ● You cannot copy the recorded contents of the USB HDD.
Setting for USB HDD / SD Card Format and setup the USB HDD with this TV in order to use it for recording. Depending on the conditions of the SD Card, the recording may not work properly. Formatting the SD Card with this TV will resolve this problem. (All data will be erased when formatting.) ● Before the settings, connect the USB HDD / SD Card (p. 70) and be sure to turn on the USB HDD. ● Prepare the USB HDD for the exclusive use of recording with this TV.
Mode : The USB HDD is available for recording / playing back. Only one USB HDD on the list is available for recording. USB HDD name is displayed : The USB HDD is available for playing back. USB HDD Setup Product USB Drive A USB Flash Disk Name USB HDD 1 ● To edit USB HDD name ● To format (red) ● To change the mode (green) ● To remove the USB HDD safely from the TV (yellow) • To set “Safely remove USB” in other conditions (p. 23) SD Card Formatting Formats the inserted SD Card.
■ To stop recording on the way or ■ To play back or delete the recorded contents “Recorded TV mode” (p. 81) ● Even if One Touch Recording is in progress, you can play back all the contents. (Depending on the USB HDD / SD Card, it may not be available or the recording may not work properly while playback.) Record constantly [REW LIVE TV] (USB HDD only) Records the current programme constantly. ● Confirm the code of the remote control is “73” (p. 31).
Using Media Player Media Player allows you to enjoy photo, video or music recorded on an SD Card and a USB Flash Memory, and contents recorded with this TV on the recording devices (SD Card / exclusive USB HDD). Photo mode: Still pictures recorded by digital cameras will be displayed. Video mode: (For SD Card / USB Flash Memory) Moving pictures recorded by digital video cameras will be played back.
Starting Media Player 1 2 Insert the SD Card or USB Flash Memory to the TV (p. 74) ● To play back contents in the USB HDD, check the connection and settings are completed. (p. 70, 71) Confirm the message and start Media Player ● You can also start by pressing following button. “Watching External Inputs” (p. 30) 3 Select the device to access Drive Select EXIT Select RETURN Access USB HDD1 SD Card select access USB Flash...
Change the contents You can switch to the other mode of Media Player from the thumbnail view. ● The mode can be switched in the current device. 1 While the thumbnail is displayed, display the contents selection 2 Select the content Contents Select EXIT Select RETURN Access (blue) Photo Video Music select access Recorded TV SD Card Photo mode ● Supported file format (p. 108) The thumbnail of all the photos in the SD Card or USB Flash Memory will be displayed.
■ To sort by folder, recorded date or recorded month 1 Display the view selection in the thumbnail view (green) 2 Select the sort type [Folder view]: Displays the thumbnail grouped by folder. ● The files which are not into a folder will be collected to the folder named “/”. [Sort by Date] / [Sort by Month]: Displays the thumbnail grouped by the same date or month. ● The group of the photos without a recorded date is shown as [Unknown].
■ To enjoy the saved 3D photos Saved 3D photos are displayed in the Thumbnail screen. Wear the 3D Eyewear and enjoy the 3D photos. Example: Thumbnail Media Player Photo All photos Saved 3D photo Photo Settings Setup the settings for Photo mode.
Menu Item Adjustments / Configurations (alternatives) Screen Mode Selects enlarged or normal viewing on Single view and Slideshow [Normal] / [Zoom] ● This function is not available when [Frame] is set to [Collage], [Drift], [Gallery] or [Cinema] or when [Transition Effect] is set to [Motion]. ● Depending on the photo size, it may not be fully enlarged to fill the screen, e.g. portrait style picture.
Video and Recorded TV mode ● Supported file format (p. 108, 109) Video mode (For SD Card / USB Flash Memory) The thumbnail of video titles in the SD Card or USB Flash Memory will be displayed. Example: Thumbnail - [Title view] Media Player Video Title view The preview will start when the title / scene is highlighted if it supports a preview. ● To turn off the preview “Video Setup” (p.
■ Video Setup Setup the settings for Video mode. ● Menu items and selectable options vary depending on the content. 1 Display the option menu 2 Select [Video Setup] 3 Select the items and set select Option Menu Video Setup Menu Item access / store Adjustments / Configurations (alternatives) Video Setup Sets to start the preview of the title or scene in the thumbnail view [Off] / [On] ● Image may not be displayed for an instant in the thumbnail view. Set the preview [Off] to resolve this.
■ Playback from the list 2 Start playback 1 Select the content ● If you stopped the last playback on the way, the confirmation screen is displayed to select whether to start from where you stopped last time or from the beginning. (USB HDD only) ● If the content has multiple programmes with the different parental ratings, the highest restriction is valid for the content. Once you unlock the restriction, all the programmes in the content can be played back.
● To repeat between the starting point “A” and finishing point “B” Set “A” and “B” in order • The points will be reset by (blue) pressing this button again or other operations. ● To the previous / next chapter (red) / (green) • A recorded content is automatically divided into chapters (about 5 minutes for each). ● To display the subtitle (if available) ● To change aspect ● To confirm or change the current status (if available) “Display the selectable settings for the current status” (p.
Music mode ● Supported file format (p. 109) The thumbnail of music folders in the SD Card or USB Flash Memory will be displayed. Example: Thumbnail - [Folder view] Media Player Music Folder view ● To play back the selected folder Select the folder Start playback My Music_1 My Music_2 Access Select Play Folder My Music_3 EXIT RETURN (red) Info Option Menu Drive Select SD Card Contents Select ■ Playback from File view Selected file will be played back.
Using Network Services (DLNA / VIERA Connect) DLNA® This TV is a DLNA Certified™ product. DLNA (Digital Living Network Alliance) is a standard that makes DLNA Certified digital electronics easier and more convenient to use on a home network. To learn more, visit www.dlna.org. ● To enable this function, connect this TV to your home network. “Network connections” (p. 87), “Network Setup” (p.
■ Sharing the TV programme or contents of this TV with the other network equipment You can enjoy the current digital TV programme or the contents∗1 of this TV on the other DLNA Certified VIERA∗2, your smartphone, etc. connected to your home network. For example, watching the continuation of the current programme on your smartphone in the other room, etc. ● To use this function, set [DLNA Server Settings] of this TV. (p.
Network connections To use only DLNA features, you need a home network environment and you can operate the features without broadband network environment. To use VIERA Connect features, you need a broadband network environment. ● If you do not have any broadband network services, please consult your retailer for assistance. ● Dial-up internet connections cannot be used. ● Required speed (effective): at least 1.5 Mbps for SD and 6 Mbps for HD picture quality, respectively.
Network Setup ● Ensure the connections are completed before starting Network Setup. “Network connections” (p. 87) Display the menu and select [Network] select Network access Network Link settings Sets the link settings to access and control this TV from the network equipment (PC with Windows 7 installed, smartphone, DLNA Certified VIERA, etc.) via the network.
Wired connection settings This setting is for the network connection by using the LAN cable.
4 Select [Connection Test] and access to test select Connection Test Access access ● Performs automatic testing of the network connection for the TV. (It takes a while to test.) Connection Test Check network cable connection. Check acquired IP address. Check for devices using same IP address. Check gateway connection. Check server connection. : succeeded The test is successful and the TV is connected to the network. : failed Check the settings and connections. And then try again.
5 Enter the encryption key of the access point Set characters Wireless Network Settings Encryption key A B C D E F G H U V W X Y Z I J K L M N O P Q R S T 0 1 2 3 4 5 6 7 8 9 ! : a b c d e f g h i j k l m n o p q r s t u v w x y z ( ) + - . * _ @ / “ ‘ % & ? , ; = $ [ ] ~ < > { } | ` ^ \ Store select # set ● You can set characters by using numeric buttons. ● After settings, return to the previous menu.
Using DLNA® features ● Ensure the preparation of the media server, network connections and network settings are completed. 1 Display [VIERA TOOLS] and select [Media Server] Media Server 2 (p.
[Slideshow] - Slideshow completes when all photos are viewed within the list. 1 Select the photo file from the list for the first view 2 Start Slideshow (red) ● To display / hide the operation guide ● To pause (return to Single view) ● To return to list For video file Playback - Playback will start. If you stopped the last playback on the way, the confirmation screen is displayed to select whether to start from where you stopped last time or from the beginning.
Option menu for each content Setup the settings for Photo, Video and Music file operations on this TV.
Audio output settings (for video contents) You can enjoy the multi-channel sound via an amplifier connected to DIGITAL AUDIO OUT or HDMI2 (ARC function) terminal. ● To confirm or change the current sound status (p.
Link Functions (Q-Link / VIERA Link) Q-Link connects the TV and DVD Recorder / VCR, and enables easy recording, playback, etc. (p. 98) VIERA Link (HDAVI Control™) connects the TV and the equipment with VIERA Link function, and enables easy control, convenient recording, playback, energy saving, creating home theatre, etc., without complicated setting. (p. 99 - 103) You can use Q-Link and VIERA Link functions together. ● This TV supports “HDAVI Control 5” function.
VIERA Link (HDMI and Audio out connections) Connected equipment Features Preset download Easy playback Power on link Power off link Reduce unnecessary power consumption in Standby Auto standby for unnecessary equipment Pause Live TV programme Direct TV Recording Control the menu of the connected equipment by VIERA remote control Speaker control Blu-ray Disc theatre with VIERA Link function – ∗6 Player theatre with VIERA Link function – ∗6 ∗3 – ∗3 ∗7 Amplifier with VIERA Link function – – – – ∗3 ∗7 –
Q-Link Preparations ● Connect the DVD Recorder / VCR with the following logos: “Q-Link”, “NEXTVIEWLINK”, “DATA LOGIC (a trademark of Metz Corporation)”, “Easy Link (a trademark of Philips Corporation)”, “Megalogic (a trademark of Grundig Corporation)”, “SMARTLINK (a trademark of Sony Corporation)” ● Q-Link connection (p. 96) ● Use fully wired SCART cable. ● Set up the DVD Recorder / VCR. Read the manual of the recorder. ● Q-Link terminal setup in the Setup Menu [AV1 out] (p.
VIERA Link “ ”∗ ∗Enjoy additional HDMI Inter-Operability with Panasonic products which have “HDAVI Control” function. This TV supports “HDAVI Control 5” function. Connections to the equipment (DIGA Recorder, HD Video Camera, Player theatre, Amplifier, etc.) with HDMI and SCART cables allow you to interface them automatically (p. 96, 97). These features are limited to models incorporating “HDAVI Control” and “VIERA Link”.
Reduce unnecessary power consumption in Standby [Standby Power Save] Set Standby Power Save [On] in the Setup Menu to use this function [Standby Power Save] (p. 46) The power consumption in Standby mode of the connected equipment is controlled higher or lower in synchronisation with the TV on / off state to reduce the consumption. When the TV is set to Standby mode, the connected equipment is automatically set to Standby and the power consumption of the connected equipment is automatically minimised.
Pause Live TV programme [Pause Live TV] You can pause the current TV programme and resume later. The current TV programme will be recorded on HDD of the connected DIGA Recorder. ● This function is available with a DIGA Recorder which has HDD. ● If you connect a variety of recorders including other manufacturers’ recorders at the same time, connect the DIGA Recorder which has HDD to the TV’s lower HDMI terminal number.
2 Select [VIERA Link Control] Pause Live TV Direct TV Rec VIERA Link Control Speaker Selection 3 select VIERA Link Menu Start Start Recorder Home Cinema access Select the equipment to access Select the type of the connected equipment and access.
Speaker control [Speaker Selection] You can control the theatre speaker with this TV remote control pointing at the TV’s signal receiver. ● If you cannot operate, check the settings and the equipment. “Summary of Q-Link and VIERA Link features” (p. 96, 97), “Preparations” (p.
External Equipment These diagrams show our recommendations for connection of your TV to various pieces of equipment. For other connections, consult the instructions for each piece of equipment, the basic connection (p. 13 - 15), the table (p. 106), and the specifications (p. 121 - 123). ● Check the type of terminals and cable plugs are correct when connecting. ● To use the specific devices supporting Bluetooth wireless technology “Bluetooth Setup” (p.
To listen with speakers Optical digital audio cable Amplifier with speaker system To enjoy the sound from the external equipment in multi-channel sound (e.g. Dolby Digital 5.1ch), connect the equipment to the amplifier. For the connections, read the manuals of the equipment and amplifier.
Types of connectable equipment to each terminal Terminal AV2∗1 USB 1 - 3 HDMI 1 - 4 ETHERNET DIGITAL AUDIO OUT VIDEO COMPONENT AV1∗1 Features To record / playback videocassettes / DVDs (VCR / DVD Recorder) To watch 3D contents (Blu-ray Disc Player) ∗2 To watch cable broadcasts (Set top box) To watch DVDs (DVD Player) To watch camcorder images (Video camera) To play games (Game equipment) ∗3 To use amplifier with speaker system To use network services ∗4 USB HDD Recording ∗5 Q-Link VIERA Link
Technical Information Auto Aspect The optimum size and aspect can be chosen automatically, and you can enjoy finer images. (p. 24) ■ Aspect Control Signal [WIDE] will appear in the top left of the screen if a Widescreen signal (WSS) or a Control signal through SCART / HDMI terminal is found. The aspect will switch to the appropriate 16:9 or 14:9 widescreen ratio. This function will work in any aspect mode.
Supported file format in Media Player and media servers ■ Photo Format File extension .jpg JPEG Image resolution (pixel) .jpeg .mpo 8×8 to 30,719 × 17,279 File extension Video codec Details / Restrictions DCF and EXIF standards Sub-sampling: 4:4:4, 4:2:2, 4:2:0 ● Progressive JPEG is not supported. ■ Video Container Details / Restrictions AVCHD .mts H.264 Dolby Digital AVCHD Standard Ver. 2.
Container File extension Video codec Audio codec Details / Restrictions .asf .wmv DivX3 DivX4 DivX5 DivX6 MPEG4 SP/ASP VC-1 Windows Media Video Ver. 9 AAC Dolby Digital Dolby Digital Plus HE-AAC LPCM MP3 WMA WMA Pro ● Copy-protected files cannot be played back. MP4 .f4v .m4v .mp4 DivX3 DivX4 DivX5 DivX6 H.264 BP/MP/HP MPEG1 MPEG2 MPEG4 SP/ASP AAC Dolby Digital Dolby Digital Plus HE-AAC MPEG Audio MP3 ● This TV supports this container recorded by Panasonic products.
DivX DivX Certified® to play DivX® and DivX Plus® HD (H.264/MKV) video up to 1080p HD including premium content. ABOUT DIVX VIDEO: DivX® is a digital video format created by DivX, LLC, a subsidiary of Rovi Corporation. This is an official DivX Certified® device that plays DivX video. Visit divx.com for more information and software tools to convert your files into DivX videos.
Devices for recording or playing back ■ SD Card 2.1 mm Use an SD Card which meets SD standards. If not, it may cause the TV to malfunction. For playing back in Media Player Card format: 32 mm SDXC Card - exFAT SDHC Card / SD Card - FAT16 or FAT32 Compliant card type (maximum capacity): SDXC Card (64 GB), SDHC Card (32 GB), SD Card (2 GB), miniSD Card (2 GB) (requiring 24 mm miniSD adaptor) ● If miniSD Card is used, insert / remove it together with the adaptor.
HDMI connection HDMI (high-definition multimedia interface) is the world’s first complete digital consumer AV interface complying with a non-compression standard. HDMI allows you to enjoy high-definition digital images and high-quality sound by connecting the TV and the equipment. HDMI-compatible equipment∗1 with an HDMI or DVI output terminal, such as a DVD player, a set top box or game equipment, can be connected to the HDMI terminal using an HDMI compliant (fully wired) cable.
USB connection ● It is recommended to connect the USB HDD, USB Flash Memory or Communication Camera to the TV’s USB ports directly. ● Some USB devices or USB HUB may not be used with this TV. ● You cannot connect any devices by using USB card reader. ● You cannot use two or more same kind of USB devices simultaneously except USB Flash Memory or USB HDD. ● Additional information for the devices may be on the following website. (English only) http://panasonic.
Operations from Keyboard / Gamepad ■ USB Keyboard / Bluetooth Keyboard ● The Keyboard requiring its driver is not supported. ● To change the language type [Keyboard Layout] (p. 49) ● Characters may not be displayed correctly on the TV screen depending on the connected keyboard or the keyboard layout setting. ● Some of the keys of keyboards may correspond to the operation of the remote control.
Input signal that can be displayed ■ COMPONENT (Y, PB, PR) (from AV2 terminal), HDMI Signal name COMPONENT HDMI 525 (480) / 60i, 60p 625 (576) / 50i, 50p 750 (720) / 60p, 50p 1,125 (1,080) / 60i, 50i 1,125 (1,080) / 60p, 50p, 24p : Applicable input signal ■ PC (from HDMI terminal) Signal name Horizontal frequency (kHz) Vertical frequency (Hz) 31.47 45.00 67.50 60.00 60.00 60.
FAQs Before requesting service or assistance, please follow these simple guides to resolve the problem. If the problem still persists, please contact your local Panasonic dealer for assistance. Block noise, frozen or disappearing image occurs in DVB mode / White spots or shadow image (ghosting) occurs in Analogue mode / Some channels cannot be tuned ● Check the position, direction and connection of the aerial or dish. ● Check [Signal Condition] (p. 58).
Problem Causes / Actions Screen Sound Chaotic image, noisy ● Set [P-NR] in the Picture Menu to remove noise. (p. 42) ● Check nearby electrical products (car, motorcycle, fluorescent lamp). No image can be displayed ● Is [Contrast], [Brightness] or [Colour] in the Picture Menu set to the minimum? (p. 41) ● Check the setting of [AV2] ([COMPONENT] / [VIDEO]) in [Input Selection] to match the output of the external equipment. (p. 30) Blurry or distorted image (no sound or low volume) ● Reset channels.
Problem Cannot connect to the network ● Check the LAN cable or wireless LAN is connected properly. (p. 87) ● Check the connections and settings. (p. 87 - 91) ● Check the network equipment and network environment. ● The router may not be set to issue IP address automatically. If the network administrator prefers to allocate an IP address, set an IP address manually. (p. 89) ● The router may be using MAC address filtering (security setting). Confirm the MAC Address of this TV (p.
Maintenance First, remove the mains plug from the socket outlet. Display panel, Cabinet, Pedestal Regular care: Gently wipe the surface of the display panel, cabinet, or pedestal by using a soft cloth to clean the dirt or fingerprints. For stubborn dirt: First clean the dust on the surface. Dampen a soft cloth with clean water or diluted neutral detergent (1 part detergent to 100 parts water). Wring the cloth and wipe the surface. Finally, wipe away all the moisture.
Licence Even if no special notation has been made of company or product trademarks, these trademarks have been fully respected. ● DVB and the DVB logos are trademarks of the DVB Project. ● DiSEqC™ is a trademark of EUTELSAT. ● THX and the THX Logo are trademarks of THX Ltd., which may be registered in some jurisdictions. All rights reserved. ● “RealD 3D” is a trademark of RealD. ● “Full HD 3D Glasses™” logo and “Full HD 3D Glasses™” word are trademark of Full HD 3D Glasses Initiative.
This product incorporates the following software or technology: (1) the software developed independently by or for Panasonic Corporation, (2) the software owned by third party and licensed to Panasonic Corporation, (3) the software based in part on the work of the Independent JPEG Group, (4) the software developed by the FreeType Project, (5) the software licensed under the GNU LESSER GENERAL PUBLIC LICENSE (LGPL) and/or, (6) open sourced software other than the software licensed under the LGPL.
■ Other information Model No. AC 220-240 V, 50 / 60 Hz Panel Plasma panel Dimensions (W × H × D) 1,171 mm × 754 mm × 335 mm (With Pedestal) 1,171 mm × 706 mm × 50 mm (TV only) Mass 29.5 25.5 Sound Speaker TX-P55VT50Y Net (With Pedestal) 36.0 31.5 Net (TV only) Net (With Pedestal) 48.0 42.5 Net (TV only) Woofer (Φ 80 mm) × 1 Headphones M3 (3.
Connection terminals HDMI 1 / 2 / 3 / 4 input TYPE A Connectors HDMI1 / 3 / 4: 3D, Content Type, Deep Colour, x.v.Colour™ HDMI2: 3D, Content Type, Audio Return Channel, Deep Colour, x.v.Colour™ ● This TV supports “HDAVI Control 5” function. Card slot SD Card slot × 1 Common Interface slot (complies with CI Plus) × 1 Built-in wireless LAN Bluetooth wireless technology∗4 ETHERNET RJ45, IEEE802.3 10BASE-T / 100BASE-TX USB 1 / 2 / 3 USB2.0 DC 5 V, Max.
Information for Users on Collection and Disposal of Old Equipment and used Batteries These symbols on the products, packaging, and/or accompanying documents mean that used electrical and electronic products and batteries should not be mixed with general household waste. For proper treatment, recovery and recycling of old products and used batteries, please take them to applicable collection points, in accordance with your national legislation and the Directives 2002/96/EC and 2006/66/EC.