
Operating Instructions


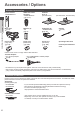


Accessories / Options
Quick Start Guide
7
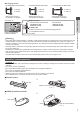
Wall-hanging bracket
●
TY-WK4P1RW (TX-P50VT50Y)
●
TY-WK5P1RW (TX-P55VT50Y)
●
TY-WK6P1RW (TX-P65VT50Y)
a: 400 mm
b: 300 mm
a: 500 mm
b: 300 mm
a: 684 mm
b: 300 mm
●
Tilting angle for this TV:
0 (vertical) to 10 degrees
●
Tilting angle for this TV:
0 (vertical) to 20 degrees
●
Tilting angle for this TV:
0 (vertical) to 10 degrees
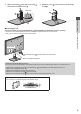
Rear of the TV
Holes for wall-hanging
bracket installation
a
b
(View from the side)
Depth of screw:
●
TX-P50VT50Y, TX-P55VT50Y
minimum 10 mm,
maximum 16 mm
●
TX-P65VT50Y
minimum 17 mm,
maximum 23 mm
Diametre: M8
Screw for fixing the
TV onto the wall-hanging bracket
(not supplied with the TV)
Warning
●
Using other wall-hanging brackets, or installing a wall-hanging bracket by yourself have the risk of personal injury and
product damage. In order to maintain the unit’
s performance and safety, be absolutely sure to ask your dealer or a
licensed contractor to secure the wall-hanging brackets. Any damage caused by installing without a qualified installer
will void your warranty.
●
Carefully read the instructions accompanying optional accessories, and be absolutely sure to take steps to prevent
the TV from falling off.
●
Handle the TV carefully during installation since subjecting it to impact or other forces may cause product damage.
●
Take care when fixing wall brackets to the wall. Always ensure that there are no electrical cables or pipes in the wall
before hanging bracket.
●
To prevent fall and injury, remove the TV from its fixed wall position when it is no longer in use.
Installing / removing batteries
Caution
●
Incorrect installation may cause battery leakage and corrosion, resulting in damage to the remote control / touch pad
controller
.
●
Do not mix old and new batteries.
●
Do not mix different battery types (such as alkaline and manganese batteries).
●
Do not use rechargeable (Ni-Cd) batteries.
●
Do not burn or break up batteries.
Batteries must not be exposed to excessive heat such as sunshine, fire or the like.
●
Do not disassemble or modify the remote control / touch pad controller.
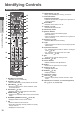
■ Remote Control
1
2
Pull open
Hook
Note the correct polarity
(+ or -)
Close
■ VIERA Touch Pad Controller
1
2
Slide open
Close
Note the correct polarity
(+ or -)