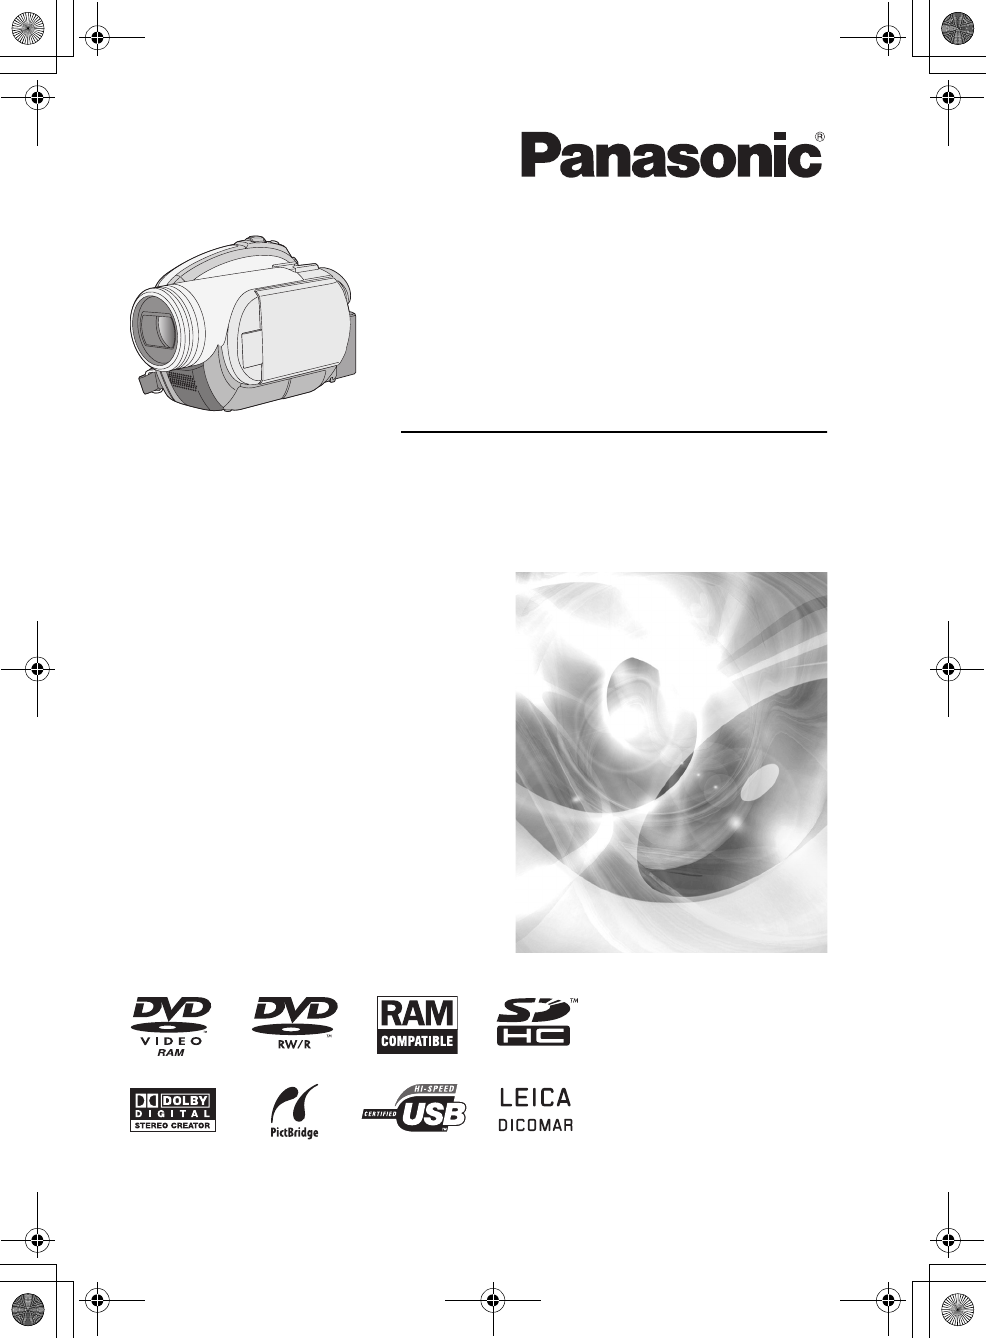
LSQT1158-T.CH.book 1 ページ 2006年12月26日 火曜日 午前10時18分 使用說明書 Operating Instructions DVD 攝錄放影機 DVD Video Camera Model no. VDR-D310GC VDR-D220GC 使用前,請完整閱讀本說明書。 Before use, please read these instructions completely.
LSQT1158-T.CH.
LSQT1158-T.CH.
LSQT1158-T.CH.book 4 ページ 2006年12月26日 目錄 安全注意事項............................................ 2 使用之前 特點 .......................................................... 6 附件 .......................................................... 8 部件的識別和操作 .................................... 9 使用 LCD 顯示屏 ......................................12 使用 取景器 ..............................................13 使用遙控器 (VDR-D310)...........................13 光碟和記憶卡.......................................... 15 本機上可以使用的光碟 .................
LSQT1158-T.CH.book 5 ページ 2006年12月26日 火曜日 午前10時18分 與其他產品一起使用 與電視機一起使用 ..................................74 在電視機上重播 ........................................74 與 DVD 錄影機/播放機一起使用........... 75 在 DVD 錄影機、DVD 播放機、 計算機上等播放 ........................................75 將拍攝內容複製到 DVD 錄影機的 硬碟上.......................................................75 與 VCR 一起使用.................................... 76 將影像複製到其他視頻設備上...................76 與印表機 (PictBridge) 一起使用 ............ 77 其他 功能表 ...................................
LSQT1158-T.CH.
LSQT1158-T.CH.
LSQT1158-T.CH.
LSQT1158-T.CH.
LSQT1158-T.CH.
LSQT1158-T.CH.
LSQT1158-T.CH.
LSQT1158-T.CH.
LSQT1158-T.CH.
LSQT1158-T.CH.book 15 ページ 2006年12月26日 火曜日 午前10時18分 使用之前 光碟和記憶卡 本機上可以使用的光碟 光碟類型 DVD-RAM 8 cm 單面/雙面 DVD-RW 8 cm 單面/雙面 (DVD-RAM Ver. 2.1) [DVD-RW Ver. 1.
LSQT1158-T.CH.book 16 ページ 2006年12月26日 火曜日 午前10時18分 使用之前 光碟類型 DVD-R 8 cm 單面/雙面 DVD-R DL 8 cm 單面雙層 (DVD-R for General Ver. 2.0) (DVD-R for DL Ver. 3.
LSQT1158-T.CH.book 17 ページ 2006年12月26日 火曜日 午前10時18分 使用之前 ≥ 本使用說明書中,把 DVD-R 和 DVD-R DL 稱為 “DVD-R”。 ≥ 無法用本機將靜態圖片錄製到光碟上。 ≥ 使用雙面光碟時,無法從光碟的一面連續拍攝或重播至另一面。需要彈出光碟後將其翻轉。 ≥ 無法使用插入到光碟座、光碟盒或光碟匣中的光碟。使用前,請務必從這些盒子中取出裸碟。 ≥ 建議您使用 Panasonic 光碟。 一般情況下,可以用符合 DVD 標準的光碟進行拍攝和重播,不會產生任 何問題。 但是,一些商用光碟在質量和性能上不符合 DVD 標準。 如果您使用這些光碟中的一種,則 可能無法正常地拍攝或重播。 (會出現 “建議使用 Panasonic 光碟。”訊息。) 有關經 Panasonic 證實的可兼容光碟的資訊,請訪問以下的支持網站。 http://panasonic.co.
LSQT1158-T.CH.
LSQT1158-T.CH.book 19 ページ 2006年12月26日 火曜日 午前10時18分 使用之前 本機可以使用的記憶卡 記憶卡類型 容量 SD 記憶卡 8 MB、16 MB、32 MB、64 MB、 128 MB、256 MB、512 MB、 1 GB、2 GB 本說明書中的指示 SDHC 記憶卡 4 GB (SD) 本機兼容 SD 記憶卡和 SDHC 記憶卡。 僅可以在兼容 SDHC 記憶卡的設備上使用 SDHC 記憶卡。 無 法在僅兼容 SD 記憶卡的設備上使用 SDHC 記憶卡。 (在其他設備上使用 SDHC 記憶卡時,請務必 閱讀該設備的使用說明書。) ≥ 本使用說明書中,SD 記憶卡和 SDHC 記憶卡都稱為 “SD 卡”。 ≥ 使用本機無法在 SD 卡上拍攝動態影像。 ≥ 請在以下網站上確認最新資訊。 (本網站僅為英文。) http://panasonic.co.
LSQT1158-T.CH.
LSQT1158-T.CH.
LSQT1158-T.CH.book 22 ページ 2006年12月26日 火曜日 午前10時18分 設定 充電時間和可拍攝時間 下表中所示的時間是指溫度為 25 oC,濕度為 60% 時的時間。 如果溫度高於或低於 25 oC,則充電時間 將會變長。 ∫ 充電時間 ≥ 表中所示的充電時間為估計值。 ≥“2 h 25 min”表示 2 小時 25 分鐘。 VDR-D310: 電池型號 電壓/容量 充電時間 提供的電池/ CGA-DU12 (可選件) 7.2 V/1150 mAh 2 h 25 min CGA-DU14 (可選件) 7.2 V/1360 mAh 2 h 45 min CGA-DU21 (可選件) 7.2 V/2040 mAh 3 h 55 min VDR-D220: 22 LSQT1158 電池型號 電壓/容量 充電時間 提供的電池/ CGR-DU06 (可選件) 7.2 V/640 mAh 1 h 40 min CGA-DU12 (可選件) 7.2 V/1150 mAh 2 h 25 min CGA-DU14 (可選件) 7.
LSQT1158-T.CH.
LSQT1158-T.CH.book 24 ページ 2006年12月26日 火曜日 午前10時18分 設定 電池型號 電壓/容量 拍攝模式 最長可連續拍攝時間 3 h 50 min (3 h 30 min) 實際可拍攝時間 1 h 40 min (1 h 35 min) SP 4 h 30 min (4 h 5 min) 2h (1 h 50 min) LP 4 h 45 min (4 h 20 min) 2 h 5 min (1 h 55 min) XP CGA-DU21 (可選件) 7.
LSQT1158-T.CH.
LSQT1158-T.CH.
LSQT1158-T.CH.
LSQT1158-T.CH.
LSQT1158-T.CH.
LSQT1158-T.CH.
LSQT1158-T.CH.
LSQT1158-T.CH.
LSQT1158-T.CH.
LSQT1158-T.CH.
LSQT1158-T.CH.book 35 ページ 2006年12月26日 火曜日 午前10時18分 設定 如果螢幕顯示的日期和時間不正確,請進行調 整。 ¬ 轉動模式轉盤選擇 1 或 。 ∫ 改變顯示類型 按 MENU 按鈕後,選擇 [ 設定 ] # [ 日期格式 ] # 想要的顯示類型,然後按下操縱桿。 按MENU按鈕後,選擇[基本功能] # [ 時鐘設定 ] # [ 是 ],然後按下操縱 桿。 顯示類型 螢幕顯示 [年/月/日] 2007.12.15 [月/日/年] 12.15.2007 [日/月/年] 15.12.2007 MENU 2 左右移動操縱桿,選擇要設定的選 項。 然後,上下移動操縱桿,設定 想要的值。 ≥ 年份將按下列順序改變: 2000, 2001, ..., 2099, 2000, ...
LSQT1158-T.CH.
LSQT1158-T.CH.
LSQT1158-T.CH.
LSQT1158-T.CH.
LSQT1158-T.CH.
LSQT1158-T.CH.
LSQT1158-T.CH.book 42 ページ 2006年12月26日 火曜日 午前10時18分 拍攝 拍攝靜態圖片 (JPEG 靜態圖片) (SD) 在 SD 卡上拍攝靜態圖片。 ≥ 在購買本機時,[ 圖片尺寸 ] 被設定為 [ 2 ] (VDR-D310)/[ 0.
LSQT1158-T.CH.
LSQT1158-T.CH.
LSQT1158-T.CH.book 45 ページ 2006年12月26日 火曜日 午前10時18分 拍攝 VDR-D310: 圖示 3.1M 寬高比 4:3 像素數 2048k1512 1M 4:3 1280k960 0.3M 4:3 640k480 16:9 1920k1080 寬高比 4:3 像素數 640k480 16:9 640k360 2 VDR-D220: 圖示 0.3M 0.2 ≥ 在購買本機時,[ 圖片尺寸 ] 被設定為 [ 2 ] (VDR-D310)/[ 0.
LSQT1158-T.CH.
LSQT1158-T.CH.
LSQT1158-T.CH.
LSQT1158-T.CH.
LSQT1158-T.CH.
LSQT1158-T.CH.
LSQT1158-T.CH.
LSQT1158-T.CH.
LSQT1158-T.CH.
LSQT1158-T.CH.
LSQT1158-T.CH.
LSQT1158-T.CH.
LSQT1158-T.CH.
LSQT1158-T.CH.
LSQT1158-T.CH.
LSQT1158-T.CH.
LSQT1158-T.CH.
LSQT1158-T.CH.
LSQT1158-T.CH.
LSQT1158-T.CH.
LSQT1158-T.CH.
LSQT1158-T.CH.
LSQT1158-T.CH.
LSQT1158-T.CH.
LSQT1158-T.CH.
LSQT1158-T.CH.
LSQT1158-T.CH.
LSQT1158-T.CH.
LSQT1158-T.CH.book 74 ページ 2006年12月26日 火曜日 午前10時18分 與其他產品一起使用 ≥ 請檢查電視機的輸入設定 (輸入開關)。(有 關更多資訊,請閱讀電視機的使用說明書。) 與其他產品一起使用 與電視機一起使用 在電視機上重播 (RAM) (-RW‹VR›) (-RW‹V›) (-R) (SD) 可以在電視機上重播用本機拍攝的動態影像和靜 態圖片。 ≥ 使用 AC 適配器可以免除電池用光的煩惱。 1 ≥ 如果影像在寬銀幕電視機上顯示不正確,則請 調整電視機上的寬高比設定。(關於詳情,請 參閱電視機的使用說明書。)如果在常規電視 (4:3) 上顯示的影像被水平壓縮,則請改變本機 上的 [TV 高寬比 ] 設定。 (l 下 ) ∫ 要在常規電視 (4:3) 上觀看 16:9 寬高 比的影像 當在寬高比為 4:3 的電視上重播用 16:9 的寬高比 錄製的動態影像 ([ 寬高比 ] 被設定為 [16:9])或 者 16:9 的寬高比錄製的靜態圖片 [[ 圖片尺寸 ] 被 設定為 [ 2 ] (VDR-D310)/[ 0.
LSQT1158-T.CH.
LSQT1158-T.CH.
LSQT1158-T.CH.
LSQT1158-T.CH.
LSQT1158-T.CH.
LSQT1158-T.CH.
LSQT1158-T.CH.book 81 ページ 2006年12月26日 火曜日 午前10時18分 其他 1 聲操作音 開始拍攝時 開啟電源時 計算機或印表機等設備識別到本機時 2 聲操作音 暫停拍攝時 關閉電源時 2 聲操作音 4 次 發生錯誤 (例如拍攝沒有開始)時。請檢查螢幕 上顯示的句子。 (l 84) 指示 指示 ∫ 拍攝指示 動態影像拍攝 SP R 30min ; 0h00m00s MNL ∫ [ 初始設定 ] ≥[是] ≥[否] 由於啟動其他功能或模式而不能選擇某個功能表 時,請設定為 [ 是 ],將功能表設定恢復到出廠時 的設定狀況。 (語言設定無法恢復到出廠時的初始狀態。) AWB 1/100 OPEN 0dB 15.12.
LSQT1158-T.CH.book 82 ページ 2006年12月26日 火曜日 午前10時18分 其他 ZOOM 變焦麥克風 ∫ 重播指示 風聲噪音降低 動態影像重播 XP , SP , LP 動態影像拍攝模式 5 運動模式 肖像模式 低光模式 聚光燈模式 水上及雪地模式 AWB 自動白平衡 室內模式 (在白熾燈下拍攝) 室外模式 手動調整模式 光碟類型 DVD-RAM DVD-RW (VR 格式) DVD-RW (影片格式) DVD-RW (未格式化) DVD-R DVD-R DL ± (白色) ¥ (綠色) 拍攝時機標記 Ø MEGA VDR-D310: 3.1M 2 1M 0.
LSQT1158-T.CH.book 83 ページ 2006年12月26日 火曜日 午前10時18分 其他 VDR-D310: 3.1M 2 1M 0.3M 靜態圖片的拍攝像素數 2048k1512 1920k1080 1280k960 640k480 VDR-D220: 0.3M 0.
LSQT1158-T.CH.book 84 ページ 2006年12月26日 火曜日 午前10時18分 其他 訊息 不能讀取光碟。請檢查光碟 上有否擦痕或污漬。 光碟被劃傷或弄髒。 彈出光碟並進行清潔。 (l 20) 如果光碟上有擦 痕,請使用新的光碟。 無資料 光碟或記憶卡上沒有已拍攝的影像。 不能兼容此光碟 插入了一張不兼容的光碟 (受複製保護的光碟等)。 請檢查光碟。 插入了一張在本機上無法讀取的光碟 (以不兼容的資料格式錄製的 光碟等)。 建議使用 Panasonic 光碟 插入了一張質量和性能不符合 DVD 標準的光碟,因此無法正常錄 製。 有關經 Panasonic 證實的可兼容光碟的資訊,請訪問以下的支 持網站。 http://panasonic.co.
LSQT1158-T.CH.
LSQT1158-T.CH.
LSQT1158-T.CH.
LSQT1158-T.CH.
LSQT1158-T.CH.
LSQT1158-T.CH.
LSQT1158-T.CH.
LSQT1158-T.CH.
LSQT1158-T.CH.book 93 ページ 2006年12月26日 火曜日 午前10時18分 其他 LCD 顯示屏/取景器 ≥ LCD 顯示屏變髒後,請用軟乾布擦拭。 ≥ 處於溫度急劇變化的環境中時,LCD 顯示屏上 會出現水汽凝結。 請用軟乾布擦拭乾淨。 ≥ 本機溫度很低時,比如由於存放在寒冷的地方 時,在電源剛剛開啟後,LCD 顯示屏會比平時 稍微暗些。 當本機內部的溫度昇高時,LCD 顯 示屏將恢復到正常的亮度。 機放置在房間裡約 1 個小時,使得本機的溫度與 房間的環境溫度接近,然後再使用。 怎麼處理霧化的鏡頭。 請取下電池或 AC 適配器,放置本機約 1 小時。 當本機溫度接近環境溫度時,霧化自然消失。 LCD 顯示屏螢幕的製造採用了極高的精密技 術,總像素約達到 123,000。 約有超過 99.99% 的像素為有效像素,僅有約 0.01% 的 像素不亮或總是亮著。 但這並非故障,不會影 響拍攝的圖片。 取景器螢幕的製造採用了極高的精密技術,總 像素約達到 113,000。 約有超過 99.99% 的像 素為有效像素,僅有約 0.
LSQT1158-T.CH.
LSQT1158-T.CH.book 95 ページ 2006年12月26日 火曜日 午前10時18分 其他 規格 DVD 攝錄放影機 安全注意事項 電源: 電流功率: DC 7.9 V/7.2 V VDR-D310: 拍攝時 7.0 W VDR-D220: 拍攝時 6.0 W 信號系統 CCIR: 625 線,50 場 PAL 彩色信號 錄製格式 DVD 影片拍攝格式 (DVD-RAM、DVD-RW) DVD 影片格式 (DVD-RW、DVD-R、DVD-R DL) 影像感測器 VDR-D310: 1/6z 3CCD 影像感測器 總計: 800 Kk3 有效像素: 動態影像: 630 Kk3 (4:3), 540 Kk3 (16:9) 靜態圖片: 710 Kk3 (4:3), 540 Kk3 (16:9) VDR-D220: 1/6z CCD 影像感測器 總計: 800 K 有效像素: 動態影像: 400 K (4:3), 540 K (16:9) 靜態圖片: 410 K (4:3), 550 K (16:9) 鏡頭 VDR-D310: 自動光圈,F1.8 至 F2.
LSQT1158-T.CH.book 96 ページ 2006年12月26日 火曜日 午前10時18分 其他 標準照度 1,400 lx 最低照度 12 lx (低光模式: 1/50) [ 用全彩夜視功能,約 1 lx (VDR-D310) /約 2 lx (VDR-D220)] 視頻輸出標準 1.0 Vp-p, 75 ™ S 視頻 輸出標準 Y: 1.0 Vp-p, 75 ™ C: 0.3 Vp-p, 75 ™ 音頻輸出標準 (線路) 316 mV, 600 ™ 麥克風輸入 (VDR-D310) 麥克風靈敏度 j50 dB (0 dB=1 V/Pa, 1 kHz) (‰ 3.5 mm 立體聲迷你插口 ) USB 記憶卡讀/寫功能 (無版權保護支持) 兼容 Hi-Speed USB (USB 2.0) 兼容 PictBridge 尺寸 (不包括突出部分) 66.7 mm (寬) k 91.1 mm (高) k 142.
LSQT1158-T.CH.book 97 ページ 2006年12月26日 火曜日 午前10時18分 其他 VDR-D310: 2048k1512, 1920k1080 (16:9), 1280k960, 640k480 VDR-D220: 640k480, 640k360 (16:9) 圖片尺寸 AC 適配器: VSK0651 安全注意事項 電源: 電流功率: DC 輸出: AC 110 V 至 240 V, 50/60 Hz 19 W DC 7.9 V, 1.4 A (本機工作時) DC 8.4 V, 0.65 A (電池充電時) 尺寸 61 mm (寬) k 32 mm (高) k 91 mm (深) 重量 約 110 g 規格變更恕不通知。 SD 卡上可拍攝的圖片數量 VDR-D310: 圖片尺寸 3.
LSQT1158-T.CH.book 98 ページ 2006年12月26日 火曜日 午前10時18分 其他 圖片尺寸 1 M (1280k960) 0.3M (640k480) 圖片質量 8 MB 8 14 42 86 16 MB 21 34 97 195 32 MB 47 75 210 420 64 MB 97 155 430 870 128 MB 185 300 820 1650 256 MB 390 620 1710 3430 512 MB 780 1230 3400 6790 1 GB 1550 2470 6800 13600 2 GB 3160 5030 13830 27660 4 GB 6210 9870 27150 54310 VDR-D220: 圖片尺寸 0.3M (640k480) (640k360) 0.
LSQT1158-T.CH.
LSQT1158_EN.book 100 ページ 2006年12月26日 火曜日 午前10時30分 Information for Your Safety WARNING: TO REDUCE THE RISK OF FIRE, ELECTRIC SHOCK OR PRODUCT DAMAGE, ≥ DO NOT EXPOSE THIS APPARATUS TO RAIN, MOISTURE, DRIPPING OR SPLASHING AND THAT NO OBJECTS FILLED WITH LIQUIDS, SUCH AS VASES, SHALL BE PLACED ON THE APPARATUS. ≥ USE ONLY THE RECOMMENDED ACCESSORIES. ≥ DO NOT REMOVE THE COVER (OR BACK); THERE ARE NO USER SERVICEABLE PARTS INSIDE. REFER SERVICING TO QUALIFIED SERVICE PERSONNEL.
LSQT1158_EN.book 101 ページ 2006年12月26日 火曜日 午前10時30分 ENGLISH ∫ How to replace the Fuse The location of the fuse differ according to the type of AC mains plug (figures A and B). Confirm the AC mains plug fitted and follow the instructions below. Illustrations may differ from actual AC mains plug. 1) Open the fuse cover with a screwdriver. Figure A Figure B -If you see this symbolInformation on Disposal in other Countries outside the European Union This symbol is only valid in the European Union.
LSQT1158_EN.book 102 ページ 2006年12月26日 ∫ Indemnity concerning recording content The manufacturer shall in no event be liable for the loss of recordings due to malfunction or defect of this unit, its accessories or recordable media. ∫ Carefully observe copyright laws Recording of pre-recorded tapes or discs or other published or broadcast material for purposes other than your own private use may infringe copyright laws. Even for the purpose of private use, recording of certain material may be restricted.
LSQT1158_EN.book 103 ページ 2006年12月26日 Contents Information for Your Safety............... 100 Before using Features .............................................. 105 Accessories ........................................ 107 Parts identification and handling ..... 108 Using the LCD monitor ........................... 111 Using the viewfinder ............................... 112 Using the remote control (VDR-D310) ... 112 Discs and cards..................................
LSQT1158_EN.book 104 ページ 2006年12月26日 With other products With a TV............................................. 176 Playback on TV ......................................176 With a DVD recorder/player............... 177 Playback on DVD recorder, DVD player, computer etc. .....................177 Dubbing recordings onto a DVD recorder’s hard disk ............178 With a VCR.......................................... 179 Dubbing images onto other video devices ........................
LSQT1158_EN.book 105 ページ 2006年12月26日 火曜日 午前10時30分 Before using Before using Features ∫ Easy recording! (l 138) No need to search for the recording start position. The new recording will not overwrite any previously recorded scene. ∫ Easy playback! (l 156) Recorded scenes are displayed as thumbnails. You can easily search for the scenes you want to watch.
LSQT1158_EN.book 106 ページ 2006年12月26日 火曜日 午前10時30分 Before using If you insert a DVD-RW or a DVD-R disc recorded in this unit (that has not been finalized) into another device such as DVD recorder, computer, etc., the disc may become unusable. Be sure to finalize the disc on this unit before inserting it in other devices. (l 172) ∫ Using with DVD player/recorder! (l 177) Just insert the disc into a DVD player/recorder compatible with 8 cm discs to play back the scenes recorded with this unit on it.
LSQT1158_EN.book 107 ページ 2006年12月26日 火曜日 午前10時30分 Before using Accessories Check the accessories before using this unit. Battery pack (VDR-D310) Battery pack (VDR-D220) AC adaptor DC cable Optional accessories Some optional accessories may not be available in some countries.
LSQT1158_EN.book 108 ページ 2006年12月26日 火曜日 午前10時30分 Before using Parts identification and handling 13 14 15 16 1 operating instructions for PC connection.
LSQT1158_EN.book 109 ページ 2006年12月26日 火曜日 午前10時30分 Before using 34 27 23 24 28 29 30 31 32 25 35 33 26 34 Disc compartment (l 125) 35 Grip belt (l 109) 23 LCD monitor (l 111) Due to limitations in LCD production technology, there may be some tiny bright or dark spots on the LCD monitor screen. However, this is not a malfunction and does not affect the recorded picture.
LSQT1158_EN.book 110 ページ 2006年12月26日 火曜日 午前10時30分 Before using 1 Pass the end of the lens cap cord through the belt. Lens hood ∫ VDR-D310 Rotate the lens hood counterclockwise A to remove it. In order to attach it, place into slot B, and then rotate it clockwise C. 2 Pass the lens cap through the loop. A B 3 To attach or remove the lens cap, hold both sides of the lens cap with the tips of your finger and thumb. C During recording The removed lens cap can be attached to the lens cap fixture.
LSQT1158_EN.book 111 ページ 2006年12月26日 火曜日 午前10時30分 Before using ≥ When 2 lens accessories, such as the ND filter and tele conversion lens, are attached and the W/T lever is pressed toward the W side, the 4 corners of an image will be darkened. (Vignetting) (Please carefully read the operating instructions for how to attach the unit to the tripod.) ∫ VDR-D220 Rotate the lens hood counterclockwise A to remove it. In order to attach it, rotate it clockwise B.
LSQT1158_EN.book 112 ページ 2006年12月26日 火曜日 午前10時30分 Before using ≥ The brightness and colour level of the LCD monitor can be adjusted from the menu. (l 135) ≥ The unit may be damaged or fail if the LCD monitor is forcibly opened or rotated. ≥ If the LCD monitor is rotated by 180x towards the lens and the viewfinder is extended (when recording yourself), the LCD monitor and the viewfinder simultaneously light.
LSQT1158_EN.book 113 ページ 2006年12月26日 火曜日 午前10時30分 Before using 1 While pressing the stopper A, pull out the battery holder. ∫ Remote control usable range The distance between the remote control and the unit’s remote control sensor A: Within approx. 5m Angle: Approx. 10o up and 15o down, left, and right A 2 Set the button-type battery with its (r) mark facing upward and then put the battery holder back in place.
LSQT1158_EN.book 114 ページ 2006年12月26日 火曜日 午前10時30分 Before using Discs and cards Discs that can be used on this unit Disc type DVD-RAM 8 cm Single sided/ double sided DVD-RW 8 cm Single sided/double sided (DVD-RAM Ver. 2.1) [DVD-RW Ver. 1.
LSQT1158_EN.book 115 ページ 2006年12月26日 火曜日 午前10時30分 Before using Disc type DVD-R 8 cm Single sided/double sided DVD-R DL 8 cm Dual layer on single side (DVD-R for General Ver. 2.0) (DVD-R for DL Ver. 3.
LSQT1158_EN.book 116 ページ 2006年12月26日 火曜日 午前10時30分 Before using ≥ For the purposes of these operating instructions, DVD-R and DVD-R DL are referred to as the “DVD-R”. ≥ Still pictures cannot be recorded on a disc with this unit. ≥ You cannot record or play continuously from one side of the disc to the other when using a double sided disc. You will need to eject the disc and turn it over. ≥ Discs inserted in a holder, cartridge, or caddy case cannot be used.
LSQT1158_EN.book 117 ページ 2006年12月26日 火曜日 午前10時30分 Before using When using brand-new DVD-RW When using DVD-RW, select whether to record in DVD Video Recording format (VR format) or DVDVideo format (Video format) and then format the disc. (l 116, About format types) 1 When a brand-new DVD-RW is inserted in this unit, the screen on the right appears. Select [YES], then press the joystick. 2 Select format type, then press the joystick.
LSQT1158_EN.book 118 ページ 2006年12月26日 火曜日 午前10時30分 Before using Cards that you can use with this unit Card type Capacity Indication in these instructions SD Memory Card 8 MB, 16 MB, 32 MB, 64 MB, 128 MB, 256 MB, 512 MB, 1 GB, 2 GB SDHC Memory Card 4 GB (SD) This unit is compatible with both SD Memory cards and SDHC Memory cards. You can only use SDHC Memory cards on devices that are compatible with them. You cannot use SDHC Memory cards on devices that are only compatible with SD Memory cards.
LSQT1158_EN.book 119 ページ 2006年12月26日 火曜日 午前10時30分 Before using Disc and card handling ∫ How to hold a disc or card Do not touch the recording/playback surface or the terminal surface. ∫ When inserting/removing a disc Do not allow the recording/playback side of the disc to get fingerprints or dirty. ≥ If there is a scratch or dirt (e.g.
LSQT1158_EN.book 120 ページ 2006年12月26日 火曜日 午前10時30分 Setup Setup Power supply Fitting the battery Push the battery against the battery holder and slide it until it clicks. Charging the battery When this unit is purchased, the battery is not charged. Charge the battery before using this unit. ≥ If the DC cable is connected to the AC adaptor, then the battery will not charge. Remove the DC cable from the AC adaptor. A Removing the battery 1 Connect the AC cable to the AC adaptor and the AC outlet.
LSQT1158_EN.book 121 ページ 2006年12月26日 火曜日 午前10時30分 Setup Charging time and recordable time The times shown in the tables below are for when the temperature is 25 oC and the humidity is 60%. If the temperature is higher or lower than 25 oC, the charging time will become longer. ∫ Charging time ≥ The charging time shown in the table are approximations. ≥ “2 h 25 min” indicates 2 hours 25 minutes. VDR-D310: Battery model number Voltage/capacity Charging time Supplied battery/ CGA-DU12 (optional) 7.
LSQT1158_EN.book 122 ページ 2006年12月26日 火曜日 午前10時30分 Setup ∫ Recordable time (When using a DVD-RAM disc) ≥ The times indicate the recordable time when the viewfinder is used. The times in parentheses indicate the recordable time when the LCD monitor is used. ≥ The actual recordable time refers to the recordable time on a disc when repeatedly starting/stopping recording, turning the unit on/off, moving the zoom lever, etc. ≥ “1 h 25 min” indicates 1 hour 25 minutes.
LSQT1158_EN.book 123 ページ 2006年12月26日 火曜日 午前10時30分 Setup Battery model number CGA-DU14 (optional) CGA-DU21 (optional) Voltage/ capacity 7.2 V/ 1360 mAh 7.
LSQT1158_EN.book 124 ページ 2006年12月26日 火曜日 午前10時30分 Setup Connecting to the AC outlet The unit is in the standby condition when the AC adaptor is connected. The primary circuit is always “live” as long as the AC adaptor is connected to an electrical outlet. How to turn on the power While pressing the button A, set the OFF/ON switch to ON. A B 1 The status indicator B lights and the power turns on.
LSQT1158_EN.book 125 ページ 2006年12月26日 火曜日 午前10時30分 Setup When the power is turned on for the first time after changing the disc or battery, the unit carries out a recognition procedure to check that there are no problems with the disc. This takes approximately 25 seconds with DVD-RAM. If you want to start using the unit as soon as you turn on the power, do the following. 1) Turn on the power. 2) After “READING DISC...” disappears from the screen, turn off the power.
LSQT1158_EN.book 126 ページ 2006年12月26日 火曜日 午前10時30分 Setup A few moments after the ACCESS/PC lamp blinks, the cover of the disc compartment will open slightly. 3 ∫ Removing disc While pressing down on the spindle, grasp the edge of the disc and gently lift it out. Open the cover of the disc compartment by hand and insert/ remove the disc. ∫ Inserting disc Fit the disc onto the spindle in the centre and then push the disc down until it clicks into place.
LSQT1158_EN.book 127 ページ 2006年12月26日 火曜日 午前10時30分 Setup “SIDE B” recording/playback side is the side with the “SIDE A” mark. A D DV -RAM / SIDE A B A “SIDE A” mark B The opposite side is the “SIDE A” recording/ playback side. ≥ Do not use excessive force when opening the cover. ≥ Do not touch the pickup lens or the recording/ playback side of the disc. This may impair recording and playback. ≥ Insert the disc securely to prevent damage. ≥ When you open the cover, the ACCESS/PC lamp flashes red.
LSQT1158_EN.book 128 ページ 2006年12月26日 火曜日 午前10時30分 Setup 3 Insert/remove the SD card into/ from the card slot. Selecting a mode The mode dial is used to switch between recording and playback modes. Rotate the mode dial slowly but surely. Rotate the mode dial, and set the desired mode pictograph to the position shown in the illustration. A ≥ When inserting an SD card, face the label side A upwards and press it straight in as far as it goes.
LSQT1158_EN.book 129 ページ 2006年12月26日 火曜日 午前10時30分 Setup Move the joystick up, down, left, or right to select an item or scene, and then press the joystick to set it. 1 1 3 4 Move the joystick up, down, left or right to select the scene to be played back and press the joystick. 5 2 1 Select by moving up. 2 Select by moving down. 3 Select by moving left. 4 Select by moving right. 5 Press the joystick to select the item.
LSQT1158_EN.
LSQT1158_EN.
LSQT1158_EN.book 132 ページ 2006年12月26日 火曜日 午前10時30分 Setup ∫ Help mode The help mode explains the operation icons that are displayed when the AUTO/MANUAL/FOCUS switch is set to AUTO in video/picture recording mode. ¬ Rotate the mode dial to select . 1 ≥ When the help mode is used, functions cannot be set. ≥ When the help mode is used, motion pictures and still pictures cannot be recorded. or Press the joystick to display the icon during the recording pause.
LSQT1158_EN.book 133 ページ 2006年12月26日 火曜日 午前10時30分 Setup 2 Move the joystick up or down in order to select the desired top menu. 7 Press the joystick to enter the selection. To get back to the previous screen Move the joystick left. 3 Move the joystick right or press the joystick. To exit the menu screen Press the MENU button. 4 Move the joystick up or down in order to select the submenu item. MENU ≥ The menu screen does not appear during recording or playing.
LSQT1158_EN.book 134 ページ 2006年12月26日 火曜日 午前10時30分 Setup move the joystick up or down to set the desired value. ≥ Use the direction buttons (3,4,2,1) and ENTER button in place of the joystick on the main unit. 3 Press the MENU button to exit the menu screen. MENU ≥ The year will change as follows: 2000, 2001, ..., 2099, 2000, ... ≥ The 24-hour system is used to display the time.
LSQT1158_EN.book 135 ページ 2006年12月26日 火曜日 午前10時30分 Setup ≥ The date and time function are driven by a built-in lithium battery. ≥ Make sure to check the time before recording. ≥ If the time display becomes [- -], the built-in lithium battery has run down. Use the following steps to charge the battery. When you turn on the power for the first time after charging, a message asking you to set the date and time will appear. Select [YES] and set the date and time.
LSQT1158_EN.book 136 ページ 2006年12月26日 火曜日 午前10時30分 Recording Recording Before recording Basic camera positioning 1 4 3 2 5 1 Hold the camera with both hands. 2 Put your hand through the grip belt. 3 Do not cover the microphones or sensors with your hands. 4 Keep your arms near your body. 5 Slightly open your legs. ≥ When you are outdoors, record pictures with the sunlight behind you. If the subject is backlit, it will become dark in the recording.
LSQT1158_EN.book 137 ページ 2006年12月26日 火曜日 午前10時30分 Recording ∫ About auto mode Set the AUTO/MANUAL/FOCUS switch to AUTO, and colour balance (white balance) and focusing will be adjusted automatically. jAuto white balance (l 198) jAuto focusing (l 199) Depending on the brightness of the subject etc., the aperture and shutter speed are automatically adjusted for an optimum brightness. (When set to the video recording mode: The shutter speed is adjusted to a maximum of 1/250.
LSQT1158_EN.book 138 ページ 2006年12月26日 火曜日 午前10時30分 Recording Recording motion pictures (RAM) (-RW‹VR›) (-RW‹V›) (-R) Record motion pictures onto a disc. ≥ When the unit is purchased, the aspect ratio is set to [16:9] for recording images compatible with a wide-screen TV. To watch images on a regular TV (4:3), change the aspect ratio setting (l 150) before recording the images or when watching them on the connected TV (l 176). ≥ Remove the lens cap before turning the unit on.
LSQT1158_EN.book 139 ページ 2006年12月26日 火曜日 午前10時30分 Recording ≥ When about 5 minutes have passed without any operation in recording pause, the unit automatically turns off to prevent the battery from running down. When you want to use the unit, turn it on again. This setting can also be set to [OFF]. (l 183, [POWER SAVE]) Screen indications in the video recording mode A Recording mode B Remaining time left for recording (When the remaining time is less than 1 minute, [R 0min] flashes red.
LSQT1158_EN.book 140 ページ 2006年12月26日 火曜日 午前10時30分 Recording ∫ Approximate recordable time for 1 disc (single sided) Recording mode Disc type XP (High quality) SP (Normal) LP (Long play) DVD-RAM Approx. 18 min Approx. 37 min Approx. 75 min DVD-R DL Approx. 35 min Approx. 69 min Approx. 138 min Image quality prioritized Recording time prioritized ≥ This unit records in VBR. VBR is an abbreviation for Variable Bit Rate.
LSQT1158_EN.book 141 ページ 2006年12月26日 火曜日 午前10時30分 Recording Recording still pictures (JPEG still pictures) (SD) Record the still picture on an SD card. ≥ When this unit is purchased, [PICTURE SIZE] is set to [ 2 ] (VDR-D310)/[ 0.2 ] (VDR-D220) for recording pictures compatible with a wide-screen TV (16:9). To record pictures with a 4:3 aspect ratio, change the [PICTURE SIZE] setting before recording (l 144). ≥ Remove the lens cap before turning the unit on.
LSQT1158_EN.book 142 ページ 2006年12月26日 火曜日 午前10時30分 Recording A Shutter chance mark A ± (The white lamp flashes.): Focusing ¥ (The green lamp lights up.): When in focus B No mark: When focusing is unsuccessful. ≥ The shutter chance mark is indicated as follows when the button is not pressed halfway. Please use it as a guide for recording. ¥ (The green lamp lights up.): When in focus and a good picture can be recorded. ± (The white lamp lights up.): Almost in focus B Focus area 5 Press the picture.
LSQT1158_EN.book 143 ページ 2006年12月26日 火曜日 午前10時30分 Recording ≥ When recording still pictures, hold the unit firmly with your hands and keep your arms stationary at your side so as not to shake the unit. ≥ You can record stable pictures without shaking by using a tripod and the remote control. Screen indications in picture recording mode A Remaining number of still pictures (Flashes in red when [R 0] appears.
LSQT1158_EN.book 144 ページ 2006年12月26日 火曜日 午前10時30分 Recording Number of pixels and picture quality for still picture recording ∫ [PICTURE SIZE] Changing the recording size. Press the MENU button, then select [BASIC] # [PICTURE SIZE] # desired item and press the joystick. MENU VDR-D310: Icon Aspect Number of pixels 3.1M 4:3 2048k1512 1M 4:3 1280k960 0.3M 4:3 640k480 16:9 1920k1080 Icon Aspect Number of pixels 0.3M 4:3 640k480 16:9 640k360 2 VDR-D220: 0.
LSQT1158_EN.book 145 ページ 2006年12月26日 火曜日 午前10時30分 Recording Various recording functions Zoom in/out function (RAM) (-RW‹VR›) (-RW‹V›) (-R) (SD) VDR-D310: You can zoom in up to 10k optically. VDR-D220: You can zoom in up to 32k optically. ¬ Rotate the mode dial to select . ≥ The zoom speed varies depending on the range over which the zoom lever is moved. (The zoom speed does not vary when operating with the remote control.) ≥ When the zoom speed is high, the subject may not be focused easily.
LSQT1158_EN.book 146 ページ 2006年12月26日 火曜日 午前10時30分 Recording ≥ This function cannot be used in picture recording mode. To use the zoom microphone function (RAM) (-RW‹VR›) (-RW‹V›) (-R) The zoom microphone is linked to the zooming operation so that far-away sounds with a teleshot and close-up sounds with a wide-angle shot are recorded more clearly. ¬ Rotate the mode dial to select . Press the MENU button, then select [ADVANCED] # [ZOOM MIC] # [ON] and press the joystick.
LSQT1158_EN.book 147 ページ 2006年12月26日 火曜日 午前10時30分 Recording 2 Move the joystick up to select [ª]. 3 Press the recording start/stop button. Start recording. (Fade in) 1/2 NEXT The image on the screen will become brighter. To return to normal recording Select [ª] again. ≥ If you turn off the power or operate the mode dial, the backlight compensation function is cancelled. When you start recording, the image/audio gradually appears. Pause recording.
LSQT1158_EN.book 148 ページ 2006年12月26日 火曜日 午前10時30分 Recording Soft skin mode This makes skin colours appear softer for a more attractive appearance. (RAM) (-RW‹VR›) (-RW‹V›) (-R) (SD) This is more effective if you record the bust image of a person. ¬ Rotate the mode dial to select . 1 Tele macro function (VDR-D310) This is for bringing only what you want to record into focus to take close-ups. (RAM) (-RW‹VR›) (-RW‹V›) (-R) (SD) or Press the joystick.
LSQT1158_EN.book 149 ページ 2006年12月26日 火曜日 午前10時30分 Recording ≥ In the following cases, the tele macro function is cancelled. jThe zoom magnification becomes lower than 10k. jThe power is turned off or the mode dial is operated. Colour night view function This allows recording in dark locations. (RAM) (-RW‹VR›) (-RW‹V›) (-R) This function allows you to record colour subjects in dark locations to stand out against the background. Attach this unit to a tripod, and you can record images free from vibration.
LSQT1158_EN.book 150 ページ 2006年12月26日 火曜日 午前10時30分 Recording ≥ If you press the button halfway and then fully, the subject is focused when the button is pressed halfway. (VDR-D310) ≥ When you press the button fully in auto focus mode, the subject is focused just before recording. (VDR-D310) Wide mode This is for selecting the screen’s aspect ratio when recording motion pictures. (RAM) (-RW‹VR›) (-RW‹V›) (-R) To stop the timer midway through Press the MENU button. (The self-timer setting is cancelled.
LSQT1158_EN.book 151 ページ 2006年12月26日 火曜日 午前10時30分 Recording Press the MENU button, then select [ADVANCED] # [O.I.S.] # [ON] and press the joystick. Press the MENU button, then select [ADVANCED] # [WIND CUT] # [ON] and press the joystick. MENU To cancel the image stabilizer function Press the MENU button, then select [ADVANCED] # [O.I.S.] # [OFF] and press the joystick. ≥ This function’s default setting is [ON].
LSQT1158_EN.book 152 ページ 2006年12月26日 火曜日 午前10時30分 Recording 1 Set the AUTO/MANUAL/FOCUS switch to MANUAL. 2 Press the MENU button, then select [BASIC] # [SCENE MODE] # desired item and press the joystick.
LSQT1158_EN.book 153 ページ 2006年12月26日 火曜日 午前10時30分 Recording 2 Move the switch down and set it to FOCUS position. 1 Set the AUTO/MANUAL/FOCUS switch to MANUAL. MNL MNL 4/4 NEXT 3/3 NEXT The manual focus indication [MF] and the icon shown in the illustration appear. The icon shown in the illustration is displayed automatically. 3 2 Move the joystick left or right to bring the subject into focus. Move the joystick up to select [ ].
LSQT1158_EN.book 154 ページ 2006年12月26日 火曜日 午前10時30分 Recording To set the white balance manually 1 1 Select [ ], fill the screen with a white subject. 2 3 1 Black balance adjustment in progress. (Flashes.) 2 White balance adjustment in progress. (Flashes.) 3 Adjustment completed. (Lights up.) MNL BACK BACK 2 will temporarily be black. (The black balance cannot be adjusted manually.) Move the joystick up to select [ ].
LSQT1158_EN.book 155 ページ 2006年12月26日 火曜日 午前10時30分 Recording 2 Move the joystick left or right to select [ ] (aperture) or [ ] (shutter speed). MNL 3/3 NEXT 3 Move the joystick left or right to make the adjustment. A B MNL ≥ You may see vertical lines of light in the playback image of a brightly shining subject or highly reflective subject, but this is not a malfunction. ≥ During normal playback, image movement may not look smooth.
LSQT1158_EN.book 156 ページ 2006年12月26日 火曜日 午前10時30分 Playback Playback Motion picture playback (RAM) (-RW‹VR›) (-RW‹V›) (-R) Play back the motion pictures recorded on the disc. 1 Rotate the mode dial to select . The motion pictures recorded on the disc are displayed as thumbnails. 2 Select the scene to be played back. A Scene number B Scroll bar display The selected scene will be encircled by a yellow frame.
LSQT1158_EN.book 157 ページ 2006年12月26日 火曜日 午前10時30分 Playback ≥ No sound will be heard except during normal playback. ≥ If pause play is continued for 5 minutes, the screen returns to the thumbnails. ≥ When the amount of time recorded on the scene is short, playback may not be possible. ≥ When a scene is displayed as [ ] on the thumbnail display, playback is not possible. ≥ The power will not turn off when the LCD monitor and the viewfinder are closed and retracted.
LSQT1158_EN.book 158 ページ 2006年12月26日 火曜日 午前10時30分 Playback ∫ Operating with the remote control (VDR-D310) Press the E or D button. SEARCH PLAY SEARCH STILL ADV PAUSE STILL ADV SKIP STOP SKIP Frame-by-frame playback The motion picture is advanced one frame at a time. 1 Move the joystick up during playback to pause the playback. 2 Move the joystick right. (The frames will be advanced one at a time in the reverse direction when you move the joystick left.
LSQT1158_EN.book 159 ページ 2006年12月26日 火曜日 午前10時30分 Playback Playing back motion pictures by date Recorded scenes are grouped by date on this unit. Scenes recorded on the same day can be played back in succession. 1 Press the MENU button, then select [PLAY SETUP] # [PLAY MODE] # [BY DATE] and press the joystick. MENU ≥ When [PLAY MODE] is set to [VIEW ALL], all recorded motion pictures will be played back in succession. 2 Select the date for playback, then press the joystick.
LSQT1158_EN.book 160 ページ 2006年12月26日 火曜日 午前10時30分 Playback Still picture playback (JPEG still pictures) (SD) Play back the still pictures recorded on the card. 1 Rotate the mode dial to select . The still pictures recorded on the SD card are displayed as thumbnails. 2 Select the file to be played back. A File number B Scroll bar display The selected file will be encircled by a yellow frame.
LSQT1158_EN.book 161 ページ 2006年12月26日 火曜日 午前10時30分 Playback ≥ It takes time to display the file depending on the number of pixels of the file. ≥ When a file is displayed as [ ] on the thumbnail display, playback is not possible. ≥ If you attempt to play back file recorded in a different format or file data is defective, an error message may appear.
LSQT1158_EN.book 162 ページ 2006年12月26日 火曜日 午前10時30分 Editing 2 Editing Editing scenes Deleting scenes This is for deleting scenes recorded on discs. (RAM) (-RW‹VR›) The deleted scenes cannot be restored. ≥ Scenes on DVD-RW (Video format) and DVDR cannot be deleted. Select [SELECT] or [ALL] and press the joystick. ≥ When [ALL] is selected, the following scenes will be deleted. Proceed to step 5.
LSQT1158_EN.book 163 ページ 2006年12月26日 火曜日 午前10時30分 Editing move the joystick down to set the dividing point. ≥ Do not turn off this unit while deleting. ≥ When you delete scenes, use a battery with sufficient battery power or use the AC adaptor. ≥ It may not be possible to delete scenes that have been divided. Combine the divided scenes, and then delete them. Dividing a scene This is for dividing a scene into two.
LSQT1158_EN.book 164 ページ 2006年12月26日 火曜日 午前10時30分 Editing 2 Select the scene to be combined, then press the joystick. ≥ If you create or delete playlists, the original scenes will not be modified. Editing scenes on a playlist will not affect the original scenes. A B ≥ The selected scene and the next scene are combined. ≥ If you wish to combine scenes that are not next to each other or scenes with different recording dates, first create a playlist and then combine the scenes on the playlist.
LSQT1158_EN.book 165 ページ 2006年12月26日 火曜日 午前10時30分 Editing 2 [PLAYLIST] # [VIEW LIST] and press the joystick. Select the scene to be added to the playlist, then press the joystick. MENU The selected scene is encircled by a red frame. ≥ When the joystick is pressed again, the selected scene will be cancelled. ≥ Up to 50 scenes can be set in succession. ≥ The scenes are registered in the playlist in the order that they were selected.
LSQT1158_EN.book 166 ページ 2006年12月26日 火曜日 午前10時30分 Editing 3 (Only when [SELECT] is selected in step 2) Select the scene to be deleted, then press the joystick. Deleting scenes ≥ Deleting scenes on a playlist will not affect the original scenes. ∫ Deleting scenes one at a time ¬ Select playlist playback mode. (l 165, steps 1 and 2) 1 Press the playback. button during The selected scene is encircled by a red frame. ≥ When the joystick is pressed again, the selected scene will be cancelled.
LSQT1158_EN.book 167 ページ 2006年12月26日 火曜日 午前10時30分 Editing 1 Press the MENU button, then select [EDIT] # [ADD] # [YES] and press the joystick. 1 Press the MENU button, then select [EDIT] # [MOVE] # [YES] and press the joystick. MENU 2 Select the scene to be added, then press the joystick. The selected scene is encircled by a red frame. ≥ When the joystick is pressed again, the selected scene will be cancelled. ≥ Up to 50 scenes can be set in succession.
LSQT1158_EN.book 168 ページ 2006年12月26日 火曜日 午前10時30分 Editing 1 Press the MENU button, then select [EDIT] # [DIVIDE] # [YES] and press the joystick. MENU Combining scenes Two consecutive scenes can be combined into one. ≥ Combining scenes on a playlist will not affect the original scenes. ¬ Select playlist playback mode. (l 165, steps 1 and 2) 1 2 Select the scene to be divided, then press the joystick. Press the MENU button, then select [EDIT] # [COMBINE] # [YES] and press the joystick.
LSQT1158_EN.book 169 ページ 2006年12月26日 火曜日 午前10時30分 Editing ≥ When [ALL] is selected, all files on the SD card except the locked files will be erased. Proceed to step 5. Editing still pictures Deleting still pictures This is for deleting still picture files recorded on SD cards. 3 (Only when [SELECT] is selected in step 2) Select the file to be deleted, then press the joystick. (SD) The deleted files cannot be restored.
LSQT1158_EN.book 170 ページ 2006年12月26日 火曜日 午前10時30分 Editing ≥ If files conforming to DCF standard are deleted, all the data related to the files will be deleted. Locking still pictures This is for preventing still picture files from being deleted by mistake. (SD) Still picture files recorded on an SD card can be locked so that they are not deleted by mistake. (However even if you lock some files on an SD card, formatting the card will delete all the files.
LSQT1158_EN.book 171 ページ 2006年12月26日 火曜日 午前10時30分 Editing To cancel all DPOF settings Press the MENU button, then select [PHOTO SETUP] # [DPOF SET] # [CANCEL ALL] and press the joystick. ≥ When the confirmation message appears, select [YES], then press the joystick. ∫ What is DPOF? DPOF stands for Digital Print Order Format. This enables picture printing information to be written onto an SD card so that it can be used on a system supporting DPOF.
LSQT1158_EN.book 172 ページ 2006年12月26日 火曜日 午前10時30分 Disc and card management [FINALIZE] # [YES] and press the joystick. Disc and card management Disc management Finalizing a disc It allows the discs to be played on other devices. MENU (-RW‹VR›) (-RW‹V›) (-R) If you insert a DVD-RW or a DVD-R disc recorded in this unit (that has not been finalized) into another device such as DVD recorder, computer, etc., the disc may become unusable.
LSQT1158_EN.book 173 ページ 2006年12月26日 火曜日 午前10時30分 Disc and card management [DISC PROTECT] and press the joystick. Un-finalizing a DVD-RW This is for un-finalizing a DVD-RW (Video format) so that it can be used for recording. MENU (-RW‹V›) ¬ Rotate the mode dial to select 1 . Press the MENU button, then select [DISC SETUP] # [UN-FINALIZE] # [YES] and press the joystick. 2 When the confirmation message appears, select [YES], then press the joystick.
LSQT1158_EN.book 174 ページ 2006年12月26日 火曜日 午前10時30分 Disc and card management [FORMAT DISC] # [YES] and press the joystick. Displaying disc information (RAM) (-RW‹VR›) (-RW‹V›) (-R) MENU ≥ When formatting a DVD-RAM, skip to step 3. 2 (When formatting a DVD-RW only) Select format type (l 116), then press the joystick. Information such as the number of recorded scenes, the remaining space and whether or not the disc is finalized or protected is displayed. ¬ Rotate the mode dial to select .
LSQT1158_EN.book 175 ページ 2006年12月26日 火曜日 午前10時30分 Disc and card management [FORMAT CARD] # [YES] and press the joystick. MENU 2 When the confirmation message appears, select [YES], then press the joystick. ≥ When formatting is complete, press the MENU button to exit the message screen. ≥ Use this unit to format SD cards. If an SD card is formatted on other products (such as a computer), the time spent for recording may become longer and you may not be able to use the SD card.
LSQT1158_EN.book 176 ページ 2006年12月26日 火曜日 午前10時30分 With other products With other products With a TV Playback on TV (RAM) (-RW‹VR›) (-RW‹V›) (-R) (SD) The motion pictures and still pictures recorded by this unit can be played back on a TV. ≥ Use the AC adaptor to free you from worrying about the battery running down. 1 Connect this unit and a TV. ∫ If the image or audio from this unit is not output on the TV ≥ Check that the plugs are inserted as far as they go. ≥ Check the connected terminal.
LSQT1158_EN.book 177 ページ 2006年12月26日 火曜日 午前10時30分 With other products ∫ To display the on-screen information on the TV (VDR-D310) The information displayed on the screen (operation icon and time code, etc.) can be displayed on the TV. Playing back a DVD-RAM or a DVD-RW (VR format) (RAM) (-RW‹VR›) 1 format)] Press the EXT DISPLAY button on the remote control. PHOTO EXT DISPLAY SHOT DATE/ TIME START/ STOP [Only when playing back a DVD-RW (VR Finalize the disc on this unit.
LSQT1158_EN.book 178 ページ 2006年12月26日 火曜日 午前10時30分 With other products the operating instructions of the playback device. ≥ The recording time is not displayed. Dubbing recordings onto a DVD recorder’s hard disk (RAM) (-RW‹VR›) (-RW‹V›) (-R) If you have a DVD recorder with hard disk, images recorded by this unit can be stored on the hard disk. ≥ Do not insert a DVD-RW or a DVD-R disc recorded in this unit (that has not been finalized) into the DVD recorder as the disc may become unusable.
LSQT1158_EN.book 179 ページ 2006年12月26日 火曜日 午前10時30分 With other products 4 With a VCR Dubbing images onto other video devices (RAM) (-RW‹VR›) (-RW‹V›) (-R) You can dub images played back on this unit onto other video devices. You can create a playlist by gathering the scenes you want to dub, then dub the scenes in this playlist only to other devices. (l 164) ≥ Use the AC adaptor to free you from worrying about the battery running down. 1 Connect this unit and a video device.
LSQT1158_EN.book 180 ページ 2006年12月26日 火曜日 午前10時30分 With other products The USB function selection screen will appear. 2 ] indication appears on this unit’s Select a file to be printed, then press the joystick. The number of pictures set is displayed. 4 Select the paper size setting on [PAPER SIZE]. Select [PictBridge] and press the joystick. The [ screen.
LSQT1158_EN.book 181 ページ 2006年12月26日 火曜日 午前10時30分 With other products ≥ Avoid the following operations during printing. These operations disable proper printing. jDisconnecting the USB cable jRemoving the SD card jSwitching the mode dial jTurning off the power ≥ Check the settings for the paper size, quality of print, etc. on the printer. ≥ The sides of pictures recorded when [ 2 ] (VDR-D310)/[ 0.2 ] (VDR-D220) is set may be cut at printing. Check before printing.
LSQT1158_EN.book 182 ページ 2006年12月26日 火曜日 午前10時30分 Others Others Menus Still picture recording menus Menu list Motion picture recording menus ∫ [BASIC] [SCENE MODE] (l 151) [GUIDE LINES] (l 150) [REC MODE] (l 139) [REC ASPECT] (l 150) [CLOCK SET] (l 134) ∫ [ADVANCED] [D.ZOOM] (l 145) [O.I.S.
LSQT1158_EN.
LSQT1158_EN.book 184 ページ 2006年12月26日 火曜日 午前10時30分 Others 1 Beep When you start recording When you turn on the power When this unit is recognized by the computer or the printer, etc. 2 Beeps When you pause recording When you turn off the power 2 Beeps for 4 times When an error occurs e.g. recording not starting. Check the sentence displayed on the screen. (l 187) Indications Indications ∫ Recording indications Motion picture recording SP R 30min ; 0h00m00s MNL AWB 1/100 OPEN 0dB 15.12.
LSQT1158_EN.
LSQT1158_EN.book 186 ページ 2006年12月26日 Others Locked still pictures VDR-D310: 3.1M 2 1M 0.3M Number of recording pixels for still pictures 2048k1512 1920k1080 1280k960 640k480 VDR-D220: 0.3M 0.2 640k480 640k360 The picture size is not displayed for still pictures recorded with other products that have different picture sizes from the sizes shown above. ∫ Confirmatory indications –– (Time display) The built-in battery is low.
LSQT1158_EN.book 187 ページ 2006年12月26日 火曜日 午前10時30分 Others Messages CAN NOT READ THIS DISC. PLEASE CHECK FOR SCRATCHES OR STAINS ON DISC. The disc is scratched or dirty. Eject the disc and clean it. (l 119) If there are scratches on the disc, use a new disc. NO DATA. There are no images recorded on the disc or card. INCOMPATIBLE DISC. You inserted an incompatible disc (copy-protected discs, etc.). PLEASE CHECK THE DISC.
LSQT1158_EN.book 188 ページ 2006年12月26日 火曜日 午前10時30分 Others CARD FULL. PUSH THE RESET SWITCH. CHECK THE DISC AFTER PUSHING THE RESET SWITCH TO REPAIR IT. CHANGE TO MANUAL MODE. CANCEL NIGHT VIEW MODE The SD card is full so no further data can be recorded. Delete unnecessary files (l 169) or insert a new SD card. An irregularity in the unit has been detected. Press the RESET button to restart the unit. (l 194) You are attempting to use a function that cannot be used simultaneously. CANNOT SET.
LSQT1158_EN.book 189 ページ 2006年12月26日 火曜日 午前10時30分 Others Functions that cannot be used simultaneously Some functions in this unit are disabled or cannot be selected due to the unit’s specifications. The table below shows examples of functions restricted by various conditions.
LSQT1158_EN.book 190 ページ 2006年12月26日 火曜日 午前10時30分 Others Frequently asked questions What kind of discs can be used? DVD-RAM, DVD-RW, DVD-R and DVD-R DL can be used if they are 8 cm bare discs. (l 114) Can discs with a cartridge be used? They can be used if the cartridge is removed. Can double sided discs be used? They can be used. However you cannot record or play continuously from one side of the disc to the other. You will need to eject the disc and turn it over.
LSQT1158_EN.book 191 ページ 2006年12月26日 火曜日 午前10時30分 Others Troubleshooting Problem Check points This unit cannot be turned on. ≥ Is the battery fully charged? # Charge the battery using the AC adaptor. (l 120) ≥ The battery protection circuit may have operated. Attach the battery to the AC adaptor for 5 to 10 seconds. If the unit still cannot be used, the battery is faulty. ≥ Is the LCD monitor opened or the viewfinder extended? This unit is turned off automatically.
LSQT1158_EN.book 192 ページ 2006年12月26日 火曜日 午前10時30分 Others Problem Check points The remote control does not function. ≥ Has the button-type battery of the remote control run out? # Replace it with a new button-type battery. (l 112) The DISC EJECT lever does not work. ≥ The disc cover will not open unless the unit is powered. # Connect a charged battery or AC adaptor. ≥ The DISC EJECT lever does not work when the unit is connected to the computer.
LSQT1158_EN.book 193 ページ 2006年12月26日 火曜日 午前10時30分 Others Problem Check points Recorded still pictures are not clear. ≥ Are you trying to record small or finely detailed objects with [PICT.QUALITY] set at [ ]? # If you try to record small or finely detailed objects with [PICT.QUALITY] set at [ ], the images may break up into a mosaic-like pattern. Record with [PICT.QUALITY] set at [ ] instead. (l 144) Auto focus function does not work.
LSQT1158_EN.book 194 ページ 2006年12月26日 火曜日 午前10時30分 Others Problem The indication disappears. The screen is frozen. No operation can be performed. Check points ≥ Is this unit connected to a computer? # No operation can be performed on this unit when it is connected to a computer. (VDR-D310) (Refer to the operating instructions for PC connection.) ≥ Turn off the power to this unit. If the power cannot be turned off, press the RESET button, or remove the battery or AC adaptor and then reattach it.
LSQT1158_EN.book 195 ページ 2006年12月26日 火曜日 午前10時30分 Others Cautions for use About this unit ≥ The unit, disc and card become warm after long operation, but this is not a malfunction. Keep the DVD Video Camera as far away as possible from electromagnetic equipment (such as microwave ovens, TVs, video games etc.). ≥ If you use the DVD Video Camera on top of or near a TV, the pictures and sound on the DVD Video Camera may be disrupted by electromagnetic wave radiation.
LSQT1158_EN.book 196 ページ 2006年12月26日 火曜日 午前10時30分 Others ≥ This unit is not intended for business use. When you are not going to use the unit for an extended time ≥ When storing the unit in a cupboard or cabinet, it is recommended that you place a desiccant (silica gel) in with it. About the battery The battery used in this unit is a rechargeable lithium-ion battery. It is susceptible to humidity and temperature and the effect increases the more the temperature rises or falls.
LSQT1158_EN.
LSQT1158_EN.book 198 ページ 2006年12月26日 火曜日 午前10時30分 Others About condensation When condensation forms on the unit, the lens will cloud up and the unit may not work properly. Make every effort to ensure that condensation does not form. If it does form, take the actions described below. Causes of condensation Condensation takes place when the ambient temperature or humidity is changed as follows. ≥ When this unit is brought inside from the cold (e.g. a ski slope) to a warm room.
LSQT1158_EN.book 199 ページ 2006年12月26日 火曜日 午前10時30分 Others source. For light outside the functional automatic white balance adjustment range, use the manual white balance adjustment mode. White balance Similarly, when recording something on the opposite side of a road with heavy traffic, a vehicle that happens to pass by may be brought into focus. The images recorded by the unit may become bluish or reddish under the influence of certain light sources. To avoid such phenomena, adjust the white balance.
LSQT1158_EN.book 200 ページ 2006年12月26日 火曜日 午前10時30分 Others Specifications DVD Video Camera Information for your safety Power source: Power consumption: DC 7.9 V/7.2 V VDR-D310: Recording 7.0 W VDR-D220: Recording 6.
LSQT1158_EN.book 201 ページ 2006年12月26日 火曜日 午前10時30分 Others Standard illumination 1,400 lx Minimum required illumination 12 lx (Low light mode: 1/50) [approx. 1 lx (VDR-D310)/approx. 2 lx (VDR-D220) with the colour night view function] Video output level 1.0 Vp-p, 75 ™ S Video output level Y: 1.0 Vp-p, 75 ™ C: 0.3 Vp-p, 75 ™ Audio output level (Line) 316 mV, 600 ™ Mic input (VDR-D310) Mic sensitivity j50 dB (0 dB=1 V/Pa, 1 kHz) (‰ 3.
LSQT1158_EN.book 202 ページ 2006年12月26日 火曜日 午前10時30分 Others Compression JPEG (Design rule for Camera File system, based on Exif 2.2 standard), DPOF corresponding Picture size VDR-D310: 2048k1512, 1920k1080 (16:9), 1280k960, 640k480 VDR-D220: 640k480, 640k360 (16:9) AC adaptor: VSK0651 Information for your safety Power source: Power consumption: DC output: AC 110 V to 240 V, 50/60 Hz 19 W DC 7.9 V, 1.4 A (Unit operation) DC 8.4 V, 0.
LSQT1158_EN.book 203 ページ 2006年12月26日 火曜日 午前10時30分 Others Picture size 1 M (1280k960) 0.3M (640k480) Picture quality 8 MB 8 14 42 86 16 MB 21 34 97 195 32 MB 47 75 210 420 64 MB 97 155 430 870 128 MB 185 300 820 1650 256 MB 390 620 1710 3430 512 MB 780 1230 3400 6790 1 GB 1550 2470 6800 13600 2 GB 3160 5030 13830 27660 4 GB 6210 9870 27150 54310 VDR-D220: Picture size 0.3M (640k480) 0.
LSQT1158_EN.book 204 ページ 2006年12月26日 火曜日 午前10時30分 C LSQT1158 A F1206Ra0 ( 6200 A ) Matsushita Electric Industrial Co., Ltd. Web site: http://panasonic.