
Operating Instructions


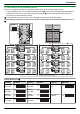


4.7.2 DIP-switches van de distributeur instellen
Wanneer u de distributeur installeert en busbedrading gebruikt, moet u de DIP-switches instellen als volgt.
– Instelling distributeur-id #1 – #8: de desbetreffende DIP-switches (A) moeten worden geconfigureerd op elke distributeur.
– Instelling kamernummer-id A – f: de desbetreffende DIP-switches (B) moeten worden geconfigureerd volgens elk
knopnummer van de lobby stations en kamers.
A
: Ter illustratie zijn nummers geschreven op het naamplaatje van elke belknop van de lobby stations.
Voorbeeld: Bij het configureren van kamernummer 20 stelt u de DIP-switch van de desbetreffende distributeurs in op
T.
#8
#7
#6
#5
#4
P O
L K
H G
D C
N M
J I
F E
B A
#3
#2
#1
Z Y
V U
R Q
X W
T
S
B
B
B
B
B
B
B
B
A
A
A
A
A
A
A
A
1 2
3 4
5 6
7 8
9 10
11 12
13 14
15 16
17 18
19 20
21 22
23 24
25 26
27 28
29 30
31 32
1
B
A
DIP SW
1 2 3 4 5 6 7 8
ON
Instellen distributeur-id A
Instelling DIP-switch Instelling DIP-switch Terminal DIP-switch
Distribu-
teur-id #1
1 2 3 4 5 6 7 8
O
N
OFF
Distribu-
teur-id #5
1 2 3 4 5 6 7 8
O
N
OFF
Verste distribu-
teur
1 2 3 4 5 6 7 8
O
N
OFF
Distribu-
teur-id #2
1 2 3 4 5 6 7 8
O
N
OFF
Distribu-
teur-id #6
1 2 3 4 5 6 7 8
O
N
OFF
Distribu-
teur-id #3
1 2 3 4 5 6 7 8
O
N
OFF
Distribu-
teur-id #7
1 2 3 4 5 6 7 8
O
N
OFF
Niet verste dis-
tributeur
1 2 3 4 5 6 7 8
O
N
OFF
Distribu-
teur-id #4
1 2 3 4 5 6 7 8
O
N
OFF
Distribu-
teur-id #8
1 2 3 4 5 6 7 8
O
N
OFF
41
4. Installatie