
Operating instructions


15
SETUP PROCEDURES
■ Prior to Setup
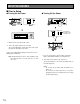
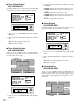
● Turning On the Power
1. Plug the power cord into the AC outlet.
2. Turn on the power switch on the rear panel.
The operate LED lights, and the date, time and operat-
ing status are displayed on the LCD.
Power-on recording will start if [Timer Rec] has been set to
[EXT] with the LCD button.
Note: Avoid turning the power on and off within a short
time. Allow at least 5 seconds from off to on and
vice versa.
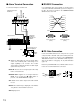
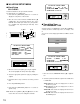
● Turning Off the Power
1. Press the stop button to quit recording or playback.
Make certain that the HDD access lamp turns off.
2. Turn off the power switch on the rear panel.
The operate LED goes out, and the operating status on
the LCD disappears.
Note:
• Do not turn off the power while the HDD access
lamp is on.
• Do not leave the unit turned off for a long time.
Supply AC power to the unit and turn it on to charge
up the backup battery.
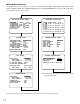
SIGNAL GND
DISPLAY SELECT
LCD CONTRAST
OPERATE
TIMER
ALARM
SUSPEND
SUMMER
TIME
POWER
ON
OFF
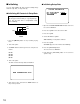
SIGNAL GND
OPERATE
TIMER HDD
ALARM
SUSPEND
SUMMER
TIME
FULL
LOCK
DISPLAY SELECT
STOP
PLAY REC
PUSH– PAUSE
SET
ALARM SEARCH STEP REW/FF
PLAY MODE SELECT
//
/
/
SETUP/ESC
Confirm that
the HDD access
indicator is off.
LCD CONTRAST
Digital Disk Recorder WJ-HD
POWER
ON
OFF