
Operating Instructions
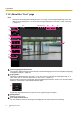
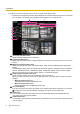
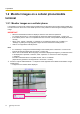
Table Of Contents
- Table of Contents
- 1 Operations
- 2 Settings
- 2.1 About the network security
- 2.2 Display the setup menu from a PC
- 2.3 Use Easy Setup [Easy Setup]
- 2.3.1 Configure the Internet settings [Internet]
- 2.3.2 Configure an event action [Event action]
- 2.3.2.1 Configure the schedule/alarm (event function type setup menu)
- 2.3.2.2 Alarm: Configure the terminal and VMD (alarm setup menu)
- 2.3.2.3 Alarm: Configure the alarm function type (Alarm function type setup menu)
- 2.3.2.4 Alarm: Configure the details for image transfer or recording conditions
- 2.3.2.5 Alarm: Configure the output terminal
- 2.3.2.6 Alarm: configure the mail notifications and mail server
- 2.3.2.7 Schedule: Configure SD recording or FTP periodic image transmission (schedule function type setup menu)
- 2.3.2.8 Schedule: Set SD memory recording (video recording setup menu)
- 2.3.2.9 Schedule: Configure FTP periodic image transmission (FTP periodic image transmission setup menu)
- 2.4 Configure the basic settings of the camera [Basic]
- 2.4.1 Configure the basic settings [Basic]
- 2.4.2 Configure the settings relating to the SD memory card [SD memory card]
- 2.4.3 Configure the settings relating to alteration detection [Alteration detection]
- 2.4.4 How to configure alteration detection settings
- 2.4.5 Access copy images saved on the SD memory card onto the PC [SD memory card images]
- 2.4.6 Configure the directory of the PC that images will be downloaded to [Log]
- 2.5 Configure the settings relating to images and audio [Image/Audio]
- 2.5.1 Configure the settings relating to the image capture mode [Image]
- 2.5.2 Configure the settings relating to JPEG images [Image]
- 2.5.3 Configure the settings relating to Stream [Image]
- 2.5.4 Configure the settings relating to image adjust, zoom/focus, privacy zone, VIQS, and lens distortion compensation [Image quality]
- 2.5.4.1 Configure the settings relating to image quality (“Image adjust” setup menu)
- 2.5.4.2 Set mask areas
- 2.5.4.3 Adjust the zoom and focus
- 2.5.4.4 Configure the settings relating to the privacy zone (“Privacy zone” setup menu)
- 2.5.4.5 Configure the VIQS setting
- 2.5.4.6 Configure the VIQS area
- 2.5.4.7 Configure the settings relating to lens distortion compensation
- 2.5.5 Configure the settings relating to audio [Audio]
- 2.6 Configure the multi-screen settings [Multi-screen]
- 2.7 Configure the alarm settings [Alarm]
- 2.7.1 Configure the settings relating to the alarm action [Alarm]
- 2.7.2 Configure the settings relating to the output terminal [Alarm]
- 2.7.3 Change the AUX name [Alarm]
- 2.7.4 Configure the settings relating to the camera action on alarm occurrence [Alarm]
- 2.7.4.1 Configure settings relating to image quality on alarm action
- 2.7.4.2 Configure settings relating to alarm E-mail notifications
- 2.7.4.3 Configure settings relating to FTP transmissions of alarm images
- 2.7.4.4 Configure settings relating to recording to an SD memory card when an alarm occurs
- 2.7.4.5 Configure settings relating to Panasonic alarm protocol notification when an alarm occurs
- 2.7.4.6 Configure settings relating to HTTP alarm notification when an alarm occurs
- 2.7.5 Configure the VMD settings [VMD area]
- 2.7.6 Set the VMD areas [VMD area]
- 2.7.7 Configuration of the settings relating to alarm notification [Notification]
- 2.8 Configure the settings relating to the authentication [User mng.]
- 2.9 Configuring the network settings [Network]
- 2.9.1 Configure the network settings [Network]
- 2.9.2 Configure advanced network settings [Advanced]
- 2.9.2.1 Configure the settings related to sending E-mails
- 2.9.2.2 Configure the settings related to FTP transmission
- 2.9.2.3 Configure the settings relating to the NTP server
- 2.9.2.4 Configure the UPnP settings
- 2.9.2.5 Configure the HTTPS settings
- 2.9.2.6 Configure the settings relating to DDNS
- 2.9.2.7 Configure the settings relating to SNMP
- 2.9.2.8 Configure the QoS settings
- 2.9.3 How to configure HTTPS settings
- 2.9.4 Access the camera using the HTTPS protocol (for pre-installed certificate)
- 2.9.5 Access the camera using the HTTPS protocol (for CA Certification)
- 2.9.6 How to configure the settings relating to DDNS
- 2.10 Configure the settings relating to the schedules [Schedule]
- 2.11 Maintenance of the camera [Maintenance]
- 2.12 Display the Panasonic support website [Support]
- 3 Others

1.2 Monitor images on a cellular phone/mobile
terminal
1.2.1 Monitor images on a cellular phone
It is possible to connect to the camera using a cellular phone via the Internet and monitor images (JPEG only)
from the camera on the screen of the cellular phone. It is also possible to refresh images to display the latest
image.
IMPORTANT
• When the authentication window is displayed, enter the user name and password.
To enhance the security, it is recommended to change the password periodically. (®page 147)
• If the cellular phone in use is not compatible with UTF-8 encode, it is impossible to display the screen
correctly.
• When “VGA”, “QVGA”, “640x360”, or “320x180” is not selected for either one of “JPEG(1)” or
“JPEG(2)” of [JPEG] on the [Image] tab, images cannot be viewed from cellular phones.
• Audio is not supported for cellular phones.
Note
• It is necessary to configure the network settings of the cellular phone in advance to connect to the
Internet and monitor images from the camera. (®page 155)
• When “Auto” is selected for “Menu language”, the screen is displayed in English. If you want the screen
to be displayed in Japanese or Chinese, select “Japanese” or “Chinese” for “Menu language”.
(®page 65)
For further information about compatible devices, refer to our website
(https://security.panasonic.com/support/info/ <Control No.: C0108>).
1. Access to “http://IP address/mobile”
*1
or “http://Host name registered in the DDNS server/mobile” using a
cellular phone.
→ Images from the camera will be displayed.
A
B
C
20 Operating Instructions
1 Operations