
Operating Instructions
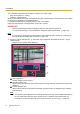

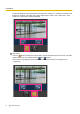
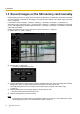
Table Of Contents
- Table of Contents
- 1 Operations
- 2 Settings
- 2.1 About the network security
- 2.2 Display the setup menu from a PC
- 2.3 Use Easy Setup [Easy Setup]
- 2.3.1 Configure the Internet settings [Internet]
- 2.3.2 Configure an event action [Event action]
- 2.3.2.1 Configure the schedule/alarm (event function type setup menu)
- 2.3.2.2 Alarm: Configure the terminal and VMD (alarm setup menu)
- 2.3.2.3 Alarm: Configure the alarm function type (Alarm function type setup menu)
- 2.3.2.4 Alarm: Configure the details for image transfer or recording conditions
- 2.3.2.5 Alarm: Configure the output terminal
- 2.3.2.6 Alarm: configure the mail notifications and mail server
- 2.3.2.7 Schedule: Configure SD recording or FTP periodic image transmission (schedule function type setup menu)
- 2.3.2.8 Schedule: Set SD memory recording (video recording setup menu)
- 2.3.2.9 Schedule: Configure FTP periodic image transmission (FTP periodic image transmission setup menu)
- 2.4 Configure the basic settings of the camera [Basic]
- 2.4.1 Configure the basic settings [Basic]
- 2.4.2 Configure the settings relating to the SD memory card [SD memory card]
- 2.4.3 Configure the settings relating to alteration detection [Alteration detection]
- 2.4.4 How to configure alteration detection settings
- 2.4.5 Access copy images saved on the SD memory card onto the PC [SD memory card images]
- 2.4.6 Configure the directory of the PC that images will be downloaded to [Log]
- 2.5 Configure the settings relating to images and audio [Image/Audio]
- 2.5.1 Configure the settings relating to the image capture mode [Image]
- 2.5.2 Configure the settings relating to JPEG images [Image]
- 2.5.3 Configure the settings relating to Stream [Image]
- 2.5.4 Configure the settings relating to image adjust, zoom/focus, privacy zone, VIQS, and lens distortion compensation [Image quality]
- 2.5.4.1 Configure the settings relating to image quality (“Image adjust” setup menu)
- 2.5.4.2 Set mask areas
- 2.5.4.3 Adjust the zoom and focus
- 2.5.4.4 Configure the settings relating to the privacy zone (“Privacy zone” setup menu)
- 2.5.4.5 Configure the VIQS setting
- 2.5.4.6 Configure the VIQS area
- 2.5.4.7 Configure the settings relating to lens distortion compensation
- 2.5.5 Configure the settings relating to audio [Audio]
- 2.6 Configure the multi-screen settings [Multi-screen]
- 2.7 Configure the alarm settings [Alarm]
- 2.7.1 Configure the settings relating to the alarm action [Alarm]
- 2.7.2 Configure the settings relating to the output terminal [Alarm]
- 2.7.3 Change the AUX name [Alarm]
- 2.7.4 Configure the settings relating to the camera action on alarm occurrence [Alarm]
- 2.7.4.1 Configure settings relating to image quality on alarm action
- 2.7.4.2 Configure settings relating to alarm E-mail notifications
- 2.7.4.3 Configure settings relating to FTP transmissions of alarm images
- 2.7.4.4 Configure settings relating to recording to an SD memory card when an alarm occurs
- 2.7.4.5 Configure settings relating to Panasonic alarm protocol notification when an alarm occurs
- 2.7.4.6 Configure settings relating to HTTP alarm notification when an alarm occurs
- 2.7.5 Configure the VMD settings [VMD area]
- 2.7.6 Set the VMD areas [VMD area]
- 2.7.7 Configuration of the settings relating to alarm notification [Notification]
- 2.8 Configure the settings relating to the authentication [User mng.]
- 2.9 Configuring the network settings [Network]
- 2.9.1 Configure the network settings [Network]
- 2.9.2 Configure advanced network settings [Advanced]
- 2.9.2.1 Configure the settings related to sending E-mails
- 2.9.2.2 Configure the settings related to FTP transmission
- 2.9.2.3 Configure the settings relating to the NTP server
- 2.9.2.4 Configure the UPnP settings
- 2.9.2.5 Configure the HTTPS settings
- 2.9.2.6 Configure the settings relating to DDNS
- 2.9.2.7 Configure the settings relating to SNMP
- 2.9.2.8 Configure the QoS settings
- 2.9.3 How to configure HTTPS settings
- 2.9.4 Access the camera using the HTTPS protocol (for pre-installed certificate)
- 2.9.5 Access the camera using the HTTPS protocol (for CA Certification)
- 2.9.6 How to configure the settings relating to DDNS
- 2.10 Configure the settings relating to the schedules [Schedule]
- 2.11 Maintenance of the camera [Maintenance]
- 2.12 Display the Panasonic support website [Support]
- 3 Others

Refresh control
Press the dial key “5” or the [Manual Refresh] button to refresh the camera images.
Press the [Auto Refresh] button to refresh the images from the camera in 5-second intervals.
When the dial key “5” or the [Manual Refresh] button is pressed again, the refresh mode of the camera
will return to manual refresh.
IMPORTANT
• Transmission will be periodically performed when “Auto Refresh” is selected for the camera
image. Confirm the contract plan of the cellular phone in use before using this function.
• Depending on the cellular phone in use, “Auto Refresh” may be unavailable.
Resolution control
Changes the image capture size by pressing the dial key “0”.
• Image in the aspect ratio of “4:3”: Changes the image capture size between 320x240 (default) and
640x480.
• Image in the aspect ratio of “16:9”: Changes the image capture size between 320x180 (default)
and 640x360.
AUX control
Controls the AUX terminal. These buttons will be displayed only when “AUX output” is selected for
“Terminal 3” on the setup menu. (®page 51)
Note
• Some cellular phones cannot change the image capture size even when resolution is changed by
resolution control.
• Depending on the image capture size selected for “JPEG(1)” or “JPEG(2)”, “Resolution” may not be
able to be used.
• When the HTTP port number is changed from “80”, enter “http://IP address: (colon) + port number/
mobile”
*1
in the address box of the browser. When using the DDNS function, access to “http://Host
name registered in the DDNS server: (colon) + port number/mobile”.
• When “HTTPS” is selected for “HTTPS” - “Connection” on the [Advanced] tab of the “Network” page,
enter as follows.
“https://IP address: (colon) + port number/mobile” or “https://Host name registered in the DDNS server:
(colon) + port number/mobile”
• When the authentication window is displayed, enter the user name of an administrator or user and
password. Depending on the cellular phone in use, password entry may be required each time the
screen is switched.
• Depending on the cellular phone in use, larger size images may not be displayed. In this case, selecting
a setting close to the lowest quality setting for “Image quality setting” of “JPEG” (®page 91) may
sometimes solve this problem.
• Depending on the cellular phone in use or its contract plan, it may be impossible to access.
• The operations menu displayed on the mobile telephone screen may not be displayed depending on
the user rights and access level of the accessing user. To display the operations menu, it is necessary
to set the user rights and access level (“User auth.” in “User mng.”). (®page 147)
*1
IP address is the global WAN IP address of the router that can be accessed via the Internet.
1.2.2 Monitor images on a mobile terminal (including
smartphones)
It is possible to connect to the camera using a mobile terminal via the Internet and monitor images (MJPEG
or JPEG) from the camera on the screen of the mobile terminal. It is also possible to refresh images to display
the latest image.
Operating Instructions 21
1 Operations