
Installation Guide


13
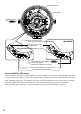
Precautions for installation
This product is designed to be installed
under eaves.
Install the product under eaves to avoid direct
sunlight.
Installing place
Contact your dealer for assistance if you are
unsure of an appropriate place in your particu-
lar environment.
• Make sure that the installation area is
strong enough to hold this product, such
as a concrete ceiling.
• Install the camera in the foundation area of
the architecture or where sufficient strength
is assured.
• If a ceiling board such as plaster board is
too weak to support the total weight, the
area shall be sufficiently reinforced.
Do not place this product in the following
places:
• Locations where a chemical agent is used
such as a swimming pool
• Locations subject to moisture or oil smoke
such as a kitchen
• Locations that have a specific environment
that is subject to an inflammable atmo-
sphere or solvents
• Locations where a radiation, an X-ray, a
strong radio wave or a strong magnetic
field is generated
• Locations where corrosive gas is pro-
duced, locations where it may be damaged
by briny air such as seashores
• Locations where the temperature is not
within the specified range (page 42).
• Locations subject to vibrations (This prod-
uct is not designed for on-vehicle use.)
Do not install this product in a humid or
dust-laden environment.
Otherwise, lifetime of the internal parts may be
shortened.
Be sure to remove this product if it is not
in use.
Design and engineer the power supply
system to turn on/off the power of this
product.
The product has no power switch. When
installing the product, use a power supply
device equipped with the ON-OFF switch for
servicing.
About the network connection
When connecting to a network using the net-
work cable of this product, observe the follow-
ing.
• When wiring for the network, design and
engineer not to be affected by thunder.
• It is impossible to install this product in
combination with a pan/tilt head.
Screw tightening
• The screws and bolts must be tightened
with an appropriate tightening torque
according to the material and strength of
the installation area.
• Do not use an impact driver. Use of an
impact driver may damage the screws or
cause tightening excessively.
• Tighten screws at a right angle to the sur-
face. After tightening screws, perform visu-
al check to ensure tightening is so suffi-
cient that there is no backlash.
Procure fixing screws separately.
The screws that secure this product are not
supplied. Prepare them according to the mate-
rial and strength of the area where the product
is to be installed.
Panasonic assumes no responsibility for injuries or property damage resulting from fail-
ures arising out of improper installation or operation inconsistent with this documenta-
tion.