
Installation Guide


20
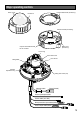
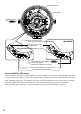
x Determine the direction of the mount bracket according to the installation environment (how the
cables are wired, etc.) before mounting it to a wall or ceiling.
The direction of the camera in relation to the mount bracket is the 4 directions as shown in
illustration.
Note:
• The camera's direction is determined by the direction of the
camera attachment (accessory) mounted to the mount
bracket c.
• For wall mounting:
The camera's upwards direction (the side opposite to
where the Panasonic log is) is fixed. Select which direction
to make the upward direction for the mount bracket.
• For ceiling mounting:
Select which direction to face the front (the side where the
Panasonic logo is) of the camera.
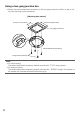
<Using the cable access hole>
Open the camera access hole on the wall or ceiling as shown in the illustration. Align the cable hole
of the mount bracket to the hole, and mount the bracket to hole A or hole B on the wall or ceiling.
[For use of the hole A]
ø27 mm
{1-1/16 inches}
51 mm {2 inches}
Cable access hole
Center of mount bracket
Mount bracket
(accessory)
Fixing screws (locally procured)
Cable hole
Female thread for the conduit
Cable hole
The direction of
the camera
(4 directions)