
Installation Guide


22
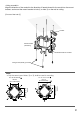
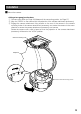
c In the direction determined in x, fix the
camera attachment (accessory) on the
mount bracket using the fixing screws.
Recommended tightening torque:
0.78 N·m {0.58 lbf·ft}
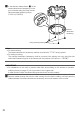
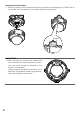
Note:
• For wall mounting:
The camera attachment (accessory) shall be mounted with "TOP" facing upward.
• For ceiling mounting:
The camera attachment (accessory) shall be mounted with aligning the front side (the side
where the Panasonic logo is) of the camera with the position of the arrow in "FRONT".
IMPORTANT:
• For installations on the wall, to prevent water from accumulating on the surface of the dehu-
midifying device (
☞ page 12), do not connect it at the upper side.
If water remains inside, the dehumidifying device cannot function properly.
v Pass the cables through the hole for cable running from the wall or ceiling, and then pass the
cables between the camera attachment (accessory) and mount bracket to the outside.
Camera
attachment
(accessory)
FRONT
TOP
Fixing screws (accessory)