
User's Manual
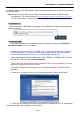


Table Of Contents

User’s Manual Wireless USB Adapter
Page 6
Tips: If there are free hotspots, simply select the network you want from the list
displayed, then click Connecting. It tries to launch your Internet browser—you should
be connected to the Internet.
If there is a pay hotspot, signing in or up will require either to enter your login
information-if you‘re an existing customer, or to enter your credit card information for
payment, it is just decided by you. Then clicking the Connecting, your default Internet
browser will launch and take you to the service provider’s login page. Most providers
have very simple and step-by-step instructions for you to sign up and then to be
connected. Another way to access the service provider’s login page is to simply
launch your Internet browser, if there’s a pay network available, you’ll be taken
directly to the login page.
After the installation of Ralink utility, the system shows a special wireless utility icon in the
Windows system tray, which locates in the bottom-right corner of your computer screen:
When an USB wireless adapter is inserted into an USB 2.0/1.1 port of Notebook or PC,
the icon changes colors according to the wireless signal quality.
1. Double-click the icon or right click the icon and then select “Launch Config Utility” to
launch the utility, the RaUI window appears like:
The Ralink wireless utility starts in compact mode as shown above, provides profile
management, the available networks listing, a statistical counter display, Wi-Fi
multimedia (WMM), protected Wi-Fi setup, Cisco compatible extensions (CCX), call
admission control (CAC), radio controls, Ralink driver/utility information, and help
functions. Clicking the expanding icon can change to the full mode as shown
below:
Should the service of Ralink wireless connection utility be applied.