Pandigital Digital Photo Frame User Guide
Table of Contents Important Safety Precautions ......................................................................... 4 Cleaning the Digital Photo Frame .............................................................. 4 Introduction..................................................................................................... 5 What’s In the Box ........................................................................................... 5 Setting Up the Digital Photo Frame ........................
Displaying a Clock with a Calendar and a Slideshow .................................. 20 Set the Internal Clock .............................................................................. 20 Set the Alarm ........................................................................................... 21 Create a Schedule for Playing Slideshows.............................................. 21 Turn Scheduled Slideshows On or Off ....................................................
Important Safety Precautions Always follow these basic safety precautions when using your Digital Photo Frame. This will reduce the risk of fire, electric shock, and injury. Warning: Do not expose this product to rain or moisture. Warning: Do not remove the cover. There are no user-serviceable parts inside. Refer all servicing to qualified personnel. • The Digital Photo Frame is for indoor use only. • Unplug the Digital Photo Frame before performing care and maintenance.
Introduction Welcome to the Pandigital Multimedia Photo Frame! Now you can display your digital photos directly from your memory card, no computer is necessary. Simply insert a memory card into the Digital Photo Frame, and turn on the power. You’ll be treated to a slideshow of your photos. It’s as easy as that. You can also display individual photos, play video clips, and play background music with your slide show.
Setting Up the Digital Photo Frame The Digital Photo Frame is easy to set up. Just follow these steps: 1. Plug the AC Power Adapter into the Digital Photo Frame and into a wall outlet. 2. Insert a memory card into the appropriate slot. Slot 1 - Compact Flash™ Slot 2 - Secure Digital™ or MultiMedia Card™, Memory Stick™, MemoryStick Pro™, Memory Stick Duo™, or Memory Stick Pro Duo™, or xD Memory Card™ Note: The card will only fit in one direction; do not force it.
Slideshow button on the remote control. Using the PanTouch Buttons and Remote Control You can use all of the Digital Photo Frame’s features with either the PanTouch buttons on top of the frame or using the remote control. Use the PanTouch Buttons The PanTouch buttons are located on top of the Digital Photo Frame. To initiate, touch the upper right corner - PanTouch point (on the matt) to activate and wait for PanTouch buttons to display. Their basic functions are the same no matter when you press them.
Install and Replace the Remote Control Battery 1. Hold the Remote Control with the control buttons facing downward. 2. While pressing down on the ridged area of the battery cover, pull the tray out. 3. Place a “CR2025” Lithium battery on the tray with the positive “+” end facing toward you. 4. Close the tray.
Photo Music Video File Clock Open the Thumbnails Screen to display still photos and jpeg slideshows. Play MP3 music files. Play Video files. View all of the files on the memory source. Show the current date and time, use alarm and schedule On/Off functions. 1. Press the Left and Right arrows on the Remote Control or the Digital Photo Frame to select Photo, Music, Video, File, and Clock; press ENTER to make the selection. 2. If you select Photo, screen will prompt you the select file sources.
4. To go back to the Mode Selection Screen, press Exit or Back or Home button. The Thumbnails Screen This screen gives you thumbnail view of all photos on the selected memory source. Use this screen to select a single photo to display, multiple or all photos to do slideshow, and copy photos from external memory to build-in memory. Display a Single Photo on the Full Screen You can choose a single photo to display on the full screen, without a Slideshow: 1. From the Home screen, choose Photo.
7. To stop the display and return to the Thumbnail screen, press the EXIT (Back) button. Rotate a Photo on the Full Screen You can rotate a displayed photo by pressing the ROTATE button both on the PanTouch button and on the Remote Control. The photo will be rotated by 90 degrees clockwise in each press of the ROTATE button. Enlarge a Photo on the Full Screen You can magnify a displayed photo on the full screen by pressing ZOOM butt on Remote Control.
With the Thumbnails Screen displayed, press the SLIDESHOW button on the Remote Control or the SETUP, START SLIDESHOW and Slideshow All for the slideshow of all photos in the selected memory. Use the PanTouch to operate: With the Thumbnail Screen displayed, press the PanTouch point to activate the sensor, then press VIEW to play a slideshow of all photos. To stop the Slideshow and return to the Thumbnails screen, press the BACK button twice.
Play Music with the Slideshow To play background music with a slideshow, copy MP3 files onto the same memory card as your photos. The music will play as the slideshow runs. See Copying Files from a Computer section for details on copying files. You can also choose a music file to play without a slideshow. Just select it from the Music screen. Note: Music files must be standard MP3 format and not from licensed music download services.
5. Use the Arrow buttons to choose the desired file and press Enter, The Digital Photo Frame plays the video. 6. Adjust the volume by using VOL+/VOL– buttons on the Remote Control. 7. To play another video file, go back to the PanTouch Home Menu and press LEFT or RIGHT button to Video and press ENTER. Press VIEW from the file listing, or toggle Up or Down button to highlight another video file and press VIEW. Use the PanTouch to operate: 1. Insert a memory card with video files on it.
2. Select “Optimized” to go back to automatically compress your pictures before copying to built-in memory. 3. Press BACK to close the menu. Copying Photos from a Memory Card to Built-in Memory The Digital Photo Frame can store photos in its built-in memory. You can copy photos one at a time, or in batches. Copy a Single Photo Use the Remote Control to copy a photo from a memory card to the built-in memory. 1.
5. Press Back from PanTouch menu to go back to Home screen. 6. Highlight Photo and press ENTER. The Thumbnails screen opens. 7. Use the Arrow Buttons to highlight the photo you want to copy. 8. Press the SELECT button on the highlighted photo. 9. Press the COPY SEL to copy selected file. 10. Once the copying is complete, a “Finished!” message display in the middle of the screen. Copy Several Photos Use the Remote Control to copy photos from an external (e.g. memory card) media source to built-in memory. 1.
3. Press the SELECT button to select the card. 4. Press BACK to go back to Home screen. 5. Highlight Photo and press ENTER. The Thumbnails screen opens. 6. Press the COPY ALL button. 7. Once the copying is complete, a “transferring and Finished!” dialog will display on the middle of the screen. Deleting Photos from the Built-in Memory You can delete photos from built-in memory, but not from memory cards using the remote control. Delete the Displayed Photo Use the Remote Control to operate: 1.
Caution: You will not be asked to confirm or have a chance to change your mind. It is a good idea to keep copies of the photos you copy onto your Digital Photo Frame. Use the PanTouch menu to delete: 1. Go to the Photo Thumbnails screen. 2. Use the Arrow Buttons to highlight the photo you want to delete. 3. Press the SELECT button on the highlighted photo. 4. Press the DELETE SEL button to delete selected file. Once the deletion is complete, a “Finished!” message display in the middle of the screen.
2. Use the Arrow Buttons to highlight the photo you want to delete. 3. Press the SELECT button on the highlighted photo. 4. Press the DELETE SEL button to delete selected photos, or press the DELETE ALL button to delete all photos in built-in memory. Once the deletion is complete, a “Finished!” message display in the middle of the screen. Bluetooth Setting Options Bluetooth USB Dongle Required. USB Bluetooth Dongle Support connectivity to popular mobile phones; e.g.
pressing the Setup button. Only available setup options will be displayed for each screen. 1. With the Home screen opens, press Setup to open the Setup Menu. 2. With the Setup Menu open, use the Up and Down arrows to choose a display option. 3. Press ENTER to select the option. A second menu opens, listing the available settings. A blue highlight shows the current setting. 4. Use the Up and Down arrows to choose the desired setting. 5. Press ENTER to select the setting. The second menu closes. 6.
5. When the date and time are correct, press the ENTER button to set the time and return to the SETUP screen. Press EXIT to close the Setup menu. Set the Alarm Use your Digital Photo Frame as an alarm clock. You can set it to alarm with a built-in tone or playing a pre-stored MP3 music in the build-in memory. You can also set the alarm to alert only once or daily after setup. 1.
the same manner. 8. When you are happy with the settings, press the Exit button to save them and return to the Calendar/Clock screen. Press EXIT again to return to HOME screen Turn Scheduled Slideshows On or Off After you set create slideshow schedules, you need to turn slideshow scheduling on to use the schedules. With the Calendar/Clock displayed, press the SCHED SLIDE button on PanTouch Sensor area.
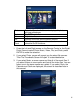
5. Each memory card inserted in the Photo Frame and the built-in memory is associated with one disk drive on your computer. 6. Double-click the desired drive to display the files on the card. The example below shows a card with several JPG images on it. 7. To copy files from the memory card, select them and drag them to the desired location on your computer. 8.
File, Copy, and then move your cursor back to the disk drive in the open window for the built-in memory. Note: Most cameras and graphic programs store photos in the Windows My Pictures folder. If you didn’t move them somewhere else, they are probably there. 9. Click in the window, and choose File Paste. 10. Similarly, to copy photos from your computer to the memory card, you copy and paste to the disk drive corresponding to the memory card.
Set Alarm Time Frequency Tone Media Source Internal Memory CF-Card SD/MMC xD-Card MS/MS-DUO USB Time: HH:MM AM/PM Frequency: SetupMenu (Off; Once; Daily) Tone: Default Tone/Music Compatible memory cards include Secure Digital™, MultiMedia Card™, xD Card, Compact Flash™, Memory Stick™, MemoryStick Pro™, Memory Stick Pro Duo™ and USB based device.
it on. Your first slide show will automatically start to play. Q: What memory cards can the Digital Photo Frame Read? A: Compatible memory cards include Secure Digital, MultiMedia Card, Compact Flash, Memory Stick, MemoryStick Pro, Memory Stick Duo, Memory Stick Pro Duo, and XD card. Q: I set up the Digital Photo Frame; why won’t it turn on? A: The Adapter is not securely connected to the Photo Frame or the Power Switch is not on.
Limited Warranty The limited warranty set forth below is given by Pandigital with respect to Pandigital brand electronics products purchased and used in the United States of America. Pandigital warrants this product against defects in material or workmanship as follows: LABOR: For a period of ninety (90) days from the date of purchase, if this product is found to be defective, Pandigital will repair or replace the product, at its option, at no charge.
subsidiaries, shall not be liable for any incidental or consequential damages for breach of any expressed or implied warranty on this product. Except to the extent prohibited by applicable law, any implied warranty of merchantability or fitness for a particular purpose on this product is limited in duration to the duration of this warranty.
which the receiver is connected. • Consult the dealer or an experienced radio/TV technician for help.