User Guide v3.
Register your pandigital novel 1 year Qualify to win a FREE digital photo frame!* (valid in USA only) Register your FREE 1-year warranty!** Register now at www.pandigital.net *For details, go to our website: www.pandigital.net **The online signup is for the purpose of user and product registration. Failure to register does not in any way diminish any of your standard warranty rights, as described in the documentation included with your product.
Tab le o f Co n t en ts Package Contents .................................................................................................... 9 Covers for your p a n d i g i t a l n o v e l ................................................................ 9 Device Overview ..................................................................................................... 10 Power Button Usage ..............................................................................................
READER .................................................................................................................. 28 Reader Function Menu ....................................................................................................... 29 Library ................................................................................................................................ 29 Table of Contents .....................................................................................................
Select Text ......................................................................................................................... 39 Share ................................................................................................................................. 39 Downloads ......................................................................................................................... 39 SETTINGS ...........................................................................................
Edit Email Information ........................................................................................................ 52 Email Inbox ........................................................................................................................ 52 Open Email Message ..................................................................................................... 53 Compose New Email Message .......................................................................................
Disclaimers ............................................................................................................. 73 License Agreement and Terms of Use ................................................................. 73 CE Notice ........................................................................................................................... 76 Battery Statement ...........................................................................................................
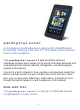
pandigital novel A contemporary multimedia device designed for straightforward functionality, featuring a full color TFT LCD display and convenient touch-screen navigation. Your pandigital novel is a light and stylish electronic multimedia eReader which allows you to quickly and easily download and read digital printed material (eBooks, eMagazines, and eNewspapers) anytime and anywhere.
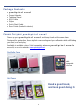
Package Contents pandigital novel Power Adapter Tabletop Stand USB Cable Stylus Quick Start Guide User Guide (loaded in device) Covers for your p an digital nov el Dress up your p a n d i g i t a l n o v e l and keep it safe at the same time. Designed for protection, these stylish covers safeguard your eReader while still letting you read, surf and play. Available in multiple colors. Sold separately wherever p a n d i g i t a l n o v e l s are sold, or on our website: www.pandigital.net.
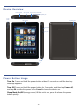
Device Overview Volume button SD card slot Wi-Fi & low power button Earphone jack Power button Light sensor Speaker holes Mini USB DC jack Stylus Power Button Usage Turn On: Press and hold the power button at least 3 seconds or until the boot up message appears. Turn Off: Press and hold the power button for 3 seconds, and then tap Power off, and tap OK confirm the power off or Cancel to leave the device on.
Touch-Screen Navigation The touch-screen allows for quick, easy and convenient navigation for all applications. Throughout the User Guide, you are instructed to use the following touch navigation methods: Tap = quick touch and release your finger on an item on the screen (i.e., selecting items) Touch & hold = touch your finger and hold in place until a response by application. (i.e.
Getting Started 1Charge your Device Plug the power adapter into an electrical wall outlet, and then connect to your device to fully charge the battery before use (approx. 4 hours). The battery does not charge via the USB cable. While charging, the battery icon displays as: . When fully charged, the battery icon displays as: . You can use the device while the battery is charging. 2Turn Device On Press the power button approximately 3 seconds until you see the boot up message.
Connecting to Public Wi-Fi Hotspot If you are connecting via a public Wi-Fi hotspot, it may be necessary to immediately launch the browser and provide the hotspot login information prior to having an active internet connection. Follow steps 1-3 above to select the hotspot Wi-Fi network. Select Web from the Application Quick Launch Bar. Enter the login information as required by the hotspot. 5Email Setup POP3, SMTP and IMAP accounts are supported.
Home Screen Wi-Fi connection status Battery charge level status Alarm(s) are activated Current Time Bookstore row shows latest books from Barnes & Noble (scrollable). Tap on media cover to display description, synopsis and Buy options. Tap Update to sync with Barnes & Noble’s website and populate the Bookstore row. Tap Bookstore to launch web browser and go to Barnes & Noble’s website.
Application Quick Launch Bar Home Displays the Home screen Reader Display your digital media for reading (EPUB, PDF) My Library Stores your digital media (eBooks, eMagazines and eNewspapers). Access the Internet and ‘surf the web’ whenever desired. Web Music Play and manage audio files (MP3, WAV, AAC) Videos Play and manage video files (MPEG4) Photos View and manage photo files (JPG, JPEG, BMP, PNG, non-animated GIF) Email Send/Receive email using your existing email addresses.
Overview of Buying & Downloading Books to Device Create an account on Barnes & Noble’s website: www.bn.com Register your Barnes & Noble account information (email & password) your pandigital novel through Settings>General. On HOME screen, tap Update to populate the Bookstore row. On HOME screen, tap Bookstore or Shop B&N. Browser displays Barnes & Noble online eBookstore. Tap on book cover in Bookstore row on HOME screen.
Barnes & Noble BOOKSTORE The top row of the Home screen displays the latest Barnes & Noble books available for purchase directly from the Barnes & Noble online bookstore. The first time you turn your pa n d i g i t a l n o v e l on, the Bookstore row is empty. Be sure you are cnnected with a Wi-Fi network, and then tap Update to sync with the Barnes & Noble website and populate the Bookstore row. Display newly released books Tap Bookstore to launch the browser and display the Barnes & Noble website.
If you want full details about a book, including Editorial and Customer Reviews, use the Shop B&N feature to shop on the Barnes & Noble website (pg. 20). After purchasing, use the Get Books feature to download them from your Barnes & Noble online account into your p a n d i g i t a l n o v e l (pg. 22). Purchase a Book 1. To be sure you are viewing the most current media on the Barnes & Noble website, in the Home screen tap Update above the Bookstore row. 2.
Tap Skip if you want to continue shopping. After you have purchased all desired publications, tap Update Library in My Library to update with new publication covers. 7. Tap on a cover with white Date to download the issue. 8. After downloading, tap on the cover to open it in the Reader. Get Free Sample Some, but not all, books offer a free sample that you can download and read before purchasing the book. 1.
My Library Row 2 IMPORTANT: In order to connect with your Barnes & Noble online account, the Date and Time must be set correctly according to your location. On the Home screen, the second row of My Library displays the covers of your downloaded or downloadable media in your Barnes & Noble online download library. As you purchase media or add book samples to your online account, they are not reflected in your p a n d i g i t a l n o v e l until you perform an update. 1.
MY LIBRARY Select My Library from the Application Quick Launch Bar. If you have not yet set up your Barnes & Noble account on the device, do so now through Settings>General (pg. 40). Function Menu Row 1: Quick launch area for your last read media (non scrollable). Rows 2-4: Downloaded and downloadable media in your Barnes & Noble online account (scrollable). Open & hide the Application Quick Launch Bar. Tap on any media icon to open and display it in the Reader.
Media Status Labels The media shown in My Library has status labels as follows: = Purchased books not yet downloaded into your p a n d i g i t a l n o v e l . After download, the book has no label. Date White Date = eMagazines or eNewspapers not yet downloaded into your p a n d i g i t a l n o v e l . After downloading, the label changes to Date . The date indicates the publication’s issue date. White Sample = sample books not yet downloaded from your Barnes & Noble online account.
download library into your p an d i g i t a l n o v e l . Music, Video and Photo files can be copied from a Macintosh computer into your p a n d i g i t a l n o v e l as long as they are in a supported file format. 1. Tap My Library. 2. To be sure you are viewing the most current media in your Barnes & Noble account, tap Update. 3. After My Library has been updated, tap Get Books. 4. To download all media, tap Download All.
Lend/Return Books There are some books that Barnes & Noble classifies as “lendable”, which means that those books can be loaned to others who also have a Barnes & Noble account. Please be aware of the following considerations before loaning or borrowing any books: In order to unlock and open a loaned book, the recipient must use their name and credit card number that is registered with their Barnes & Noble account. The book can only be loaned for 14 days. Only one copy of a book can be read at a time.
8. Tap Lend Book. The book’s status changes to ‘LENT’ and remains in a locked state until it is returned to your account. If the recipient declines the loan offer, the book will be available in My Update to sync with your Barnes & Noble account again. Library after you perform an Check for Offers Use this function to check for book loan offers that you have not yet accepted or declined. Offers expire after 7 days. 1. In the My Library screen, tap Update to sync with your Barnes & Noble account. 2.
3. Tap OK to confirm the purchase. 5. After the purchase is confirmed, the device automatically syncs with your Barnes & Noble online account to update My Library. 6. The book is changed from “Returned” to “purchased” status. Tap on the book cover or use the Get Books feature to download your purchased book (pg. 22). Bookshelves Use Bookshelves to create and manage personalized bookshelves into which you want to save your downloaded media (i.e., Short Stories, Drama, etc.).
4. Media is sorted by date; if desired, tap Title or Author to re-sort your media accordingly. Quick Open another Bookshelf Tap the bookshelf name in the upper right of any bookshelf screen to display the list of all bookshelves, tap the desired bookshelf to open. Delete Shelf 1. In the My Library screen, tap Bookshelves. next to the bookshelf you want to delete. 2. Tap 3. Tap Delete. 4. Deleting a bookshelf does not delete the books from the device. They are still in My Library.
READER The Reader application is for displaying your digital media (eBooks, eMagazines, and eNewspapers). eBook supported formats: EPUB, PDF Methods that can be used to launch the Reader: Tap on a media cover in the Home or any Bookshelf screen. Select Reader from the Application Quick Launch Bar; the last read media file opens. Note: You must exit the Reader before shutting off the device in order for the last read page to be saved.
If unit goes into sleep mode (power saving feature), lightly press & release the power button quickly to turn sleep mode off. Reader Function Menu In the Reader application, the Reader Function Menu can be displayed by tapping on the top of the screen. Library To access My Library bookshelf while viewing a media page, display the Reader Function Menu, tap Library. Table of Contents Display the Table of Contents of the currently open media file, allowing you to quickly display a desired chapter/page.
4. To delete bookmarks, tap on while displaying a bookmarked page, or while in the Bookmarks screen, tap next to the desired bookmark, tap Delete Selected. Notes As you read your media, you can quickly and easily make notes on pages for later reference. Add Note 1. On a page, touch & hold on any word to open the Reader options window. 2. Tap Add Notes. The Notes dialog window opens. 3. Tap into the note entry area, enter the desired text, tap Add. 4. The word related to the note is highlighted in blue.
2. Tap Highlights. 3. Tap on the highlight you want to view. 4. To jump to the page associated with a highlight, tap highlight, tap View. next to the Hide all Highlights 1. To turn all highlights off in the currently open media file, display the top function menu, tap Bookmarks. 2. Tap Highlights. 3. Tap Highlights Off. 4. To show highlights again, tap Highlights On. Delete Highlights 1. Display the top function menu, tap Bookmarks. 2. Tap Highlights. 3.
2. Tap Word. 3. Enter the desired text, tap GO. All instances of the found text are highlighted throughout the document. 4. You can scroll through the pages for all highlighted text, tap Cancel Find to return to the original page you were viewing. OR You can touch any of the highlighted text to automatically cancel the find mode, and then that page becomes the current page. Last Read After performing searches, you can quickly return to the last page you were reading.
Screen Orientation - Lock For optimal viewing while reading, the orientation of the screen automatically rotates from vertical to horizontal depending on how you hold the device. When desired, you can lock the screen in the desired orientation to prevent the auto-rotation (in Reader only). To lock, while viewing a media page in the desired orientation, display the Lock. Reader Function Menu, tap To unlock, display the Reader Function Menu, tap Unlock.
Go to a Website 1. Select Web from the Application Quick Launch Bar to launch the internet browser. Touch & finger slide on screen to display zoom options Display magnifier box; touch & drag corner of box to magnify a portion of screen Tap to return to 1X view after zooming in Tap to zoom out/in 2. To go to a new website, tap Go To, tap in the web address entry field at the top of the screen. 3. Enter the desired website address, tap Go.
Refresh Go to Bookmarks New Window Settings Exit More Refreshes the screen by re-loading the current web page. Enter a different website URL address. Bookmark currently displayed web page, access list of all bookmarks, or delete bookmarks. Shows open browser windows. You can have up to 8 browser windows open at a time. Set multiple browser settings as desired. Close the web browser and return to previous screens Display Menu page 2.
Go To Website Use Go To to enter and go to a different website URL address. 1. In an open browser window, tap Go To. 2. Tap into the URL address field to enter the desired website address. 3. Tap Go. Browser Bookmarks You can bookmark web pages that you visit and want quick access to later. Bookmark a Web Page 1. In an open browser window, tap Bookmarks, tap Add Boomark. 2. If you want to rename the bookmark, tap in the Name field and enter the desired name. 3. Tap OK. Go to Bookmarked Web Page 1.
Open New Window 1. In an open browser window, tap New Window. 2. The new window opens to your designated Home website. 3. Tap Go to and then enter the new website address, tap Go. Switch Windows 1. In an open browser window, tap New Window. 2. If more than 4 windows are open, finger slide vertically to view all windows. 3. Tap on the window that you want to view. Close Windows 1. In an open browser window, tap New Window. 2. Tap on each window you want to close.
Privacy Set the following options pertaining to your privacy level when viewing web pages: Clear cache (delete all cached information from visited web pages) Clear history (clear the browser navigation history) Accept cookies (allow websites to save and read “cookie” data from the device whenever you visit their site) Clear all cookie data (clears all browser cookies that have been saved) Remember form data (remembers data you entered into forms for later use) Clear form data Security Set the f
Select Text You can select the text of a webpage address on the web page you’re viewing, and then you can paste the text into web or other application entry fields. 1. On the browser window, tap to display Menu page 2, tap Select Text. 2. Touch, hold & slide your finger across the text you want to copy. The text is copied to the clipboard. 3. Touch and hold in the desired entry field, tap Paste. 4. Tap Go on keypad.
SETTINGS Settings>General 1. Select Settings from the Application Quick Launch Bar. 2. Tap in the B&N Account and Password fields to enter your Barnes & Noble account login information. 3. Tap in the Time Zone field to select the time zone for your location, and then tap Set Date/Time. It is important to have the correct time zone set in order to connect with your Barnes & Noble account. 4. Select your desired time format: 12 = 12:00am-12:00pm (default) 24 = 12:00-24:00 5.
Settings>Network In order to connect to the Internet, you must have a Wi-Fi network set up on your p a n d i g i t a l n o v e l . If you did not set up a network during the initial setup, do so now. 1. Select Settings from the Application Quick Launch Bar, tap Network. 2. The device scans and lists local Wi-Fi Networks found. A networks that require login name/key to connect. 3. Tap the desired network to which you want to connect. indicates secure 4.
1. Select Settings from the Application Quick Launch Bar, tap Network. 2. Tap the network that you want to delete, tap Forget. Settings>Alarm This clock icon displayed at the top of screens indicates that one or more alarms have been set and are active. Add Alarm 1. Select Settings from the Application Quick Launch Bar. 2. Tap in top option bar, tap Alarm. 3. Tap Add Alarm. 4. Tap in the Label entry field to enter the desired descriptive title (i.e., Lunch with friends). 5.
Edit Alarm 1. In the Alarm screen, tap Edit. 2. Tap the alarm you want to edit, make desired edits. 3. Tap Save. to return to the Alarm screen. 4. Tap Delete Alarm 1. In the Alarm screen, tap Delete. 2. Tap the alarm you want to delete, tap Delete. Settings>Factory Reset WARNING! All Barnes & Noble account information will be deleted. Adobe DRM Activation records will be deleted. All personalized data (email accounts, contacts, etc.) will be deleted.
Wi-Fi Network Setup The device automatically scans and lists local Wi-Fi Networks found. A indicates secure networks that require login name/key to connect 1. Tap the desired network to which you want to connect. 2. If secure network, enter the network Password. 3. Tap Connect. 4. When connected, tap continue. Next to The on the top of screens indicates the Wi-Fi is connected, otherwise no icon is displayed. If your Wi-Fi network broadcast is set as hidden, it won’t be found by the auto scan.
Email Setup POP3, SMTP and IMAP accounts are supported. 1. Enter your Email Address and Password, tap Next. This is your default account until you add other email addresses later, and then you can select a different address as the default account (pg.51). 2. If desired, enter an account name, tap Done. 3. (optional) To select the account type, tap Manual Setup and then select the account type. Settings>Support Select Settings from the Application Quick Launch Bar.
3. The Music List screen is displayed. 4. When Shuffle is off, selected audio files play in the order of selection, or if all are selected, audio files play in order listed in the Music List. To play audio files in random order, tap Shuffle to turn on ( = on). 5. When Repeat is off, selected audio files play once and then stop. To play audio files continuously, tap Repeat to turn on ( = on). 6. If you want the songs sorted by song title rather than artist, tap Title. 7.
2. Tap the Playlist that you want to play. 3. The Music Play screen is displayed and the first song begins to play. Delete songs from Playlist 1. In the Music screen, tap Playlist. 2. Tap the Playlist which contains songs you want to delete. 3. The Music Play screen is displayed. 4. Tap to return to the Playlist screen. 5. Tap next to the desired song titles you want to delete. 6. Tap Delete Selected, tap OK to confirm deletion.
Video Navigation Bar While your video is playing, tap anywhere on the video to display the navigation bar at the bottom of the screen. Use the controls to pause repeat play , play , play previous or next video , and . Use the volume button on the top of the device to adjust the volume. To return to the Video Gallery screen, tap . Delete from Video Library In the Video Gallery screen: 1. To delete all videos, tap Select All, and then Delete Selected. 2.
Scroll through multiple pages of photos in the Photo Gallery by finger sliding vertically from top or bottom of screen. 1. Select Photos from the Application Quick Launch Bar. 2. Select the desired media source from which you want to view your photos. 3. The Photo Gallery screen is displayed. 4. To view a single photo, tap on the desired photo, tap View. To view multiple photos, tap Multi-Select, tap on each photo you want to view, tap View.
Play Slideshow You can set photo slideshow display functions through Settings> Photos (pg.40). To play a slideshow of all photos, in the Photo Gallery screen, tap Select All, tap Slideshow. To play a slideshow of selected photos, tap Multi-Select, tap on each photo you want to include, tap Slideshow. When the slideshow is playing, tap anywhere on the screen to display the Photo for the Application Quick Launch Menu Bar.
To import multiple photos, tap Multi Select, tap desired photos to import, tap Import Selected, tap OK to confirm import. Delete Photos You can only delete photos from the internal memory, not from SD cards. 1. Select Photos from the Application Quick Launch Bar. 2. Tap Internal Memory in the Select Media Source window. 3. To delete individual photo, tap on the photo that you want to import, tap Delete Selected, tap OK to confirm import.
Set up Yahoo! Plus Account Your p a n d i g i t a l n o v e l does not support free Yahoo email accounts. Yahoo! Plus accounts must use the following data when setting up your email account. Incoming Mail Server Settings POP server: plus.pop.mail.yahoo.com Use SSL Port: 995 Outgoing Mail Server Settings SMTP server: plus.smtp.mail.yahoo.com Use SSL Port: 465 Use Authentication Account Name/Login Name: Your Yahoo! Mail ID (your email address without the “@yahoo.
2. If you set up only one email account, it opens immediately. If you set up multiple accounts, they are listed in the Accounts screen. 3. Tap on the desired email account, tap Inbox. Open Email Message 1. In the Inbox screen, tap on an email to open it. 2. Tap Reply to select a Reply option: Reply Reply all Attachment files must be of a supported format in order to be saved in your p a n d i g i t a l n o v e l . 3.
Set Default Email Account You must always have one account designated as the default account, so if you have multiple email accounts, you can select any one as the default. 1. Select Email from the Application Quick Launch Bar. 2. On the Email Accounts screen, tap the account you want as the default, tap Account Settings. next to Default Account. 3. Tap If you delete the account that was designated as the default account, the next email listed is automatically designated as the default.
Add Event 1. On the Calendar screen, tap on the date to which you want to add an event. 2. Tap Add Event. 3. Tap in each entry field to enter the desired event information, tap Save. 4. Repeat steps 2-3 for additional events on the same date. 5. Tap to return to the Calendar screen. Edit Event 1. On the Calendar screen, tap on the date with the event you want to edit. 2. Tap on the event you want to change. 3. Make desired changes, tap Save. 4. Tap to return to the Calendar screen.
CONTACTS You can create an address book of your personal contacts, including personal notes as desired. Select Contacts from the Application Quick Launch Bar. Add New Contacts 1. In the Contacts screen, tap Add Contact. 2. Tap in each entry field to enter your contact information. 3. Tap Save. Edit Contacts 1. In the Contacts screen, tap on the desired contact name that you want to edit. 2. Make desired changes, tap Save.
FACEBOOK Select Facebook from the Application Quick Launch Bar. The browser launches and displays your Facebook login window; enter your login information to log into your Facebook account. WEATHER Select Weather from the Application Quick Launch Bar. The browser launches and displays a popular Weather webpage. SEARCH You can search for text within media file names or text within eBook titles in the Bookstore row on the HOME screen. 1. Select Search from the Application Quick Launch Bar. 2.
Macintosh users must format SD cards using the FAT32 option in order for your p a n d i g i t a l n o v e l to read the card. 1. Insert your SD card. 2. Select Import SD from the Application Quick Launch Bar. 3. In the Import Media window, tap to import. next to the desired media type(s) you want 4. Tap Import. If you want to select specific photos to import, you can use the Import Photos function (pg. 50).
PC System Requirements Operating system: WINDOWS 2000/XP/VISTA/7 MAC OSX USB Port Supported: USB 2.0 port Connect to Windows PC 1. Connect the small end of the USB cable to the p a n d i g i t a l n o v e l mini USB port, and the larger end to an available USB port on your computer. 2. Windows Explorer opens with the list all drives connected to your computer; the p a n d i g i t a l n o v e l drive is listed as PD_Novel. 3.
3. When the message “Safe to Remove Hardware” appears, you can disconnect the USB cable from your p a n d i g i t a l n o v e l and computer. Windows VISTA 1. On the Windows System Tray, click the hardware removal icon. 2. Click the Safely remove USB mass Storage device message corresponding with the p a n di g i t a l n o v e l device drive. 3.
3. To copy files into your p a n d i g i t a l n o v e l , select and drag the desired files into the appropriate pre-assigned folder based on file type. eBooks (EPUB, PDF) Separate cover images files: - must be named the same as the eBook files, (for example, myebook.epub, myebook.jpg) - must be copied into the eBooks>.
Authorize your p a n d i g i t a l n o v e l for ADE After you authorize your p a n d i g i t a l n o v e l , it appears as a device in ADE (titled PD_NOVEL). You can then copy eBooks from your ADE collection to your p a n d i g i t a l n o v e l and vice versa. 1. Start ADE on your computer. 2. Connect your p a n d i g i t a l n o v e l to your computer using the USB cable. 3. ADE detects your p a n d i g i t a l n o v e l and displays the Device Setup Assistant. 4.
4. Tap next to the eBooks you want to delete, tap Delete Selected. 5. Tap Yes to confirm the deletion. B. Connect the device to your computer, and then use standard file deletion methods using Windows Explorer or MAC Finder windows. USER GUIDE To view the full p a n d i g i t a l n o v e l User Guide, select User Guide from the Application Quick Launch Bar. The User Guide opens in the Reader.
If the device has a low battery charge, you may not be able to perform a successful update. It is recommended that you connect the device to the power adapter before performing the firmware upgrade. This option is for Windows PC only at this time. 1. Back up all your media files to your computer 2. On your computer, go to www.pandigital.net/downloads. 3. Choose the Update with Your PC option. 4. When asked to Save or Run, select Run. 5.
Q: My unit seems to be frozen and is un-responsive. What do I do? A: Reset the device by pressing and holding the power button for 10 seconds. Q: I have attempted to perform a firmware update but it consistently fails. A: If the device has a low battery charge, you may not be able to perform a successful update. Connect the device to the power adapter and then try again.
Q: How do I display the Reader Function Menu while reading? A: Simply tap on the top of the screen. Q: How do I display the Application Quick Launch Bar while reading? at the bottom of A: Simply tap on the top of the screen and then tap the screen. Q: How do I bookmark a page? A: Tap the in the upper right corner of the page (pg. 29). Q: Can I highlight text on a page? A: Yes. On a page, touch, hold & slide your finger across the text that you want to highlight.
Q: How do I add audio files to my p a n d i g i t a l n o v e l ? A: You can download audio files from your favorite online music/video store, import audio files from your SD card (pg. 57), or copy audio files from your computer (pg. 58). Q: Can I create a separate list of my favorite songs? A: Yes. Use the Playlist feature (pg. 46). VIDEO Q: What type of video files can I play on my p a n d i g i t a l n o v e l ? A: MPEG4 Q: Can I stream videos on my p a n d i g i t a l n o v e l ? A: No.
eBooks, Magazines, Newspapers Q: What types of printed emedia files are compatible with my pandigital novel? A: PDF and EPUB Q: How does the Lend/Return Books feature work? A: You can lend “lendable” books to your friends and family that have been purchased from Barnes & Noble. Barnes & Noble determines which books are “lendable”. Use Lend/Return Books function (pg. 24). Q: Can I receive books from my friends & family? A: Yes.
Battery Management The p a n d i g i t a l n o v e l battery is not fully charged out of the box, so it is recommended that you charge the battery for at least 4 hours before you start to use the device. The rechargeable battery is designed and manufactured to be used and recharged frequently. As with all batteries, the capacity of the battery reduces each time it is charged/depleted.
Technical Specifications Product Specs 7” Digital TFT LCD Display 600x800 pixels Compatible Media Sources Secure Digital™ (SD), MMC Features Display digital printed media (eBooks, eMagazines, eNewspapers) Play digital Audio files Play digital Video files Display digital Photo files Alarm Clock and Calendar Connect to Wi-Fi networks Web – check your social networks, stocks or the weather Send/Receive Email Display and import directly from SD Card Automatic rotation of screen orientation Includes stylus
Li m i ted War r an t y The limited warranty set forth below is given by Pandigital with respect to the Pandigital Novel™ line of products (the “Device”) purchased and used in the United States of America. Pandigital warrants this product as follows: LABOR: For a period of one (1) year from the date of purchase, if this Device is found to be defective, Pandigital will repair or replace the Device, at its sole option, at no charge.
WARRANTY OR UNDER ANY OTHER LEGAL THEORY. IN SOME JURISDICTIONS THE FOREGOING LIMITATION DOES NOT APPLY TO DEATH OR PERSONAL INJURY CLAIMS, OR ANY STATUTORY LIABILITY FOR INTENTIONAL AND GROSS NEGLIGENT ACTS AND/OR OMISSIONS, SO THE ABOVE EXCLUSION OR LIMITATION MAY NOT APPLY TO YOU. SOME JURISDICTIONS DO NOT ALLOW THE EXCLUSION OR LIMITATION OF DIRECT, INCIDENTAL OR CONSEQUENTIAL DAMAGES, SO THE ABOVE EXCLUSION OR LIMITATION MAY NOT APPLY TO YOU.
be collocated or operating in conjunction with any other antenna or transmitter within a host device, except in accordance with FCC multi-transmitter product procedures. D isc l a im er s Linksys is a registered trademark or trademark of Cisco Systems, Inc. and/or its affiliates in the U.S. and certain other countries. Copyright © 2005 Cisco Systems, Inc. All rights reserved. Barnes & Noble and the “BN” logo are registered trademarks of Barnesandnoble.com LLC. All rights reserved.
not, and you will not encourage, assist or authorize any other person to, bypass, modify, defeat or circumvent security features that protect the Digital Content.
WARRANTIES OF MERCHANTABILITY, FITNESS FOR A PARTICULAR PURPOSE, ACCURACY, QUIET ENJOYMENT AND NON-INFRINGEMENT OF THIRD-PARTY RIGHTS. NO ORAL OR WRITTEN INFORMATION OR ADVICE GIVEN BY PANDIGITAL OR AN AUTHORIZED REPRESENTATIVE OF PANDIGITAL SHALL CREATE A WARRANTY. THE LAWS OF CERTAIN JURISDICTIONS DO NOT ALLOW THE DISCLAIMER OF IMPLIED WARRANTIES. IF THESE LAWS APPLY TO YOU, SOME OR ALL OF THE ABOVE DISCLAIMERS, EXCLUSIONS OR LIMITATIONS MAY NOT APPLY TO YOU, AND YOU MAY HAVE ADDITIONAL RIGHTS.
CE Notice Pandigital hereby declares that the essential requirements set out in the R&TTE Directive 99/5/EC have been fully fulfilled on our product with indication below: Product Name: Pandigital Novel Mule-Rader Model Name: PRD07T20WBL1 Brand Name: Pandigital The following standards have been applied for the investigation of compliance: EN 300 328 V1.7.1:2006 EN 301489-1 V1.8.1 2008-04 EN 301489-17 V2.1.