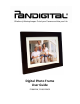
Effortlessly Moving Images Out of your Camera and Into your Life Digital Photo Frame User Guide PI1002DW, PI1051DWCB
Sign up now to enjoy the following benefits… 1 Year Qualify to win a FREE digital photo frame!* Register your FREE 1-year warranty!** (valid in USA only) Sign up now at… http://www.pandigital.net *For details, go to our website: www.pandigital.net **The online signup is for the purpose of user and product registration. Failure to register does not in any way diminish any of your standard warranty rights, as described in the documentation included with your product.
Table of Contents Introduction ..................................................................................................5 Overview of the DPF ....................................................................................6 Remote Control ............................................................................................6 Control Buttons on DPF ..............................................................................8 Getting Started ...............................................
VIDEOS .......................................................................................................23 Select Media Source for Videos ............................................................................23 Watch a Video .......................................................................................................23 Video Repeat Mode ...............................................................................................23 Import Video Files into Internal Memory .............
Introduction Welcome to the Pandigital Multimedia Digital Photo Frame (DPF). Now you can display your digital photos directly from your memory card, no computer is necessary.
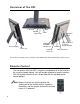
Overview of the DPF Left arrow ENTER Right arrow Power ON/OFF DC power jack MENU EXIT SD/MS/MSPro/MMC/ xD card slot Adjustable Stand USB host Compact Flash slot Magnetized Area for storing Remote Control Mini USB device (The memory card slots, ports, and jacks in your DPF may be different than those pictured here.) Remote Control You can access all of the DPF’s features, and perform all of the functions by using the remote control.
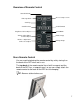
Overview of Remote Control Start Slideshow Exit or go back Access Setup screens Scroll Up Scroll Previous Play/Pause/Select object Scroll Forward Scroll Down Volume adjust higher or Select object Rotate image Volume - adjust lower or De-select object Enlarge image Store Remote Control You can avoid misplacing the remote control by safely storing it on the back of the DPF when not in use.
Replace the Remote Control Battery 1. Hold the remote control with the buttons facing down. 2. Push and hold the small release tab while pulling the battery tray out. 3. Replace the “CR2025” Lithium battery on the tray with the positive (+) side facing up. 4. Push the tray back in until it clicks into place. Release tab Control Buttons on DPF You can perform many (but not all) of the DPF functions by using the control buttons located on the top-back panel of the DPF.
Getting Started 1. Plug the AC Power Adapter into the DPF’s DC power jack and an electrical wall outlet. 2. Slide the power button on the left side of the DPF up to the ON position. 3. If prompted, select the desired language for the user interface display (varies by model). 4. After the initial start up screen is displayed, a slideshow will automatically begin displaying the photos that are stored in the internal memory. 5.
PHOTOS Display your photo files (.JPG or .JPEG) individually or as slideshows. PHOTOS-Manage: set viewing preferences, assign photos to category folders, import and delete photo files (page 12) MUSIC Play your MP3 music files. MUSIC-Manage: set listening preferences, import and delete music files (page 21) VIDEO Play your AVI video files.
Select Media Source Select the media source for current viewing or listening (page 11) Wi-Fi Network Setup Set up wireless network to which you want to connect (page 33) Slideshow Setup Set multiple slideshow functions to optimize your viewing preferences (page 16) Adjust Screen Colors Adjust LCD screen settings as desired (page 14) Optimal Image Display Set photos to display as actual photo size, or optimized to best fit the screen (page 14) Photo Import Method Set photos to be imported compress
You will also use this function to view the contents of the Slideshow Folders after you assign photos to these folders (page 17). 1. On the HOME screen, press MENU to display the Setup Menu. 2. Select Select Media Source, and then select the desired media source (sources not present will not be available).
2. Use to scroll through individual photos, or use the Page Up/Page Down arrows to scroll full pages. 3. To view an individual photo full screen, press ENTER on the highlighted photo. 4. While the photo is displayed, you can use next/previous photos. to view the View Individual Photo during a Slideshow 1. With the desired photo displayed, press EXIT to pause the slideshow. 2.
Adjust Screen Colors You can adjust the four LCD color levels for optimal image viewing. 1. On the HOME screen, press MENU to display the Setup Menu. 2. Select Adjust Screen Colors. 3. Use to scroll through the LCD options, and use adjust the setting until the desired view is achieved. 4. Use to to select Done. Optimal Image Display You can choose the desired display mode for displaying your photos on the DPF as follows: 1. On the HOME screen, press MENU to display the Setup Menu. 2.
2. Select Slideshow Setup, and then use under Display Current Time. to select Yes or No 3. Select Done. TIP: If the time is incorrect, refer to Set Date and Time on page 27 to set the clock. Display Photo File Date/Time Stamp with Photos Most digital cameras typically include a Date/Time stamp when saving photo files. If your photo files contain this Date/Time information, you can have it displayed with your photos if desired. 1. On the HOME screen, press MENU to display the Setup Menu. 2.
3. Use to scroll through the photos, and then press ‘+’ to select the desired photos to import (‘-‘ will deselect). 4. Press MENU, and then select Import Selected Photos. 5. Press EXIT to return to Photo Thumbnails screen. Delete Photos from Internal Memory You can delete photo files from the DPF’s internal memory, but not from an external media source (i.e., memory card, USB flash drive). Be sure you have Internal Memory as your selected media source.
Slideshow of Photos in Internal Memory You can play a slideshow of the photos stored in the DPF’s internal memory by simply powering on the DPF (with no external media source or wireless Wi-Fi adapter inserted*) and then wait for the slideshow to automatically begin. Slideshow of Photos on your Media Source Insert an external media source and then power on the DPF; the slideshow will begin displaying your photos (with no wireless Wi-Fi adapter inserted*).
Assign Photos to Slideshow Folder 1. On the HOME screen, select the PHOTOS-Manage button. 2. On the Photo Thumbnails screen, use to scroll through your photos. 3. To assign an individual photo: With the desired photo displayed, press MENU. To assign multiple photos: Press ‘+’ to select desired photos (‘-‘ will deselect), and then press MENU. 4. Select Assign to Folder, and then select the desired folder to assign the photo. Play Slideshow from Slideshow Folder 1. On the HOME screen, press MENU. 2.
Slideshow Background Music To play background music during a slideshow, simply copy at least one music MP3 file onto the same media source as your photos. The music will automatically play as the slideshow is displayed. If you have multiple MP3 files on your media source, each music file will play in succession until all have been played, and then will repeat according to the Music Repeat Mode setting (page 21). Adjust the Volume While the music is playing, press ‘+’ or ‘-‘ to adjust the volume.
3. Use to select Slideshow Interval, and then use select your desired setting. to 5 (default), 10, 30, 60 seconds, 1 hour, or 24 hours 4. Select Done. Set Slideshow Transition You can set the transition ‘special effects’ as photos transition from one to another during a slideshow. 1. On the HOME screen, press MENU to display the Setup Menu. 2. Select Slideshow Setup. 3. Use to select Slideshow Transition, and use your desired setting.
MUSIC Note: Music files must be standard MP3 format and not from licensed music from download services. Select Media Source for Music When you have the MUSIC screen displayed, you can easily select a different media source by selecting the current media source button in the upper right corner and then select a different media source from the Select Media screen. Playing Music Only 1. On the HOME screen, select the MUSIC-Play button.
Import Music Files into Internal Memory You can import your music files from external media sources (i.e., memory card, USB flash drive) into the DPF’s internal memory. The number of music files you can import depends on file size and available memory. TIP: After starting an import, you can press EXIT to cancel the import operation. 1. On the HOME screen, select the MUSIC-Manage button. The music files will be listed. 2. To import all music files, press MENU and then select Import All.
VIDEOS The DPF supports motion JPEG AVI video files. If your movie file is not in AVI format, you may have to convert the file by using a software video converter which is easily found for purchase on the Internet. Select Media Source for Videos When you have the VIDEO screen displayed, you can easily select a different media source by selecting the current media source button in the upper right corner and then select a different media source from the Select Media screen. Watch a Video 1.
Import Video Files into Internal Memory You can import your video files from external media sources (i.e., memory card, USB flash drive) into the DPF’s internal memory. The number of videos you can import depends on file size and available memory. TIP: After starting an import, you can press EXIT to cancel the import operation. Import Videos 1. On the HOME screen, select the VIDEO-Manage button. All present video files will be listed. 2. To import all video files, press MENU and then select Import All.
TIP: If you select Yes by mistake, press EXIT to cancel the delete operation. Video files already deleted will not be automatically restored. CALENDAR/CLOCK Your DPF can be used as a personal desk calendar with a real-time clock and alarm, and also displays a continuous slideshow of photos on the selected media source. To display the CALENDAR/CLOCK screen, select Clock from the HOME screen. The slideshow will be displaying photos found on the currently selected media source.
Set Schedule You can schedule the DPF to automatically go into a “stand-by” mode and resume operation according to your weekly schedule. For example, if you have your DPF on your desk at work, you may want to display the calendar/clock or play a slideshow from 8:30am to 5:30pm every weekday, and then set the DPF to remain in stand-by mode throughout the weekend. The following Monday morning, the DPF would resume operation at 8:30am. 1. On the CALENDAR/CLOCK screen, press MENU. 2. Select Set Schedule. 3.
CAUTION: After you select the Run Schedule function, any user intervention will cancel the activation (i.e., pressing remote or control button, powering off) and the schedule will not take effect until you select this function again to re-activate. Run Schedule from Slideshow 1. Start a slideshow and press ENTER to select the Run Schedule button when it appears in the lower left corner of the screen (approx 10 sec). 2.
Set Alarm You can use your DPF as an alarm clock when desired. You can set the frequency of the alarm, and set the alert to sound the built-in tone or play your music file. 1. On the CALENDAR/CLOCK screen, press MENU. 2. Select Set Alarm, and then select the options and use change the field values. to Alarm = set the time you want the alarm to alert.
Note: The Recipes feature is accessible only when the Internal Memory is the selected media source (page 11.) You will use these instructions for the pre-loaded sample recipes as well as the complete cookbook collections. View Recipes in Cookbook 1. On the HOME screen, select RECIPES. 2. Select Sample Recipes (or select a Cookbook if you have added seasonal cookbooks). The Cookbook Thumbnails screen will be displayed. to scroll through the recipes. (When highlighted, 3.
Assign Recipes to ‘My Favorite Recipes’ You can assign recipes from a main Cookbook into six food group categories for quick and easy retrieval: Hors d’oeuvres, Soups, Salads, Entrées, Desserts and Others. (The food group category names are not changeable). 1. On the HOME screen, select RECIPES. 2. Select Sample Recipes (or select a Cookbook if you have added seasonal cookbooks). The Cookbook Thumbnails screen will be displayed. 3. Use to scroll through the recipes.
Copy or Reassign Recipes from one Category to Another After you have assigned recipes into food group categories, you can reassign (move) or copy (duplicate) them from one category into another when desired. 1. On the RECIPES screen, select My Favorite Recipes. 2. Select the desired food group category from which you will reassign recipes. 3. On the Food Group Thumbnails screen, use to scroll through the recipes, and then press ‘+’ to select recipes to reassign. 4.
2. Select the desired food group category from which you will unassign recipes. 3. On the Food Group Thumbnails screen, use to scroll through the recipes, and then press ‘+’ to select recipes you want to unassign. 4. Press MENU, and then select Unassign. A status message appears as the recipes are unassigned. Wi-Fi This feature allows a wireless connection with multiple online photo sharing and streaming RSS content feed websites (i.e., Windows Live FrameIt).
Navigate the keyboard keys as follows: Use the remote control buttons to highlight the keys, and then press ENTER, multiple times as needed, to select the desired characters SYM = Access the following symbols: \ / : ; ( ) $ & [ ] .
1. Insert the Pandigital wireless USB adapter into the USB Host port on the DPF. 2. On the HOME screen, press MENU. 3. Select Wi-Fi Network Setup. The Network Setup window will be displayed, similar to this example: 4. Select Scan for Available Network. The wireless networks within range will appear in the Network Setup window. 5. Select the desired Wi-Fi network to which you want to connect.
6. If necessary, change the Secure Access type by pressing ENTER on the option button multiple times to select the appropriate security type. 7. Select Password, and then use the virtual keyboard to enter your Wi-Fi Password. (The ID and password are case sensitive; use the ‘ABC/abc’ ‘NUM’ and ‘SYM’ keys as needed for correct characters.) 8. Select Done on the virtual keyboard. 9. Select Connect. Do not press any other keys until the connection completes (20-30 seconds).
Windows Live FrameIt You can wirelessly connect with Windows FrameIt, an online photo sharing and streaming live RSS data feeds website for viewing live News, Weather, Traffic, Sports, and more. Connect with FrameIt 1. On the HOME screen, select Wi-Fi. 2. Select FrameIt. 3. The DPF is pre-set to display the following live feeds when you initially access Windows Live FrameIt: World News US Major City (weather) Sports MSNBC Top Stories 4. Select the RSS feed folder you want to view.
3. Select Get Claim Token 1. A new Claim Token will be displayed, which you will need in the next step. 4. On your PC: Go to http://frameit.live.com/device/claim.aspx to enter the Claim Token, and then click Continue. 5. On the DPF: On the FrameIt screen, be sure the Status changed from Registration Required to Registered. 6. If applicable, repeat steps 3-5, selecting Get Claim Token 2 to connect with your second FrameIt account. 7. Select Connect to display the Photo Sharing screen.
3. The RSS feed folders that you assigned on frameit.live.com will be displayed; the titles will appear as you highlight the folders. Press ENTER to display the contents of a highlighted folder. Wait for the feed data to appear; the length of time it takes to appear depends on the amount of feed data contained within the selected folder. For instance, a folder that contains a large number of photos will take substantially longer to display than when you select News or Weather feeds.
Establish Accounts with Photo Sharing Websites The online photo sharing websites that the DPF can access vary depending on the DPF models, and could change without notice. Follow these steps to determine which sites are available with your DPF: 1. After completing the initial wireless network setup (page 33), on the HOME screen, select Wi-Fi. 2. On the Photo Sharing screen, use to highlight the desired photo sharing site to which you want to connect. 3.
8. To view a photo individually, use to scroll through the photos and press ENTER on the desired photo. Note: Functions like zoom and rotate are available and behave in the same manner as described under the PHOTOS section, beginning on page 12. Import Photos from Photo Sharing Website into DPF’s Internal Memory 1. On the HOME screen, select Wi-Fi. 2. On the Photo Sharing screen, select the desired photo sharing website, and then select the desired folder containing photos you want to import. 3.
Set up Universal Plug and Play (UPnP) Server A UPnP Server must be set up on your computer before you will be able to connect the DPF to your PC wirelessly. Windows Go to Microsoft’s website for instructions on setting up and configuring your Windows UPnP Server: http://www.microsoft.com/windows/windowsmedia/knowledgecen ter/howto/mp11/sharemedia.aspx Apple Macintosh Go to the Twonky Vision website for instructions on setting up and configuring your Macintosh UPnP Server: http://www.twonkyvision.
DPF to PC – USB Connection You can connect the DPF to a Windows PC or Macintosh computer via the USB cable (included) to copy files between the computer and the DPF’s internal memory. If you have memory cards inserted in the DPF, you can also copy between the PC, internal memory, and memory cards. Connect DPF to Windows PC 1. Connect the small end of the USB cable to DPF’s Mini USB port, and the larger end to an available USB port on your computer. 2.
5. Double-click the desired drive to display the files on the card. The following example shows a card listing several JPG images. 6. To copy files from a media source, select and drag them into the DPF’s internal memory drive (Pandigital). 7. Similarly, to copy files from your computer to the internal memory, first locate the files on your computer, select the files you want to copy, and then drag and drop them into the appropriate folder in the DPF’s internal memory drive.
Windows Vista 1. On the Windows System Tray, click the hardware removal icon . 2. Click the Safely remove USB mass Storage device message corresponding with the DPF device drive. 3. When the message “This device can now be safely removed from the computer” appears, you can disconnect the USB cable from your computer. Windows XP 1. On the Windows System Tray, click the hardware removal icon . 2. Click Remove Hardware Safely. 3.
USB Flash Drive to DPF Connection The DPF recognizes a USB Flash Drive the same way it recognizes external memory cards. When you insert the flash drive, the DPF automatically recognizes photo, music, and video files stored on it. To import files from your flash drive to the DPF’s internal memory, follow the file import instructions under each feature section (Photos on page 12, Music on page 22, Video on page 24).
Set Sleep Mode The DPF will stay on until you power it off, however, to save power you can set it to automatically go into a sleep mode when left idle for a specific amount of time. 1. On the HOME screen, press MENU to display the Setup Menu. 2. Select Set Sleep Mode, and then select the desired setting.
Frequently Asked Questions Q: How do I set up my DPF? A: It is very simple to get your Digital Photo Frame setup. Just plug the power adapter into the DPF and into a standard wall outlet, and then power it on. A slideshow will begin displaying the images preloaded in the internal memory. To view your own photos, insert a memory card or USB flash drive into the appropriate card slot or USB port on the side of the DPF. Select Start Slideshow from the memory card option screen.
Q: Can I insert multiple memory cards? A: Yes, you can insert multiple cards at the same time, depending on slot availability. Use the ‘Select Media’ function to select the desired media source for immediate viewing/listening. Q: Does the DPF have built-in (internal) memory? A: Yes. The memory size varies by model. Q: Does the DPF support all JPEG and Motion JPEG files? A: No. The DPF only supports JPEG and Motion JPEG files taken from a digital camera.
Important Safety Precautions Always follow these basic safety precautions when using your Multimedia Digital Photo Frame (DPF). This will reduce the risk of fire, electric shock, and injury. WARNING: Do not expose this product to rain or moisture. Do not remove the cover. There are no user-serviceable parts inside. Refer all servicing to qualified personnel. The DPF is for indoor use only. Unplug the DPF before performing care and maintenance.
Technical Specifications Product Resolution 10.4” LCD Screen Digital Photo Frame 800X600 pixels, 4:3 aspect ratio Compatible Media Sources Compact Flash, Secure Digital™, Multi Media Card™, xD Memory Card™, Memory Stick™, Memory Stick PRO™, Memory Stick PRO DUO, and USB Flash Drive Features File Format JPEG image, AVI video, MP3 audio USB Ports USB2.0 Host USB2.
Limited Warranty The limited warranty set forth below is given by Pandigital with respect to Pandigital brand electronics products purchased and used in the United States of America. Pandigital warrants this product against defects in material or workmanship as follows: LABOR: For a period of one (1) year from the date of purchase, if this product is found to be defective, Pandigital will repair or replace the product, at its option, at no charge.
limitations or exclusions may not apply. This warranty gives you specific legal rights, and you may have other rights, which vary from state to state.