Effortlessly Moving Images Out of your Camera and Into your Life Digital Photo Frame User Guide PI7002AW, PI9001DW, PI1003DW
Sign up now to enjoy the following benefits… 1 Year Qualify to win a FREE digital photo frame!* Register your FREE 1-year warranty!** (valid in USA only) Sign up now at… http://www.pandigital.net *For details, go to our website: www.pandigital.net **The online signup is for the purpose of user and product registration. Failure to register does not in any way diminish any of your standard warranty rights, as described in the documentation included with your product.
Table of Contents Introduction ..................................................................................................5 DPF Key Features ...................................................................................................5 Compatible Memory Cards ......................................................................................5 What’s in the Box.....................................................................................................5 Overview of the DPF ..........
CALENDAR/CLOCK ...................................................................................19 Select Media Source for Calendar Slideshow........................................................20 Set Schedule .........................................................................................................20 Disable Schedule...................................................................................................20 Run the Schedule ......................................................
Introduction Welcome to the Pandigital Multimedia Digital Photo Frame (DPF). Now you can display your digital photos directly from your memory card, no computer is necessary.
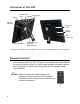
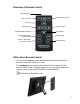
Overview of the DPF MENU ►Right arrow ◄ Left arrow ENTER EXIT Memory cards slot Brightness control Power ON/OFF DC power jack Mini USB Device Magnetized area for storing Remote Control (The memory card slots, ports, and jacks in your DPF may be different than those pictured here.) Remote Control You can access all of the DPF’s features, and perform all of the functions by using the remote control.
Overview of Remote Control Start Slideshow Exit or go back Access Setup screens Scroll Up Scroll Previous Play/Pause/Select object Scroll Forward Scroll Down Volume adjust higher or Select object Rotate image Volume - adjust lower or De-select object Enlarge image Safely Store Remote Control You can avoid misplacing the remote control by safely storing it on the back of the DPF when not in use.
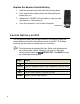
Replace the Remote Control Battery 1. Hold the remote control with the buttons facing down. 2. Push and hold the small release tab while pulling the battery tray out. 3. Replace the “CR2025” Lithium battery on the tray with the positive (+) side facing up. 4. Push the tray back in until it clicks into place. Release tab Control Buttons on DPF You can perform many (but not all) of the DPF functions by using the control buttons located on the top-back panel of the DPF.
Getting Started 1. Plug the AC Power Adapter into the DPF’s DC power jack and an electrical wall outlet. 2. Slide the power button on the left side of the DPF up to the ON position. 3. If prompted, select the desired language for the user interface display (varies by model). 4. After the initial start up screen is displayed, a slideshow will automatically begin displaying the photos that are stored in the internal memory. 5.
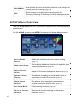
CALENDAR View calendar and clock with photo slideshow, and manage the calendar and clock settings (page 19) Edit Quick access to single photo manage mode for Zooming, Rotating, or Deleting currently displayed photo. SETUP Menu Overview Use the Setup Menu for DPF functions to optimize your viewing/listening preferences. On the HOME screen press MENU to display the Setup Menu screen.
Set Language Select desired DPF display language (page 25) System Upgrade Used for firmware upgrades About Selecting Options Throughout this User Guide, when you are instructed to ‘select’ a function option or button, unless otherwise instructed, use to highlight [the referenced option], and then press ENTER to select. Select Media Source If you have inserted one or more external media sources (i.e.
display the current time with your images, display the photo file date/time, adjust the screen colors, choose slideshow transitions, and even schedule slideshows according to your weekly schedule. Photo Thumbnails 1. On the HOME screen, select the PHOTOS-Manage button. to scroll through individual photos, or use the Page Up/Page Down arrows to scroll full pages. 2. Use 3. To view an individual photo in full screen, press ENTER on the highlighted photo. 4.
1. With the photo displayed that needs rotating, press ZOOM or ROTATE, multiple times if necessary, to achieve the desired view. 2. Press SLIDESHOW to resume the slideshow. Zoom or Rotate a photo from the Photo Thumbnails screen 1. On the HOME screen, select the PHOTOS-Manage button. 2. On the Photo Thumbnails screen, press ENTER to select the desired photo to be magnified or rotated, and then press ZOOM or ROTATE multiple times if necessary to achieve the desired view. 3.
Original = Displays photos in actual photo size. Optimal (default) = Optimizes the size and resolution to best fit the screen, which may result in part of a photo not being visible on the screen. 3. Press EXIT to return to previous screen. Photo Import Method When importing files into the internal memory from an external media source, the file can be optimized or left as the original file size and resolution. 1. On the HOME screen, press MENU to display the Setup Menu. 2.
‘Display photo file date/time stamp?’. 3. Select Done. 4. Press EXIT to return to previous screen. Import Photos into Internal Memory You can import your photo files from memory cards into the DPF’s internal memory. The number of photo files you can import depends on file size and available memory. Import All Photos into Internal Memory 1. Insert your media source into the DPF. The memory card option screen will be displayed. 2. Select Import All Photos. 3.
2. To delete all photos, press MENU, and then select Delete All. To delete individual photos, use to highlight the photos you want to delete, press ‘+’ to select (‘-‘ will deselect), press MENU, and then select Delete Selected. 3. A confirmation message appears; select Yes to delete the photos, or No to keep the photos in the internal memory. TIP: If, by mistake, you select Yes to delete photos, press EXIT to cancel the delete operation. Photos already deleted will not be automatically restored.
Only photos stored in the internal memory can be assigned to the slideshow folders. Assigned photos are not physically moved or copied into the folders, rather, a link is assigned to the photo so it appears to be located in the folder. If you delete the actual photo file from internal memory, the link to the folder will also be deleted. Assign Photos to Slideshow Folder 1. On the HOME screen, select the PHOTOS-Manage button. 2. On the Photo Thumbnails screen, use to scroll through your photos. 3.
To copy or reassign multiple photos, use to scroll through the photos, use ‘+’ to select those that you want to copy or reassign (‘-‘ will deselect), and then press MENU. 3. Select Copy to Folder or Reassign to Folder, and then select the desired folder into which you want to reassign or copy the photos. Set Slideshow Interval You can set the speed at which the slideshow photos transition from one to another. 1. On the HOME screen, press MENU to display the Setup Menu. 2. Select Slideshow Setup, 3.
Set Slideshow Shuffle You can set the slideshow to display your photos in a random ‘shuffle’ order, or display them in the order as stored on the selected media source. 1. On the HOME screen, press MENU to display the Setup Menu. 2. Select Slideshow Setup. 3. Use to select Slideshow Shuffle, and then use select your desired setting. to ON = Displays photos randomly OFF(default) = Displays photos in the order found on selected media source 4. Select Done. 5. Press EXIT to return to previous screen.
Select Media Source for Calendar Slideshow You can easily change the media source if you want the calendar/clock slideshow to display photos from a different media source (i.e., memory card, slideshow folder). 1. On the CALENDAR/CLOCK screen, press MENU, and then select the Media Source button in the upper right corner. 2. Select the desired media source from the Select Media screen.
3. Select Done. 4. Press EXIT to return to previous screen. Run the Schedule After the schedule times have been set (per above instructions), you will use the Run Schedule function whenever you want the schedule to take effect. There are two methods for running the schedule, either from a slideshow or from the CALENDAR/CLOCK screen. CAUTION: After you select the Run Schedule function, any user intervention will cancel the activation (i.e.
Set the Date and Time 1. On the CALENDAR/CLOCK screen, press MENU. 2. Select Set Date/Time, and then select the options and use to change the field values. 3. Select Done. 4. Press EXIT to return to previous screen. DPF to PC – USB Connection You can connect the DPF to a Windows PC or Macintosh computer via a USB cable to copy files between the computer and the DPF’s internal memory. If you have memory cards inserted in the DPF, you can also copy between the PC, internal memory, and memory cards.
) IMPORTANT: If your PC is connected to Local Area Network drives, or if you have multiple drive letters already assigned to peripheral devices, you will need to manage your drive settings in Windows to free up the four drive letters immediately following your CD-ROM drive so the DPF can assign them to memory card slots properly. 4. Double-click the desired drive to display the files on the card. The following example shows a card listing several JPG images. 5.
Disconnect DPF from Windows PC It is important to always perform a safe PC ‘release’ before disconnecting the DPF USB cable from the PC. WARNING: Do not unplug or switch off the DPF when files are being transferred, as that can seriously damage the memory. Windows Vista 1. On the Windows System Tray, click the hardware removal icon . 2. Click the Safely remove USB mass Storage device message corresponding with the DPF device drive. 3.
Disconnect DPF from Macintosh Computer 1. To safely disconnect the DPF from your Macintosh, select DPF’s icon on your desktop and press Command-e to eject the disk. 2. When the icon is no longer on the desktop, it is safe to unplug the USB cable. Set Sleep Mode The DPF will stay on until you power it off, however, to save power you can set it to automatically go into a sleep mode when left idle for a specific amount of time. 1. On the HOME screen, press MENU to display the Setup Menu. 2.
2. Select Reset to Factory Defaults, and then select Yes to reset, or No to leave current settings. 3. Press EXIT to return to the HOME screen. Frequently Asked Questions Q: How do I set up my DPF? A: It is very simple to get your Digital Photo Frame setup. Just plug the power adapter into the DPF and into a standard wall outlet, and then power it on. A slideshow will begin displaying the images preloaded in the internal memory.
Q: Why is the photo display slower with some photos than others? A: Higher resolution photos load more slowly. Try using lower resolution photos or down scaling your images. Refer to your camera’s operating user guide for details on down scaling your photos. Q: Can I insert multiple memory cards? A: No, there is only one memory card slot. Q: Does the DPF have built-in (internal) memory? A: Yes. The memory size varies by model. Q: Does the DPF support all JPEG and Motion JPEG files? A: No.
Cleaning the DPF Treat the screen gently, it is made of glass and can break. To clean fingerprints or dust from the LCD screen, we recommend using a soft, non-abrasive cloth such as a camera lens cloth to clean the LCD screen. If you use a commercial LCD Cleaning Kit, do not apply the cleaning liquid directly to the LCD screen. Clean the LCD screen with cleaning cloth moistened with the liquid.
Limited Warranty The limited warranty set forth below is given by Pandigital with respect to Pandigital brand electronics products purchased and used in the United States of America. Pandigital warrants this product against defects in material or workmanship as follows: LABOR: For a period of one (1) year from the date of purchase, if this product is found to be defective, Pandigital will repair or replace the product, at its option, at no charge.
limitations or exclusions may not apply. This warranty gives you specific legal rights, and you may have other rights, which vary from state to state.