
Information


ELECTRICAL SOLUTIONS
Order number of pieces required, in multiples of Standard Package Quantity.
Prime items appear in BOLD.
B1.92
B2.
Cable
Accessories
C1.
Wiring
Duct
C3.
Abrasion
Protection
C4.
Cable
Management
D1.
Terminals
D2.
Power
Connectors
E1.
Labeling
Systems
E2.
Labels
E3.
Pre-Printed
& Write-On
Markers
F.
Index
B3.
Stainless
Steel Ties
C2.
Surface
Raceway
E5.
Lockout/
Tagout
& Safety
Solutions
B1.
Cable Ties
A.
System
Overview
D3.
Grounding
Connectors
E4.
Permanent
Identification
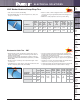
Cable Bundle Organizing Tool
• Reduces cable installation time up to 50% compared to traditional
methods
• Arranges 24 cables prior to applying Panduit network cable ties
• Optimizes bundle size and improves installed appearance
• Two inserts handle multiple network cable diameters
• Unique design allows twist-free bundling from the end or the
middle of bundle
• Smooth edges; safe for use on network cables preventing
cable abrasion
• Ergonomic fit and compact design
• Impact resistant material and low friction design to glide smoothly
across cable bundle
**When using the CBOT24K on 10 Gigabit cables, it is recommended that Panduit 10Gig
™
Category 6A cables be used for
optimum performance of installed cable. See www.panduit.com for cable details.
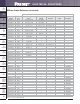
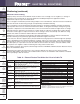
Part
Number Description
Recommended for
Cable Outer
Diameter Range
Use the
Following
Insert
Insert Used with the
Following
Panduit Cable Types
Std.
Pkg.
Qty.
Std.
Ctn.
Qty.
CBOT24K Kit contains
jacket cover
with hook
and loop
fastener and
two inserts.
0.180" – 0.248"
(4.57mm – 6.30mm)
Fluorescent
Green
TX5500
™
Category 5e UTP
TX6000
™
Category 6 UTP
110
0.230" – 0.310"
(5.84mm – 7.87mm)
Fluorescent
Yellow
TX6500
™
Enhanced
Category 6
TX6A
™
10Gig
™
Category 6A**
All Shielded Cables
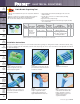
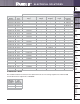
The steps below outline how easy it is to use the Panduit cable bundle organizing tool starting from the middle of the bundle outwards, using
two tools. For starting at the end of the bundle, follow the same steps using only one tool. (Use above table to select appropriate insert based
on cable diameter/type.)
Step 1
Use the unique pocket and boss
features to align two same color
inserts. Hold both together.
Step 2
Insert cables, one at a time, into the
pre-formed slots of both inserts until
all cables are installed.
Step 3
Pull the two inserts apart.
Step 4
Place the jacket cover around each
insert and secure with the attached
hook and loop fastener.
Step 5
Guide the tool along the bundle
length to organize the cables,
stopping at desired intervals to
apply Panduit Network Cable Ties.
Step 6
When completed, slide tool off of
cable bundle. The Panduit cable
bundle organizing tool reduces
installation time up to 50% and
delivers a professional,
organized installation.
Pocket
Boss
Installation Instructions