
Installation Manual

For Technical Support: www.panduit.com/resources/install_maintain.asp
INSTALLATION INSTRUCTIONS
© Panduit Corp. 2018
FS136A
Page 2 of 6
2. INSTALLATION OF FLEX-OPTI-1RU INTO PANDUIT 1RU PATCH PANEL (PANDUIT
PART NUMBER CFAPPBL1)
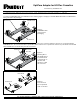
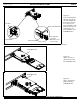
2.1 Slide the front insert into the patch panel opening (see figure 4) from the front of the patch panel in the orientation
shown. Make sure the plungers attached to the front insert (see figure 4) are pulled back to the "unlocked" position when
the FLEX-OPTI-1RU is slid into the proper holes.
Push this
direction
Front
Insert
Patch
Panel
Opening
Front of CFAPPBL1
Plunger
pulled back
"Unlocked" position:
back portion not
flared out
Figure 4:
Front insert oriented
and in process of being
placed into proper
patch panel opening
with plungers in
"unlocked" position
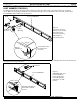
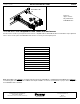
Detail showing plunger
pushed into "locked"
position
Front Insert
Front of CFAPPBL1
2.2 Lock the front insert in place by pressing the plungers into the "locked" position once plungers have been inserted into the
necessary holes in the patch panel.
Figure 5:
FLEX-OPTI-1RU front
insert installed into
proper patch panel
holes with plungers
pushed into "locked"
position