
Brochure


4
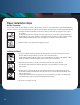
Proper Installation Steps
Surface Preparation
For best results, mounts should be applied to a clean, dry, and grease-free surface. It is recommended that for each individual application,
a solvent or cleanser be used to thoroughly prepare the surface for mount installation. The following are recommended cleaning guidelines:
1. For Rubber and Acrylic-based Adhesive Foam Tape, a mixture of water and isopropyl alcohol may be used on
most surfaces.
For Two-part Epoxy Adhesive, especially on masonry surfaces, be sure to clean all loose particles away before
mount installation. Some surface abrasion is recommended on smooth surfaces to achieve maximum strength.
A light rubbing with medium grit emery cloth or sandpaper is best. Wash the surface after abrading.
2. Allow the surface to dry completely before applying the mount.
1. For proper installation of adhesive backed mounts with foam tape, remove the release liner from the foam
adhesive. Without touching the adhesive, place the mount in the desired location.
For Two-part Epoxy Adhesive Mounts, apply 1/3 of the mixed adhesive to the bottom of the
PANDUIT
®
EMS or
ASMS mount. Without touching the adhesive, place the mount in the desired location.
2. Apply firm pressure for five (5) seconds to the foam tape mounts to insure proper adhesion.
Two-part Epoxy Adhesive Mounts should be twisted in place to ensure the adhesive is forced into the
porous surface.
3. Allow the mount to remain in place for the recommended dwell time for the specific adhesive being used.
The dwell time for Rubber-based Adhesive Foam Tape is two (2) hours and for Acrylic-based Adhesive Foam
Tape it is eight (8) hours.
Two-part Epoxy Adhesive Mounts can support about 5 lbs. after first fifteen (15) minutes. The adhesive fully
cures after twenty-four (24) hours and bonding strength will exceed 50 lbs.
4. The mount is now ready to be used.
Installing the Mount
Alcohol
12
6
3
9