
Installation Manual


INSTRUCTIONS V00028FG REV 12
© Panduit Corp. 2020
FOR TECHNICAL SUPPORT www.panduit.com/resources/install_maintain.asp
Page 1 of 4
Part Numbers: R4P, R4PCN, R4P23, R4P23CN, R4P36, R4P36CN, R4P42, R4P42CN, R4P96, R4PCN96,
R4P2396, R4P23CN96, R4P3696, R4P36CN96, R4P4296, R4P42CN96,R4P79, R4PCN79, R4PW3696,
R4PW36CN96
(2) Side Channel Assembles
(2) Base Angles
(2) Top Brackets
(1) Hardware Kit
(25) 12-24 Cage Nuts
(25) 12-24 x.5" Screws
(16) Paint Piercing Washers
(16) 3/8 x 1" Bolts
(1) Tube of Anti-Oxidizing Gel
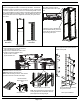
Step 1
Lay one side assembly on the floor or on a pair of sturdy saw
horses. Apply antioxidant paste to painted surfaces that the 3/8"
paint piercing washers will come in contact with. Install base
angles and top brackets using (8) 3/8" bolts and paint piercing
washers.
DO NOT TIGHTEN.
Note: The base angles are assembled on the bottom of the rack
and the top angles are assembled at the top of the rack. A dia-
mond on the outer face of each post indicates the bottom of the
rack. See closeup in Step 2.
(2) Side Channel Assembles
(2) Base Angles
(2) Top Bracket
(1) Hardware Kit
(25) 12-24 x.5" Screws
(16) Paint Piercing Washers
(16) 3/8 x 1" Bolts
(1) Tube of Anti-Oxidizing Gel
4 Post Rack and Accessories
R4P**CN**
R4P****
Step 2
Place remaining side assembly as shown. Apply antioxidant paste to
painted surfaces that the 3/8" paint piercing washers will come in con-
tact with. Assemble to base angles using 3/8" bolts and paint piercing
washers. One of each per side.
DO NOT TIGHTEN.
Diamond indicates
bottom of rack
Base angles
Top angles
NOTE: If using caster bracket kit (RCSTR). Reference CM450.
Fixed Caster and Bracket
Assembly
Swivel Caster and Bracket Assembly