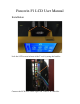
Panowin F1 LCD User Manual Installation Lock the LCD screen in front of the Y axis by using the buckles. Connect the LCD cable on the right side of the PCB controller.
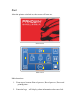
Start After the printer switched on, the screen will start-on. Initial screen 2 1 3 5 4 Main screen Main functions: 1. From top to bottom: Rate of process, Bar of process, Processed printing time . 2. Panowin logo,will display about information after one click.
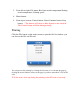
. From left to right: File menu, Real-time nozzle temperature/Setting nozzle temperature, Printing speed. 4. Menu button 5. From top to bottom: Control button, Pause/Continue button, Stop button. *The buttons will show or hide depend on the situation. The Control button will hide during printing. Printing Click the File button on the main screen to open the file list window, you can choose the files on SD card. You can process the printing by clicking the file name.
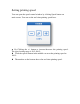
Setting nozzle temperature Click the Temp button to open the temperature control window. You can set the nozzle temperature here. l By Clicking the +/- button to increase/decrease the temperature. temperature setting range is 0-255 Centi-grade. l Click the Temperature meter button in the middle can switch the setting temperature to 0 or 200 centi-grade. l The number on the bottom shows the setting temperature value.
Setting printing speed You can open the speed control window by clicking Speed button on main screen. You can set the real-time printing speed here. l By Clicking the +/- button to increase/decrease the printing speed. The speed setting range is 20%-500%. l Click the speedo button in the middle can reset the printing speed to 100%.. l The number on the bottom shows the real-time printing speed.
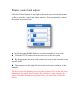
Printer control and adjust Click the Control button on top right of the main screen while the printer is idle to open the control and adjust window. You can manually control the printer movement here. l By Clicking the HOME button to reset the extruder to zero point. l Click the X/Y/Z button can reset each axis to the zero point. l By dragging the block on each control bar to move the extruder to the specific place. l The numbers on the right side shows the real-time coordinate of the extruder.
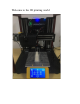
Welcome to the 3D printing world