G310C USER MANUAL Eng_Ver1.
Feature Specifications Display Dual clamshell TFT LCD, both Main & Sub. Main LCD : 260,000 TFT Color Display (128 X 143) Sub LCD : 260,000 TFT Color Display (96 X 64) Animated messages, variable icons Melody 64 Poly Orches tra Musical Bell Sounds Camera Highly sensitive Digital Camera with flash Dimensions & Weight 80* 40* 20.
Caution For the safety of You and the proper operation of the phone, please ensure you read the guidelines that follow. For more details, please refer to the appendix. Antenna If you use antenna which is not approved by the manufacturer of the units, it may cause a malfunction or serious damage of the unit. Traffic safety Please ensure that you check out the traffic regulations on the use of mobiles beforehand. Do not use mobiles while driving. If required, please use a hands -free kit in safe conditions.
prohibited. In airplanes Please turn off your mobile before taking it on board an airplane. If you use your mobile in an airplane, it could dangerously impact on the function of the airplane. Explosive gas Please turn off your mobile in regions where any explosive gas is presumed to exist and then follow the instructions or the contents of sign boards. Do not disconnect the battery from your mobile in regions where any explosive gas is presumed to exist.
Contents Caution Components Handset description Internal LCD (Main LCD) Sub-LCD Menu Option Function keys Quick start Getting started Basic telephone functions Menu functions i. ii. iii. iv. v. vi. vii. viii. ix. x. Messages Call logs Sounds Settings Net service Organizer Fun & Tools STK Phonebook Hot folder Appendix - How to use T9 & etc.
Components The picture below is for the reference of You. Each item in the package could be different according to the policy of dealers.
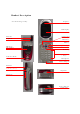
Handset Description * For detail usage of key Earpiece LCD display Antenna Earphone Camera key Menu key OK key Side keys Sub display Navigation keys Clear key Camera & Flash Alphanumeric keys Microphone Power Adaptor Connectors Antenna Camera (+key) Earphone Side keys Power Adaptor Connectors
Internal LCD (Main LCD) The main-LCD and the sub-LCD are divided into two parts of screen. One screen lines up a group of icons showing the status of the unit, while the other screen shows messages, telephone numbers, icons, etc. When a particular function is activated or a message is received, each applicatble icon is shown. The icons shown above are the maximum number of icons which can be displayed at the top. The definition of icons with pictures is explained as below.
Roaming This icon indicates that the roaming system is supported. Battery This indicates the level of the battery. [마이 Answering 크] Machine [테이 Answering This icon is displayed if there is a recorded message in an 프] Machine incoming call.. This icon is displayed when the answering machine is turned on. Sub-LCD Menu options In the case of being in standby mode when th e hinged door of the unit is closed, you can adjust the time shown in the Sub LCD by using the [Vol Down] key.
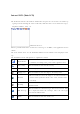
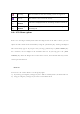
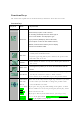
Functional keys The table below explains the list of functional keys which have more than one feature Function keys Key Icon Name Key Function Press this key to place a call or answer an incoming call Except when the answer type is set as "Auto Answer" and "Flip Open" type. SEND KEY If you press the [SEND] key twice in idle mode, you can place a call to the last number received, dialled, or missed. Press this key once to display the list of the numbers called.
and Phonebook SIDE UP and DOWN KEYS Press this key if you would like to adjust the volume of the conversation. If the hinged door of the unit is closed, this will carry out FLASH and Sub LCD related jobs. CAMERA If you press this key in the initial screen, you can directly access KEY the [Camera] Menu. SIDE If you press this key when the phone flip is CAMERA closed, you can directly access the [CAMERA KEY Preview] mode.
Quick start If you use the unit for the first time, please follow the procedures as below. : Put the SIM card within the unit. If a user is registered to the network provider, he/she is supposed to be provided with a ‘ plug-in SIM ’which contains the user’ s registration information. (PIN, the existence of additional service, etc). If required, keep pressing the [END] key until the message of power off appears. 1. Separate the battery from the unit. 2.
Battery Installation As shown in the picture below, put the metal locators of the battery into the holes located in the bottom of the unit. 1. Insert the metal locators of the battery into the hole located in the bottom of the unit. 2. Press the Upper part of the battery until the sound of a ‘ click’ is heard. Battery Recharging The power of the unit is supplied by the Li -ton battery charged. Ensure that you use only authoriz ed batteries and chargers.
connect an adapter to the outlet located in the lower part of the unit. An adaptor is provided together with the unit When finishing recharging, separate the adaptor connection from the outlet located in the lower part of the unit.
Getting started 1. Unit power on (turn on the phone power ) Press the [END] key for a moment (approximately 3 seconds) in order to turn on the power of the unit. 2. Unit power off Press the [END] key for a moment in order to turn off the power of the unit. 3. Making calls Press the [END] key for a moment in order to turn on the power of the unit. If a message “ Insert SIM card”appears, insert the SIM into the SIM slot.
volume by pressing the volume key on the side of the unit for up to 8 steps as you wish. 7. Searching the main Menu If you would like to move to the main Menu in the initial screen, press the [Menu] key. Press the [End] key if you would like to escape from the Menu and return to the initial screen. You can select one of the items in the Menu by pressing the Navigation key [Up][left] and [Down][right]. You can reply to questions with ‘ Yes’by pressing the [OK] key, and ‘ No’the [Clr] key. 8.
Basic Call related Functions 1. Speed Dial There are two ways to make a call in the initial screen. One is to press [Send] normally after inputting a telephone number. The other is to use speed dial. When making calls by using speed dial, you should press the index number for a moment which is allocated when saved in the Phone Book of the unit. Then, the telephone number matching the index number is attempted to be called.
key in the initial screen without going via the Menu 6. Check out the latest number received and missed calls If you would like to check out the list of latest numbers taken or made, press the [SEND] key. If you would like to make a call to any number from the list, press the [Up/Down] key to select the applicable number and then press the [SEND] key and a call will be made. If you press the [OK] key, the information of the number selected will appear. 7.
Hold ? This option allows you to attempt another call while keeping the current call. End current ? by selecting this option, you can finish the current call. Mute On ? this option allows the other party not to hear you while the user is taking another call. DTMF on/off ?you can turn on or off the DTMF tone with this option.
Menu functions Menu Type The unit provides two different types of Menu. One is a basic main Menu and the other is a hot folder (short cut) Menu. The basic way to access to the main Menu is to press the To access the hot folder Menu, press the key. key.
1. Messages 1. SMS/EMS EMS (Enhanced Messaging Service) is formed based on SMS (Short Message Service). You can create a text message (SMS) including pictures, animation, melodies, messages, and emotions through EMS. The characteristics of the lettering can also be adjusted. Before starting You, first ensure th at the number of the service center is set. This number is normally provided by dealers and saved in the SIM card. [MENU] 1. Create (writing message) 2. Inbox (received message) 3.
Message center ? Authorization of the URL of proxy relay or set MMSC. Message lifetime ?Adjustment of the lifetime of messages (1hour~6 months) Message format ? Normal , fax, voice mail, ERMES, National paging, X.400, Internet) Used space detailed functions 1. Capacity 2. Used records 3. Unread records Capacity ? displays the maximum number of messages that the SIM can save Used records ? displays the number of messages saved in the SIM. Unread records ? displays the number of messages unread.
Press the [Menu] key among the list of the “ Archive” . The size of the data is indicated under the message. 3. You can select a menu among the “ View ” , “ Info ” , “ Delete ” , and “ Rename ”icons that pop up. 4. If you press [OK] in the list of “ Archive ”the messages saved will appear. Menu of Inbox and Outbox [MENU] 1. Edit (editing) 2. Delete (deleting) 3. Forward (delivering) 4. Text Reply (replying) 5. Voice call (making calls) Edit ? edits the messages received or sent.
Message creating/sending/saving 1. Message created You can add items in the ‘ Insert item’ . 1. Press the [OK] key after selecting “ Create ” 2. Press the [MENU] key to select “ Insert items”while creating a message. 3. Select one of the menus among the Picture / Animation / Melody/Message/ Emoticon under “ Insert items” .. 4. Then “ Predefined”and “ Load”are indicated. 5. Select item by using the [Navigation] key and press [OK]. The selected item will be loaded.
2. Sending Messages 1. Press the [OK] key after creating a message. 2. Press the [OK] key after selecting “ Send ” . 3. At this time, you can either input a number or bring out a number saved in the “ phonebook list”through the [MENU] to transmit. 4. If you press [OK] after inputting a number, sent animation and sending progress (i.e. :1/3) is displayed. 3. Saving Messages Saving messages in SIM 1. Press the [OK] key after creating a message. 2. Press the [Ok] key after selecting “ Save ” . 3.
received. Saving items in the Inbox If messages include Pictures/Animations/Melodies/Messages/Emoticons, you can save them in the Phone memory. (User defined items only.) 1. Place the cursor at the back of the item while checking messages. 2. You can set file name and directory by pressing the [MENU] key. 3. Message is saved in the File system. 4. Saved items can be sent by selecting Insert item] ? [Picture/Animation/melody/Message]-[Load] under message created.
2. MMS MMS is a multi -media message to create and s end which includes image files taken by camera or downloaded and sound files downloaded. The size allowed for each file is 32KB, and the total size of messages should not exceed 64KB. ?? Structure of Menu ?? MMS ?? Create : new messages are created and sent. ?? Inbox : displays received messages. ?? Outbox : displays messages to be sent. ?? Drafts : displays messages which have not been completed. ?? Sent : displays sent messages.
?? Spam filter: sets spam filter for the MMS messages set as “ Advertisement” . ?? Off : receives all the MMS messages ?? Prompt i f s p a m: a s k s y o u whether spam messages should be downloaded. ?? Reject spam : does not receive all spam messages. ?? Creating and sending Multi-media messages A new message can be written by selecting the “ Create ”menu. If you select the “ Create ” menu, the first page of MMS messages is displayed in the screen.
– Add photo : Select “ Add photo ”after pressing [MENU] in order to insert saved images taken by camera. Then select desired image files (*.jpg) by pressing [OK] key. – Change picture, Change photo : Select [MENU] ->” Change image,”“ Change photo ” , “ Change sound”in order to modify the object of inserted files and modify the selected files. – Add sound : select Add sound after pressing the [MENU] key in order to insert the sound. Then select desired sound files (*.imy,*.mid,*.
4. You can adjust the object properties of images and sound inserted. – Object properties : after pressing the [MENU] key select More->Object properties and press the [OK] key after selecting the desired object (image, sound). Then, you can select how long or when the object will be displayed at the time the page is read. 5. Adjust “ Page properties” – Page property ->Page layout : After pressing the [MENU] key, select More>Page properties ->” Page layout” .
8. Input title by moving to “ Subject” . 9. “ Priority ” 항목에서 message priority(Normal / High / Low) 를 설정할 수 있다. After going to “ More” for the additional setting of the message, select one of the options for “ Normal” , “ High” ,” Low”Priority. 10. After completing the creation of a message, you can press the Send key to send immediately or press Send later to save. ?? Receiving messages When a new MMS message arrives, an alert icon is displayed in the IDLE screen. 1.
– Play from start: this plays images and sounds from the first page ( this function activates when the messages consist of more than 2 pages.) – Step forward a page, Step back a page : this moves forward or backward a page. You can carry out the same function with the right/left key of the handset key pad. – Edit : this edits messages . – Delete : this deletes the current messages . – Reply : this creates an immediate reply. – Move to : this moves messages to the desired mail box.
??Moving Messages 1. You select desired mail box. 2. After selecting a message you are wanting to move to other mail box, press the [MENU] key 3. Move the message to the desired mail box by using “ Move To” . ?? Editing Messages 1. You select desired mail box. 2. After selecting a message you want to read, press the [MENU] key and select Edit. The rest of the procedures are the same as those of creating messages. 3.Voice mail [MENU] 1. Call 2. On 3. Off 4.
message no./ disale no./ enable no. 2. Alert by call Sets the reminder of receiving voice mail by call 3. Alert by SMS Sets the reminder of receiving voice mail by SMS 4. Alert match Sets a message to be shown when voice mails arrive 4. Cell broadcasts [MENU] 1. Reading information (Read info) You can read the message of Cell Broadcast provided by your network service. 2. Settings You can select the subject and language you prefer. - Language You can set the language of the information message.
2. Current list: displays the list of subjects currently registered. You can 1. add or 2. delete a new title by pressing the [OK] key in the registered title. You can select a maximum of 2 titles of information message. For more detail, please ask network service provider. 2.
MENU OPTION: With the numbers selected by using the scroll bar you can use the popup menu as follows. EDIT: After modifying the telephone number selected by using the OPTION” .( scroll, used you for can use ’ Received the “ SEND calls’ /’ Dialed calls’ /’ Missed calls’ ) VIEW CALL LOG: After placing the state bar in the desire d telephone number by using the scroll up/down key, press the OK key or the MENU key to display the popup-menu.
?If you press the END key while carrying out functions or before carrying out functions, you will return to the initial screen. Pressing the CLR key takes you to the previous screen. Also after pressing the MENU key, while the “ popup-menu” is appears, if you do not press any key for 10 seconds, the “ popup-menu ”will disappear. 4) Clear logs This is a function to delete the list of calls .
-Set limit: this sets the maximum units . (2) Call timers This is a function to read the information on call times. [1] Last call This displays the time lapse of the latest call. [2] Dialled calls This displays the time lapse of the Dialled calls . [3] Received calls This displays the time lapse of th e Received calls . [4] All calls This displays the total lapsed time of all calls [5] Reset call time This initializes the call time of Last call or All call.
Ringing tone ; activates the selected Melody, Bell Sound, Voice Sound, Natural Sound, My melody. Vibration; activates in vibration Vib then Ring; rings bell after vibration. Vib and Ring; bell and vibration simultaneously rings. Ascending ; the sound of the bell increases. None (Quiet); ramp activates without ringing bell or vibration Melody Type This consists of Melody/Bell Sound/Natural Sound/My melody. There are many melodies and 24 melodies are provided ( subject to the model of unit).
Settings: this consists of On/Off. Tones Bell 1/Bell 2/Bell 3 This is a melody ringing when opening Flip. (no melody for shutting flip) Volume Adjust volume up to 8 levels (0~7) 3.5 Sound effect Connection/Minute minder/Disconnection/Area alerting /On & Off melody/menu moving This activates melody which is checked.
Key Tone Setting Select Key Tone menu Select Setting/Tone/Volume by using the Up/Down/Left/Right key. Save the selected one by pressing the OK key. If not wanting to save it, press the CLR or END key to escape from the menu. (CLR; move to the previous page END; return to the IDLE screen) Modified tones, for Key tone is applied only to number keys. Flip Open Tone Select Flip Open Tone menu. Select Setting/Tone/Volume by using the Up/Down/Left/Right key. Save the selected one by pressing the OK key.
4. Settings You can modify or confirm the settings of th e screen, date, time, etc in this menu. 1. Display 1.1 Visual setting 1.1.1 Screen setting (Idle image 및 Power on/off image 변경됨) You can set each picture as shown below. Idle screen image Power On screen image Mtcall screen image Mocall screen image Power O ff screen image Dialing screen image If You want to change the picture matching each situation, first place the select bar in the desired situation by using the Left/Right key.
You can set three screen options here. Screen option: select the kind of idle screen. Display string: modifies the string on the idle screen. Font color: modifies the color of letters. Use the UP/DOWN key in order to move to each option. Screen option LEFT/RIGHT You can select one of the IDLE screens among the 4 options using this function. Normal image: this displays the picture set in the Screen Setting menu. Analog clock: this displays the analogue time screen.
The colors available , are red, blue, green, and dark grey including basic colors. 1.1.3 Voice equalizer A pattern on the screen is shown on the outside LCD during conversations depending on the volume of the other party ’ s voice. On : Voice equalizer function is ON Off : this shows the other party ’ s information (telephone number, name, conversation lapsed time, condition) instead of showing a pattern on the screen by the volume of the voice.
1.4 Backlight You can set the backlight levels of the internal and external LCDs. First, position the Select Bar on the desired feature that you wish to set, and then use the Left/Right key to adjust the values. Light level: this is the brightness value when the backlight turns on. You can set 5 levels of value (Off, Low, Medium, High, and Maximum) Minimal brightness: this is the brightness value minimized after the period of time of light duration.
2.3 Set time zone (Mexico City 로 변경) After selecting desired time zone press the OK key. Then this reflects the current time. 2.4 Display In this menu you can set the time format to be displayed in the handset. Time format: you can convert 12 hours and 24 hours by pressing the Left/Right key. Date format: you can set the day format D:M:Y, M:D:Y or Y:M:D. Display: you can select the information related time to be displayed. You can select one option among Time only, Date only, Date & Time. 3.
, If you set automatic , the value set in the SIM you currently use will be automatically set. 4. Reset settings With this menu, all the values that you have saved in your handsets return to the initial values. After entering this menu, input the PIN of the handset. Then press the OK key at a box saying ‘ Restore factory settings? The all the values saved in the handset return to the initial value and the handset automatically are rebooted. 5. Information 5.
2. Add: adds new numbers. 3. Delete: deletes saved numbers. Own numbers can be saved up to 2. 5.2 Software version (S/W version화면 변경되어야 함) You can confirm the Software version of handsets you currently use. 6. Auto power alarm . In this mode, the phone turns on if it is turned off at the time of alarm to go off and turns off again after setting the alarm off. 6.1 On This activates the function. 6.2 Off This deactivates the function.
function, by which a user can record up to 10 messages. The user can also overhear the recording and can choose to accept or reject the call. To access answering machine press [MENU] ? 4 ? 7 4.7.1 Settings Settings: You can turn on or off the answering machine by selecting this button. Press the right or left key to change between the On and Off. When the answering machine is activated, a “ mike”icon appears on the idle screen.
Press [OK] button to start recording, by speaking clearly into the mouth piece/ microphone. Maximum recordable time is 15 secs. Once a message is recorded, User Defined Message is automatically selected as the Response Message. 4.7.3 User message Select this key to hear the recorded message. Press [OK] button to hear the recorded message. In case the user wishes to delete the recording, press [Menu] key and select “ Delete” . Message can be re -recorded by selecting the “ Recording” key again.
A “ Audio-cassette”type icon appears on the idle screen, in case there any unread/ unheard messages among the recorded messages. Pantech phones have also developed a unique feature by which a voice call or a SMS message can be made to the person who has left a message. To access this function, select the recorded message to which the voice call/ SMS needs to be made, then press [Menu] button and select “ Call”or “ Send message” .
5. Net Services 1. Divert calls Divert calls ? according to the service status of you, diverts calls into other number as set. 1. 1 All calls Divert all calls ? sets other numbers to be diverted for voice call, receiving data, fax, message service. 1. 1. 1 On This sets call diversion for all calls. If you press On, the screen saying “ Input a number to be diverted” will appear. After inputting a number to be diverted press the [OK] button.
1. 1. 4 By service You can set call diversion for all 4 services [1], or set call diversion for each service [2][3][4][5]. You also can select all services except for message service [6]. 1.2 When busy Call diversion when line is busy ? this diverts calls to another number set when a user’ s line is busy. The procedure of setting this is the same as the one explained in 1.1. 1.
1. 4 When not found Call diversion when you are out of the coverage service zone ? this diverts calls to another caller set when you are out of range. The procedure of setting this is the same as the one explained in 1. 1 1. 5 Cancel all You can cancel all options currently set ? all settings regarding call diversion are cancelled. 2. Call Settings Call settings ? this sets additional functions used for making or taking calls. 2.
Answer type ? this sets the method of taking calls for incoming calls. 2. 1. 1 Flip open To take incoming calls, open the flip of the unit. 2. 1. 2 Send key To take incoming calls, press the [SEND] key. 2. 1. 3 Any key To take incoming calls, press any key except for the [END] key. 2. 1. 4 Auto answer For incoming calls, this will automatically connect after 10 seconds of ringing, 2.
2. 3 Caller number Displays telephone number ? this displays the numbers of names of receivers and callers. This function varies according to the settings such as the existence of your service registration, or of callers ’ settings. 2. 3. 1 Show my no. This shows my number. 2. 3. 2 Show called no. This shows the callers ’number 2. 3. 3 Hide if called This hides you’unit number from callers when you have incoming calls. 2.
Set preferred Network ? When the network list currently provided by handset is displayed, press the [MENU] key. Then the sub options as follow will appear. - Insert: this adds the preferred net work to the top of the current list. - Add to end : this adds the preferred net work to the end of the current list - Delete: this deletes the contents of selected networks. Units have had the profiles of the various dealers of every country saved on them.
This menu has the following sub-menus. - Add: this adds a new network . - Change: this changes the contents of the net work currently registered. - Delete: this deletes the contents of selected network. “ (1) This menu is used when another dealers should be additionally saved, apart from the dealers saved in the contents of Preferred N/W” .
You should input your PIN1 in order to continue this menu after selecting it. If you input the wrong PIN1 3 consecutive times, PIN1 will be locked and the system goes to the status of IDLE. The security function setting is used to protect any unauthorized use and to restrict service in case of loss or theft. You can change your PIN1 or PIN2 used in your unit and can set or cancel the security function.
with others, the lock continues. However, emergency calls can be made even in the lock state of handsets. Also this function can be carried out by pressing the [#] key for a moment in the IDLE screen. If you press the [#] key in the lock state, the handset will be unlocked. However that is temporarily carried out while the phone is turned on. This function includes the following sub menus.
This rejects all incoming calls. You can select On/Off in the menu. [2] Outgoing This restricts making calls. This function includes sub optional menu classified by (1) restricts all dial calls, (2) restricts particular calls, which means the restriction of calls applied to prefixes set and (3) no restr iction of dial calls. If you select the Bar prefix, then the bar list is displayed. You can select and set here or, popup menus such as add, modify, delete, delete all, etc.
[1] Foreign calls Barring of Outgoing International Calls (BOIC)- this restricts all outgoing overseas calls. [2] Only Local/Home Barring of Outgoing Calls except those directed to the HPLMN Country (BOIC-exHC) ? this allows only overseas calls outgoing Home PLMN and restricts other outgoing overseas calls. [3] Bar incoming Barring of All Incoming Calls(BAIC) ? this restricts all received calls.
Off: this sets cancellation of barring for applicable calls. Status: this indicates the current status of applicable calls whether you are barred [6] Clear all This sets the cancellation of barring through [1-5] menu. When attempting to use this, a window input network password will appear. (5) Fixed dialing [1] Fixed dial Fixed Dialing Numbers (FDN) is a function that only particular numbers are available in the telephone list saved in the SIM.
, Add: this adds a new CUG name inputted by you at the end of the CUG name list. Edit: this edits the CUG name and index. Delete: this deletes the CUG name and index. Clear all: this deletes registered the CUG name and index. [2] Select 1. This displays the CUG name list inputted by you. 2.
6. Organizer You can alarm alert settings, record important events, make memos, use calculations, do unit conversions, use a stop watch, etc with this function. 1. Alarm [left] navigation key ? 1.Alarm You can set an alarm ringing once on an alert day, or on a daily or weekly basis. [Status showing that no alarm is registered] Add and delete alarm alert Pres [Menu] key -> [OK] key. Alarm on/off 설정은 ‘ Add alarm’ 을 통해서 새로운 alarm을 설정할 때는 동작하지 않으며 기존의 저장된 alarm을 edit할 때 설정 가능함.
alarm alert set as above is rung once or in a daily or weekly basis. If selected [Once], alarm rings once on alert date. If selected [Daily], alarm rings at set time everyday. If selected [Weekly], alarm rings at a set time on a particular day set by pressing the right navigation key [ ->]. Select alarm melody, If pressing [Menu] in Alarm Setting, you will see a popup window. Select [Melody] here to select alarm melody.
2. Scheduler(Image 변경바람 : 아랫줄 양/음력 표시 없음.) [left] navigation key ? 2. Scheduler You can record important events by setting a brief memo with alarm in the calendar. You can move cursor by using [When there is no event registered] Add and delete events After moving the cursor to the date you wish to put the event, press the [MENU] key. Then select [Add Event]. You simply press [OK] and [MENU] to select [Add Event]. Then, you will see the following screens.
1) Event: you can decide the kind of events. (option: meeting, call, restaurant, entertainment, birthday, travel, others) 2) Memo: by pressing the [right], [left] navigation key or [Number] key , you can input memos. 3) Time: records event time. 4) Alarm alert: this decides when the alarm alert for the above events recorded. (option: on time, 1 hour before, 2 hours before, 1 day before, 2 days before, no alerting can be selected) 5) Repeat: this sets the frequency of events.
OK ? Menu? If you press the [Menu] key, the popup menus will be displayed. 1. Add Event: this adds new events on the date selected 2, 3 Delete and delete all: this deletes an event or all events registered on the selected dates. 4. On D-day: this shows the days left until the event. (2. On D-day: this shows the days left until the event. 3, 4 Delete and delete all: this deletes an event or all events registered on the selected dates.) 5. Memory Info: this displays the number of events registered.
3. Memo You can leave a brief memo in your handset. If you press the [MENU] key, sub menus as follows are displayed. 1. Add memo: this creates new memos. 2. Delete: this deletes selected memos. 3. Delete all: this deletes all the memos. After comple ting writing memos you can press the [OK] key in order to save the memo. By pressing the [OK] key in the memo list screen, the contents of the selected memo are displayed. A maximum of 20 memos can be left. 4.
i.e. : 6 X 5 / 2 + 2 = [Keypad 6], [Scroll Left], [5], [Ok Key], [Scroll Right], [2], [Ok Key], [Scroll Up], [2], [Ok Key] 5. Converter You can convert units such as length, width, volume, and weight into various units by using the converter. ‘ Length ’ includes cm, m, inch, feet, yard, and mile,. ‘Area’ includes sq. m, a, sq. feet, sq. yard and acre. ‘ Volume ’includes cu. cm, cu. m, L, cu. inch, cu. feet, cu. Yard, and gallon, and ‘ Weight’includes g, kg, t, grain, oz, pound.
After moving down by using the [Down] key, select a unit to calculate by using the [Left] or [Right] key. Input value to calculate by using key pad. By using the [*] key, you can use decimal points. Select a unit by using the [Left] or [Right] key. Whenever inputting values or changing units, the converter outputs the results. In case several units are not calculated, the result of the value becomes 0. Also if the value is over the range of calculation, the result will be indicated "overflow".
6. Stop Watch You can record events by using the stop watch. The stop watch is operated by the navigation keys. Press ‘ Start’ (right) to record events, press ‘ Pause’ (left) to pause time, and press ‘ Reset’ (down) to delete the time and wait. 7. Fun & Tools 7.1 Game (Game은 Embeded Game이며 Java 는 들어가지 않음). 7.1.1 Escape of the Rabbit A cute rabbit living in a deep forest is one day very happy to find carrots scattered here and there in a pathway.
by the fox or being starved to death. The total number of stages is 10 and there are 1 type of character, 1 type of obstacle, 2 types of items, and 1 type of attack provided. The game basically consists of 5 menus and you can select menus by using keypads or navigation keys. When pressing [UP/2] key and [DOWN/8] key in the game menu, it moves the scroll up or down. When pressing it in the game, it will move the position of the rabbit up or down.
A brave knight, the hero of ‘ Combat,’fights against malicious monsters to defend his nation. He can attack the monsters by shooting 3 types of weapons: big rock, cold-volt and fireball. With the fireball, the most powerful weapon, he has limited shooting chances. But it can be recharged for additional shooting when he attacks a pterosaur flying over the battlefield now and then. The game is performed by turns. As the number of stages increases, the hero fights with more intelligent and powerful monsters.
Select image file by using navigation key [UP/DOWN]. This will display image files downloaded. You can see the selected image file in a small screen at the bottom. Select desired image file by using the [search] key. (we do not support viewing over 256X256 sized images or viewing in a small screen at the bottom. Press the [Menu] key to carry out work regarding image files. When the file menu screen appears, select the desired menu by using the [Search] key and press the [OK] key. View ? viewing image.
Delete ? deletes files Rename ? Change file names. Enter editor screen by pressing the [OK] key. After inputting the name you desire to change press [OK] to save it. You can escape from the file menu screen by pressing the [OK] key or the [END] key. 7.2.2. Animation This shows the list of animation files downloaded (applies to animation with wbmp format. You can see animation gif files at the Image menu.). You can see the selected animation file in a small screen at the bottom.
View ? Views animation. Info ? views file information, You can see basic file information, the number of horizontal and vertical pixels, and color resolution. Delete ? deletes files Rename ? changes file names. Enter editor screen by pressing the [OK] key. After inputting th e name you desire to change press [OK] to save it. You can escape from the file menu screen by pressing the [OK] key or the [END] key. 7.2.3. Melody This shows the list of melody files downloaded.
Play ? plays melody Set as ring tone ? bell sound registration. After pressing the [OK] key wait until the progress bar is completed. Info ? views file information. You can see basic file information and audio type (i.e. midi, imelody, etc). Delete ? deletes files Rename ? changes file names. Enter editor screen by pressing the [OK] key. After inputting the name you desire to change, press the [OK] key to save it. You can escape from the file menu screen by pressing the [OK] or [END] key . 7.3.
Press the [RECORD] key to record your voice, and save the recording by pressing the [SAVE] key. During recording, you can stop the recording by pressing [STOP] key and save the recording by pressing the [SAVE] key. Then a text editor window in which you can input the title of the recording will appear. The inputted title is displayed in the Voice memo list. Once creating the list of recording, select the applicable list which you desire to replay by pressing the [OK] key.
1) Home 2) Resume This re-connects to web sites recently visited. 3) Bookmarks This saves internet addresses which have WAP browsers. 4) Push messages Handsets can receive ‘Push message’ from the service provider. 5) Settings You can set functions such as connection setting, security certificate, Cache mode, and Push security.
A. Home pages: This is the address of homepages. B. Image settings: You can select image display options. C. Connection type/options: You can select temporary/continuous connection or secure/none secure connection, etc D. Gateway settings (040506): This is the ID and password of the gateway. E. Bearer: You can select bearer type (Data/GPRS). F.
(3) Cache mode You can select one mode among two options.
4) Version info This function displays the software version of the WAP browser. 3) On-line menu When browsing, press this menu key, then you can use browser menu. Stop: this stops downloading the current page. Go back: this moves to the previous page of the page in the history list. Bookmarks: this displays bookmarks. Add bookmarks: this creates current pages into a new bookmark. Enter address: this allows entering URL’ s for browsing. Home: this returns to the beginning of current page.
7.5.Camera You can take and save photos any time anywhere by using the camera function. The saved photos can be checked by using the Album menu. A change of name is also available. [ Snapshot ] You can take photos by selecting this menu. You can carry out the function by pressing ‘ 1’in the Camera menu or selecting ‘ Snapshot’ . A. Function i) Select Snapshot to run preview mode. ii) Take photos by using ‘ OK’or ‘ Side camera ’key.
vi) When running snapshot functions while the flip of the mobile is closed You can take photos in the preview mode by using the ‘ side camera ’key, adjust brightness by using ‘ Volume Up’ key, and end snapshot function by using the ‘ Volume Down ’key. After taking photos, by pressing the ‘ side camera ’save photos, or carries out the preview mode without saving by pressing the ‘ Volume Up ’ . Also pressing the ‘ Volume Down ’key will finish the snapshot function.
C. You can carry out the following functions for the selected photos by using ‘ menu’. i) Set as wallpaper: this sets the selected photos as the background screen for main LCD or sub LCD when you are idle. ii) Information: this displays the detailed information on selected photos. iii) Rename: this changes the name of selected photos. iv) Link/Unlink phonebook: this links/unlinks the selected photos to phonebook.
down navigation’key . The setting value of currently selected objective is displayed at the bottom of the screen. B. Save and end the current setting values by pressing the ‘ OK’ key. Pressing the ‘ END’key finishes without saving the changed setting values. 7.6. Memory info This displays the consumption and capacity of memory. In order to select memory info press [MENU] ? [4] ? [6] keys in order and press [OK] key. 8. STK STK is a service provided by service dealers while using the GSM net.
[HOT KEY] Phonebook Phonebook supports the function of saving the list of private telephone numbers. The addition and deletion of telephone numbers is always available. Besides this, you can select a desired saving space between SIM/Phone memories. A maximum of 1,000 telephone numbers can be saved. (Phone memory 800 개이며 SIM 에 따라 1,000 개 이상 저장될 수 있음) ※ If you press the down key in the IDLE screen, you can enter Phonebook.
(2) Name Search After selecting Name Search, input names to be searched in the Edit Window. The cursor moves to the list of similar names. If not inputting names, the list arranged by name is displayed. ok ok menu/select ‘ Edit’ If a name is long, it is automatically scrolled. The movement of up a n d d o w n i s available by using the Navigation key and pressing the Send key in the list will connect to the applicable telephone number.
Menus appearing in Phonebook when pressing Menu keyin case you do not select icons ?Search (search a number in the list) ?Edit ?Delete (delete all numbers of the person) Menus appearing in Phonebook when pressing Menu key after selecting icons ?Delete (delete the number) ?Add to Speed (store the number to the Speed Dial) ?Send Message (Menu to send SMS / EMS) Select each number with left & right navigation key. If you press the OK key, you can see saved contents in one screen.
(5) Speed Dial List This function supports the creation of a 100 (00~99) Speed dial list. If you move the cursor, the name and number of the list will be automatically scrolled. Pressing number (00~99) for a moment in the IDLE screen, will connect calls registered in the Speed dial list. If wanting to register desired numbers in the Speed dial list, press Menu key in Phone book list and select Add to speed.
6-2) Used space This indicates the consumed capacity of the Phonebook. Phonebook can 800 telephone numbers. 6-3) Group ring tones You can assign different melodies by group. 6-4) Delete all When you activate the ‘Delete all’ function, the phone will request you to enter the lock code. If the lock code is correct, a screen will appear for you to choose from: 1) delete SIM, 2) delete phone. If you select the desired item, the entire list stored in the item will be erased.
1. Register My Menu 1) Go to desired menu. 2) Press the [Menu] key. 3) When the ‘ Add to My menu?’window pops up, register it by pressing the [OK] key. 4) When not wanting to register cancel by pressing the [End] or [Clr] key. 2. Use registered menu 1) Press the [left] key in the idle screen. 2) Select the menu you want to use among the registered menus. 3. Delete registered menus 1) Run My Menu by pressing the [Left] key in the IDLE screen.
Appendix T9 Guideline T9 helps you easily input both English and Chinese. Here is the guideline for T9 usage. First of all, enter INPUT MODE, then the T9 modes as below will be displayed. Key T9Number T9English Multitap Next Smart punctuation candidate .
9 WXYZ No function Smart period WXYZ9 Smart punctuation .
A mode to be able to input numbers or mathematical signs A mode to be able to input Greek letters, currency units, period, etc T9 English You can complete a word by inputting each letter in the T9 English. For instance, if you want to input ‘ hello’ , input [4][3][5][5][6] in order. In case you can not find a desired letter, search the letter by pressing the [1] key. You can alter capital and small letter by pressing the [#] key and input period by using [*] key. In order to input a space, press [0].
Multi -tap English You can input particular English words such as names, nicknames, or acronyms, etc. As this provides an English dictionary, it helps to search or display candidate words. You can simply search for a desired word by inputting several initial letters of the word which is the same function as mobiles. You can alter the capitals from/into the small letters and T9 number mode by pressing the [#] key. T9 number 와 T9 Symbol You can input numbers or signs in this mode.
Mobile Administration & Cautions This displays cautions and administrative methods when using the unit. - Keep the unit and its related accessories beyond children’ s reach.
- Maintain the unit dry and use it in a normal temperature. Any temperature over 55 ?C (131?F) or below ?20?C(-4?F) could damage the unit. - Do not keep or use the unit in dust or an unhygienic place. - Do not attempt to dissemble the unit. - Do not drop or give impact on the unit. - Do not apply chemicals, solvents, or detergents to the unit for the purpose of cleaning. - When the unit is not properly operated, please contact the nearest dealer shop immediately.
nearest dealer shop. When the “ Enter PIN1”message displayed: Input a PIN1. If you fail to remember the PIN1, please contact the nearest dealer shop. Any units locked by inputting the 3 times of wrong PIN1 are able to take calls. When the “ No service”or “ Network failure”message displayed: Confirm the SSI(signal strength indicator).
When the unit unable to turn on: Confirm batteries are charged. While recharging batteries, confirm the level of batteries by turning on the unit. When sending messages unable: When you are not registered to the SMS service or you are out of the range which a service provider can not provide a due service. When making calls unable: The unit is set as a fixed dial function. Please cancel the fixed dial function. When recharging unable: This is applied to the following three cases. 1.
You are not registered to particular services or are out of the range which a service provider can not provide those services. Please contact the service provider. Battery Use The unit uses Li-on batteries. There are two types of batteries as follows. Please refer to the nearest dealer shop. - Standard batteries - Slim batteries Cautions required when using batteries - Do not use damaged batteries or chargers. - Do not use a battery in other use.
batteries according to the related regulations. Do not throw batteries into the fire. Do not use batteries except for the assigned batteries. Ensure that any metal substances do not ground in order to avoid possible injury or burn. Safety Cautions When driving in the roads Safety is a priority when driving in the roads. Do not use the unit while driving. If you require using the unit, pull over your car before using the mobile. Confirm the unit is properly placed.
medical device manufacturers. Besides this, other electric devices could be exposed to the hindrance of electric wave. Please comply with the related regulation while switching off your units in gas stations, chemical manufacturing factories, and any places which have a danger of po tential explosion. Do not keep or carry the mobile with substances containing a danger of explosion. Please turn off your mobile before taking it on board an airplane. Using your mobile in an airplane is illegal.
FCC & Industry Canada Regulatory Compliance This device complies with Part 15 of the FCC Rules. Operation is subject to the following two conditions: (1) this device may not cause harmful interference, and (2) this device must accept any interference received, including interference that may cause undesired operation. Your mobile device is a low power radio transmitter and receiver. When it is ON, it receives and also sends out radio frequency (RF) signals.
Health and Safety Information FCC This EUT has been shown to be capable of compliance for localized specific absorption rate (SAR) for uncontrolled environment/general population exposure limits specified in ANSI/IEEE Std. C95.1-1992 and had been tested in accordance with the measurement procedures specified in FCC/OET Bulletin 65 Supplement C (2001) and IEEE Std. 1528-200X (Draft 6.5, January 2002). Ministry of Health (Canada), Safety Code 6.