TX-60B 표지출력TX60B 2003.12.8 4:42 PM 페이지1 TX-60B OWNER’S MANUAL http:// www.curitel.com CDMA DIGITAL WIRELESS HANDSET Overseas Sales Team 1. 17 Floor Kukje Electronics Center Bldg, 1445-3, Seocho 1-dong, Seocho-Gu, Seoul, 137-070 Korea Tel:+82-2-3465-3376 Fax:+82-2-3465-7798/3399 REV.
HYUNDAI TX-60B Digital CDMA2000 1X Handheld Portable Telephone In today’s fast paced world, it has become a necessity to have access to real time information. Your communications tools must provide you with this access from anywhere at anytime. With that in mind, Hyundai developed the TX-60B, a bar type handset with 4096 colors STN display.
TABLE OF CONTENTS CHAPTER 1 BEFORE USING YOUR PHONE .........7 Inside the Package .................................................8 Handset Description ..............................................9 Function Keys.......................................................10 Display Indicators.................................................11 Using the Battery..................................................13 Installing the Battery ...........................................13 Removing the Battery ..........
TABLE OF CONTENTS TABLE OF CONTENTS Voice Privacy.......................................................29 Speaker Mode.....................................................30 VR Mode................................................................70 Name ..................................................................70 Dial......................................................................71 Redial..................................................................71 Voice Memo .......................
TABLE OF CONTENTS TABLE OF CONTENTS Inbox....................................................................103 Inbox Menu .......................................................103 Outbox.................................................................105 Outbox Menu ....................................................105 Web Alerts...........................................................107 Saved...................................................................108 Erase All .........................
Chapter 1 BEFORE USING YOUR PHONE Please read and fully understand this manual before using your phone. This chapter addresses your phone, its keys and display icons, and covers the charging and proper use of the battery.
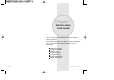
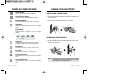
INSIDE THE PACKAGE HANDSET DESCRIPTION Thank you for purchasing the TX-60B wireless handset. The phone’s giftbox contains all of the items listed below. This phone is a CDMA2000 1X digital phone with data and web browsing capabilities. The TX-60B weighs 90g with Standard battery and the dimensions are 109mm x 47mm x 19.3mm. Antenna For best call quality, fully extend the antenna during the call. Standard Battery Earpiece Earjack Travel Adaptor Volume Button Adjusts the earpiece and ringer volume.
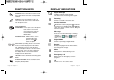
FUNCTION KEYS SEND KEY: Press to make or receive a call. Press and hold to view most recently dialled numbers. END KEY: Press to terminate a call or to return to the idle screen. Press and hold to turn the phone on/off. NAVIGATION KEY: In Idle Mode - Press up to access the phone book, down to access the messaging menu, right for Recent Calls and left for Mobile Web. Inside the menu - Within a menu, use to scroll through menu options. Press to select an option.
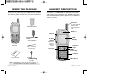
DISPLAY INDICATORS Voice Memo New voice memo has been made. USING THE BATTERY INSTALLING THE BATTERY Phone is in answering machine mode. 1. Insert the bottom of battery into groove at bottom of the handset. Etiquette Mode 2. Press in the top of the battery until it clicks. Answering machine Phone will vibrate when call is received. Schedule Appears when either an event or an alarm is set. Ring Mode Appears when a ringer is set as a ringer mode.
CHARGING THE BATTERY POWER CONNECTION CHARGING THE BATTERY NOTE: 1. Plug the Travel Adaptor into a standard outlet. 2. Plug the other end of the Travel Adaptor into the bottom of your phone. The battery must be installed on to the phone. 1. It is more efficient to charge the battery with the handset powered off. 2. The battery must be connected to the phone in order to charge it. 3. Battery operating time gradually decreases over time. 4.
BATTERY INFORMATION Use only manufacturer approved batteries. Never use a damaged or worn out battery. Use the battery only for its intended purpose. Never expose the battery terminals to any other metal object. This can short circuit the battery. Avoid exposure to temperature extremes. A phone with a hot or cold battery may temporarily not work (or charge), even if the battery is fully charged. Always allow it to cool down or warm up first and keep the battery between 41oF and 95oF (5oC and 35oC).
USING THE MENU USING THE PHONE TURNING THE PHONE ON USING THE MENU 1. Press and hold , until your “Power On” logo appears and the melody begins to play. 1. To access the menu from the idle screen, press [MENU]. ● To select a logo, refer to page 59 for more details. (Settings>Display>Animation Setting) for more detail. ● If “PASSWORD” appears, the phone is locked. To unlock, enter your 4-digit password. NOTE: The default password is “0000”. TURNING THE PHONE OFF 1. Press and hold appears. NOTE: . 2.
MENU SUMMARY MENU SUMMARY PHONE BOOK u 1 : Find 1 : By Name 2 : By Number 3 : By Group 2 : Add New Entry 3 : Edit Existing Entry 1 : Add New Group 4 : Edit Group 2 : Change Group Name 3 : Clear Group 5 : Edit SMS Group 1 : Add New Group 2 : Change Group Name 3 : Edit Existing Group 4 : Clear Group 6 : Speed Dial 7 : My Profile RECENT CALLS MESSAGING u u SETTINGS u 1 : Sounds 2 : Display 3 : Security 1 : Dialled 2 : Received 3 : Missed 4 : Call Timers 1 : Last Call 2 : All Calls 3 : Home Call
MENU SUMMARY DATA SVC. u 1 : Connection VOICE SVC. u 1: Voice Memo 2: Call Answer 3: Voice Command 4: Voice Dial 5: Voice Alert 6: Voice Setting BASIC FUNCTIONS MAKING A CALL 1. Enter a phone number.
BASIC FUNCTIONS BASIC FUNCTIONS PAUSE FEATURE ANSWERING A CALL You can dial or save a phone number with pauses for use in the automated systems where you need to enter a credit card number, a PIN number, and so on. This feature will be convenient when you are linked to ARS (Advanced Record System). 1. To answer a call, press any key except OK, End or the Navigation Key. 1. Enter a phone number, then press a pause. [PSE] to insert 2. Press to dial or [STO] to store.
BASIC FUNCTIONS BASIC FUNCTIONS CALL WAITING FUNCTION ADJUSTING VOLUME Notifies you of another incoming call when you are on the phone by sounding a beep and displaying the caller’s phone number on the screen. Adjusts the volume in two ways: by using the volume control keys on the side of the handset, or by using the menu. 1. To answer another call while on the phone, press . This places the first call on hold. 1. Press [MENU] following. 2. To switch back to the first caller, press ● ● ● ● again.
FUNCTIONS DURING A CALL FUNCTIONS DURING A CALL To display menu options during a call, press . These menu items are available while you are on a call. SEND MY PHONE # MESSAGING Enables you to send a message (SMS) during a call. 1. Press [MENU] . Enables your phone number to be automatically transmitted to a pager. (Dependent on pager service.) 1. To transmit your phone number during a call, press [MENU] and .
FUNCTIONS DURING A CALL SPEAKER MODE Activates the speakerphone when you are on a call. The phone returns to normal (speakerphone off) after ending or call or when the phone is turned off and back on. 1. Press [MENU] . 2. Select “On” or “Off” and press [OK] to save it. Chapter 3 MEMORY FUNCTION This chapter addresses numerous functions including saving phone numbers to the internal phone book, entering text and accessing call logs.
TEXT INPUT METHODS STORING PHONE NUMBERS The phone book stores up to 300 entries, each with 5 phone numbers. ENTERING CHARACTERS 1. Enter phone # and press For convenient entry of memory location names and text messages, your phone offers several text input methods: [STO]. 2. Choose Add New Entry or Add Existing Entry. Press [OK] to select. 3. The Phone # will appear next to a list of icons. The name of the icon is displayed above the list.
TEXT INPUT METHODS T9TM PREDICTIVE TEXT MODE [T9TMABC] To choose T9TM mode, press [MODE] then choose [T9TMABC]. This mode predicts the words you are entering using a built-in dictionary. With T9TM predictive text input, you press each key only once for each letter. The chart below outlines how to use T9TM text input. TEXT INPUT METHODS 1. Press each key once for each letter of the word you are writing. ● To write John with the English dictionary selected: 1. Press 5 once - (for - k) 2.
SPEED DIALLING TEXT INPUT METHODS NUMERIC MODE [123] ONE-TOUCH/TWO-TOUCH DIALLING Numeric mode allows you to add a number to your entry/message. To select numeric mode, press [MODE] then select [123]. Ideal for frequently dialled numbers, this feature allows phone book entries to be dialled via the keypad with only one or two key presses. SYMBOL MODE [SYM] Select symbol mode allows you to add various symbols to your entry.
PHONE BOOK PHONE BOOK Stores up to 300 entries, each of which can be assigned to a group like Personal, Business, etc. Entries can be retrieved by name, phone number or group. FIND 1. Press [MENU] . 2. To search through the menu, enter a part of the phone number and press [OK]. Retrieves an entry by group, name, or number. 1. Press BY NUMBER ● If there is no match, “Cannot find number” will appear. [FIND]. 3. All matching entries will be displayed.
PHONE BOOK PHONE BOOK ADD NEW ENTRY EDIT GROUP Adds a new entry to the phone book. Adds, changes and deletes groups. 1. To add a new entry to the phone book, press [MENU] . ADD NEW GROUP 2. Enter a name, then press 1. To add a new group, press [STO]. 2. Input a new group name. [STO]. 3. Press Group – Personal, Business, Etc Voice dial – Home, Mobile, Office, Pager, Unassigned Set Secret – Yes, No Ringer – Select Ringer Type. Picture – Select Downloaded Image. 5.
PHONE BOOK PHONE BOOK CLEAR GROUP 1. To delete an existing group, press [MENU] CHANGE GROUP NAME 1. To change a group name, press [MENU] . 2. Select the group to be deleted and press “Clear [Group name]?” will be displayed. [OK]. . 2. Select an existing group name and press [OK]. 3. Input a new name. 3. Press [OK] to delete it. 4. Press [OK] to save it. EDIT SMS GROUP EDIT EXISTING GROUP Adds, changes and deletes a group. 1. To editing menu, press [MENU] . ADD NEW GROUP 2.
PHONE BOOK MY PROFILE CLEAR GROUP Saves your personal information. 1. To clear a group name, press [MENU] . 2. Select a group name and press [OK]. 3. “Clear [Group Name]?” will be displayed. 4. Press [OK] to delete the group. Links a phone number from the phone book to a location number and enables you to call that number simply by pressing its location number from the idle mode. [MENU] 1. Press [MENU] to review and edit your personal information as follows.
RECENT CALLS RECENT CALLS The TX-60B keeps a log of the 20 most recently missed, received (incoming) and dialled (outgoing) calls. Log information includes the phone number, the date and time of the call. This feature is not intended for billing purposes. In idle mode, you can access Recent Calls by pressing [MENU] . RECEIVED DIALLED 1. To see a list of the 20 most recently answered calls, press or [MENU] . Displays information about the 20 most recently dialled numbers.
RECENT CALLS RECENT CALLS MISSED CALL TIMERS Displays information of the 20 most recently missed calls. You can dial a selected number by simply pressing . Displays accumulated Talk Time. The five timers include: 1. To see a list of the 20 most recently missed calls, press [MENU] . If the number is already stored in your phone book, only the name appears. If the number is not stored, only the phone number appears. To display the total amount of time of your last call: 2.
RECENT CALLS RECENT CALLS HOME CALLS CUMULATIVE CALLS To display the total amount of time for calls placed within your home area: To display talk time of cumulative calls: 1. Press [MENU] and the message “Not intended for billing purposes” appears for 5 seconds. 2. Use the Navigation Key to view the time of the following items: ● Voice, Data/Fax 3. To reset the timer, press [RST]. To return to the previous page, press 1.
MEMO Chapter 4 SETTINGS This chapter addresses customizing your phone by adjusting backlighting, volume, ring tones and other user-friendly features.
SETTINGS SETTINGS SOUNDS RINGER MODE Select Ringer type, Ringer Mode, Volume, Alert, Roam Ringer, Tone Length and Etiquette Mode. Alerts you to incoming calls in the following modes: 1. Press [MENU] . RINGER TYPE Selects a ringer type to alert you of an incoming call. RINGER LIST 1. Press [MENU] . 2. Select one of the following options: ● ● ● ● Ringer Vibrate Ringer after Vibrate: The ringer sounds after vibration. Silent: Mutes the ringer. 2.
SETTINGS VOICE CALL To adjust the earpiece volume. 1. Press [MENU] . 2. Adjust the earpiece volume with the Navigation Key or the volume keys on the side of the phone. 3. To activate, press ROAM ALERT Sounds an alert to sound when leaving a service area and entering a roaming service area: 1. Press [MENU] . 2. Select “Off” or “On” and press . 2. Select “Off” or “On” and press 2. Adjust the speaker volume with the Navigation Key or the volume keys on the side of the phone. 3.
SETTINGS SETTINGS ROAM RINGER DISPLAY Sounds a different ringer from the one set in Ringer Type when you enter a roaming service area. Customizes and personalizes the display. ANIMATION SETTING 1. Press [MENU] . Selects your favorite LCD display in the following modes: 2. Select “Distinctive” or “Normal” and press to activate it. [OK] ● Distinctive: Sounds a different ringer type. ● Normal: Sounds the same ringer type as used in Home area. IDLE DISPLAY 1. Press [MENU] 2.
SETTINGS SETTINGS MAIN DISPLAY SETTING LCD SETTING Selects your favorite LCD display for the following modes: Controls backlight and LCD contrast for a better view and more efficient use. GREETING INPUT To input a personal greeting: 1. Press [MENU] BACKLIGHTING Backlights the display and keypad for easy viewing in low ambient light conditions. 1. Press [MENU] . 2. To edit the banner, press . [EDIT]. 3. Input your personal banner, using the Alpha Editor. (Refer to page 33). 4.
SETTINGS SETTINGS DIM Backlights the display at reduced light intensity to conserve battery power. 1. Press [MENU] . SYSTEM Scans the channels to stay connected to any available system. SET MODE 2. Select one of the following options: 5 secs, 10 secs, 20 secs, Off. To activate, press [OK]. NOTE: Dim backlight and normal backlight times selected are cumulative. GRAPHIC SETTING SCREEN SAVER 1. Press [MENU] .
SETTINGS SETTINGS NAM SETTING OTHERS Enables Auto NAM (Number Assignment Modules) or manually selects a NAM. ANSWER MODE To select an answer mode: AUTO NAM Automatically switches phone to proper NAM when you have multiple NAM registrations. 1. Press [MENU] . 2. Select “Yes” or “No” then press NOTE: [OK] to activate it. “NO” is the default AUTO NAM setting. 1. Press [MENU] 2. Select “Any Key” or “Send Key”. ● Any Key: Press any key to answer an incoming call except , , and .
SETTINGS SETTINGS AUTO ANSWER KEYGUARD Automatically answers a call after a preset second of rings. 1. Press 1. Press [MENU] . 2. Select on of the following: ● Off / 5 seconds / 10 seconds / 18 seconds. This function will not be active when you select Vibrate, Silent, Etiquette or Ringer after Vib as a ringer mode. This function is only available when a Headset or Hands-free Car Kit is connected to the phone. 3. To activate, press . 2. Select “On” or “Off”.
SETTINGS SETTINGS TTY MODE SPEAKER MODE Your phone is able to operate with a “TTY” (Teletypewriter) device in both analog and digital modes. This feature is system dependent and may not be available in all areas. 1. Press CONNECTING TO TTY DEVICE 1. Turn the “TTY” device off. 2. Connect the “TTY” device to the phone at the earphone-microphone jack. ACTIVATING/DEACTIVATING TTY MODE 1. Press [MENU] . 2. Select one of the following options (TTY Full/ TTY+TALK/TTY+HEAR/TTY Off) and press [OK].
VR MODE VR MODE Voice Recognition (VR) enables you to place calls and record voice memos using your voice. 1. Press and hold until your phone turns to VR mode. 2. When the phone turns to VR mode, the screen on the right appears. 1. Press and hold until your phone turns to VR mode. VR Mode Say a name or a command DEL OK 2. Say “Dial” and the display on the right will appear.
VR MODE VR MODE VOICE MEMO CANCEL This feature is the same as on page 74, except you can access the menu by voice command. 1. Press and hold mode. 1. Press and hold mode. until your phone turns to VR until your phone turns to VR To exit VR mode or return to the standby mode, say “Cancel.” 2. Say “Voice Memo” and you will hear “Voice Memo Menu” and the message “Please begin recording after the prompt tone” will be briefly displayed. In Beginner Mode you will also hear “Please record at the tone”. 3.
VS MENU VS MENU VOICE MEMO CALL ANSWER RECORD VOICE MEMO Sets and operates the answering machine. 1. To start VS menu, press [MENU] . 2. To enter the voice memo menu, press 1. Press . 3. Press [OK] to record a voice memo. The message “Please begin recording after the prompt tone” will be briefly displayed. In Beginner Mode you will also hear “Please record at the tone”. 4. To stop recording a memo, press NOTE: [STOP]. Press [PAUS] to pause, then press to resume or press [EXIT] to exit.
VS MENU VS MENU VOICE COMMAND TOP LEVEL Trains the VR with the following categories of control words: Use Top Level to train or untrain the VR with your control words (Dial, Redial, Voice Memo, Phone Book, Cancel). YES/NO 1. Press 1. Press [MENU] [MENU] . . 2. Select one of the following options, then press [OK]. LIST WORDS: Displays the list of control words in the Yes/No set. Select a control word from the list then press [OK]. Either train, untrain or view its status. To train a word, press .
VS MENU VS MENU VOICE DIAL ADD Lists, adds, and erases voice tags for phone book entries. 1. Press LIST 2. To add a voice tag to phone book entry, press . . . 3. Select a group, then press [OK]. 2. To list phone book entries with attached voice tags, press . 4. Select an entry, then press [OK]. 1. Press [MENU] [MENU] 3. Select one of the entries, then press 5. Select a phone number, then press [OK]. 6. “Enter voice tag?” will be displayed. [OK] then say the name.
VS MENU VS MENU VOICE ALERT VOICE SETTING Sets the voice alert service. Customizes the voice service menu. ON/OFF UNTRAIN ALL 1. Press [MENU] 1. Press . 2. Select “On” or “Off”, then press [OK]. . 2. Select “Yes” or “No”, then press [OK]. PROMPT MODE RECORD 1. Press [MENU] [MENU] Use the prompt mode to select either beginner or expert mode. The expert mode consists of shorter texts and just beeps as opposed to the beginner mode that gives full instructions. . 2. Record voice alert.
VS MENU DIGIT MODE Use the digit mode to select one of the following options ; ECHO, ECHO+BEEP, BEEP. 1. Press [MENU] . 2. Select one option, then press [OK]. ECHO: Digit echoes back when entered. ECHO + BEEP: Digit echoes and beeps when entered. BEEP: Digit beeps when entered. Chapter 5 SECURITY FEATURES HFK MODE HFK stands for Hands-Free Car Kit. With this function, you can activate and utilize the VR feature when the phone is in hands-free car kit. 1. Press [MENU] . 2.
SECURITY FEATURES SECURITY Prevents the unauthorized use of the handset and only allows access to certain features to those who have the password. SECURITY FEATURES DIALLED To block all outgoing calls except emergency calls from being placed, but allows incoming calls to be answered: 1. Press [MENU] and enter “Password”. 2. Press RESTRICT Enables you to restrict certain features with the password. Password must be entered to use restricted features.
SECURITY FEATURES SECURITY FEATURES MENU To block access to the menu to prevent any changes: 1. Press [MENU] and enter “Password”. 1 900 NUMBERS To restrict calling 1 900 numbers. 1. Press [MENU] and enter “Password”. 2. Press 2. Press and select “Allow” or “Restrict”. ● Restrict: Restrict access to the menu. ● Allow: Allow access to the menu. 3. To save, press [OK]. PHONE BOOK To block access to, and protect data in your phone book. 1. Press [MENU] and enter “Password”. 2.
SECURITY FEATURES SECURITY FEATURES SPECIAL #’S RESET PHONE Stores 3 phone numbers that can be called even in the lock mode. To reset phone to the default settings: 1. Press [MENU] 2. Press and select a location. 3. Press press [OK] and input a phone number; [STO] to save. 1. Press [MENU] 2. Press . and enter “Password”. and enter “Password”. 3. Select “Yes” or “No”, then press [OK]. ● When you select “Yes”, you will see “Wait a Moment” on the screen and the phone will be off.
MEMO Chapter 6 SUPPLEMENTARY FUNCTIONS This chapter addresses supplemental functions including the schedule, calculator, world clock and stopwatch features.
SCHEDULE SCHEDULE Sets an event and reminds you of that event. ALARM EVENT You can set up to 3 alarms. 1. To display a calendar, press [MENU] . 2. Move the Navigation Key to choose a date in the calendar and press [OK]. ● Day to Day movement: Move the navigation key left and right. ● Week to Week movement: Move the navigation key down and up. 3.1. To set a time for an event, press . Press [STO] to save the event.
CALCULATOR WORLD CLOCK CALCULATOR WORLD CLOCK Allows you to use the TX-60B as a calculator to perform basic mathematic functions (addition, subtraction, multiplication, division). Notifies you of the time in a specific preprogrammed city. 1. Press 2. The world map is to be displays with the city, its date and time. [MENU] . 2. Follow the instructions below to calculate (8*6)/4-2.5 ● 1. Press [MENU] . ● Use the Navigation key to see another city time. Input 8. Move the Navigation key leftward.
STOPW ATCH STOPWATCH Simultaneously times up to six different events. To operate the stopwatch: 1. Press [MENU] Chapter 7 . 2. To measure a time period. ● To start the stopwatch, press ● To pause it, press ● To resume, press [START]. To reset the counter, press [RST]. [START]. [STOP]. 3. To time up to six events at once: ● To start, press [START]. ● To stop a time period and continue measuring another one, press [CONT]. ● To stop the second and continue measuring a third one, press [CONT].
TWO-WAY SMS CHECKING MESSAGES Your TX-60B features Two-Way Short Message Service (SMS). This feature sends and receives text messages through your phone. Voice mail notification is also supported. CHECKING RECEIVED VOICE MAIL MESSAGE MESSAGE INDICATORS 2. The number of voice mail messages currently waiting in your mailbox appears. To access your voice mailbox, press . The following symbols indicate the status of message received by your phone. These symbols appear for voice mail and text messages. 1.
SENDING TEXT MESSAGES SENDING NEW TEXT MESSAGES 1. Press [MENU], then press PRIORITY or 2. Input a new phone number and press . [NEXT]. ● You can look it up from the phone book by pressing [PB]. 3. Input a new text message and press Marks messages as urgent. 1. To send an urgent message, press [NEXT]. CALL BACK Allows you to input a specific call back number. Your phone number is the default. . ● If “Delivery Failed. Retry in 3 mins?” Appears, press to select Auto retry. 1.
SENDING TEXT MESSAGES INBOX INSERT SIGNATURE INBOX MENU 1. Include user's signature in message, press “Insert Signature”. Manages received text messages. 1. Press 2. Select (No/Yes), then press [MENU], then press or . [OK]. : : : : : Urgent New Msg(not read) Urgent read Msg New Msg (not read) Old Msg (already read) Lock (already read and locked) 2. Select a message and press The message is displayed. 3. Press [OK]. [OPTS]. REPLY 1. To reply to the text message, press . 2.
INBOX OUTBOX OUTBOX MENU FORWARD 1. To forward the text message, press “Forward”. 2. Input the phone number of the person you are sending the message, then press [NEXT]. SAVE 1. To save the text message in your phone, press “Save”. Manages sent text messages or messages waiting to be sent. 1. Press : : : : : : [MENU], then press or . Auto resend Delivered Fail Not send Read Sent SAVE ADDRESS 1. To save the Callback number from the text message, press “Save Address”. 2.
OUTBOX WEB ALER TS ERASE 1. To erase a text message, press WEB ALERTS . 2. When you see “Erase this message?”, press [YES]. SAVE ADDRESS 1. Press 2. Select the phone number and press [OK]. Follow the procedures for “STORING PHONE NUMBERS” on page 32. or . 2. To select GoTo, press . To select Erase Message, press . The text message will be displayed. •[ •[ 1. To save the Callback number, press “Save Address”. [MENU], then press •[ V ]: Read Message. ]: Unread Message.
ERASE ALL SAVED SAVED ERASE MESSAGES Manages saved messages from the Inbox/Outbox. Erases all the messages from the “Inbox”, “Outbox” or “Saved” folder. 1. Press [MENU], then press or . 1. Press 2. Select a message and press The message is displayed. 3. Press [MENU], then press or . [OK]. 2.1. To erase all the inbox messages, press . ● Erases entire inbox or old inbox. [OPTS]. 2.2. To erase all the outbox messages, press 4.1.
SETTINGS SETTINGS SETTINGS MENU ALERT Manages messaging features through various features. Enables phone to alert you of an incoming message. 1. Press [MENU], then press “Settings”. 1. Press or . 2. Select “Ringer”, “Vibrate”, “Silent”, “Ringer & Remind”, or “Vibrate & Remind”. SAVE SENT MESSAGES ● The Ringer & Remind or Vibrate & Remind rings or vibrates every 2 minutes to remind you of an incoming message. They will be cleared when any key is pressed. Saves every sent message. 1.
SETTINGS SETTINGS AUTO ERASE SIGNATURE Automatically erases (Inbox/Outbox) messages when new messages arrive. Allows user to edit message signature. 1. Press AUTO ERASE INBOX 1. Press “Auto Erase Inbox”. 2. Select “Disable” or “Old Inbox”. 3. Press [OK]. AUTO ERASE OUTBOX 1. Press “Auto Erase Outbox”. 2. Select “Disable” or “Old Outbox”. 3. Press [OK]. ENTRY MODE Sets an Entry Mode as a default. The T9 mode indicator will appear whenever the input mode is activated if the T9 mode is the default.
MEMO Chapter 8 MAKING AN EMERGENCY CALL Page 114 - Chapter 7 Chapter 8 - Page 115
EMERGENCY CALLING The Emergency Call feature allows Emergency numbers (such as 000,112) to be dialled even when the phone is in Lock Mode or outside your service provider’s coverage area, provided any other compatible systems are available (CDMA/PCS/AMPS). EMERGENCY NUMBER IN LOCK MODE The Emergency number call service is available even in the lock mode. 1. Enter Emergency number and press Chapter 9 WIRELESS INTERNET . 2. The call connects. 3. The phone exits the Lock Mode for 5 minutes.
STAR T WIRELESS INTERNET BROWSER BROWSER MENU ACCESS THE WIRELESS INTERNET BROWSER MENU Your TX-60B allows you to browse various Wireless Internet websites directly from your phone. This provides you with access to up-to-date information such as news, sports, weather and stock quotes when you subscribe to Wireless Internet access with your service provider. Please contact your service provider for a list of available Wireless Internet websites and service details.
BROWSER MENU BROWSER MENU BOOKMARKS 1. To view your bookmark list, press or [OK], then press . This provides easy website access without entering its URL. INBOX or [OK], or [OK], SCROLL MODE 1. To select scroll mode, press . ● SCROLL SPEED 1. To select scroll speed, press RELOAD . ● KEY PRESS TIMEOUT 1. To select Key Press Timeout, press Reloads current page. or [OK], SETTINGS Displays Browser Menu Settings. Page 120 - Chapter 9 . ● 1. To select Save Image, press then press . 1.
BROWSER MENU ● SHOW URL Displays the URL (Uniform Resource Locator) of the current page. 1. To select Show URL, press . ● RESTART BROWSER Causes the deck history and deck cache to be cleared and starts a new session with the UP.Link. 1. To select Restart Browser, press . Chapter 10 DATA SERVICE Your phone works as wireless modem when connected to a PC and a Laptop computer with data interface cable. This chapter shows you how to choose the correct settings for this to properly function.
DATA SER VICES CONNECTION To select a connection mode based on the handset usage: 1. Press [MENU] . 2. Select one of the following connection modes: ● Voice Call: To receive a voice call. ● Data Only: To receive data when connected to PC. ● Fax Only: To function as a fax when connected to PC. 3. Press NOTE: Chapter 11 SAFETY INFORMATION [OK] to save. This function is available only when the phone is connected to data cable.
SAFETY INFORMATION FOR WIRELESS HANDHELD PHONES Read This Information Before Using Your Handheld Portable Cellular Telephone EXPOSURE TO RADIO FREQUENCY SIGNALS Your wireless handheld portable telephone is a low power radio transmitter and receiver. When it is ON, it receives and also sends out radio frequency (RF) signals. In August 1996, the Federal Communications Commissions (FCC) adopted RF exposure guidelines with safety levels for handheld wireless phones.
SAFETY INFORMATION FOR WIRELESS HANDHELD PHONES SAFETY INFORMATION FOR WIRELESS HANDHELD PHONES ELECTRONIC DEVICES ELECTRONIC DEVICES Most modern electronic equipment is shielded from RF energy. However, certain electronic equipment may not be shielded against the RF signals from your wireless phone.
SAFETY INFORMATION FOR WIRELESS HANDHELD PHONES SAFETY INFORMATION FOR WIRELESS HANDHELD PHONES OTHER SAFETY GUIDELINES PRECAUTIONS AND WARNINGS Aircraft Please read and understand all of the Precautions and Warnings contained in this manual before attempting to operate your phone. FCC Regulations prohibit using your phone while in the air. Switch OFF your phone before boarding an aircraft. 1.
SAFETY INFORMATION FOR WIRELESS HANDHELD PHONES OPERATING PROCEDURES Never violate any of the following Rules and Regulations of the FCC when using your phone. The following offenses are punishable by fine, imprisonment, or both: - Using obscene, indecent, or profane language. - Using the unit to give off false distress calls. - Wiretapping or otherwise intercepting a telephone call, unless that person has first obtained the consent of the parties participating in the call.
SAR INFORMATION SAR INFORMATION THIS MODEL PHONE MEETS THE GOVERNMENT’S REQUIREMENTS FOR EXPOSURE TO RADIO WAVES. as described in this user guide, is 0.633 W/kg. (Body-worn measurements differ among phone models, depending upon available accessories and FCC requirements). While there may be differences between the SAR levels of various phones and at various positions, they all meet the government requirement for safe exposure. Your wireless phone is a radio transmitter and receiver.
MEMO Chapter 12 WARRANTY Protect Your Warranty 12 Month Limited Warranty Page 136 - Chapter 11 Chapter 12 - Page 137
PROTECT YOUR W ARRANTY 12 MONTH LIMITED WARRANTY Read your Warranty carefully, with the special consideration to paragraph seven of the Limited Warranty for your unit. HYUNDAI COMMUNICATIONS CORP. (the Company).
12 MONTH LIMITED WARRANTY 12 MONTH LIMITED WARRANTY HYUNDAI Help Line : 1800 224 537 Some states do not allow limitations on how long an implied warranty lasts or the exclusion or limitation of incidental or consaquential damage so the above limitation or exclusions may not apply to you. This Warranty gives you specific legal rights, and you may also have other rigths which vary from state to state.
MEMO Page 142 - Chapter 12 MEMO Chapter 12 - Page 143
MEMO Page 144 - Chapter 12 MEMO Chapter 12 - Page 145
MEMO Page 146 - Chapter 12