User Guide Pantum M5000/M6000 Series Monochrome Laser MFP Read this User Guide carefully before using the printer
Preface Welcome to Pantum series products! Thank you for choosing to use a Pantum series product! To protect your vital interests, please read the following statements carefully. Legal Notice Trademark Pantum and Pantum logos are registered trademarks of Zhuhai Seine Technology Co., Ltd. Microsoft®, Windows®, Windows server® and Windows Vista® are trademarks registered by Microsoft Corporation in the United States and/or other countries/regions.
Safety Precautions Laser Safety Laser radiation is harmful to the human body. Since the laser components are completely sealed within the printer, laser radiation will not leak. To avoid laser radiation, please do not disassemble the printer at discretion! The device is certified as a Class IIIB laser product. Since radiation emitted inside the device is completely confined within protective housings and external covers, the laser beam cannot escape during any phase of normal operation.
Precautions Precautions before Using the Printer: 1. Read and understand all instructions. 2. Familiarize yourself with the basic principles associated with operating electrical appliances. 3. Comply with all warnings and instructions marked on the equipment or specified in the manual supplied with the equipment. 4. If the operating instructions conflict with the safety information, please refer back to the safety information, as you may have misunderstood the operating instructions.
Regulatory Information This symbol indicates that, at the end of your product’s life, it must not be discarded as domestic waste. Instead, you should dispose of your used equipment at a designated collection point for the recycling of waste electrical and electronic equipment. Ref: EU Directive 2002/96/EC on Waste Electrical and Electronic Equipment (WEEE). Please contact your distributor / supplier for further information. This product is suitable for indoor use only.
Table of Contents 1. Before Using the Printer..................................................................................................................1-2 1.1. Packing List..............................................................................................................................1-2 1.2. Components of the Printer........................................................................................................1-3 1.3. Overview of the Control Panel..............................
6. Scan................................................................................................................................................6-2 6.1. Basic Operations......................................................................................................................6-2 6.1.1. Scanning with Control Panel..............................................................................................6-2 6.1.2. Scanning with TWAIN........................................................
Before Using the Printer 1 CHAPTER 1. Before Using the Printer.....................................................................................................................2 1.1. Packing List.................................................................................................................................2 1.2. Components of the Printer...........................................................................................................3 1.3. Overview of the Control Panel.......
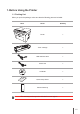
1. Before Using the Printer 1.1. Packing List When you open the package, make sure that the following parts are included: Parts Name Quantity Printer 1 Toner cartridge 1 USB interface cable 1 Power cord 1 CD-ROM 1 Quick Setup Guide 1 Pantum Warranty 1 Note: • The warranty card may not be included in some regions.
1.2.
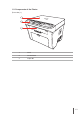
|Front view (2) 1 2 B5 B5 LT R A4 ID LTR A4 C OPY 3 4 5 8 9 6 7 1 Glass Platen 2 Scanning Platform 3 Output Tray 4 Manual Feed Guide 5 Automatic Feed Guide 6 Paper Stop 7 Feeder Tray 8 Automatic Feeder Tray 9 Manual Feeder Tray 1-4
|Rear view 1 2 3 4 1 USB Interface 2 Rear Cover 3 Power Switch 4 Power Supply Socket 1-5
1.3.
1.4. Display 100 % T+P |Copy Standby Mode |ID Copy Standby Mode |Receipt Copy Standby Mode 01 A4 OK 100 % T+P 01 A4 ID 01 A4 100 % 100 % 01 Receipt A4 Scan/Merge |Single Page Scan Standby Mode |N-UP Scan Standby Mode 1.Scan mode Scan/Merge 2.
1.5. Menu Button Settings 1. Copy Settings/Scan Settings 2. Paper Settings 3. System Settings 4. System Information 5. Back 1.6. Toner Cartridge | Outside view of the toner cartridge Type Average print volume Standard-capacity toner cartridge About 1500 pages (The above data is based on ISO/IEC 19752 standard) High-capacity toner cartridge About 2300 pages (The above data is based on ISO/IEC 19752 standard) Note: • Subject to change without notice.
Paper and Media 2 CHAPTER 2. Paper and Media................................................................................................................................2 2.1. Select Paper................................................................................................................................2 2.2. Special Paper..............................................................................................................................3 2.3. Loading Paper........................
2. Paper and Media 2.1. Paper type and sizes Automatic Feeder Tray Manual Feeder Tray Media Type Plain, Preprinted Media Size A4, A5, JIS B5, IS0 B5, A6, Letter, Legal, Executive, Folio, Oficio, Statement, Japanese Postcard, Monarch Env, DL Env, C5 Env, C6 Env, No.10 Env, ZL, Big 16K, Big 32K, 16K, 32K, B6, custom, etc. Media Weight 60~105g/m² Maximum capacity of the tray 150 pages, 80g/m² Media Type Plain, Cardstock, Transparency, Envelope, Label, Thick Media Size Width: 75~218mm (2.95-8.
2.2. Special Paper This printer supports using special paper for printing. Special paper includes: labels, envelopes, transparencys, thick papers, etc. Note: • When using special paper or print media, be sure to select the appropriate media type and size in the print settings so as to get the best results. |Please observe the following standards: Type of media Correct practices Incorrect practices Label Labels must be put flat when being used. Use a full sheet of labels only.
2.3. Loading Paper 2.3.1. Loading into the Automatic Feeder Tray a) Open the feeder tray. b) Slide the automatic feed guides to match both sides of the paper. c) Raise the output tray to avoid paper slipping and falling.
d) Load the paper into the automatic feeder tray print-side up. e) Adjust the paper stop to match the paper size. Note: • If the paper loaded into the automatic feeder tray at one time exceeds 150 pages, the paper will jam or will not be fed in. • When using printed paper, please place the side to be printed (the blank side) facing up. • When printing on A5 paper, it is recommended that the paper is fed in landscape orientation, which helps extend the toner cartridge life.
2.3.2. Loading into the Manual Feeder Tray a) Open the feeder tray. b) Slide the manual feed guides to match both sides of the paper. c) Raise the output tray to avoid the paper from slipping and falling.
d) Put a piece of paper, envelope or transparency into the manual feeder tray with two hands until the front end of the paper, envelope or transparency contacts the feed roller. Note: • When loading paper into the manual feeder tray, the printer will automatically enable the manual feed mode. • Load the paper into the manual feeder tray print-side up. When loading, the top of the paper first enters into the manual feeder tray.
2.4. Select Media |Paper requirements: Type Size Quantity Plain, Cardstock, Transparency, Envelope, Label, Thick A4, B5, A5, A6, Letter, Executive One piece at a time 2.5. Loading Media 1). Raise the cover. 2). Load the document face down.
3). Align the manuscript to match the appropriate paper size. B5 LTR A4 B5 A4 LTR ID COPY 4). Gently close the cover. Note: Cautions: • Do not put documents with glue, ink or correction fluid on the glass unless it is completely dry. • Only use paper designed for laser printers. • Paper should be clean and free of dust and other contaminants.
2.6. Nonprinting Area The shaded edge indicates the nonprinting area. A A B Usage Copy Printing B Paper Size Top and bottom margins (A) Left and right margins (B) A4 5mm (0.197in) 5mm (0.197in) LETTER 5mm (0.197in) 5mm (0.197in) A4 5mm (0.197in) 5mm (0.197in) LETTER 5mm (0.197in) 5mm (0.
Installation and Uninstall of Driver Software 3 CHAPTER 3. Installation and Uninstall of the Driver Software ................................................................................2 3.1. Windows-based Driver................................................................................................................2 3.1.1. Driver Installation .................................................................................................................2 3.1.2. Driver Uninstall .............
3. Installation and Uninstall of the Driver Software 3.1. Windows-based Driver 3.1.1. Driver Installation 1. Introduction The driver can be installed using two methods. • Install the driver with the printer connected to the PC. • Install the driver first and then connect the printer after the driver installation is completed. For users of Windows XP and Windows Server 2003: when connecting the equipment for the first time, the Found New Hardware Wizard window will pop up. Please close this window.
b) Installation Language After the authority is checked the installation proceeds to the next step – Language Selection interface. c) Installation Settings Click Next to select the installation method. Note: • Install Now installs the printer driver software, the scanner driver software and Pantum Push Scan Manager together. • The Install Now installs the software to the default path, namely the "System disk:\Program Files" directory.
d) License Agreement Click Install Now button to enter the License Agreement screen. Please carefully read and accept the user license agreement by selecting I Agree option and clicking Next button to proceed with the installation. The “I Disagree” radio button is checked in the interface by default, and the Next button is grayed out. To proceed with the installation of the software, users need to check the “I Agree” option. The Next button is then available.
If the appropriate printer device is detected, it will automatically move to the Copying Files step. If the printer is plugged into the PC the user can click “Try Again” to look again for the connected printer. If the user will connect the printer later the user can click ‘Continue Installation”. Selecting Continue Installation will go to the next step, copying files. f) Copying Files Copy the installation files to the installation path.
g) Driver Installation h) Completing Installation After the driver installation progress bar shows that the installation progress is completed, it will show Installation Complete screen.
Click the Done button to complete the installation of the printer driver, carry out online product registration which can provide online services and consultation as well as the toner cartridge and other information, and set this printer as the default printer. You can also cancel these options as needed. Note: • If the driver is installed with the printer unconnected, the option "Set this printer as the default printer" will not be displayed.
b) Component Selection Click the Custom Installation button to enter the Element Selection and select the desired components for installation as well as change the installation path if desired. c) License Agreement After selecting components and installation path, click Next button to enter the interface of the License Agreement. Please carefully read and accept the user license agreement by selecting I Agree option and clicking Next button to proceed with the installation.
The “I Disagree” radio button is checked in the interface by default, and the Next button is grayed out. To proceed with the installation of the software, users need to check the “I Agree” option. The Next button is then available. d) Search for Printers After selecting Agree and clicking Next, it will go to the interface of Search for Printers, and the program will automatically search for the appropriate printer device connected to the computer.
Please check the device connection and click Try Again. If the printer is not connected, select Continue Installation to enter the Copying Files interface. e) Copying Files Copy the installation files to the installation path.
f) Driver Installation g) Completing Installation After the driver installation progress bar shows that the installation progress is completed, it will enter the Installation Complete interface.
Click the Done button to complete the installation of the printer driver, carry out online product registration which can provide online services and consultation as well as the toner cartridge and other information, and set this printer as the default printer. You can also cancel these options as needed. Note: • If the driver is installed with the printer unconnected, the option "Set this printer as the default printer" will not be displayed. 3.1.2. Driver Uninstall 1. Select uninstall mode.
3. Uninstall Uninstall Element interface. Click OK on the Welcome interface to enter the Uninstall Element interface where you can select the components to be uninstalled. Only all installed components will be displayed. 4. Uninstall progress interface After selecting the components, click Next to enter the uninstall interface.
5. Done interface After the progress bar advancing is completed, it will enter the Done interface. Click Done button, the following window will pop up prompting you to restart the computer. Click OK to exit the uninstaller and restart the computer; click Cancel to exit the uninstaller. Note: • If you choose not to restart the computer after uninstalling is completed, an unsuccessful installation or scan abnormality after installation may occur when reinstalling the driver.
3.2. Mac System-based Driver 3.2.1. Introduction Mac driver installer is made by using the PackageMaker software that comes with the Mac System. The installation style is basically consistent with the installation of the ordinary software under Mac. The installation is divided into the following steps: introduction, license, destination volume, type of installation, installation, and summary. 3.2.2. Installation Steps 1.
2. License Agreement Click Continue on the above figure to display the contents of the License Agreement, as shown below: Click Continue, it will pop up the “To continue installing the software you must agree to the terms of the software license agreement.” dialog box. Click Agree to accept the License Agreement and continue the installation.
3. Destination Volume Click Continue on the above figure to select the installation disk, then the following view will be displayed: 4.
Click Install, the following prompt box will pop up. Only after getting permission from the administrator user can you continue with the installation. 5.
6.
General Settings 4 CHAPTER 4. General Settings ................................................................................................................................2 4.1. System Settings ..........................................................................................................................2 4.1.1. Toner Save Settings .............................................................................................................2 4.1.2. Language Settings ........................
4. General Settings This chapter mainly introduces some general settings of the control panel's menu. To learn about other buttons and functions of the control panel, please see Section 1.3. 4.1. System Settings 4.1.1. Toner Save Settings 1) Press Menu button to enter the menu interface. 100 % T+P 01 A4 OK 2) Press direction pad ▲ or ▼ to select 3. System setting and press OK button. Menu setting 3.System setting OK 3) Press direction pad ▲ or ▼ to select the 1.
5) Press Menu button to exit the menu interface directly or select the last option from each level of menu and press OK button to exit the menu interface. Cancel Copy Scan Start OK Status 4.1.2. Language Settings Language setting is used to select the language of the control panel to be displayed. 1) Press the Menu button to enter the menu interface. 2) Press direction pad ▲ or ▼ to select 3. System setting and press the OK button. 3) Press direction pad ▲ or ▼ to select 2.
This is used to help users to set power saving quickly. It can only be operated after exiting all operations. Press down this function button and the equipment will enter Power Saving Sleep status. The power saving indicators will stay on (green) to indicate that the equipment is in Sleep Status and both the LCD display and backlight are off. To wake up the printer, press the Power Saving button to cancel power saving or send print and scan job. Pressing any other button does not work. 4.1.5.
4.1.8. Sleep Time System setting OK 5.Sleep time 1) Press Menu button to enter the menu interface. 2) Press direction pad ▲ or ▼ to select 3. System setting and press the OK button. 3) Press direction pad ▲ or ▼ to select 5. Sleep time and press the OK button. 4) The direction pad ▲ or ▼ can be used to select 1. 1 Minute, 2. 5 Minutes, 3. 15 Minutes, 4. 30 Minutes, 5. 60 Minutes and Back.
5. Press Menu button to exit the menu interface directly or select the last option from each level of menu and press OK button to exit the menu interface. Note: • For information on paper size, please see Section 2.1. 4.2.2. Setting Paper Type Paper setting OK 2.Paper type 1. Press the Menu button to enter the menu interface. 2. Press direction pad ▲ or ▼ to select the 2. Paper setting option and press the OK button. 3. Press direction pad ▲ or ▼ to select the 2.
Print 5 CHAPTER 5. Print ...................................................................................................................................................2 5.1. Print Function..............................................................................................................................2 5.2. Opening Help Document ............................................................................................................3 5.3. Manual Duplex ................................
5. Print 5.1.
Note: • You can select the 2x2 Poster printing in N-in-1 to see the poster printing function. • You can open the Printing Preferences and click the Help button to view the explanation of the specific function. For information about how to open the help document, see Section 5.2. 5.2. Opening Help Document Open the Printing Preferences and click the Help button (Only for Windows system).
The Help document contains the User Guide for the printer. 5.3. Manual Duplex 1. The printer driver supports manual duplex. Note: • If the paper is thin, it may wrinkle. • If the paper is curled, make it flat and put it back into the manual feeder tray. • If the manual duplex function causes a paper jam, see Section 9.1 for instructions. 2. Ensure that a certain amount of paper is loaded into the automatic feeder tray before printing. Note: • For loading paper, see Section 2.2.
3. The printing steps are as follows (Only for Windows system): a) Open the document to be printed from the application (such as Notepad), and select Print from the File menu. b) Select Pantum Printer.
c) Click Printing Preferences or Properties button for the print settings. d) Check Manual Duplex in the Basic tab and click OK after completing the settings. e) Click Print. Note: • It is recommended to raise the output tray to prevent the paper from sliding out of it. If you choose not to raise the output tray, we recommend that you immediately remove the printed paper from the printer.
f) A window of “Duplex Recovery Tips” will automatically pop up to inform you of the specific operation procedures. g) Remove the printed paper from the output tray, tidy the paper and put it back into the automatic feeder tray, print-side (blank side) facing up. Note: • Remove a stack of paper from the output tray and put them into the automatic feeder tray after flipping the up and down sides. Do not change the order of the stack of paper during this process.
h) Press OK on the control panel to continue printing. The printer will print all the even pages on the other side of the paper in turn. 5.4. Cancel Job Press the Cancel button on the control panel to cancel the job you want to cancel during the printing process.
Scan 6 CHAPTER 6. Scan ..................................................................................................................................................2 6.1. Basic Operations ........................................................................................................................2 6.1.1. Scanning with Control Panel ................................................................................................2 6.1.2. Scanning with TWAIN ..................................
6. Scan This printer offers two types of scanning modes: scanning with the control panel or TWAIN. 6.1. Basic Operations 6.1.1. Scanning with Control Panel This section introduces how to scan documents to the computer with the control panel. The specific operation procedures are as follows: Put the document into the glass platen. Note: • During the scanning, please do not open the cover to avoid any adverse impact on the image quality.
6.1.2. Scanning with TWAIN PANTUM printer can be selected by other applications to perform scanning with TWAIN. After selecting the printer, the following interface will pop up: 6.1.3. Cancel Job When a document is scanning, there are two ways to cancel the job: Press the Cancel button on the control panel.
Click the Cancel button on the scanning progress bar interface. 6.2. Scan Function This section introduces how to use the control panel to achieve single page scan and N-UP scanning. 6.2.1. Single Page Scan The default scan mode of the control panel is single page scan. The prompted control panel is shown as follows: Scan/Merge 1.Scan mode OK Note: • For the procedures of scanning operation, please see Section 6.1.1. 6.2.2.
The specific operations are as follows: 1. Press Scan button to enter scan status. The control panel defaults to the single page scan mode. Scan/Merge 1.Scan mode OK 2. Press ▼ button to select and enter the 2. Merge mode. Scan/Merge 2.Merge mode OK 3. Press Start button and the scanning progress bar interface will pop up on the computer. 4.
6.3. Scan Settings 6.3.1. Basic Settings Basic Settings can be used to set Scan Configuration and Variable Size. In Scan Configuration, it can perform the configurations of Color Mode, Resolution and Scan Area. For the specific contents and detailed description of the Scan Configuration, please click the Help button at the bottom left of the interface.
6.3.2. Advanced Settings Click the Advanced Settings tab to perform image adjustment and image processing. For the detailed description of the advanced settings, please click Help button to view the corresponding Help Document.
Copy 7 CHAPTER 7. Copy...................................................................................................................................................2 7.1. Basic Operations.........................................................................................................................2 7.1.1. Basic Operations of Copying................................................................................................ 2 7.1.2. Cancel Copy Operations................................
7. Copy 7.1. Basic Operations 7.1.1. Basic Operations of Copying 1. Put the manuscript into the scanner glass. Note: • During copying, please do not open the cover to avoid any adverse impact on the image quality. • For information about the Manuscript Selecting Requirements, please see Section 2.3. • For information about the Manuscript Loading Procedures, please see Section 2.4. 2. Press Copy on the control panel and enter the copy mode.
3. Press the Start button to start copy. Cancel Copy Scan Start Status 7.1.2. Cancel Copy Operations If you want to cancel the copy operation, please press Cancel button. LCD screen will prompt Cancelling... Cancelling... OK 7.2. Copy Function 7.2.1. Receipt Copy ID copy Receipt copy Press this button to enter Receipt Copy mode. It is used to get high-sharpness Receipt copies. Procedures for Receipt copies: 1.
7.2.2. ID Copy ID copy Receipt copy Press this button to enter ID Copy mode. It is used to copy ID cards and other two-sided certificates. Procedures for ID Card copies: 1. Press this button to flash to ID Copy mode. The area on the main interface that displays image quality will then change to display ID Card; 2. Place the certificates on the left half of the scanning platform and press the Start button to start the scan. The LCD will then prompt Copying...; 3.
7.3. Copy Settings 100 % T+ P 01 A4 OK Press the Menu button to enter the menu interface.
Routine Maintenance 8 CHAPTER 8. Routine Maintenance.........................................................................................................................2 8.1. Cleaning the Printer.....................................................................................................................2 8.2. Maintenance of the Toner Cartridge............................................................................................5 8.2.1. About the Toner Cartridge.........................
8. Routine Maintenance 8.1. Cleaning the Printer Note: • Please use mild detergents. Please clean the printer in accordance with the following steps: 1. Turn off the main power switch and unplug the power cord. 2. Use a soft cloth to wipe the outside of the printer clean. 3. Raise the cover and gently wipe the scanner glass with a soft cloth.
4. Raise the scanning platform until it is locked. 5. Open the output bin from the upper right ridge of the concave section. 6. Remove the toner cartridge along the guides. Note: • When removing the toner cartridge, put the toner cartridge in a protective bag or wrap it with thick paper to avoid direct light damaging the toner cartridge.
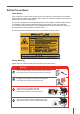
Warning Some parts of the printer are still hot within a short time after use. When opening the front cover or rear cover to clean the parts inside the printer, please do not touch the parts in the shaded area, as shown below, so as to avoid burns. 7. Wipe the laser scanning unit's dustproof surface gently with a cotton, swab or a dry and lint-free soft cloth with a little alcohol. 8.
8.2. Maintenance of the Toner Cartridge 8.2.1. About the Toner Cartridge 1. Use and maintenance of the toner cartridge For better print quality, please use an original Pantum toner cartridge. When using the toner cartridge, please pay attention to the following: • Unless it is used immediately, do not remove the toner cartridge from the package. • Do not attempt to refill the toner cartridge without authorization. Otherwise, the resulting damage is not included in the printer warranty.
8.2.2. Steps for Replacing the Toner Cartridge Note: Before replacing the toner cartridge, please pay attention to the following: • The toner cartridge surface may contain toner. Please remove it carefully to avoid spilling. • Put the removed toner cartridge on a piece of paper to avoid the toner from accidently spilling. • After removing the protective cover, please immediately install the toner cartridge into the printer, so as to avoid damage from exposure to too much direct sunlight or indoor light.
4. Open the package of a new toner cartridge, hold the handle of the toner cartridge and gently shake around 5-6 times, so as to evenly distribute the toner inside the toner cartridge. 5. Remove the toner cartridge protector (blister cover), insert the toner cartridge along the guides, then push it firmly along the direction of the arrow until you hear a click, assuring you that the toner cartridge is fully inserted. 6. Cover the output bin and close the scanning platform. 7.
Troubleshooting 9 CHAPTER 9. Troubleshooting .................................................................................................................................2 9.1. Clearing Jammed Paper .............................................................................................................2 9.2. Error Message ............................................................................................................................5 9.3. Common Troubleshooting.......................
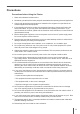
9. Troubleshooting Please read this section carefully. It can help you solve common problems in the printing process. If the problems that arise remain, please contact Pantum Aftersales Service Centre. Prior to handling common problems, first check that: • The power cord is connected correctly and the printer is powered on. • All of the protective parts are removed. • The toner cartridge is installed correctly. • The output bin is fully closed. • The paper is correctly loaded into the tray.
2) Open the output bin by the upper right ridge of the concave section. 3) Remove the toner cartridge along the guides. 4) Gently draw the jammed paper out along the paper output orientation.
5) After removing the jammed paper, insert the toner cartridge into the printer along the guides until you hear a click assuring you that the toner cartridge is fully inserted. 6) Put the paper in the tray neatly to carry out the next print until the indicator resumes print-ready status. 7) If you cannot remove the jammed paper yourself, please contact your local Pantum authorized repair center or send the printer to the nearest Pantum authorized service center for repair.
9.2. Error Message Error Message Cause Measure Please Close Output Bin The output bin is not fully closed. Close Output Bin. Toner cartridge is not detected Toner cartridge is not properly installed or is damaged. Properly install or replace the toner cartridge. Toner Low Cartridge toner is insufficient. Replace the toner cartridge. Toner cartridge has expired Cartridge toner is exhausted. Replace the toner cartridge. Paper Empty No print paper is loaded Incorrect loading of paper.
9.3. Common Troubleshooting 9.3.1. Common Problems Problem Type Problem Cause Solution Problems in printing Poor print quality See 9.3.3 Image Defects for details. See 9.3.3 Image Defects for details. Problems in copying Failed to copy The scanner is damaged. Please contact Pantum Customer Service. There are abnormal images on the copy • The scanner is dirty or defective. • The toner cartridge is dirty or damaged. • Clean the scanner. • Clean or replace the toner cartridge.
Problem Type Problem Cause Solution Problems with handling paper Paper feed failure • The print media is loaded incorrectly. • The print media is beyond the use specification range. • The feed roller is dirty. • Please correctly load the print media. If you use special print media for printing, please print with the manual feeder tray. • Please use the print media within the specification range. • Clean the feed roller Paper jam • There is too much paper in the tray.
9.3.2. Software Status Recommended Solution When the printer is connected, during the steps from installing to searching for printers, the driver file copying interface can not be accessed, and the installation can not be continued. • When selecting a printer series, ensure to select the same series as the printer and that which the printer is powered on. • Ensure that the USB interface cable is properly connected. • Download and reinstall the latest version of the driver.
Problem P ABCD abcde 12345 Toner spots White spots P Cause Solution • The toner cartridge is dirty or leaks toner. • The toner cartridge is damaged. • The print media does not meet use specification, such as the media is damp or too rough. • The feed channel is dirty. • If toner spots appear on the copied or scanned pages, the platen glass may be dirty. • The scanner is dirty or damaged. • Please use the print media within the specification range. • Clean the feed channel. • Clean the platen glass.
Problem Black background (gray background) Cause Solution • The print media does not meet use specification, such as the media is damp or too rough. • The toner cartridge is dirty. • The parts inside the toner cartridge are damaged. • The feed channel is dirty. • The transfer voltage inside the printer is abnormal. • Scanning exposure. • If black background or gray background appears on the copied or scanned pages, the platen glass may be dirty.
Problem Whole page dark Cause Solution • The toner cartridge is installed incorrectly. • The inside of the toner cartridge is damaged. • Abnormal charge inside the printer; the toner cartridge is not charged. • If all-black image appears when copying and scanning, it could be scanning exposure, and the cover on the manuscript is not properly closed. • The scanner is damaged. • Ensure correct installation of the toner cartridge.
Product Specification 10 CHAPTER 10. Product Specification........................................................................................................................2 10.1. Overview....................................................................................................................................2 10.2. Scanning Specification..............................................................................................................3 10.3. Printing Specification..............
10. Product Specification 10.1. Overview Functions PC monochrome printing, PC colored/monochrome scanning, monochrome copying Memory 128 MB Interface Type USB 2.0 (High-speed interface) Supported Operating Systems Microsoft Windows Server 2003/Server 2008/ Server 2012/XP/Vista/Win7/Win8 (32bit&64bit) Mac OS X 10.5/10.6/10.7/10.
10.2. Scanning Specification Scan Source Platen Optical System CIS Scan Driver TWAIN WIA Scan Resolution Optics 1200*1200DPI Maximum Scan Size (Tablet) 216 mm x 297 mm Bit Depth 24 bit/8 bit/1 bit Output Function Scan to PC 10.3. Printing Specification Print Speed A4: 16ppm, 20ppm LTR: 16ppm, 21ppm Print Language GDI Resolution 1200*600DPI Max Monthly Volume 20,000 pages 10.4.