
User Manual
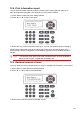


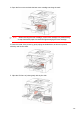

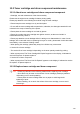


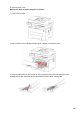

Table Of Contents
- Preface
- Legal Notice
- Safety Precautions
- Precautions
- Legal Information
- Table of Contents
- 1. Before Using the Printer
- 2. Paper and Print Media
- 3. Driver installation and uninstallation
- 4. Wired network setup (applicable to wirednetwork models)
- 5. Wireless network setup (applicable to Wi-Fi models)
- 6. Web server
- 7. Print
- 8. Copying
- 9. Scan
- 10. Fax
- 11. Mobile Print/Scan/Fax
- 12. General Settings
- 13. Routine Maintenance
- 14. Troubleshooting
- 15. Menu Structure
- 16. Product Specifications

12.6. Congure the e-mail address book
(Applicable to machine with the fax feature)
1) Press “Scan” and then “Menu” on control panel to enter the “Menu Setting” interface.
2) Press “OK” to enter the “Scan setting” interface.
3) Press “▲” or “▼” to select “Email Add.” and then press “OK”.
4) Press “▲” or “▼” to select “Add. book edit” and then press “OK” to execute operations of
Create, Edit/Check, Delete and Add to Group.
5) Press “▲” or “▼” to select “Group mail ed.” and then press “OK” to execute operations of
Create, Edit/Check and Delete.
Note: • the address book members cannot be added to the group before creating a
group e-mail.
•
You will not receive the e-mail without proper settings on your e-mail box.
For specific setting steps, please consult your network administrator.
12.7. Congure the FTP address book
(Applicable to machine with the fax feature)
1) Press “Scan” and then “Menu” on control panel to enter the “Menu Setting” interface.
2) Press "OK" to enter the "Scan setting" interface.
3) Press "▲" or "▼" to select “FTP Add. book” and then press “OK” to execute operations of
Create, Edit/Check and Delete.
Note: • before configuring the FTP address book, you may need to consult
your network administrator for the server IP address, port number and FTP name.
12.8. Online upgrade
This printer supports firmware upgrade with its control panel without a compute .
1) Switch on the printer and then connect it to network.
2) Press "Menu" to enter the Menu Settings interface.
3) Press "▲" or "▼" to select “Online upgrade” and then press “OK”.
4) Please follow instructions to operate. After completion, please reboot the printer.
Note: • if the firmware fails to be downloaded, pleas reboot the printer and then
operate again.
119