
User Manual
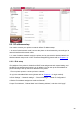


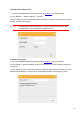


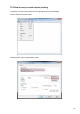
Table Of Contents
- Preface
- Legal Notice
- Safety Precautions
- Precautions
- Legal Information
- Table of Contents
- 1. Before Using the Printer
- 2. Paper and Print Media
- 3. Driver installation and uninstallation
- 4. Wired network setup (applicable to wirednetwork models)
- 5. Wireless network setup (applicable to Wi-Fi models)
- 6. Web server
- 7. Print
- 8. Copying
- 9. Scan
- 10. Fax
- 11. Mobile Print/Scan/Fax
- 12. General Settings
- 13. Routine Maintenance
- 14. Troubleshooting
- 15. Menu Structure
- 16. Product Specifications

II. Set the e-mail group
1. Log in the embedded Web server (please refer to Chapter 6.1 for login method).
2.
Click “Settings”, “Machine Settings” and then “E-mail Group” to enter the setting interface of
e-mail group.
3.
Click “Create” to pop out a window as below and edit the group name and check the e-mail
address to be added in the contact name (e-mail address) listbox, and then click "Apply".
Note:
• If some groups have been created, you may click to check a corresponding
group to add the newly created e-mail address into it.
Log in the embedded Web server (please refer to Chapter 6.1 for login method).
Click “Settings” – “Machine settings” – “System”.
1.
2.
3.
Click "Create" to pop out a window as below and edit the contact name and input the e-mail
address, and then click "Apply".
I. Set the E-mail address book
61