User Guide Pantum P3000 Series High-speed Monochrome Laser Printer It is recommended that you read this Guide carefully before using the printer
Preface Welcome to Pantum series products! Thank you for choosing to use a Pantum series product! To protect your vital interests, please read the following statements carefully. Legal Notice Trademark Pantum and Pantum logos are registered trademarks of Zhuhai Seine Technology Co., Ltd. Microsoft, Windows, Windows server and Windows Vista are trademarks registered by Microsoft Corporation in the United States and/or other countries/regions.
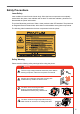
Safety Precautions Laser Safety Laser radiation is harmful to the human body. Since the laser components are completely sealed within the printer, laser radiation will not leak. To avoid laser radiation, please do not disassemble the printer at discretion! The printer follows the provisions of Class 1 laser products under CFR standard. The printer has an integrated Class III B laser diode, which does not emit radiation among laser components.
Precautions Precautions before Using the Printer: 1. Read and understand all instructions; 2. Familiarize yourself with the basic principles associated with operating electrical appliances; 3. Comply with all warnings and instructions marked on the equipment or specified in the manual supplied with the equipment; 4. If the operating instructions conflict with the safety information, please refer back to the safety information, as you may have misunderstood the operating instructions.
Regulatory Information This symbol indicates that, at the end of your product’s life, it must not be discarded as domestic waste. Instead, you should dispose of your used equipment at a designated collection point for the recycling of waste electrical and electronic equipment. Ref: EU Directive 2002/96/EC on Waste Electrical and Electronic Equipment (WEEE). Please contact your distributor / supplier for further information. This product is suitable for indoor use only.
TABLE OF CONTENTS 1. BEFORE USING THE PRINTER....................................................................................................1-2 1.1. PACKING LIST.........................................................................................................................1-2 1.2. COMPONENTS OF THE PRINTER.........................................................................................1-3 1.3. TONER CARTRIDGE .............................................................................
8.1.3. INTERNAL JAM..................................................................................................................8-4 8.1.4. PAPER JAM IN THE FUSER UNIT.....................................................................................8-5 8.1.5. DUPLEX UNIT JAM............................................................................................................8-6 8.2. SOFTWARE FAILURE.................................................................................................
BEFORE USING THE PRINTER 1 CHAPTER 1. BEFORE USING THE PRINTER.......................................................................................................2 1.1. PACKING LIST............................................................................................................................2 1.2. COMPONENTS OF THE PRINTER............................................................................................3 1.3. TONER CARTRIDGE ......................................................
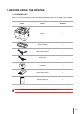
1. BEFORE USING THE PRINTER 1.1. PACKING LIST When you open the package, make sure that the following parts are included in the package: Parts Name Quantity Printer 1 Toner Cartridge 1 USB interface cable 1 Power cord 1 CD-ROM 1 Quick Setup Guide 1 Pantum Warranty 1 Note: • The warranty card may not be included in some regions.
1.2.
| Rear view 1 4 2 5 3 1 USB Interface: For connecting directly to the computer 2 Network Interface (optional): For connecting the printer to the network 3 Power Socket: For connecting the power cord 4 Rear Cover: It can be opened to check for jammed paper 5 Duplex printing unit: For release of paper jammed during duplex printing at the back of the printer 1-4
1.3. TONER CARTRIDGE | Service life of the toner cartridge Type Average Print Volume Standard-capacity toner cartridge About 3,000 pages (The above data is based on the ISO/IEC 19752 standard) High-capacity toner cartridge About 6,000 pages (The above data is based on the ISO/IEC 19752 standard) Note: • The model is subject to change without notice. • The consumable capacity may vary depending on the type used.
PAPER AND PRINT MEDIA 2 CHAPTER 2. PAPER AND PRINT MEDIA...............................................................................................................2 2.1. PAPER SPECIFICATIONS .........................................................................................................2 2.2. SPECIAL PAPER.........................................................................................................................3 2.3. LOADING PAPER................................................
2. PAPER AND PRINT MEDIA 2.1. PAPER SPECIFICATIONS Automatic Feeder Tray Manual Feeder Tray Media Type Plain Media Size A4, A5, JIS B5, IS0 B5, A6, Letter, Legal, Executive, Folio, Oficio, Statement, Japanese Postcard, Monarch Env, DL Env, C5 Env, C6 Env, No.10 Env, ZL, Big 16K, Big 32K, 16K, 32K, B6 custom, etc. Media Weight 60~105g/m² Maximum Capacity of the Tray 250 sheets, 80g/m² paper Media Type Plain, special paper (transparency, cardstock, label, envelope, cardstock, etc.
2.2. SPECIAL PAPER This printer supports the use of special printing papers. Special paper includes: label, envelope, transparency, thick, etc. Note: • When using special paper or print media, be sure to select the appropriate paper type and size in the printer settings so as to get the best print effect. | Please observe the following recommendations: Types of print media Correct Practices Incorrect Practices Label Only use labels with no exposed lining paper. Labels should be placed flat when used.
2.3. LOADING PAPER 2.3.1. LOADING INTO THE AUTOMATIC FEEDER TRAY 1. Slide out the automatic feeder tray from the printer. 2. Adjust the automatic feeder tray’s paper length and width guides to the desired paper size slot; so that they are consistent with the length and width of the paper. Note: • Do not overly squeeze the "paper length guide" and "paper width guide", otherwise it could easily lead to deformation of paper. 3.
4. Raise the output tray to avoid the printed paper from slipping and falling. Note: • It is recommended that you raise the output tray to prevent the paper from slipping and falling after printing. If you choose not to raise the output tray, we recommend that you immediately remove the printed paper from the printer. • If the quantity of paper loaded into the standard tray at any one time exceeds 250 sheets (80g/m2), the paper may jam or may not feed effectively.
3. Slide the paper guides inside the manual feeder tray to match the size of both sides of the paper. Do not exert too much force, otherwise it will cause the paper to jam or skew. 4. Put the print media, such as the envelope or transparency into the manual feeder tray with both hands until the front end of the envelope or transparency contacts the correction roller. Note: • When loading paper into the manual feeder tray, the printer will automatically switch to manual feed mode.
2.4. NON-PRINTABLE AREA The shaded area indicates the non-printable area. A A B Usage Printing B Paper Size Top and bottom margins (A) Left and right margins (B) A4 5 mm (0.197 in) 5 mm (0.197 in) Letter 5 mm (0.197 in) 5 mm (0.197 in) 2.5. PAPER AND MANUSCRIPT USE PRINCIPLES • Paper or manuscript with rough texture, concave and convex, oil stained and high gloss will result in poor printing performance. • Please make sure that there is no dust, fluff, etc. on the paper.
INSTALLING AND UNINSTALLING DRIVER SOFTWARE 3 CHAPTER 3. INSTALLING AND UNINSTALLING DRIVER SOFTWARE ..............................................................2 3.1. WINDOWS-BASED DRIVER.......................................................................................................2 3.1.1. DRIVER INSTALL .................................................................................................................2 3.1.2. DRIVER UNINSTALL......................................................
3. INSTALLING AND UNINSTALLING DRIVER SOFTWARE 3.1. WINDOWS-BASED DRIVER 3.1.1. DRIVER INSTALL 1. Introduction The driver software helps users to run the installer and uninstaller using the installation wizard and uninstall wizard. The tools provided by it and its main functions are as follows: • Auto-run completes the automatic launch of the installation procedure from the CD. • Installation: To provide users with the printer installation wizard.
2) Installation Language Once the program has started running, you will be taken to the next dialog where you can change the default installation language. 3) License Agreement Click the Next button to enter the License Agreement interface. Please read the end user license agreement carefully and agree by selecting the “I Agree” option and clicking the Next button to continue with the installation. The “I Disagree” radio button is checked in the interface by default and the Next button is inactive.
4) Search for Printers After selecting “I Agree” and clicking Next, you will be taken to the Search for Printers interface and the program will automatically search for the appropriate printer device connected to the computer or to the network. 5) Select Printer If the appropriate printer device is detected, you will be automatically taken to the Select Printer interface. Note: • Detected Printer and Specify an IP Address for Installation cannot both be selected.
If the appropriate printer device is not detected, click Next, the dialog box “No printer has been detected. Do you still want to proceed with the installation?” will pop up. If you select Yes, the program will proceed with the installation and take you to the Copy interface. If you select No, the program will stay at the Select Printer interface. Select Yes and click Next to enter the Copy interface. 6) Copying Files Copy the installation files to the installation path.
7) Driver Installation If Windows cannot verify the publisher of this driver software during the driver installation process, you will be asked if you still wish to proceed with the installation. You need to click “Continue Anyway” or “Always Install this Driver Software”, otherwise the installation will be unsuccessful (the warning pop-ups may differ slightly depending on the operating systems).
8) Completing Installation After the driver installation progress bar shows that the installation is complete, you will be taken to the Installation Complete interface. Click the Done button to complete the installation of the printer driver, carry out online product registration which can provide online services and other information, and set this printer as the default printer. You can also cancel these options as needed.
3.1.2. DRIVER UNINSTALL 1) Selecting the Uninstall Mode In the Start menu, select the Pantum Uninstall entry to launch the Uninstall wizard, or find the Add/Remove option in the control panel, find the relevant Pantum options, and click Change and Delete, a Welcome interface will pop up. 2) Uninstall Privilege Verification Uninstall requires administrator privileges. If a non-administrator runs the uninstaller, the “Insufficient privileges.
3) Uninstall Progress Interface Click Next to enter the uninstall interface. 4) Done Interface After the progress bar shows that the process is complete, you will be taken to the Done interface. Click the Done button to complete the uninstall.
3.2. INSTALLING THE DRIVER SOFTWARE ON A MAC SYSTEM The Mac driver installer operates via the PackageMaker software that comes with the Mac OS X system. The installation steps are basically the same as when installing other Mac software and are divided into: introduction, license, destination volume, type of installation, installation, summary. 1. Introduction Insert the CD-ROM into the CD-ROM driver, run the CD-ROM and click the Mac system installation package, then the following interface will display.
2. License An illustration of the contents of the License Agreement is shown below: Click Continue, the “To continue installing the software, you must agree to the terms of the software license agreement” dialog box will pop up. Click “Agree” to accept the License Agreement and continue the installation.
3. Destination Volume Select the installation disk, then the following view will display; Click Continue to display the installation-related information. Note: • In Mac OS X 10.4, you will enter this interface directly, but in Mac OS X 10.5 and later systems, you will enter the Installation Type option interface first. You should click the Change Install Location button to jump to the Destination Volume. 4.
Click Install, the following prompt box will pop up. After logging in as an administrator and getting permission, you can continue with the installation. 5. Install An illustration of the installation progress bar is shown below: Click Continue to display the Installation Complete interface.
6.
NETWORK SETTINGS (FOR NETWORK MODELS) 4 CHAPTER 4. NETWORK SETTINGS (FOR NETWORK MODELS)................................................................................ 2 4.1. INSTALLING THE PRINTER ONTO THE NETWORK................................................................ 2 4.2. SETTING NETWORK PRODUCTS.............................................................................................3 4.2.1. VIEWING OR CHANGING NETWORK SETTINGS............................................................
4. NETWORK SETTINGS (FOR NETWORK MODELS) You may need to set some network parameters for the printer. These parameters can be set from the embedded Web server. 4.1. INSTALLING THE PRINTER ONTO THE NETWORK In this setting, the printer is directly connected to the network and can be set to allow all computers on the network to print directly from the printer. 1. Before turning on the printer, connect the network cable to the printer’s network port so that it is directly connected to the network. 2.
4.2. SETTING NETWORK PRODUCTS 4.2.1. VIEWING OR CHANGING NETWORK SETTINGS You can use the printer embedded Web server to view or change its IP settings. 1. Print DEMO Information Page, for viewing the printer's IP address information. In the idle state, long press the control panel button (as shown below) to print the DEMO page. 2. Type the printer IP address into the Web browser’s address line to open the embedded Web server. 3. Click the tab to obtain network information. Change the settings as needed.
4.2.3. IP ADDRESS The printer’s IP address can be automatically set through the DHCP function and can also be set manually. | Automatic Setting The DHCP automatic setting function is enabled by default. 1. Connect the printer to the network via a network cable and complete the startup preparation work; 2. The printer will automatically obtain the IP address assigned by the server which can be used after a few seconds.
PRINT 5 CHAPTER 5. PRINT.................................................................................................................................................2 5.1. PRINT FUNCTION......................................................................................................................2 5.2. OPENING HELP DOCUMENT....................................................................................................3 5.3. PRINTING MODE.....................................................
5. PRINT 5.1. PRINT FUNCTION The following print functions can be achieved by setting various properties in the Printing Preferences.
Note: • You can select the 2 x 2 Poster printing in N-in-1 to use the poster printing function. • You can open the Printing Preferences and click the Help button to view an explanation of the specific function. For information on how to open the help document, see Section 5.2. 5.2. OPENING HELP DOCUMENT (Only for Windows system) You can open the Printing Preferences and click the Help button.
The Help Document contains the printer’s User Guide. 5.3. PRINTING MODE The printer offers two printing modes, namely, printing with the automatic feeder tray and printing with the manual feeder tray. It prints with the automatic feeder tray by default but it will print with the paper in the manual feeder tray first if there is print media in the manual feeder tray. 5.3.1.
5.3.2. PRINTING WITH THE MANUAL FEEDER TRAY When loading paper into the manual feeder tray, the printer will automatically switch to manual feed mode. Note: • The manual feed mode will feed paper from the manual feeder tray first when paper is loaded into the manual feeder tray. • Generally, the manual feeder tray is used to print on special paper, such as envelopes, transparency films, etc., and only one piece of paper can be loaded at a time.
2. The printer supports automatic duplex with the automatic feeder tray and automatic duplex with the manual feeder tray. 1) Automatic duplex with the automatic feeder tray Ensure that a certain amount of media is loaded into the automatic feeder tray before printing. 2) Automatic duplex with the manual feeder tray Feeding paper from the manual feeder tray for automatic duplex When you put paper into the manual feeder tray, the printer will give priority to using the print paper in the manual feeder tray.
Follow the steps below for automatic duplex (Only for Windows system) : 1. Open the print job to be printed from the application (such as Notepad). 2. Select Print from the File menu. 3. Select the Pantum printer with the appropriate model. 4. Click the Preferences or Properties button to configure the print settings.
5. Select the Basic tab in the Duplex area and select the Long Edge or Short Edge options. 6. Click Print to complete the print settings and to carry out the automatic duplex. Note: • It is recommended that you raise the output tray to prevent the printed paper from sliding out of the output bin. If you choose not to raise it, we recommend that you immediately remove the printed paper from the printer output bin.
CONTROL PANEL 6 CHAPTER 6. CONTROL PANEL..............................................................................................................................2 6.1. OVERVIEW OF THE CONTROL PANEL.................................................................................... 2 6.2. CONTROL PANEL'S BUTTON AND LED FUNCTIONS.............................................................. 2 6.3. LED INDICATIONS..........................................................................................
6. CONTROL PANEL 6.1. OVERVIEW OF THE CONTROL PANEL The control panel includes a button, a multi-colored LED indicator (the LED indicator will display red, green and orange), and a monochrome LED indicator, as shown in the figure below: 2 3 1 1 Button 2 Paper: Monochrome red LED indicator 3 Data/cartridge: multi-colored LED indicator 6.2. CONTROL PANEL'S BUTTON AND LED FUNCTIONS 1.
3. Multi-colored LED indicator function The multi-colored LED indicator will display red, green, and orange, with the specific functions as follows: Red indicates the occurrence of a serious error.
Status No. Paper Data/Cartridge Status Description 9 If there is a Toner Cartridge error (toner cartridge is not installed, toner cartridge mismatch, toner cartridge expired), the Data/Cartridge indicator displays a steady orange. 10 For other printer errors (abnormal heating roller, abnormal laser motor, communication error, lid is open, etc.), the Data/Cartridge indicator displays a steady red.
ROUTINE MAINTENANCE 7 CHAPTER 7. ROUTINE MAINTENANCE................................................................................................................2 7.1. CLEANING THE PRINTER.........................................................................................................2 7.2. MAINTENANCE OF THE TONER CARTRIDGE ........................................................................ 3 7.2.1. ABOUT THE TONER CARTRIDGE................................................................
7. ROUTINE MAINTENANCE 7.1. CLEANING THE PRINTER Note: • Please use mild detergents. • Some parts of the printer may still be hot for a short period after use. When opening the front cover or rear cover to clean the parts inside the printer, please do not touch the parts in the shaded area as shown in the following picture. 1. Use a soft cloth to wipe the outside of the printer clean. 2. Open the front cover and remove the toner cartridge.
3. Clean the inside of the printer by gently wiping the shaded area, as shown in picture, with a dry and lint-free cloth. 7.2. MAINTENANCE OF THE TONER CARTRIDGE 7.2.1. ABOUT THE TONER CARTRIDGE 1. Use and maintenance of the toner cartridge. For better print quality, please use an genuine Pantum toner cartridge. When using the toner cartridge, please pay attention to the following: • Unless using it immediately, do not remove the toner cartridge from its packaging.
7.2.2. REPLACING THE TONER CARTRIDGE Note: Before replacing the toner cartridge, please pay attention to the following: • The toner cartridge surface may contain toner. Please remove it carefully to avoid spilling. • Put the removed toner cartridge onto a piece of paper to avoid the toner from accidently spilling. • After removing the protective cover, please immediately install the new toner cartridge into the printer, so as to avoid damaged by exposing it to too much direct natural or artificial light.
4. Remove the protective cover, put the toner cartridge into the printer along the guides and close the lid tightly. Note: Before installing the cartridge in the printer, please check whether there is a seal and tear off it if any, and then proceed with the installation. 5. Restart the printer to print a test page.
TROUBLESHOOTING 8 CHAPTER 8. TROUBLESHOOTING.......................................................................................................................2 8.1. CLEARING JAMMED PAPER ....................................................................................................2 8.1.1. PAPER JAM IN THE TRAY....................................................................................................2 8.1.2. PAPER JAM IN THE MANUAL FEEDER TRAY...........................................
8. TROUBLESHOOTING Please read this section carefully. It may help you to solve common problems encountered during the printing process. If the problems persist, please contact Pantum Aftersales Service Centre. Prior to handling common problems, first check that: • The power cord is connected correctly and the printer is powered on. • All of the protective parts are removed. • The toner cartridge is installed correctly. • The output bin is fully closed. • The paper is correctly loaded into the tray.
2. Gently pull the jammed paper straight out. 3. After removing the jammed paper, reload the tray into the printer, then the printer will automatically resume printing. 8.1.2. PAPER JAM IN THE MANUAL FEEDER TRAY 1. Gently pull the jammed paper out.
2. After reloading the removed paper into the tray, the printer will automatically resume printing. 8.1.3. INTERNAL JAM Note: • Do not touch the shaded area to avoid burns when removing the internally jammed paper and the jammed paper in the fuser unit. 1. Open the front cover. 2. Remove the toner cartridge in a straight line. (To avoid the exposure of the toner cartridge which will affect the print quality, wrap the toner cartridge in a black plastic bag or cover it with paper.
3. Gently pull the jammed paper straight out. 4. After removing the jammed paper, reload the toner cartridge and close the front cover, then the printer will automatically resume printing. 8.1.4. PAPER JAM IN THE FUSER UNIT 1. Open the rear cover. 2. Open the fuser door using the handles on both sides. 3. Gently pull the jammed paper out.
4. Remove the jammed paper and close the fuser door and the rear cover, then the printer will automatically resume printing. 1 2 8.1.5. DUPLEX UNIT JAM 1. Remove the duplex printing unit from the back of the printer. 2. Remove the jammed paper from the duplex unit. 3. If the paper does not come out along with the duplex unit, open the tray and remove the jammed paper directly from the bottom. 4.
8.2. SOFTWARE FAILURE Problem Solution Pantum 3000 Series Printer Driver cannot be found in the printer and fax folders. Reinstall the printer driver. Ensure that the USB interface cable and the power cord are properly connected. The printer is in Ready mode but it will not perform any print job. If the failure still exists after restarting the printer, please reinstall the printer driver. Ensure that the USB interface cable is properly connected.
Problem Cause Solution Paper Jam There is too much paper in the tray. The print media is out of the supported media range. There is foreign matter in the paper path. The feed roller is dirty. Internal parts failure. Remove excess paper from the tray. If you are printing on special print media, please use the manual feeder tray. Make sure that you use paper that meets the specifications. If you are printing on special print media, please use the manual feeder tray. Clean the paper path.
Problem Cause Solution • Please use print media within the specification range. • Clean the paper path. • Clean the mirror of the laser. White spots • The print media does not meet the usage specifications, for example the media is damp or too rough. • The paper path is dirty. • The internal part of the toner cartridge is damaged. • The mirror of the laser inside the printer is dirty. • The print media does not meet the usage specifications, for example the media is damp or too rough.
Problem Cause Solution • The toner cartridge is dirty. • The parts inside the toner cartridge are damaged. • The fuser component is damaged. • Clean or replace the toner cartridge. • Please contact Pantum Customer Service to repair and replace the fuser component. • The print media has been loaded incorrectly. • The paper path of the printer is dirty. • Ensure the correct loading of the print media. • Clean paper path inside the printer. • The print media has been loaded incorrectly.
Problem The toner does not adhere to the paper Cause Solution • The print media does not meet the usage specifications, for example the media is damp or too rough. • The inside of the printer is dirty. • The toner cartridge is damaged. • The parts inside the printer are damaged. • Please use print media within the specification range. If you are using special print media, please print with the manual feeder tray. • Clean the inside of the printer. • The toner cartridge has been installed incorrectly.
PRODUCT SPECIFICATIONS 9 CHAPTER 9. PRODUCT SPECIFICATIONS...........................................................................................................2 9.1. OVERVIEW.................................................................................................................................2 9.2. PRINTING SPECIFICATION.......................................................................................................
9. PRODUCT SPECIFICATIONS 9.1. OVERVIEW Memory 64MB/128MB Interface Type USB2.0 and 10/100 Ethernet on certain models Applicable Platform Microsoft Windows Server2003/Server2008/Server2012/ XP/Vista/Win7/Win8 (32bit&64bit) Mac OS X 10.4/10.5/10.6/10.7/10.8 Power Supply 220V Model: AC220~240V (-15%,+10%), 50HZ/60HZ (±2HZ), 4A 110V Model: AC110~127V (±10%), 60HZ±2HZ, 8A (Note: For the power supply and voltage which are suitable for this printer, please refer to the nameplate at the back of the printer.
9.2. PRINTING SPECIFICATION Print Speed (PPM) 30/33 (A4) 32/34 (LTR) Resolution (DPI) 1200*600DPI Print Language GDI Time to First Page < 8.5s Maximum print size Legal (216*355.