
Installation Instructions
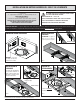

On 24˝ center
IN-615
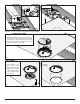
INSTALLATION FOR BX-10R BACKBOX AND SPEAKER
BACKBOX DIMENSIONS
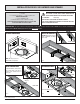
INSTALLING BRACKETS
STEP 1
STEP 2
STEP 3
On 16˝ center
On 16˝ center
On 16˝ center
IMPORTANT: Orientation of brackets will differ when used on 24˝ center (see inset)
IMPORTANT: Orientation of backbox and position of wire loop will differ when used
on 24˝ center (see inset)
On 24˝ center
PARADIGM DOES NOT SUPPLY SCREWS FOR MOUNTING BACKBOX
AND SPEAKER TO CEILING. CHOOSE SCREWS APPROPRIATE FOR
CEILING COMPOSITION AND WEIGHT OF BACKBOX WITH SPEAKER.
BX-10R BACKBOX: 14 lb / 5.5 kg
REFER TO PRODUCT SPECIFICATIONS FOR WEIGHT OF SPEAKER.
IF YOU ARE NOT COMFORTABLE PERFORMING THE FOLLOWING PROCEDURE,
CONTACT A PROFESSIONAL INSTALLER.
14-11/16 in / 32.7 cm
21-1/2 in / 54.6 cm
7-1/4 in / 18.4 cm
13-1/2 in / 34.3 cm
IMPORTANT NOTE: The required amount of damping material is included and correctly positioned in backbox. DO NOT remove, compact or add additional
damping material. DO NOT add damping material to ceiling directly behind
backbox.
All 4 screws MUST be used
NOTE: Wire loop needs to be
attached with screw provided.
Wire loop
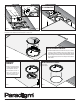
PARTS INCLUDED:
• 1 – Backbox
• 2 – Pre-Construction Brackets • 1 – Wire Loop with Screw
NOTE: DO NOT PUNCTURE OR REMOVE PROTECTIVE PLASTIC OVER
CUTOUT UNTIL READY TO INSTALL SPEAKER.
REQUIRED, NOT INCLUDED:
• 12 – #8 or #10 Wood Screws
(8 to attach brackets to box; 4 to attach box to ceiling)
To prevent vibrations and resonances
from coloring output, center the box
between joists—backbox must not
touch joists.
INSTALLING BACKBOX
SECURING BACKBOX
On 24˝ center
CAUTION: Mounting Brackets are
made of galvanized steel. Edges
may be sharp.