This device contains FCC ID: YZY-HT205 and IC ID: 9261A-HT205. This device complies with Part 15 of the FCC Rules. Operation is subject to the following two conditions: (1) This device may not cause harmful interference, and (2) This device must accept any interference received, including interference that may cause undesired operation. Any changes or modifications of this product, not approved by the manufacturer, may void the user’s authority, to operate the equipment.
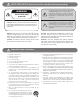
SAFETY PRECAUTIONS: Read this section carefully before proceeding! WARNING RISK OF ELECTRIC SHOCK DO NOT OPEN WARNING: TO REDUCE THE RISK OF ELECTRIC SHOCK, DO NOT REMOVE COVER (OR BACK). NO USER-SERVICEABLE PARTS INSIDE. REFER SERVICING TO QUALIFIED SERVICE PERSONNEL.
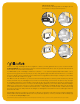
Talk About Sub Yoga Check out this positioning matrix. No Paradigm sub has ever offered so many placement options … Thanks for choosing a Paradigm sub! And congrats! It’s obvious you have great taste since you’ve chosen the world’s #1 Speaker Brand! We’re not blowing smoke, we’ve been voted #1 twenty times* (the only speaker manufacturer in the world that can claim that achievement!).
TOC Finding the spot pg 1 Taking a stand pg 2 Down under pg 2 Art Attack! Wall mounting pg 3 Hookin’ up pg 6 Watts up? Fine tuning pg 3 pg 7 Getting the best from my sub Geek Alert … Technology Tidbits pg 4 pg 8 Going wireless Tech Specs pg 5 pg 9 Twins are more fun Warranty … your new sub is family now, treat it well pg 5 pg 10
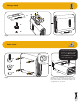
Finding the spot PLEASE NOTE: Wall-mounting requires the MilleniaSub Wall-Mount Bracket system (sold separately, see dealer) Audio is all about finding ‘the spot’ … the sweet spot* in seating gets a lot of attention but so should finding the right spot for your sub. In a traditional setup, for best sonic integration, locating your sub between your front speakers, beside one of them or close to the back wall will usually provide the best bass performance. Fig. 1a and Fig.
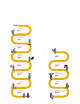
Taking a stand x1 x2 x4 Fig. 2 Down under “Suck up the dust bunnies before you put me under the couch, allow 2.5 cm (1˝) clearance and make sure I sit this way up!” x4 Close-up 13.75 cm (5-1/2 in) 35.5 cm (14 in) x4 x4 Fig. 3 46.
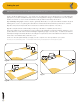
Art Attack! Wall mounting Side view Fig. 4 Complete instructions for wall mounting your sub included with the MilleniaSub Wall-Mount Bracket system (sold separately, see dealer) Watts up? The Watts (W) rating indicated on the rear panel of your sub is the typical AC power the subwoofer will draw. Keep in mind, the actual wattage draw will vary with the bass content of the program material.
Getting the best from my sub Break-In Although your new sub will sound great right out of the carton, it will sound even better when broken in. Let it operate for several hours before you listen critically. If it has been transported or stored in the cold, allow it to warm to room temperature before you listen. Cleaning Use a damp (not wet!) soft cloth to clean. Never use a strong or abrasive cleaner on your sub.
Going wireless TIP! Our PT-2 transmitter will work with up to four MilleniaSubs simultaneously Placement plays a major role in optimizing bass performance. However, it can impose the inconvenience not to mention the unsightliness of running long lengths of cable through walls, along baseboards and under floors and carpets.
Hookin’ up TIP! We recommend the use of high-quality cables and connectors when hooking up your subwoofer (see dealer) Turn all components OFF before connecting the sub Input Line-Level (RCA) Input IMPORTANT: Speakers set to ‘Large’ with your A/V receiver or processor will still be reproducing bass frequencies so be very careful not to overdrive them! Allows connection from the Sub/LFE Output of an A/V receiver, processor or other suitable low-level source.
Fine tuning TIP! Use a slot-head screwdriver or even a large coin to adjust the controls on the side panel of your new subwoofer Once you have the rest of your speakers positioned in the room and have set speaker distances and calibrated speaker levels with your processor or A/V receiver, it’s time to fine tune your sub. Subwoofer Controls When setting the subwoofer controls use music and video soundtracks that you know well.
Geek Alert … Technology Tidbits “How cool am I? What other brand gives you the inside story on your sub in the Owners Manual.” The Inside Story DESIGN WHAT’S COOL THE THINKING BEHIND IT Maximum versatility … more positioning options than a swami teaching yoga in an ashram! See our Positioning Matrix in the beginning of this manual! WOOFER Dual-woofer back-to-back bipolar design—inherently vibration cancelling.
Tech Specs Design Dual driver, sealed box, vibration cancelling, built-in Ultra-Class-D™ power amplifier, built-in wireless receiver for wireless option, USB port for PBK equalization Amplifier: High-Current, Discrete Output 900 watts Dynamic Peak / 300 watts RMS Sustained Amplifier Design Features Auto-on, soft clipping, thermal monitoring Bass Drivers Two 355-mm x 76-mm (14 in x 3 in) reinforced polymer cones, corrugated Santoprene® surrounds, 25-mm (1 in) voice-coils Low-Frequency Extension* 21
Warranty … your new sub is family now, treat it well! Paradigm® Reference subwoofers are warranted to be and remain free of manufacturing and/or material defects for a period of three (3) years from the date of the original retail purchase. Within this specified period, repair, replacement or adjustment of parts for manufacturing and/or material defects will be free of charge. Thermal or mechanical abuse/misuse is not covered under warranty.
Love Notes
MESURES DE SÉCURITÉ: lire attentivement cette section avant de poursuivre! AVERTISSEMENT RISQUE DE CHOC ÉLECTRIQUE NE PAS OUVRIR AVERTISSEMENT : POUR MINIMISER LE RISQUE DE CHOC ÉLECTRIQUE, NE PAS ÔTER LE CAPOT (OU LE PANNEAU ARRIÈRE). IL N’Y A À L’INTÉRIEUR AUCUN COMPOSANT RÉPARABLE PAR L’UTILISATEUR. CONFIER TOUTE INTERVENTION À UN PERSONNEL QUALIFIÉ.
Du yoga pour le caisson de sous-graves Consultez cette grille de positionnement.
TDM Trouver le bon endroit pg 1 Utilisation d’un support pg 2 Aux antipodes pg 2 Du grand art! Montage mural pg 3 Raccordement pg 6 Watts up? Réglage fin pg 3 pg 7 Obtenir le meilleur de mon caisson Alerte pour les technophiles … Détails technologiques pg 4 pg 8 Le monde du sans fil Spécifications techniques pg 5 pg 9 Deux, c’est mieux Garantie … votre caisson fait maintenant partie de la famille, traitez-le bien! pg 5 pg 10
Trouver le bon endroit VEUILLEZ NOTER : le montage mural nécessite le système de montage mural MilleniaSub (vendu séparément, voir le revendeur) L’audio, c’est une question de trouver le bon endroit … la zone d’écoute idéale* pour le positionnement des sièges fait l’objet d’une grande attention, mais il doit en être de même pour trouver le bon positionnement pour votre caisson.
Utilisation d’un support x1 x2 x4 Fig. 2 Aux antipodes « Enlevez les boules de poil avant de me mettre sous le divan; laissez 2,5 cm (1 po) de dégagement et assurez-vous de me placer de cette façon! » x4 Gros-plan 13,75 cm (5-1/2 po) 35,5 cm (14 po) x4 x4 Fig.
Du grand art! Montage mural Vue latérale Fig. 4 Les instructions complètes pour le montage mural de votre caisson sont incluses dans le système de support pour le montage mural MilleniaSub (Wall-Mount Bracket system) (vendu séparément, voir le revendeur) Watts up? La cote Watts (W) indiquée sur le panneau arrière du caisson est la puissance CA typique que le caisson utilisera. N’oubliez pas, l’utilisation de puissance réelle variera en fonction du contenu des graves du film ou de la musique.
Obtenir le meilleur de mon caisson Rodage Bien que votre nouveau caisson offre un son excellent « en sortant de la boîte », le son sera encore meilleur après une période de rodage. Le laisser fonctionner pendant quelques heures avant une première écoute critique. S’il a été transporté ou entreposé au froid, laissez-le réchauffer à la température de la pièce avant de l’utiliser. Nettoyage Utilisez un linge doux humide (pas mouillé!) pour nettoyer.
Le monde du sans fil CONSEIL! Notre transmetteur PT-2 peut fonctionner avec jusqu’à quatre MilleniaSubs simultanément Le positionnement joue un rôle important dans l’optimisation du rendement des graves. Toutefois, il peut imposer l’inconvénient, sans mentionner l’aspect inesthétique, de passer de longs câbles dans les murs, le long des plinthes, ainsi que sous les planchers et les tapis.
Raccordement CONSEIL! Nous recommandons l’utilisation de câbles et de connecteurs de haute qualité lorsque vous raccordez votre caisson de sous-graves (voir le revendeur) ÉTEIGNEZ toutes les composantes avant de raccorder le caisson Entrée Entrée de niveau de ligne (RCA) IMPORTANT : les enceintes réglées à « Large » avec votre récepteur A/V ou votre processeur reproduiront encore les basses fréquences, alors faites très attention pour ne pas les surcharger! Permet le raccordement à partir d’une sortie
Réglage fin CONSEIL! Utilisez un tournevis à tête plate ou même une grande pièce de monnaie pour régler les commandes sur le panneau latéral du caisson de sous-graves Une fois que les autres enceintes sont placées dans la pièce et que vous avez établi les distances entre les enceintes et calibré les niveaux des enceintes avec votre processeur ou votre récepteur A/V, il est temps d’effectuer le réglage fin du caisson de sous-graves.
Alerte pour les technophiles … détails technologiques « Vous voulez savoir à quel point je suis cool? Alors, quel autre fabricant vous indique ce qui se passe à l’intérieur de votre caisson dans le manuel de l’utilisateur? » Ce qui se passe à l’intérieur pg 8 DESIGN LES ÉLÉMENTS COOL RAISONNEMENT SOUS-JACENT Polyvalence maximale … encore plus d’options de positionnement qu’un swami qui enseigne le yoga dans un ashram! Consultez la grille au début du présent manuel! HAUT-PARLEUR DE GRAVES Deux haut-
Spécifications techniques Design Haut-parleur double, boîtier scellé, annulation de vibration, amplificateur de puissance Ultra-Class-D™ intégré, récepteur sans fil intégré pour l’option sans fil, port USB pour l’égalisation PBK.
Garantie … votre caisson fait maintenant partie de la famille, traitez-le bien! Les caissons de sous-graves ParadigmMD Reference sont garantis contre les défauts de matériaux et de fabrication pendant une période de trois (3) ans à compter de la date d’achat du matériel neuf. Durant cette période, la réparation, le remplacement ou le réglage de pièces pour des défauts de matériaux ou de fabrication ne seront pas à la charge du premier acheteur.
Mots d’amour
Paradigm, Paradigm Reference, MilleniaSub and all associated proprietary and patented designs and technologies are registered trademarks of Paradigm Electronics Inc. Copyright © Paradigm Electronics Inc. All rights reserved. All other trademarks are the property of their respective owner(s). Paradigm Electronics reserves the right to change specifications and/or features without notice as design improvements are incorporated. Jason Hartog Photography. Printed in Canada.