IMPORTANT! Subwoofers covered by this manual are designed for use with a Paradigm® Subwoofer Amplifier only. Use with any other brand of subwoofer amplifier can cause permanent damage and will void the Paradigm® warranty.
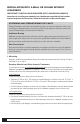
RECYCLING AND REUSE GUIDELINES FOR EUROPE DIRECTIVES EUROPEENNES SUR LE RECYCLAGE ET LE TRAITEMENT DES DECHETS In accordance with the European Union WEEE (Waste Electrical and Electronic Equipment) directive effective August 13, 2005, we would like to notify you that this product may contain regulated materials which, upon disposal, according to the WEEE directive, require special reuse and recycling processing. For this reason Paradigm Electronics Inc.
TABLE OF CONTENTS Important Operating Instructions: Read Before Operating Subwoofer . . . . . . . 3 Subwoofer Assembly Parts List . . . . . . . . . . 3 3-Position “EQ” Switch (Pictorial) . . . . . . . . 4 Your New Subwoofer . . . . . . . . . . . . . . . . . . 4 Configuring the Amplifier for use with Your Subwoofer System . . . . . . . . . . . . . . . . . . . . 5 The Listening Room . . . . . . . . . . . . . . . . . . . . 5 Guidelines for Deciding on Subwoofer Placement . . . . . . . . . . . . . . . . . . . .
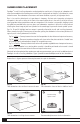
3-POSITION “EQ” SWITCH Fig. 1 1 All PCS subs with/without backbox & RVC-12SQ without backbox 2 3 RVC-12CF with/without backbox RVC-12SQ with backbox + 1 All PCS subs with/without backbox & RVC-12SQ without backbox 2 3 RVC-12CF with/without backbox RVC-12SQ with backbox YOUR NEW SUBWOOFER Break-In Allow your Paradigm® subwoofer system to operate for several hours before you listen critically. Cleaning Clean subwoofer housing with a soft, damp cloth.
CONFIGURING THE AMPLIFIER FOR USE WITH YOUR SUBWOOFER SYSTEM WARNING: The following procedure is imperative for correct system setup and optimal sound. Failure to follow the instructions below will result in permanent damage to amplifier and subwoofer. Such damage is NOT covered under the Paradigm warranty.
SUBWOOFER PLACEMENT Paradigm® in-wall/in-ceiling subwoofers are designed to be used in pairs. Using a pair of subwoofers will allow you to randomize the standing waves within your listening room so that bass is distributed in a more uniform manner. Two subwoofers also ensures even lower distortion, especially at high output levels. Bass is less and less directional as it goes down in frequency.
COLOR MATCH PAINTING (optional) Your new subwoofer has a textured finish in neutral white to blend into any area. It may also be painted to match any décor. If you plan to paint your subwoofer, to avoid "painting it to the wall", we recommend that you paint it before installation. Please note: • Do not paint the surface behind the grille; • Do not heat-cure your newly painted subwoofer; • Avoid painting the subwoofer’s rear surface—protect it by masking it (paint mask included).
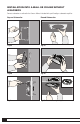
INSTALLATION INTO A WALL OR CEILING WITHOUT A BACKBOX Connect subwoofer as outlined in the Owners Manual included with your Paradigm® subwoofer amplifier. 8 Square Subwoofer Round Subwoofer Fig. 4a Fig. 5a Fig. 4b Fig. 5b Fig. 4c Fig. 5c Rotate before tightening screws.
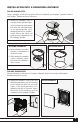
INSTALLATION INTO A PARADIGM® BACKBOX ROUND SUBWOOFER: Connect subwoofer as outlined in the Owners Manual included with your Paradigm® subwoofer amplifier and Paradigm® Backbox connection instructions. a) Holding the subwoofer’s front lip with your thumbs and index fingers, push the 4 mounting screws toward each other with your other fingers so the mounting brackets can fit through the hole with an “up-and-in” motion. Release the screws and gently push the subwoofer up into the Paradigm® Backbox.
INSTALLATION INTO A WALL OR CEILING WITHOUT A BACKBOX IMPORTANT! IF INSTALLING SUBWOOFER INTO A PARADIGM® BACKBOX Instructions for installing your subwoofer into a backbox were provided with the backbox. If you no longer have the instructions, follow the instructions on the preceding page.
2. Connecting and Installing You are now ready to connect and install the subwoofers. If you are color match painting do so now before proceeding. Follow painting instructions provided earlier. With grille removed and bracket attached to speaker, place subwoofer against wall or ceiling and … Connecting Subwoofer: Connect subwoofer cable as outlined in the Owners Manual included with your Paradigm® subwoofer amplifier (sold separately).
LIMITED WARRANTY IMPORTANT! Subwoofers covered by this manual are designed for use with a Paradigm® Subwoofer Amplifier only. Use with any other brand of subwoofer amplifier can cause permanent damage and will void the Paradigm® warranty. Paradigm® subwoofers covered in this manual are warranted to be and remain free of manufacturing and/or material defects for a period of three (3) years from the date of the original retail purchase.
NOTES
NOTES
IMPORTANT : les caissons de sous-graves couverts par ce manuel sont conçus pour être utilisés avec un amplificateur de caisson de sous-graves ParadigmMD uniquement. L’utilisation avec une autre marque d’amplificateur de caisson de sous-graves annulera la garantie de ParadigmMD.
TABLE DES MATIÈRES Consignes de sécurité importantes : à lire avant d’utiliser le caisson de sous-graves . . 16 Positionnement du caisson de sous-graves . . . . . . . . . . . . . . . . . . . . . . . . . 19 Liste des pièces . . . . . . . . . . . . . . . . . . . . . . 17 Appariement de la couleur . . . . . . . . . . . . . 20 Interrupteur « EQ » à trois positions (illustrations) . . . . . . . . . . . . . . . . . . . . . . . . 17 Installation dans le mur ou le plafond sans boîtier arrière (illustrations) .
LISTE DES PIÈCES (une enceinte) • 1 caisson de sous-graves avec un support de montage fixé • 1 gabarit de montage • 1 masque à peinture • 1 attache métallique Nécessaire, non compris • 1 amplificateur ParadigmMD X-300 (pour une utilisation avec jusqu’à 4 caissons de sous-graves ParadigmMD PCS) INTERRUPTEUR « EQ » À 3 POSITIONS Fig.
VOTRE NOUVEAU CAISSON DE SOUS-GRAVES (suite) Boîtiers Arrière ParadigmMD Facultatifs Les caissons de sous-graves ParadigmMD encastrables au mur ou au plafond peuvent être installés dans un boîtier arrière ParadigmMD facultatif (vendu séparément). Si vous décidez d’utiliser un boîtier arrière, veuillez suivre les instructions en matière de placement et d’installation comprises avec le boîtier arrière.
DIRECTIVES POUR DÉCIDER OÙ PLACER LE CAISSON DE SOUS-GRAVES Lorsque vous pensez à placer le caisson de sous-graves directement dans le mur ou le plafond, veuillez observer les directives suivantes : • NE PAS installer le ou les caissons de sous-graves dans un support d’enduit ou du plâtre – la vibration des basses fera craquer le matériel au fil du temps. • NE PAS installer le ou les caissons de sous-graves dans les cavités qui contiennent des conduits.
POSITIONNEMENT DU CAISSON DE SOUS-GRAVES (suite) Les lignes pointillées dans les figures représentent un positionnement alternatif pour une paire de caissons de sous-graves. Fig. 2a Deux caissons près du sol dans les coins de la pièce Fig. 2b Deux caissons près du sol dans le milieu des murs Rond : Plafond dans le plafond Carré : Encastrables au mur Fig. 2c Deux caissons dans le plafond près des coins Fig.
INSTALLATION DANS LE MUR OU LE PLAFOND SANS BOÎTIER ARRIÈRE Raccordez le caisson de sous-graves en suivant les instructions du manuel de l’utilisateur compris avec votre amplificateur de caisson de sous graves ParadigmMD. Caisson de sous-graves carré Caisson de sous-graves rond Fig. 4a Fig. 5a Fig. 4b Fig. 5b Fig. 4c Fig. 5c Tournez avant de serrer.
INSTALLATION DANS UN BOÎTIER ARRIÈRE PARADIGMMD CAISSON DE SOUS-GRAVES ROND : Raccordez le caisson de sous-graves en suivant les instructions du manuel de l’utilisateur compris avec votre amplificateur de caisson de sous graves ParadigmMD et les instructions concernant le raccordement du boîtier arrière ParadigmMD.
INSTALLATION DANS LE MUR OU LE PLAFOND SANS BOÎTIER ARRIÈRE IMPORTANT! SI VOUS INSTALLEZ LE CAISSON DE SOUS-GRAVES DANS UN BOÎTIER ARRIÈRE PARADIGMMD Les instructions pour installer votre caisson de sous-graves dans un boîtier arrière sont fournies avec le boîtier arrière. Si vous n’avez plus les instructions, suivez les instructions sur la page opposée.
INSTALLATION DANS LE MUR OU LE PLAFOND (suite) Montage au plafond : Pour une performance optimale, placez, sans les compacter : • Un morceau d'isolant en fibre de verre standard (de largeur telle qu'il s'insère entre les solives) audessus du caisson de sous-graves, qui se prolonge de 30 cm (12 po) ou plus de chaque côté de l’enceinte entre les solives, en laissant assez d’espace pour que le caisson de sous-graves s’encastre dans la cavité; • (Pour les solives plus hautes) de l'isolant en fibre de verre dire
GARANTIE LIMITÉE IMPORTANT : les caissons de sous-graves couverts par ce manuel sont conçus pour être utilisés avec un amplificateur de caisson de sous-graves ParadigmMD uniquement. L’utilisation avec une autre marque d’amplificateur de caisson de sous-graves annulera la garantie de ParadigmMD.
NOTES
NOTES
w w w . p a r a d i g m . c o m © PARADIGM ELECTRONICS INC.