OWNERS MANUAL OM-575 MILLENIA™ SERIES: FRONT AND CENTER SPEAKERS Thank you for choosing Paradigm® Reference Millenia™ Speakers and congratulations! You are about to hear the difference these state-of-the-art high-end speakers will make in your music and home theater system. Comprehensive R&D, leading-edge design, use of the finest materials, and sophisticated manufacturing and quality control techniques provide vastly superior performance for each component part and at every stage of design.
TABLE OF CONTENTS Base Assembly for Floorstanding Speakers (Pictorial) . . . . . . . . . . . . . . . . . . . . . . . . . . . . . . . . . . . 3 Speaker Placement . . . . . . . . . . . . . . . . . . . . . . . 9 Grille Removal and Reinstallation (Pictorial) . . . . 3 Speaker Connection . . . . . . . . . . . . . . . . . . . . . 10 Speaker Placement and Connection (Pictorial) . . 4 Fine Tuning . . . . . . . . . . . . . . . . . . . . . . . . . . . . 10 Your New Speakers . . . . . . . . . . . . . . . . . . .
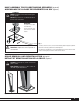
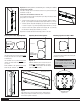
BASE ASSEMBLY FOR FLOORSTANDING SPEAKERS (pictorial) ASSEMBLAGE DE LA BASE DES ENCEINTES AU SOL (figures) DO NOT overtighten screws when attaching glass base to speaker NE PAS trop serrer les vis au moment de fixer la base en verre à l’enceinte IMPORTANT: Lay speaker on its side to assemble base. Coucher l’enceinte sur le côté avant d’assembler la base. OR OU x4 x4 Fig.
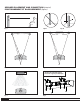
SPEAKER PLACEMENT AND CONNECTION (pictorial) POSITIONNEMENT ET RACCORDEMENT (figures) Fig. 3 Fig. 4a up to / à Fig. 5 Fig. 4b up to / à Fig. 6 Attaching the TV-Top/Shelf Supports Fixation des supports pour télé/étagère Fig. 7 4 Fig.
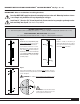
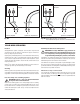
BRACKET INSTALLATION FOR MILLENIA™ 20 AND MILLENIA™ 30 (Figs. 9a – 9e) IMPORTANT: Please read before installing brackets Paradigm DOES NOT supply hardware for mounting brackets to the wall. Mounting hardware shown is an example only; hardware will vary depending on wall type. Install into 1/2˝ (13 mm) or 5/8˝ (16 mm) drywall only. Screws must be long enough to go through anchor bolts and firmly into drywall (see inset circle, below).
Fig. 9d (Before wiring speakers see note on Fig. 9d – 1 and Fig. 9d – 2 below) Horizontal Position CONNECTING SPEAKER Pull cables through center hole in bracket and connect speaker following the information on Page 10. ADJUSTING THE SPEAKER’S ANGLE OF TILT The self-adhesive bumper pads (included) allow you to adjust the angle at which your speakers sits on the wall: • To further optimize imaging, you can tilt Left and Right speakers inward 7° (Fig.
Speaker Enceinte Receiver / Amplifier Speaker Enceinte Syntoniseur / Amplificateur Fig. 10a Receiver / Amplifier Syntoniseur / Amplificateur Fig. 10b Wiring when speakers are rotated 180° Raccordement lorsque les enceintes sont tournées 180° YOUR NEW SPEAKERS On-Wall/Stand-Mounted LCR Speakers Break-In Although Millenia speakers sound great “out of the carton” they will sound even better once they are “broken in.” Allow them to play for several hours before you begin any critical listening.
HOW TO AVOID SPEAKER DAMAGE Millenia™ speakers are efficient and can be driven to loud listening levels with moderate amplifier power. They are also able to handle the output of very powerful amplifiers. To prevent damage to your speakers, please read the following guidelines before hooking them up. Amplifier Distortion—The #1 Culprit! Amplifier distortion is the principal cause of speaker damage. When listening at loud levels your amplifier may run out of clean power.
SPEAKER PLACEMENT FLOORSTANDING FRONT SPEAKERS Balanced Bass Performance (Figs. 4a, 4b) Millenia™ floorstanding speakers are designed to allow flexible placement while providing a very large window of sound throughout your listening room. To ensure the best high-end performance possible however, we strongly recommend that you observe the following placement guidelines: Placing front speakers in corners will over-emphasize bass and reduce overall clarity. Avoid corner placement (Fig. 4a).
WALL MOUNTING (Figs. 9a – 9e) IMPORTANT: Paradigm DOES NOT supply hardware for mounting LCR brackets to the wall. Mounting hardware used is an example only; it will vary depending on wall type. If you are not comfortable performing this procedure, contact Dealer. IMPORTANT: When mounting the speakers, use the bumper pads marked with the angle you wish to achieve.
TROUBLESHOOTING GUIDE PROBLEM No Sound No Sound from One or More Speakers Lack of Bass or Dislocated Image SOLUTION Make sure receiver, preamp or amplifier is plugged in and turned on. Check power outlet at the wall is working. Are headphones plugged in, or is the system on Mute? Re-check all connections. Check your balance control or VC-150 Volume Control (if using). Check that all power cords are properly plugged in and functioning.
MD MD MODE D’ EMPLOI OM-575 MC SÉRIE MILLENIA : ENCEINTES AVANT ET CENTRALE Félicitations! Nous vous remercions d'avoir choisi ces enceintes MilleniaMC ParadigmMD Reference. Vous allez entendre la différence que confèrent ces enceintes de pointe haut de gamme à votre système audio ou de cinéma maison.
TABLE DES MATIÈRE Assemblage de la base des enceintes au sol (figures) . . . . . . . . . . . . . . . . . . . . . . . . . . . . . . . . 3 Positionnement des enceintes . . . . . . . . . . . . 17 Retrait et réinstallation de la grille (figures) . . . 3 Raccordement des enceintes . . . . . . . . . . . . . . 18 Positionnement et raccordement (figures) . . . . 4 Réglage fin . . . . . . . . . . . . . . . . . . . . . . . . . . . . . 18 Vos nouvelles enceintes . . . . . . . . . . . . . . . . . .
INSTALLATION DU SUPPORT POUR LE MILLENIAMC 20 ET LE MILLENIAMC 30 (Figs. 9a – 9e) IMPORTANT : veuillez lire ces remarques avant d’installer les supports Paradigm NE fournit PAS le matériel nécessaire pour monter les supports sur le mur. Le matériel est illustré à titre d’exemple uniquement; le matériel variera en fonction du type de mur. Installez les supports sur une cloison sèche de 1/2 po (13 mm) ou de 5/8 po (15 mm) uniquement.
Fig. 9d (Avant de raccorder l’enceinte, consultez la remarque à la Fig. 9d – 1 et 9d – 2 ci-dessous) Position horizontale RACCORDEMENT DE L’ENCEINTE Passez les câbles dans le trou du centre du support et branchez l’enceinte en suivant les renseignements de la page 18.
POUR ÉVITER D'ENDOMMAGER LES ENCEINTES Les enceintes sont efficaces et peuvent produire des volumes élevés à des puissances de sortie modérées de l’amplificateur. Elles peuvent également être jumelées à des amplificateurs haute puissance. Pour éviter d’endommager les enceintes, lire les directives suivantes avant de procéder à leur raccordement. Distorsion de l’amplificateur—Le principal fautif! La distorsion de la puissance provenant de l’amplificateur est la principale cause de dommages aux enceintes.
POSITIONNEMENT DES ENCEINTES ENCEINTES AU SOL Basses fréquences équilibrées (Figs. 4a, 4b) Les enceintes avant gauche/droite MilleniaMC sont conçues pour offrir une grande souplesse dans le choix de leur emplacement tout en produisant une très vaste couverture sonore dans toute la salle d’écoute. Pour la meilleure performance possible, il est toutefois recommandé de suivre les directives suivantes sur le positionnement des enceintes.
INSTALLATION AU MUR (Figs. 9a – 9e) IMPORTANT : Paradigm NE fournit PAS le matériel pour installer les supports (GCD) sur le mur. Le matériel utilisé est illustré à titre d’exemple uniquement et il variera en fonction du type de mur. Consulter le revendeur pour une installation professionnelle. IMPORTANT : lorsque vous montez les enceintes, utiliser les coussins marqués à l’angle que vous souhaitez obtenir.
GUIDE DE DIAGNOSTIC PROBLÉME Aucun son Aucun son d'une ou plusieurs enceintes Déficience des graves ou image disloquée SOLUTION S'assurer que le préamplificateur ou l'amplificateur est branché et allumé. Vérifier que la prise de courant fonctionne correctement. Les écouteurs sont-ils branchés ou le système est-il en mode sourdine (mute)? Vérifier tous les raccords. Vérifier la commande de réglage d'équilibre (balance) ou la commande de volume VC-150 (si elle est utilisée).
w w w . p a r a d i g m . c o m © PARADIGM ELECTRONICS INC.