
Installation Guide
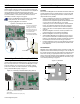
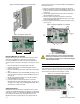
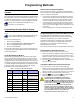
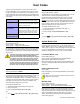
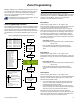

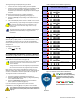
Table Of Contents
- Introduction
- About Magellan and this Manual
- Conventions
- Specifications
- Quick Setup
- Installation
- AC Power
- Backup Battery Pack
- Telephone Line Connections
- Programmable Outputs (PGMs)
- Hardwire Zone Connections
- WinLoad Connection
- UIP-256 Universal In-Field Programmer Connection
- X10 Transmitter Connection
- Connecting a Paradox Memory Key (PMC-3)
- Location and Mounting
- Connecting the Radio Antenna
- Programming Methods
- WinLoad Installer Upload/Download Software
- Programming Using the Built-in Keypad
- Programming Using a Paradox Memory Key
- User Codes
- User Code Length
- Installer Code
- Maintenance Code
- System Master Code
- Duress Code
- Zone Programming
- Zone Programming Overview
- Zone Definitions
- Zone Options
- Zones 15 and 16 become Hardwire Zones
- EOL (End-Of-Line) Zones
- Wireless Programming
- Assigning Wireless Zone Transmitters
- Assigning Wireless Doorbells to the Console
- Deleting Assigned Wireless Transmitters
- Viewing Wireless Transmitter Signal Strength
- Assigning Remote Controls
- Programming the Remote Control’s Buttons
- Arming and Disarming
- Regular Arming Switches to Stay Arming
- Regular Arming Switches to Force Arming
- Stay Arming Switches to Force Arming
- Timed Auto-Arming
- No Movement Auto-Arming
- Auto-Arming Options
- One-Touch Arming
- Exit Delay
- Bell Squawk on Arm/Disarm with Remote Control
- No Exit Delay when Arming with Remote Control
- Exit Delay Termination
- Follow Zone Switches to Entry Delay 2
- Closing Delinquency Timer
- Alarm Options
- Bell Cut-off Timer
- Wireless Transmitter Supervision Options
- Tamper Recognition Options
- Check-in Supervision Options
- Panic Alarms
- Reporting and Dialer Settings
- Report Codes
- Console Telephone Numbers
- Console Account Number
- Reporting Formats
- Event Call Direction
- Delay Between Dialing Attempts
- Alternate Dial Option
- Force Dial Option
- Dialing Method
- Pulse Ratio
- Switch to Pulse Dialing on 5th Attempt
- Telephone Line Monitoring (TLM)
- Recent Close Delay
- Auto-Test Report
- Power Failure Report Delay
- Disarm Reporting Options
- Zone Restore Report Options
- Programmable Outputs
- PGM Activation Event
- PGM Deactivation Event
- PGM Delay
- PGM Normal State
- PGM X10 Option
- System Settings
- Software Reset
- Installer Lock
- Console Tamper Supervision
- Console Audible Trouble Warning
- FM Tuner Option
- Daylight Savings Time
- AC Power Failure Warning
- The Trouble Display
- WinLoad Software Settings
- Panel Answer Options
- Panel Identifier
- PC Password
- PC Telephone Number
- Call Back Feature
- Appendix 1: Ademco Contact ID Report Code List
- Index

Paradox Magellan Systems 17
Wireless Programming
The Magellan system supports up to 16 wireless zones and two
wireless doorbells. These wireless zones are monitored using
transmitters such as wireless detectors and door contacts. The
Magellan console only supports the Paradox Magellan series of
wireless transmitters. The programming of the transmitters is
accomplished in two steps:
1. Assign the wireless transmitter to Magellan.
2. Program the wireless zone.
Assigning Wireless Zone Transmitters
Sections [021] to [036]: Zones 1-16; Wireless Transmitters 1-16
Sections [021] to [036] represent zones 1 to 16. A wireless
transmitter assigned to a section ([021] to [036]) will be assigned
to the zone represented by the section.
For example, a wireless transmitter assigned to section [025] will
be assigned to zone 5.
To assign a wireless transmitter:
1. Access the installer programming mode (page 11).
2. Enter the [
SECTION
] corresponding to the desired zone.
3. Enter the 6-digit [
SERIAL
NUMBER
] of the wireless transmitter.
The serial number is located on the inside of the wireless
transmitter.
The wireless transmitters must be activated once having been
assigned to the Magellan console. To activate a transmitter,
insert the batteries and close the cover. To ensure proper
synchronization between the console and the transmitter, open
and close the zone corresponding to the transmitter.
Are the zones that have wireless transmitters assigned to them
programmed? See Zone Definitions on page 13 and Zone
Options on page 15.
Wireless transmitters can also be assigned through the Installer
menu. Press [
MENU
] + [4] + [
INSTALLER
CODE
] + [6]. Select the
zone you wish to assign the transmitter to, press [
OK
], open the
cover of the transmitter and then close the cover. The
transmitter has been assigned. Refer to the Magellan Quick
Setup for more information on the Installer menu and the
assignment of the wireless transmitters.
Assigning Wireless Doorbells to the Console
Sections [058] and [059]: Wireless Doorbells 1 and 2
Magellan supports the use of two wireless “doorbells”. By
connecting a pushbutton to the Universal Transmitter inputs of a
Magellan Wireless Door Contact (MG-DCT1), the MG-DCT1 will
transmit a signal to Magellan whenever the pushbutton is
pressed. Magellan will in turn become a “doorbell” and play a
predetermined tone (see Wireless Doorbell Tones on page 17).
Please refer to the appropriate Magellan Wireless Door
Contact Instruction for information on the installation and
configuration of the wireless door contact.
To assign a wireless doorbell:
1. Access the installer programming mode (page 11).
2. Enter the [
SECTION
] corresponding to the desired doorbell.
3. Enter the 6-digit [
SERIAL
NUMBER
] of the MG-DCT1.
Wireless Doorbell Tones
Section [096]: Options [1] to [4]
Options [1] and [2] = Set tone for wireless doorbell 1
Options [3] and [4] = Set tone for wireless doorbell 2
Section [096] options [1] to [4] set the tones that will be played
when Magellan receives a signal from either wireless doorbell 1
or 2 or both. Magellan comes with four tones. Refer to Table 3 on
page 17 to set the desired tone.
Table 3: Wireless Doorbell Tones
Deleting Assigned Wireless Transmitters
Sections [021] to [036]: Zones 1-16; Wireless Transmitters 1-16
Sections [058] and [059]: Wireless Doorbells 1 and 2
To delete an assigned wireless transmitter:
1. Access the installer programming mode (page 11).
2. Enter the [
SECTION
] corresponding to the desired zone or
doorbell.
3. Press the [0] key six times to clear the wireless transmitter’s
serial number.
Viewing Wireless Transmitter Signal
Strength
Sections [021] to [036]: Zones 1-16; Wireless Transmitters 1-16
Sections [058] and [059]: Wireless Doorbells 1 and 2
Once wireless transmitters have been assigned to the Magellan
console, the signal strength of each transmitter can be verified in
sections [021] to [036] (zones 1 to 16 respectively) and sections
[058] and [059] (wireless doorbells 1 and 2 respectively). Each
section represents the signal strength viewer for the wireless
transmitter assigned to the corresponding zone.
For example, section [021] is the viewer for the wireless
transmitter assigned to zone 1 and section [036] is the viewer for
the wireless transmitter assigned to zone 16.
Section [096] - Options [1] and [2] Doorbell Tone #
Option [1] OFF / Option [2] OFF (Doorbell 1) Tone 1 (default)
Option [1] OFF / Option [2] ON (Doorbell 1) Tone 2
Option [1] ON / Option [2] OFF (Doorbell 1) Tone 3
Option [1] ON / Option [2] ON (Doorbell 1) Tone 4
Section [096] - Options [3] and [4] Doorbell Tone #
Option [3] OFF / Option [4] OFF (Doorbell 2) Tone 1
Option [3] OFF / Option [4] ON (Doorbell 2) Tone 2 (default)
Option [3] ON / Option [4] OFF (Doorbell 2) Tone 3
Option [3] ON / Option [4] ON (Doorbell 2) Tone 4