
Installation Guide
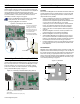
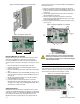
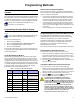
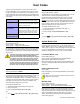
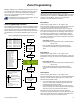

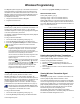
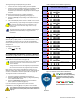
Table Of Contents
- Introduction
- About Magellan and this Manual
- Conventions
- Specifications
- Quick Setup
- Installation
- AC Power
- Backup Battery Pack
- Telephone Line Connections
- Programmable Outputs (PGMs)
- Hardwire Zone Connections
- WinLoad Connection
- UIP-256 Universal In-Field Programmer Connection
- X10 Transmitter Connection
- Connecting a Paradox Memory Key (PMC-3)
- Location and Mounting
- Connecting the Radio Antenna
- Programming Methods
- WinLoad Installer Upload/Download Software
- Programming Using the Built-in Keypad
- Programming Using a Paradox Memory Key
- User Codes
- User Code Length
- Installer Code
- Maintenance Code
- System Master Code
- Duress Code
- Zone Programming
- Zone Programming Overview
- Zone Definitions
- Zone Options
- Zones 15 and 16 become Hardwire Zones
- EOL (End-Of-Line) Zones
- Wireless Programming
- Assigning Wireless Zone Transmitters
- Assigning Wireless Doorbells to the Console
- Deleting Assigned Wireless Transmitters
- Viewing Wireless Transmitter Signal Strength
- Assigning Remote Controls
- Programming the Remote Control’s Buttons
- Arming and Disarming
- Regular Arming Switches to Stay Arming
- Regular Arming Switches to Force Arming
- Stay Arming Switches to Force Arming
- Timed Auto-Arming
- No Movement Auto-Arming
- Auto-Arming Options
- One-Touch Arming
- Exit Delay
- Bell Squawk on Arm/Disarm with Remote Control
- No Exit Delay when Arming with Remote Control
- Exit Delay Termination
- Follow Zone Switches to Entry Delay 2
- Closing Delinquency Timer
- Alarm Options
- Bell Cut-off Timer
- Wireless Transmitter Supervision Options
- Tamper Recognition Options
- Check-in Supervision Options
- Panic Alarms
- Reporting and Dialer Settings
- Report Codes
- Console Telephone Numbers
- Console Account Number
- Reporting Formats
- Event Call Direction
- Delay Between Dialing Attempts
- Alternate Dial Option
- Force Dial Option
- Dialing Method
- Pulse Ratio
- Switch to Pulse Dialing on 5th Attempt
- Telephone Line Monitoring (TLM)
- Recent Close Delay
- Auto-Test Report
- Power Failure Report Delay
- Disarm Reporting Options
- Zone Restore Report Options
- Programmable Outputs
- PGM Activation Event
- PGM Deactivation Event
- PGM Delay
- PGM Normal State
- PGM X10 Option
- System Settings
- Software Reset
- Installer Lock
- Console Tamper Supervision
- Console Audible Trouble Warning
- FM Tuner Option
- Daylight Savings Time
- AC Power Failure Warning
- The Trouble Display
- WinLoad Software Settings
- Panel Answer Options
- Panel Identifier
- PC Password
- PC Telephone Number
- Call Back Feature
- Appendix 1: Ademco Contact ID Report Code List
- Index

18 Reference & Installation Manual
The signal strength is displayed using two terms:
• “Good”: This is an average reading and is acceptable.
• “Weak”: This is the weakest reading. The transmitter should
be moved to another location. Sometimes moving the
transmitter by a small amount will greatly increase the signal
reception.
To view the signal strength of a wireless transmitter:
1. Access the installer programming mode (page 11).
2. Enter the [
SECTION
] corresponding to the desired zone or
doorbell.
3. The LCD will display either “Good” or “Weak” on the screen.
When performing a signal strength test, Magellan also displays
the noise level surrounding each of the transmitters. “Low”
refers to a low level of noise while “High” refers to a noisy
environment.
The signal strength can also be verified by performing a
system test. See Quick Setup on page 4 for more
information.
Assigning Remote Controls
Sections [041] to [056]: Users 1 to 16; Remote Controls 1 to 16
The Magellan console accepts up to 16 fully programmable
remote controls. Every user code can have one remote control
assigned to it.
To assign a remote control:
1. Press [
MENU
] + [4] + [2].
Programming the Remote Control’s Buttons
Sections [161] to [176]: Users 1 to 16; Remote Controls 1 to 16
Sections [161] to [176] represent the remote controls assigned to
user codes 1 to 16 (see Table 4 on page 18).
The remote control will transmit a signal for only 1 second when
a button is pressed. This is done to conserve the remote
control’s batteries.
Though remote controls can be assigned by the System Master,
the remote control’s buttons are programmed by the installer.
Each remote control can be programmed to perform up to 5
different actions. Each digit in sections [161] to [176] represents
a button or combination of buttons (see Table 4 on page 18).
To program a remote control’s buttons:
1. Access the installer programming mode (page 11).
2. Enter the [
SECTION
] (sections [161] to [176]) corresponding
to the desired remote control.
3. Enter the [
HEXADECIMAL
VALUE
] (0 to D) of the desired
button option from Table 20 (page 19).
If you do not wish to program all the buttons or button
combinations, press the [#] key at any time to save and exit.
If you enable any Panic button options, you must enable the
Panic options in the control panel (refer to Panic Alarms on
page 23).
Table 4: Remote Control Button Programming
Figure 19: Remote Control Button Identification
Section
#
Data (refer to Table 20 on page 19)
User
#
[161] _____/_____/_____/_____ Remote Control 1
001
[162] _____/_____/_____/_____ Remote Control 2
002
[163] _____/_____/_____/_____ Remote Control 3
003
[164] _____/_____/_____/_____ Remote Control 4
004
[165] _____/_____/_____/_____ Remote Control 5
005
[166] _____/_____/_____/_____ Remote Control 6
006
[167] _____/_____/_____/_____ Remote Control 7
007
[168] _____/_____/_____/_____ Remote Control 8
008
[169] _____/_____/_____/_____ Remote Control 9
009
[170] _____/_____/_____/_____ Remote Control 10
010
[171] _____/_____/_____/_____ Remote Control 11
011
[172] _____/_____/_____/_____ Remote Control 12
012
[173] _____/_____/_____/_____ Remote Control 13
013
[174] _____/_____/_____/_____ Remote Control 14
014
[175] _____/_____/_____/_____ Remote Control 16
015
[176] _____/_____/_____/_____ Remote Control 16
016
+
+
+
+
+
+
+
+
+
+
+
+
+
+
+
+
MG-REM1
The button of the MG-REM1
remote control has been permanently
programmed to disarm the system.
The button’s functionality cannot be
altered.
The , and
button combinations do not function
with the MG-REM1 remote control.
+ + +