
Router User's Guide
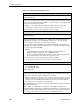
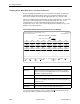
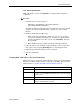

Table Of Contents
- Contents
- About This Guide
- 1. About the FrameSaver SLV
- 2. User Interface and Basic Operation
- 3. Configuration Procedures
- 4. Configuration Options
- Using the Easy Install Feature
- Using RIP with FrameSaver SLV CSU/DSUs
- Entering System Information and Setting the System Clock
- Setting Up the Modem
- Setting Up Auto-Configuration
- Setting Up Dial Backup
- PVC Backup Over the Network Interface
- Setting Up Back-to-Back Operation
- Configuration Option Tables
- Configuring the Overall System
- Configuring Physical Interfaces
- Assigning Time Slots/Cross Connections
- Configuring Frame Relay for an Interface
- Manually Configuring DLCI Records
- Configuring PVC Connections
- Configuring the IP Path List
- Setting Up Management and Communication Options
- Configuring the Criteria for Automatic Backup
- 5. Configuring the FrameSaver SLV Router
- FrameSaver SLV Router Overview
- IP Routing
- Address Resolution Protocol
- Proxy ARP
- Interface Configuration
- Network Address Translation
- Network Address Port Translation
- Dynamic Host Configuration Protocol Server
- DHCP Relay Agent
- Router Security
- Provisioning the Router Interface
- Configuring the Router Using Terminal Emulation
- 6. Security and Logins
- 7. Operation and Maintenance
- 8. Troubleshooting
- 9. Setting Up OpenLane for FrameSaver Devices and Activating SLM Features
- 10. Setting Up NetScout Manager Plus for FrameSaver Devices
- 11. Setting Up Network Health for FrameSaver Devices
- A. Menu Hierarchy
- B. SNMP MIBs and Traps, and RMON Alarm Defaults
- C. Router CLI Commands, Codes, and Designations
- D. Router Command Line Summaries and Shortcuts
- E. Connectors, Cables, and Pin Assignments
- F. Technical Specifications
- G. Equipment List
- Index
4. Configuration Options
4-52
September 2002 9128-A2-GB20-80
Assigning Frame Relay Time Slots to the Network Interface
Before assigning network time slots for use by frame relay traffic, configure the
Network physical and Frame Relay options (if needed), then allow Time Slot
Discovery to autodetect and assign the appropriate time slots to frame relay.
If there are multiple Frame Relay data links on the network interface, or if Time Slot
Discovery is not currently active, you can manually assign time slots on the
network interface for frame relay traffic using the Frame Relay Network
Assignments screen. This screen is read-only when Time Slot Discovery is set to
Enable for the network interface.
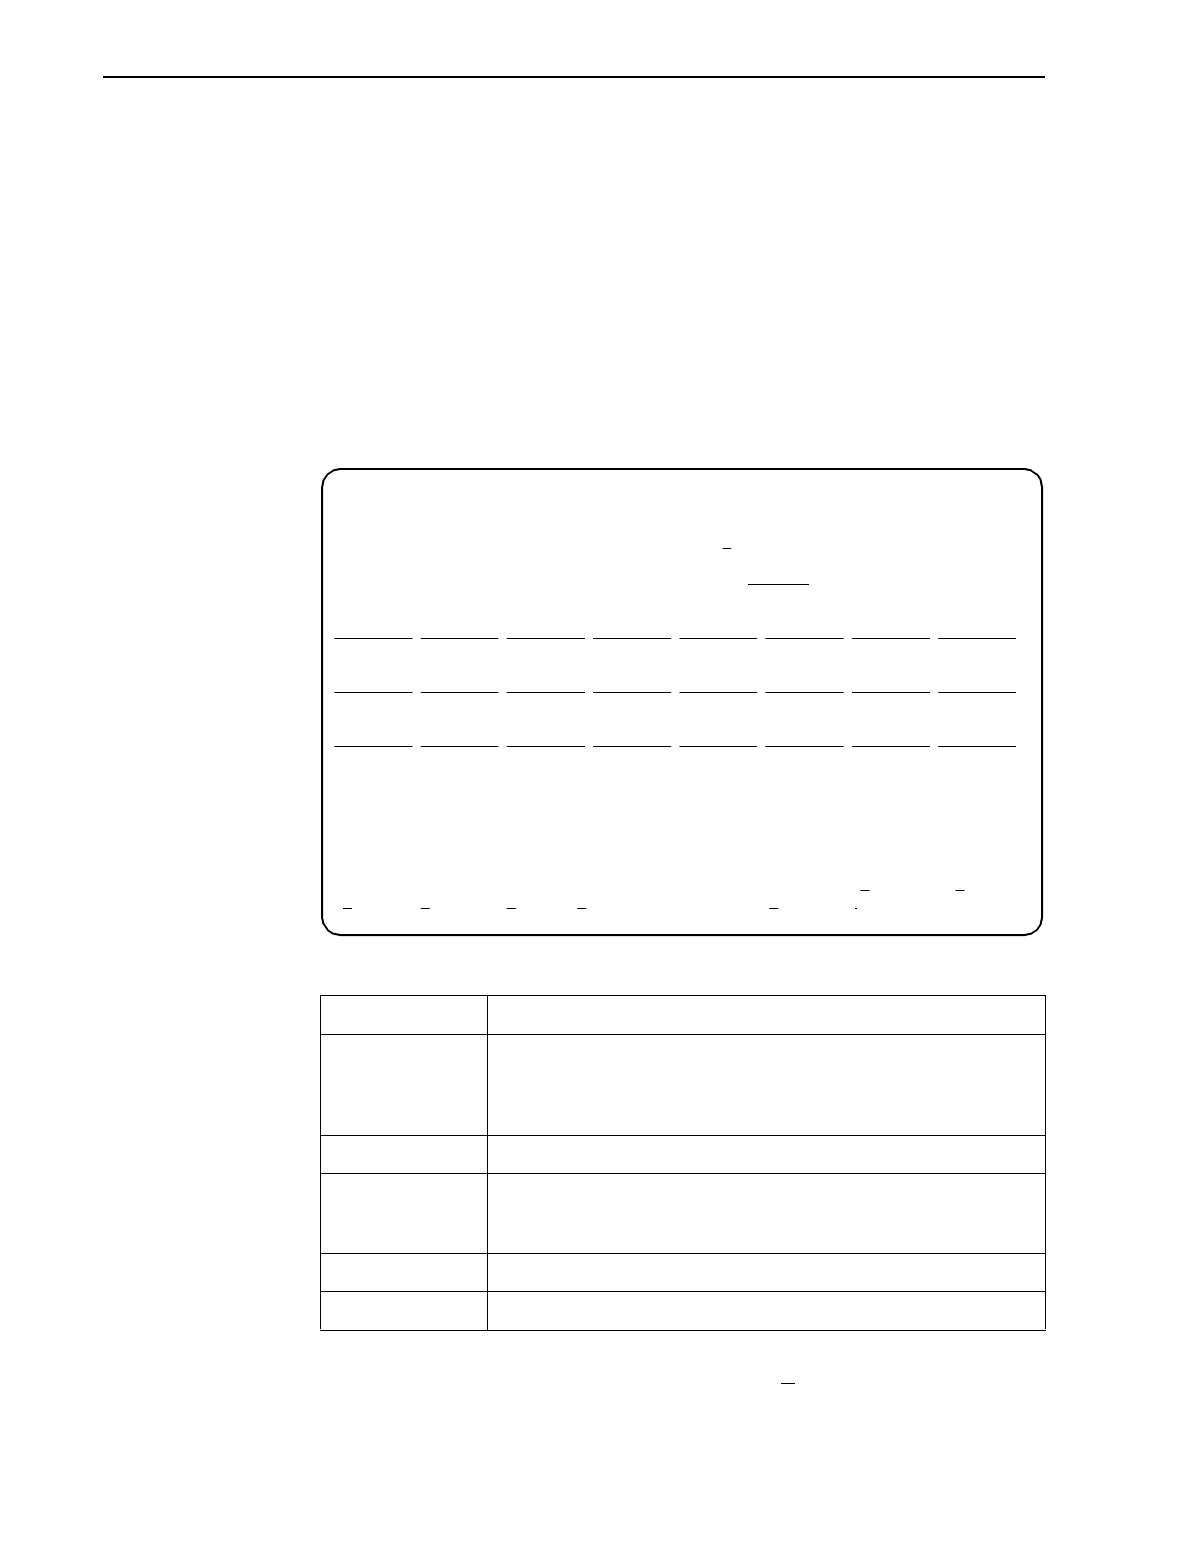
Frame Relay Network Time Slot Assignment Screen Example
For easy movement between screens, select the DSX
Assign function key to go
directly to the DSX-1 to Network Assignments screen.
Value Meaning
Time Slot
Discovery
Specifies whether the time slots used for frame relay traffic should be
discovered from the network interface upon detection of an LMI
failure. This option allows additional time slots to be added without
manually reconfiguring the device.
N
tt
This field represents time slot
tt
of the selected network interface.
Assigned The time slot is already assigned to something other than frame
relay, so it is unavailable. Assigned time slots cannot be modified
from this screen.
Available The time slot is currently unassigned.
FrameRly1 The time slot is assigned to frame relay service, link 1.
main/config/tslot_assign/frame_relay 9128-II
Device Name: Node A 5/26/2000 23:32
FRAME RELAY NETWORK 1
ASSIGNMENT
Time Slot Discovery: Disable
N01 N02 N03 N04 N05 N06 N07 N08
Available
Available Available Available Available Available Available Available
N09 N10 N11 N12 N13 N14 N15 N16
Available
Available FrameRly1 FrameRly1 FrameRly1 FrameRly1 FrameRly1 FrameRly1
N17 N18 N19 N20 N21 N22 N23 N24
FrameRly1
FrameRly1 FrameRly1 FrameRly1 FrameRly1 FrameRly1 FrameRly1 FrameRly1
--------------------------------------------------------------------------------
Ctrl-a to access these functions, ESC for previous menu M
ainMenu Exit
S
ave PgDn PgUp ClearAll DSXAssign