
Manual


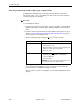
Table Of Contents
- Contents
- About This Guide
- 1. About the FrameSaver SLV
- 2. User Interface and Basic Operation
- 3. Configuration Procedures
- 4. Configuration Options
- Using the Easy Install Feature
- Using RIP with FrameSaver SLV CSU/DSUs
- Entering System Information and Setting the System Clock
- Setting Up the Modem
- Setting Up Auto-Configuration
- Setting Up Dial Backup
- PVC Backup Over the Network Interface
- Setting Up Back-to-Back Operation
- Configuration Option Tables
- Configuring the Overall System
- Configuring Physical Interfaces
- Assigning Time Slots/Cross Connections
- Configuring Frame Relay for an Interface
- Manually Configuring DLCI Records
- Configuring PVC Connections
- Configuring the IP Path List
- Setting Up Management and Communication Options
- Configuring the Criteria for Automatic Backup
- 5. Configuring the FrameSaver SLV Router
- FrameSaver SLV Router Overview
- IP Routing
- Address Resolution Protocol
- Proxy ARP
- Interface Configuration
- Network Address Translation
- Network Address Port Translation
- Dynamic Host Configuration Protocol Server
- DHCP Relay Agent
- Router Security
- Provisioning the Router Interface
- Configuring the Router Using Terminal Emulation
- 6. Security and Logins
- 7. Operation and Maintenance
- 8. Troubleshooting
- 9. Setting Up OpenLane for FrameSaver Devices and Activating SLM Features
- 10. Setting Up NetScout Manager Plus for FrameSaver Devices
- 11. Setting Up Network Health for FrameSaver Devices
- A. Menu Hierarchy
- B. SNMP MIBs and Traps, and RMON Alarm Defaults
- C. Router CLI Commands, Codes, and Designations
- D. Router Command Line Summaries and Shortcuts
- E. Connectors, Cables, and Pin Assignments
- F. Technical Specifications
- G. Equipment List
- Index

8. Troubleshooting
9128-A2-GB20-80 September 2002
8-5
Troubleshooting Management Link Feature
A dedicated troubleshooting management link is available to help service
providers isolate device problems within their networks. This feature allows Telnet
or FTP access to the unit on this link and troubleshooting over this link is
essentially transparent to customer operations. No alarms or SNMP traps are
generated to create nuisance alarms for the customer.
See
Configuring Node IP Information
in Chapter 4,
Configuration Options
, for
additional information about this feature.
LMI Packet Capture Utility Feature
A packet capture utility has been provided to aid with problem isolation when LMI
errors are detected. Using this utility, any enabled frame relay link on the user data
port or network interface can be selected. The utility captures any LMI packets
sent or received and writes them to a data file called lmitrace.syc in the system’s
data directory so the data can be uploaded and transferred to a Network
Associates Sniffer for analysis.
The LMI Trace Log also provides access to captured packet information. See
Viewing Captured Packets from the Menu-Driven User Interface
on page 8-6 for
additional information on this feature.
Procedure
To use this utility:
1. Select the LMI Packet Capture Utility. Select an enabled frame relay link.
Main Menu
→
Control
→
LMI Packet Capture Utility
2. Select an enabled frame relay link, or Capture Interface, either Net1-FR1
Port-1, Port-2, or an ISDN Link Name if a DBM is present.
3. Start packet capture.
While capturing data, the status is Active. Packets in Buffer indicates the
number of packets that have been captured. Up to 8000 packets can be held.
When the buffer is full, the oldest packets will be overwritten.
4. To stop the utility, press Enter. The field toggles back to Start.
5. Upload the data file holding the collected packets to a diskette so the
information can be transferred to a Network Associates Sniffer for
debugging/decoding.
See
Transferring Collected Data
in Chapter 7,
Operation and Maintenance
, for
additional information about this feature.