
Manual
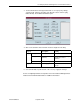
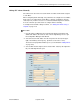
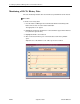
Table Of Contents
- Contents
- About This Guide
- 1. About the FrameSaver SLV
- 2. User Interface and Basic Operation
- 3. Configuration Procedures
- 4. Configuration Options
- Using the Easy Install Feature
- Using RIP with FrameSaver SLV CSU/DSUs
- Entering System Information and Setting the System Clock
- Setting Up the Modem
- Setting Up Auto-Configuration
- Setting Up Dial Backup
- PVC Backup Over the Network Interface
- Setting Up Back-to-Back Operation
- Configuration Option Tables
- Configuring the Overall System
- Configuring Physical Interfaces
- Assigning Time Slots/Cross Connections
- Configuring Frame Relay for an Interface
- Manually Configuring DLCI Records
- Configuring PVC Connections
- Configuring the IP Path List
- Setting Up Management and Communication Options
- Configuring the Criteria for Automatic Backup
- 5. Configuring the FrameSaver SLV Router
- FrameSaver SLV Router Overview
- IP Routing
- Address Resolution Protocol
- Proxy ARP
- Interface Configuration
- Network Address Translation
- Network Address Port Translation
- Dynamic Host Configuration Protocol Server
- DHCP Relay Agent
- Router Security
- Provisioning the Router Interface
- Configuring the Router Using Terminal Emulation
- 6. Security and Logins
- 7. Operation and Maintenance
- 8. Troubleshooting
- 9. Setting Up OpenLane for FrameSaver Devices and Activating SLM Features
- 10. Setting Up NetScout Manager Plus for FrameSaver Devices
- 11. Setting Up Network Health for FrameSaver Devices
- A. Menu Hierarchy
- B. SNMP MIBs and Traps, and RMON Alarm Defaults
- C. Router CLI Commands, Codes, and Designations
- D. Router Command Line Summaries and Shortcuts
- E. Connectors, Cables, and Pin Assignments
- F. Technical Specifications
- G. Equipment List
- Index

10. Setting Up NetScout Manager Plus for FrameSaver Devices
9128-A2-GB20-80 September 2002
10-13
Creating History Files
Up to 14 additional user history tables can be created in the FrameSaver unit for
each interface. An interface is a specific DLCI or the entire frame relay interface. A
table must be created for each DLCI or frame relay link to be monitored. Additional
user history tables are created using the command-line prompt in NetScout
Manager Plus to load a file that contains the OIDs (Object IDs) to be monitored
into the unit.
OpenLane provides several useful examples, including three files containing a
complete set of OIDs appropriate to the interface to be monitored: one for a DLCI,
one for a frame relay link, and one containing system-type OIDs. Any of these files
can be used as a template when creating customized history files specific to the
FrameSaver unit.
These files have a
pdn*.udh
(user-defined history) format and are found in the
OpenLane/netscout/userHistory
directory. The userHistory files should be
moved to
$NSHOME/usr
so they can be used.
A separate *.udh file must be created and loaded for each DLCI or link that will be
monitored before a customized user history table can be loaded. Use a text editor
to create these *.udh files by:
Copying one of the interface-specific files (DLCI or link) and editing it using
one of the examples provided as a guide.
Copying one of the examples provided and editing the extensions to fit the
FrameSaver unit.
CAUTION:
Two user history table files are already configured and installed in the
unit, UserHistory1 and UserHistory2. These files must not be modified.
These two tables are used to keep SLV data for reports.
It is always a good idea to rediscover agents and their DLCIs before starting to be
sure your agent and DLCI lists are current. To rediscover agents and their DLCIs,
select the Learn button on the NetScout Manager Plus main window (the
FrameRelay and Admin radio buttons still selected).